2015 AUDI TT ROADSTER wheel
[x] Cancel search: wheelPage 206 of 244
204 What do I do now ?
What do I do now?
Trunk escape handle
In case of an emergency, the rear lid can be
opened from the inside using the trunk es
cape handle.
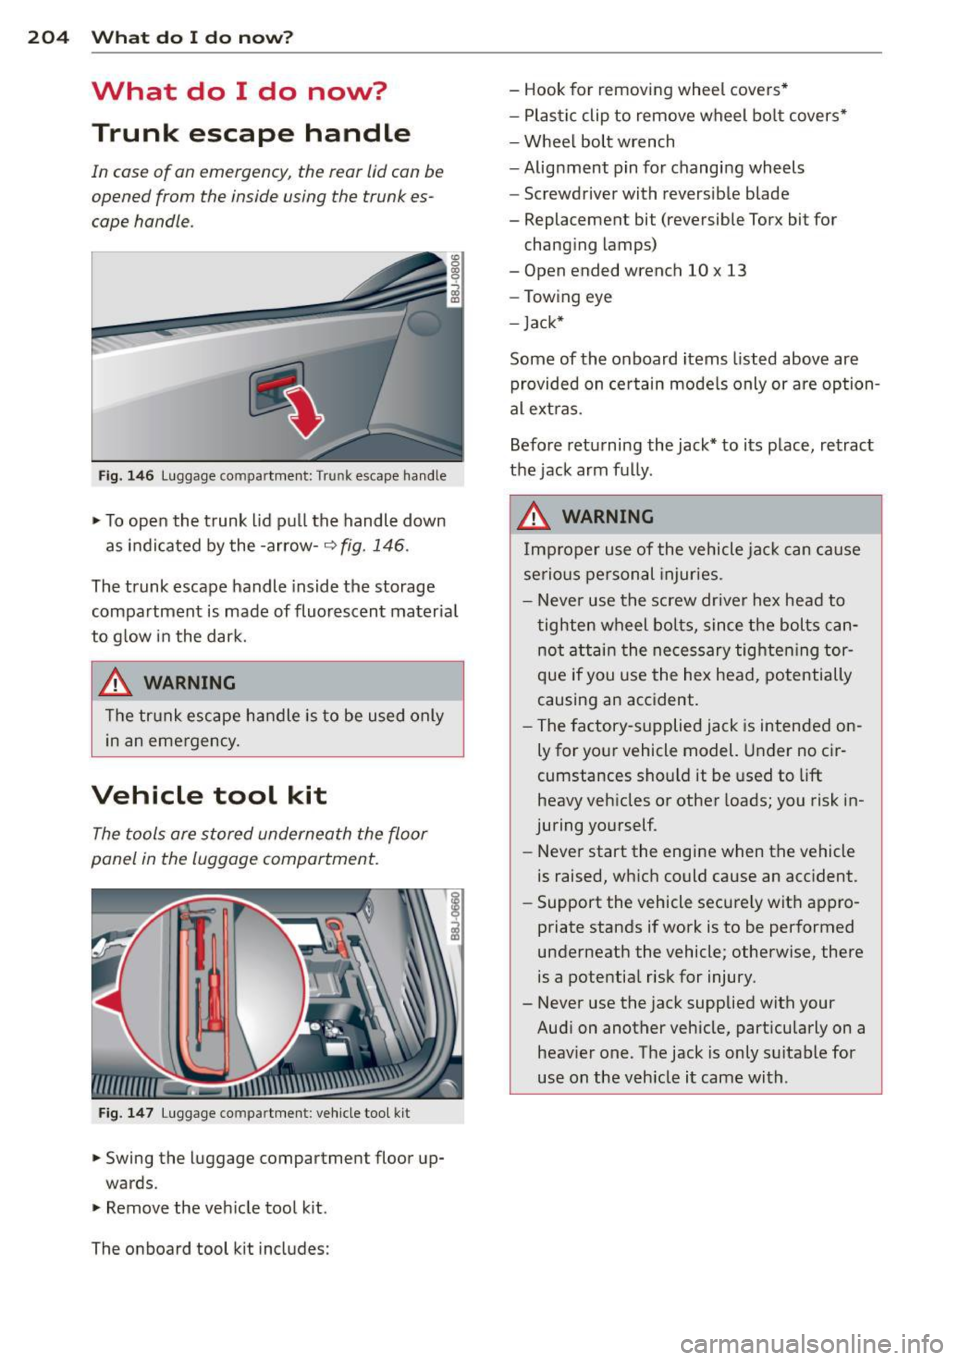
Fig. 1 46 Luggage compartment: Trunk escape handle
... To open the trunk lid pu ll the handle down
as indicated by the -arrow-~
fig. 146.
The trunk escape handle inside the storage
compartment is made of fluorescent materia l
to g low in the dark.
A WARNING
The trunk escape handle is to be used only
in an emergency.
Vehicle tool kit
The tools are stored underneath the floor
panel in the luggage compartment.
Fig. 1 47 Luggage co mpa rtment : veh icle too l kit
... Swing the luggage compartment floor up
wards .
... Remove the veh icle tool k it.
The on board tool kit includes: -
Hook for removing wheel covers *
- Plastic clip to remove wheel bo lt covers•
- Wheel bolt wrench
-Alignment pin for changing wheels
- Screwdriver with reversible blade
- Replacement bit (reversible Torx bit for
chang ing lamps)
- Open ended wrench 10 x 13
- Towing eye
- Jack*
Some of the on board items listed above are
provided on certain mode ls only or are option
al ext ras.
Before returning the jack* to its place, retract
the jack arm fully .
A WARNING
Im proper use of the vehicle jac k can cause
serious personal injuries .
- Never use the screw driver hex head to tighten wheel bo lts, since the bolts can
not attain the ne cessary tighten ing tor
que if you use the hex head, potentially
causing an accident.
- The factory-supplied jack is intended on ly for your vehicle model. Under no cir
cumstances should it be used to lift
heavy vehicles or other loads; you risk in
juring yourself.
- Never start the engine when the vehicle
is raised, wh ich could cause an acc ident.
- Support the vehicle secure ly wit h appro
priate stands if work is to be performed
underneath the vehicle; otherwise, there
is a potential risk for injury.
- Never use the jack supplied with your
Audi on another vehicle, part icularly on a
heavier one. The jack is only su itable for
use on the veh icle it came with .
Page 210 of 244
208 What do I do now ?
A WARNING
If tire pressure is less than 1.3 bar after
driving for 10 m inutes, the tire is too se
verely damaged . Do not continue to d rive .
Seek professional assistance .
@ Tips
After a tire repair, have the sealant bo ttle
replaced at a dealersh ip. This restores full
functionality to t he Tire Mob ility System .
What should I be
aware of when
changing a tire?
General information
The fo llow ing se ctions will prov ide yo u with
importa nt information o n how to change a
tire using the vehicle tool kit .
H oweve r, we recomme nd that you have a
q uali fied servi ce center change t he tire and
perform all work associated with changi ng it.
Wheels with cap-covered wheel bolts
Applies to vehicles: with cap-covered wheel bolts
The caps must be removed first from the
wheel bolts before the bolt s can be un
screwed .
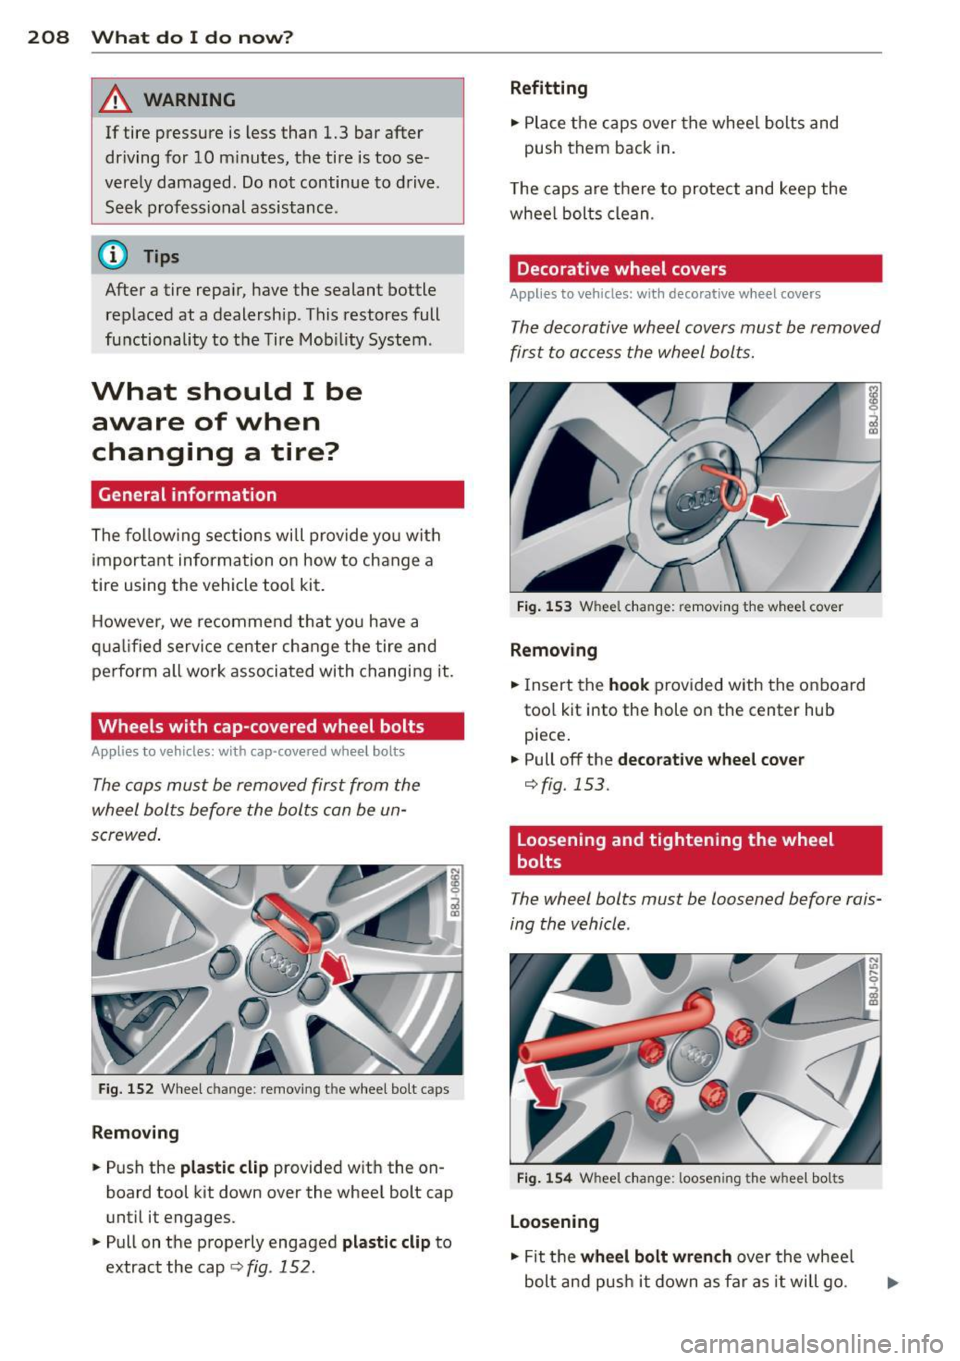
Fig. 152 W hee l chan ge: remo ving th e whee l b o lt c aps
R em oving
.. Push the plastic cl ip provided w it h the on
bo ard tool k it down over the wheel bolt cap
until i t engages .
.,. Pull on the properly engaged
plastic clip to
extract the cap
r:> fig . 152 .
Refitting
.,. Place the caps over the whee l bolts and
push them back in.
T he caps are the re to protect and keep the
whee l bolts clean .
Decorative wheel covers
Applies to vehicles: with decorative wheel covers
The d ecorative wheel covers must be remov ed
first to acc ess the wheel bolts.
Fi g. 1 53 Wheel c hang e: re moving t he wh eel c over
Removing
.. Insert the hook provided with the o n board
too l kit into the hole on the center hub
piece .
.. Pull off the
decor ative wheel cover
r:>fig.153 .
Loosening and tightening the wheel
bolts
T he wheel bolts mus t be loosened before rais
ing the vehicle .
Fig . 1 54 Whee l cha nge: loose ning t he whee l bol ts
Loosening
., Fit t he whe el bolt wren ch over the whee l
bolt an d pus h it down as far a s it will go .
Page 211 of 244
.. Close your grip around the end of the
wrench handle for maximum torque and
turn the wheel bolts
c ounter-clockwis e
about one single turn in the direct ion of ar
row
r:> fig . 154.
Tightening
.. Fit the wheel bol t wrench over the wheel
bolt and push it down as far as it will go .
.. Close your grip around the
end of the
wrenc h handle for maximum torque and
turn each wheel bolt
cl ock wis e unt il it sits
t ight .
A WARNING
-Us ing fo rce without control to speed the
wheel change up can cause the veh icle to
slip off the jack and ca use se rious pe r
sonal in juries.
-Do not loosen the wheel bolts more than
one turn
before you ra ise the veh icle with
the jack. -Risk of inj ury!
(1) Tips
- N ever t ry and use the hexagona l socket
i n the handle of the screwdriver to loos
en or tighte n the wheel bolts .
- If a whee l bolt sits very t ight, you may
find i t easie r to loosen by carefully p ush
i ng down on the end of the whee l bolt
wrench with
one foot only . As you do,
ho ld on to the car to keep yourse lf stable
and ta ke care not to slip .
Raising the vehicle
The vehicle must be lifted with the jack first
before the wheel can be removed .
..
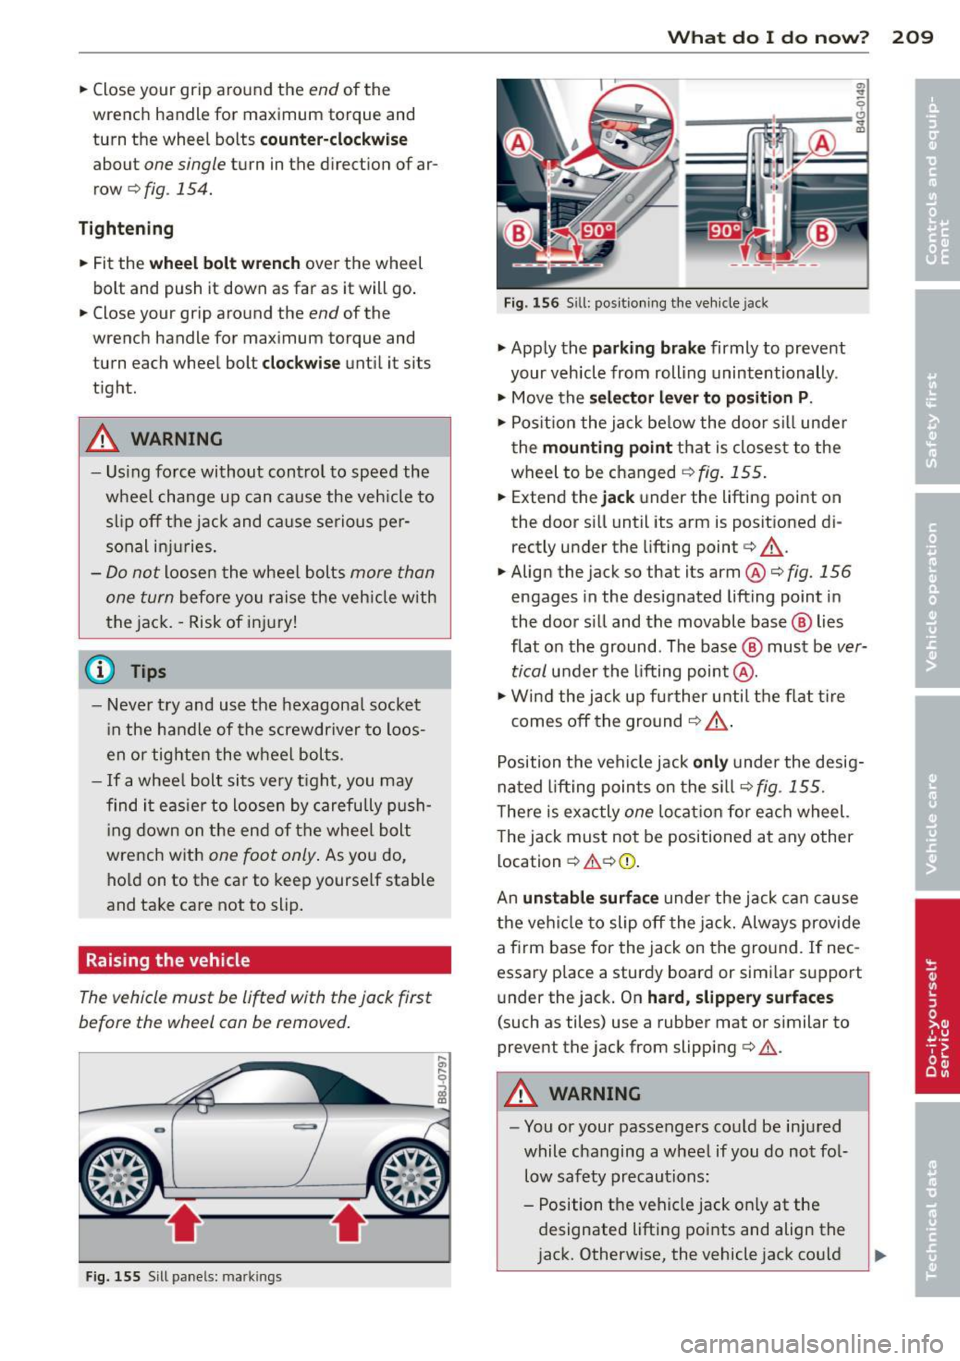
Fig. 155 Sill p ane ls: m arkin gs
What do I do now ? 209
Fig. 1 56 Sill : pos itio ning the ve hicle jac k
.. App ly the pa rkin g brake firmly to prevent
your veh icle from rolling unintentionally .
.. Move the
se lect or lever to p osition P .
.. Posit io n the jack be low the door sill unde r
t he
m ounting point tha t is closest to the
wheel to be changed
r=> fig. 155 .
.. Extend the jack under the lifting point on
the door s ill until its arm is positioned di
rectly under the lifting point
c> ,& .
.. Align the jack so that its arm@¢ fig. 156
engages in the designated lift ing point in
the door s ill and the movable base ® lies
flat on the ground . The base @ must be
ver
tical
under the lifting point @ .
.. Wi nd the jack up fu rther u ntil t he f lat t ire
comes off the ground
c> ,& .
Position t he vehicle jack only under the desig
na ted lifting points on the s ill
r:>fig . 155.
T he re is exactly one locat io n for eac h wheel.
T he jack must not be positioned at any other
location ¢
,&¢(D .
An unstable surfa ce unde r the jack ca n cause
the ve hicl e to slip off the jack. Always provide
a firm base for the jack on the gro und . If nec
essary place a sturdy board or s im ilar support
u nder the jack. On
hard , slippery surf aces
(such as tiles) use a rubber mat or similar to
prevent the jack from slipping ¢
.&.
A WARNING
-You or your passengers cou ld be in jured
while changing a wheel if you do not fo l
low safety precautions:
- Position the veh icle jack on ly at the
designated lifting poi nts and align the
j ack. Otherwise, the vehicle jack co uld
Page 212 of 244
210 What do I do now?
slip and cause an injury if it does not
have sufficient hold on the vehicle.
- A soft or unstable surface under the
jack may cause the vehicle to slip off
the jack. Always provide a firm base for
the jack on the ground . If necessary,
use a sturdy board under the jack.
- On hard, slippery surface (such as tiles)
use a rubber mat or similar to prevent
the jack from slipp ing .
- To help prevent injury to yourself and
your passengers:
- Do not raise the vehicle unti l yo u are
sure the jack is securely engaged.
- Passengers must not remain in the ve
hicle when it is jacked up.
- Make sure that passengers wait in a
safe p lace away from the vehicle and
well away from the roadway and traffic.
- Make sure jack position is correct, ad
just as necessa ry and then continue to
ra ise the jack .
(D Note
A floor jack or the pads on the hoist arms
must
not be posit ioned at the points
shown
-arrows- .
Taking the wheel off
Follow these instructions step-by-step for
changing the wheel.
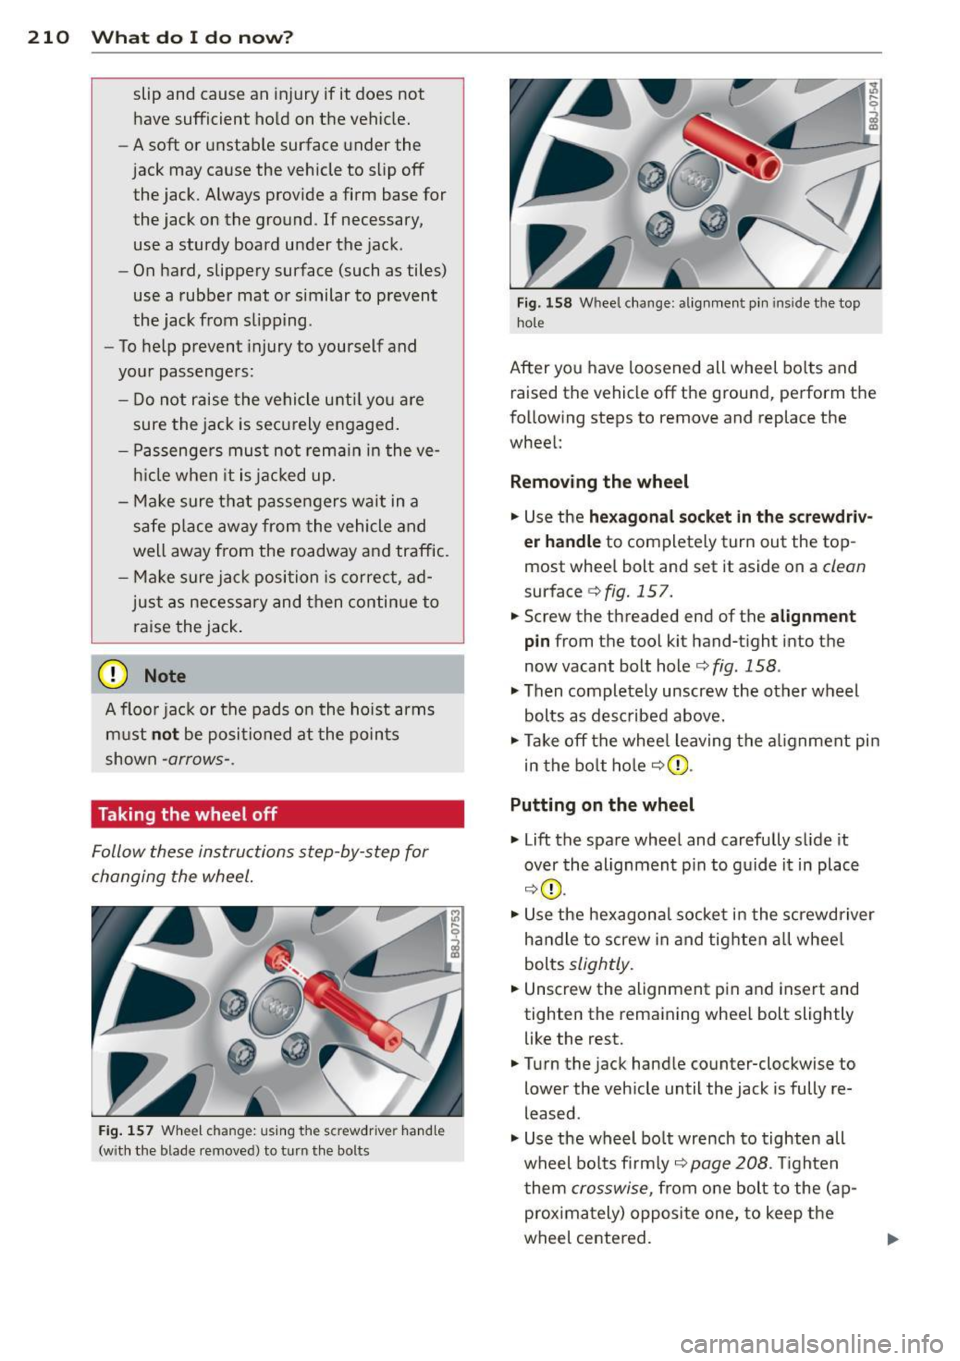
Fig. 157 Wheel ch an ge: us ing the sc rewdrive r hand le
(w ith the b lade removed) to turn the bolts
Fig. 158 Whee l change : alignmen t pin inside the top
hol e
After you have loosened all wheel bolts and
raised the vehicle off the ground, perform the
following steps to remove and replace the
wheel:
Removing the wheel
.,. Use the hexagonal socket in the screwdriv
er handle
to completely turn out the top
most whee l bolt and set it aside on a
clean
surface c;, fig. 15 7.
.,. Screw the threaded end of the
alignment
pin from the tool kit hand-tight into the
now vacant bolt hole <=>
fig. 158 .
.,. Then completely unscrew the other wheel
bolts as described above.
.,. Take off the whee l leaving the alignment pin
in the bolt hole
c;,(D .
Putting on the wheel
.,. Lift the spare wheel and carefully s lide it
over the alignment p in to guide it in place
c;,(D .
.,. Use the hexagonal socket in the screwdriver
handle to screw in and tighten all whee l
bolts
slightly .
.,. Unscrew the alignment p in and insert and
tighten the remaining wheel bolt slightly like the rest .
.,. Turn the jack handle counter-clockwise to
lower the vehicle until the jack is fully re
leased .
.,. Use the wheel bo lt wrench to tighten all
wheel bolts firmly ,=:,
page 208 . Tighten
t hem
crosswise, from one bolt to the ( ap
proximately) opposite one, to keep the
wheel centered.
Page 213 of 244

(D Note
When removing or installing the wheel,
the rim could hit the bra ke rotor and dam
age the rotor . Wor k carefully and have a
second person help you.
N ever use the hexa gonal s ocket in the ha n
d le of the screwdriver to loosen or t ighten
the wheel bolts.
- Pull the reversib le blade from the screw
drive r before yo u use the hexagonal
socket in t he handle to t urn the whee l
bo lts .
- When mounting tires with
unid irectional
tread design
make s ure the tread pat
te rn is poi nte d the r ight way
¢pag e 211.
- The wheel bolts should be clea n and easy
to tu rn . Ch eck for dirt and corros ion on
the mat ing su rfaces of both the whee l
a nd th e hu b. Remove a ll dir t fro m these
s ur fa ces before remo unting the wheel.
Notes on wheel change
Pl ease rea d the information ¢ page 191, New
tires and replacing tires and wheels,
i f you are
going to use a spare t ire which is different
from the tires on your ve hicle.
Afte r you change a tire:
- Check the tire pressure on the spare imme
diately after mounting .
- Have the wheel bolt tightening torque
che cked with a torque wrench as soon as
possible by your authorized Audi dealer or
a qualified service station.
- With steel and alloy wheel rims, the wheel
bolts are correctly tightened at a torque of
90 ft lb (120 Nm) .
- If you notice while changing a tire that the
wheel bolt s are co rroded and diffi cult to
turn , then they should be replaced before
you check the t ightening torque.
What do I do now? 211
- Replace the flat tire with a new one and
have it installed on your vehicle as soon as
possible. Remount the wheel cover .
Until then , drive with extra care and at re
duced speeds.
A WARNING
-
- If you are go ing to e quip your ve hicl e
wit h tires o r rims which differ from those
which were factory installed, t hen be
sure to read the information¢
page 191,
New tires and replacing tires and
wheels .
-Always sto re the tools secu rely in lug
gage compartment. Othe rwise, in a n ac
cident o r su dd en maneuv er they cou ld fly
forwa rd, causi ng injury to passe ngers in
the vehicle.
Tires with unidirectional tread design
Tires with unidirectional tr ead design must be
mounted with their tread pattern pointed the
right dire ction.
A u nidirectional tire can be identified by ar
rows on the sidewall,
which point in the direc
tion of t he rota tion. Yo u m ust follow the
s p ecifie d direction of rot ation. This i s nece ssa
r y in order fo r these tires to develop t heir op
timum charac ter istics regard ing grip, road
no ise, wear, and hydrop la ning.
•
•
Page 221 of 244
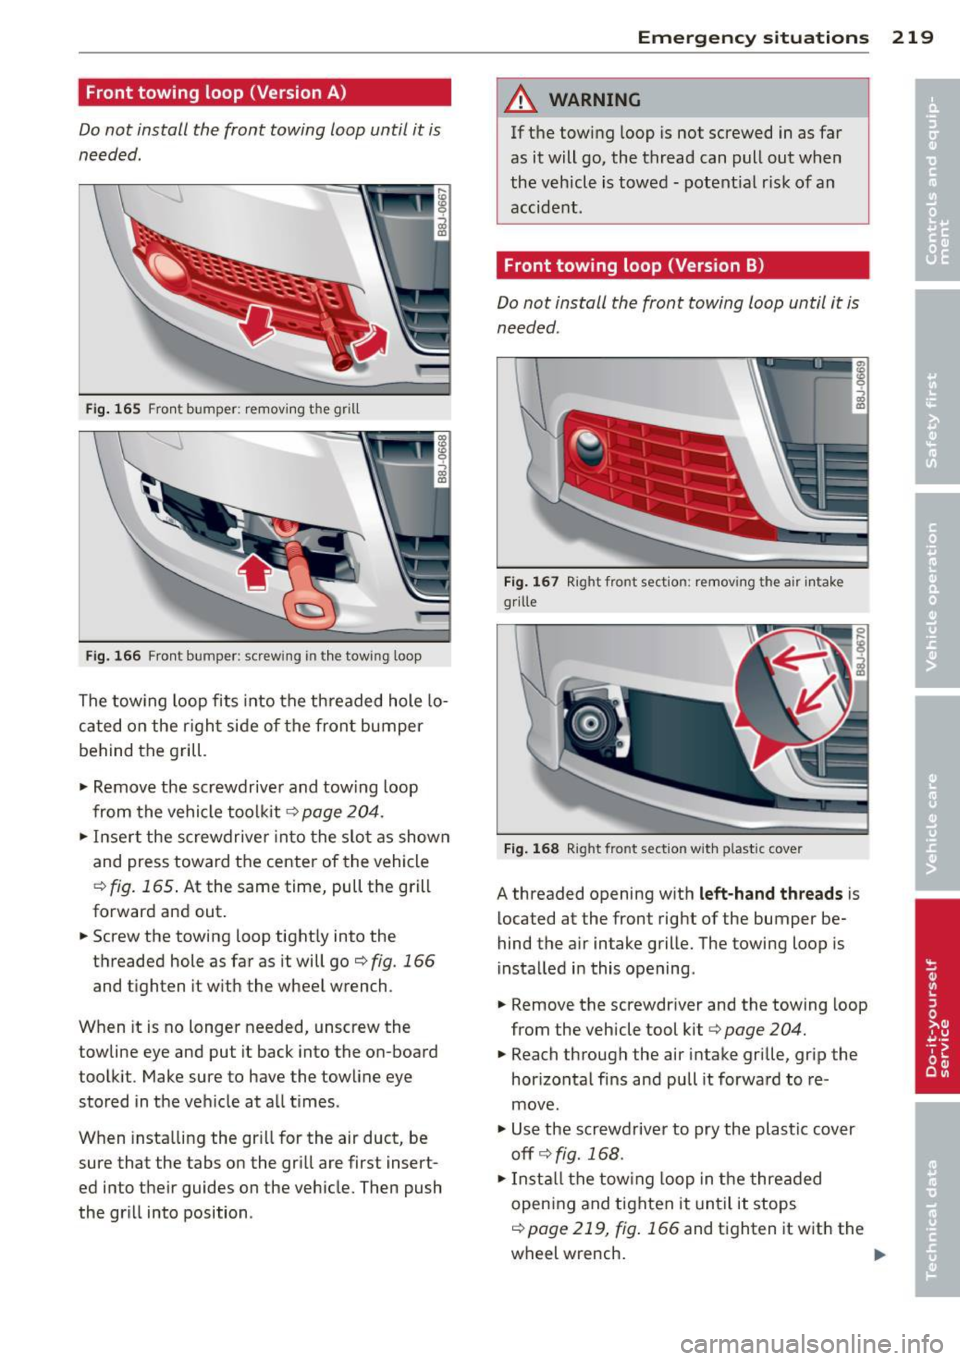
Front towing loop (Version A)
Do not install the front towing loop until it is
needed.
Fig. 165 Fro nt bumper: removing t he grill
Fi g. 166 Fron t bumper: screw ing in t he tow ing loop
The tow ing loop fits into the threaded hole lo
cated on the righ t side of the fron t bumper
behind the grill.
"' Remove the screwdriver and towing loop
from the vehicle tool kit ¢
page 204.
"'Inse rt the screwdrive r into the slo t as shown
and press toward the center of the vehicle
c;, fig. 165 . At the same time, pull the grill
forward and out.
"' Screw the towing loop tightly into the
threaded hole as far as it will go
c;, fig. 166
and tighten it w ith the wheel wrench .
When it is no longer needed, unscrew the
towline eye and put it back into the on -board
toolkit . Make sure to have the towline eye
stored in the ve hicle at all times .
When insta lling the gr ill for the air duct, be
sure that the tabs on the grill are first insert
ed into their guides on the veh icle. Then push
the gr ill into position .
Emergency situations 219
A WARNING
If the tow ing loop is not screwed in as far
as it will go, the thread can pull out when
the vehicle is towed -potential risk of an
accident .
Front towing loop (Version B)
Do not install the front towing loop until it is
needed.
Fig. 167 Right front sectio n: remov ing the air intake
g ri lle
Fig. 168 Right fro nt sect ion w it h plast ic cove r
A threaded opening w ith left-hand threads is
located at the front right of the bumper be·
hind the air intake grille. The towing loop is
i nstalled in this opening .
"' Remove the screwdr iver and the towing loop
from the vehicle tool kit
c:> page 204.
"'Reach through the air intake grille, grip the
hor izonta l fins and pull it forward to re·
move .
"' Use the screwdrive r to pry the plastic cover
offr=;,fig. 168.
"'Install the towing loop in the threaded
opening and tighten it unt il it stops
c;, page 219, fig . 166 and tighten it with the
wheel wrench.
...
Page 222 of 244
220 Emergency situations
Remove the towing loop when you are done
using it and place it back in the vehicle tool
kit. Always keep the towing loop in the vehi
cle .
When installing the air intake grille, insert the
tabs on the grille in the mounts on the vehicle
f ir st. Then press the grille in to secure it.
A WARNING
If the towing loop is not tightened until it
stops when installing, the threads may be
pulled out when tow ing the vehicle and
that could cause an accident .
Rear towing loop
Do not install the rear towing loop until it is
needed.
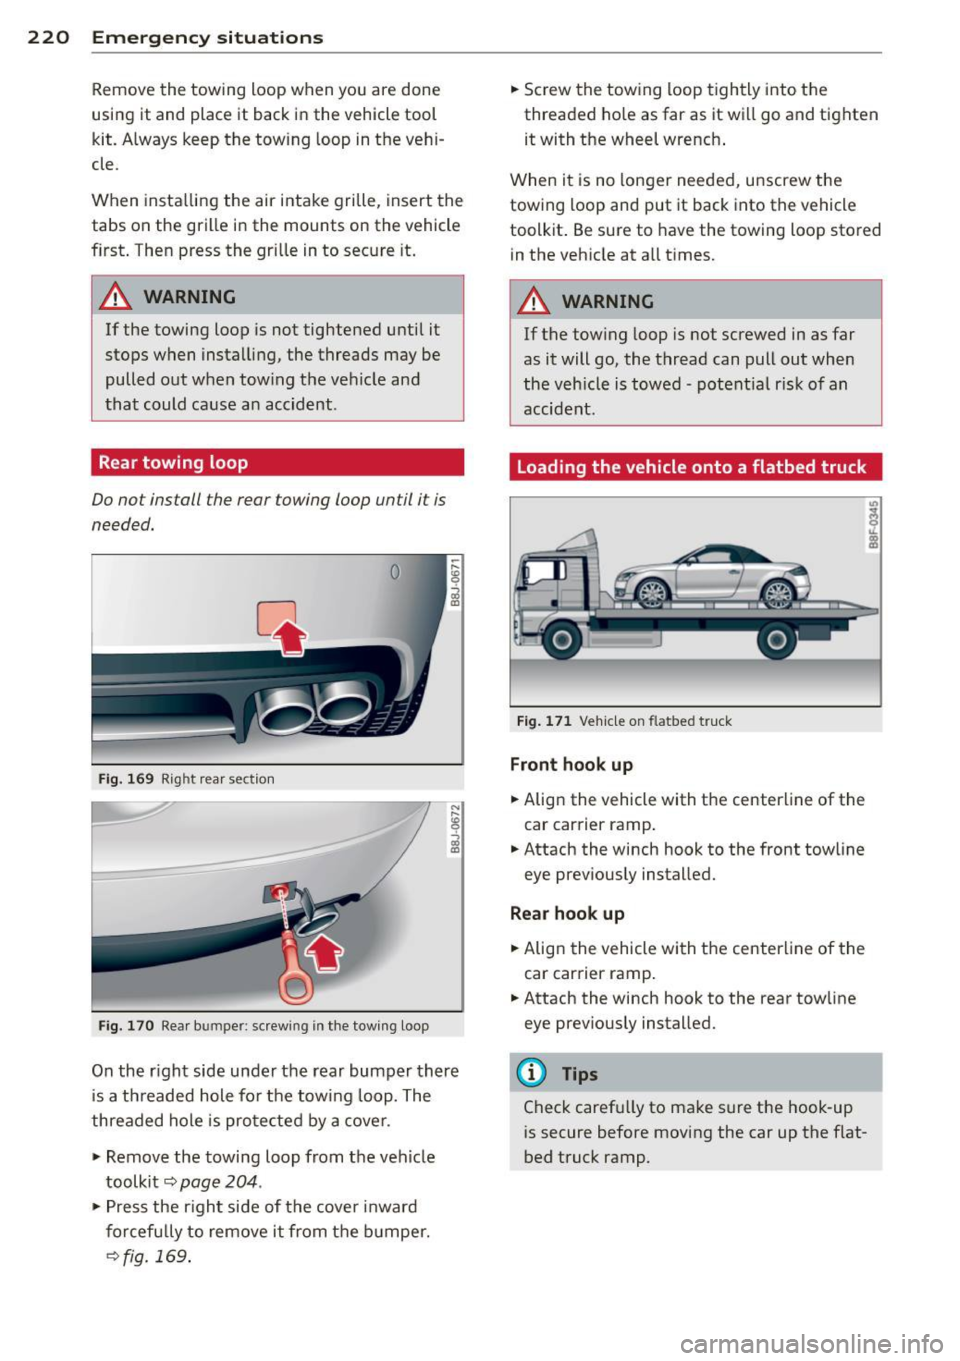
Fig. 169 Right rear section
Fig. 170 Rear bum per: screw ing in the towing loop
On the r ight side under the rear bumper there
is a threaded hole for the towing loop. The
threaded hole is protected by a cover.
"' Remove the towing loop from the vehicle
toolkit ~
page 204 .
"'Press the right side of the cover inward
forcefully to remove it from the bumper.
~fig. 169.
"' Screw the towing loop tightly into the
threaded hole as far as it will go and tighten
it with the wheel wrench .
When it is no longer needed, unscrew the
towing loop and put it back into the vehicle
toolkit . Be sure to have the towing loop stored
in the vehicle at all times.
A WARNING
-If the towing loop is not screwed in as far
as it will go, the thread can pull out when
the veh icle is towed -potent ial risk of an
accident.
Loading the vehicle onto a flatbed truck
Fig. 171 Vehicle on flatbed t ruck
Front hook up
"' Align the vehicle with the centerline of the
car carrier ramp .
"' Attach the winch hook to the front towline
eye previously installed.
Rea r hook up
"' Align the vehicle with the centerline of the
car carrier ramp.
"' Attach the winch hook to the rear towline
eye previously installed.
(D Tips
Check carefu lly to make sure the hook-up
is secure before moving the car up the flat
bed truck ramp.
Page 228 of 244

226 Consum er Inf ormation
steadi ly reduced the scope of maintenance
and repairs which can be carried out by vehicle
owners.
Also , sa fe ty a nd en vir onm ent al con
cerns place very strict limits on the nature of
repairs and adjustments to engine and trans
miss ion parts which an owner can perform .
Maintenance, adjustments and repa irs usua lly
require special tools, testing devices and oth
er equipment available to specially trained
workshop personnel in order to assure proper pe rformance, reliab ility and safety of the vehi
cle and its many systems.
Improper maintenance, adjustments and re
pa irs can impair the operation and reliab ility
of your vehicle and even void your vehicle war
ranty. Therefore, proof of servic ing in accord
ance w ith the ma intenance schedule may be a
condition for upholding a poss ible warranty
claim made within the warranty period.
Above all, operational safety can be adversely
affected, c reating unnecessary risks for you
and your passengers.
If in doubt about any se rv icing, have it done
by your author ized Audi dealer or any other
p roperly equipped and qualified workshop.
We strong ly urge you to give yo ur autho rized
Audi dealer the opportunity to perfo rm all
schedu led maintenance and necessary repairs.
Your dea ler has the facilities, original parts
and trained specialists to keep your vehicle
running properly.
Performing limit ed m aint enance yours elf
The following pages describe a limited num
ber of proced ures which can be performed on
your vehicle with ordinary too ls, shou ld the
need arise and trained personnel be unavaila
ble. Before performing any of these proce
dures, always thoroughly read all of the app li
cable text and carefully follow the instruc
tions given . Always rigorously observe the
WARNINGS p rovided.
Before you ch eck anything in th e engine
co mpartm ent , alway s re ad and hee d all
WA RNINGS
c::> .&. and c::> .&. in Working in the
engine compartment on page 164.
_& WARNING
- Serious personal injury may occur as a re
sult of improperly performed mainte
nance, adjustments or repa irs.
- Always be extremely careful when work
ing on the vehicle. Always follow com
monly accepted safety pract ices and gen
eral common sense. Never r is k personal
inju ry.
- Do not attempt any of the maintenance,
checks or repairs descr ibed on the fol
lowing pages if you are not fu lly fam iliar
with these or other procedures with re
spect to the vehicle, or are uncertain how
to proceed .
- Do not do any work without the proper
too ls and equipment. Have the necessa ry
work done by your authorized A udi deal
er or another proper ly equipped and
qualified workshop.
- The engine compartment of any motor
veh icle is a potentially hazardous area.
Never reach into the area around or
touch the radiator fan. It is temperature controlled and can sw itch on suddenly -
even when the engine is off and the igni
tion key has been removed. The rad iator
fan switches on automa tical ly when the
coo lant reaches a certain temperature
and will continue to run until the coo lant
temperature drops .
- Always remove the ign ition key before
anyone gets under the vehicle.
- Always support your veh icle with safety
stands if it is necessary to work under
neath the vehicle. The jack supplied with
the vehicle is not adequate for this pur
pose and cou ld collapse causing serious
personal injury.
- If you must work underneath the vehicle
with the wheels on the ground, always
make sure the vehicle is on leve l ground,
that the wheels a re a lways secure ly
b locked and that the engine cannot be
started.