2015 AUDI TT ROADSTER key
[x] Cancel search: keyPage 63 of 244
seating position and improperly posi
tioned safety belts!
Power seats
Adjustment switches
App lies to vehicles: with power seats
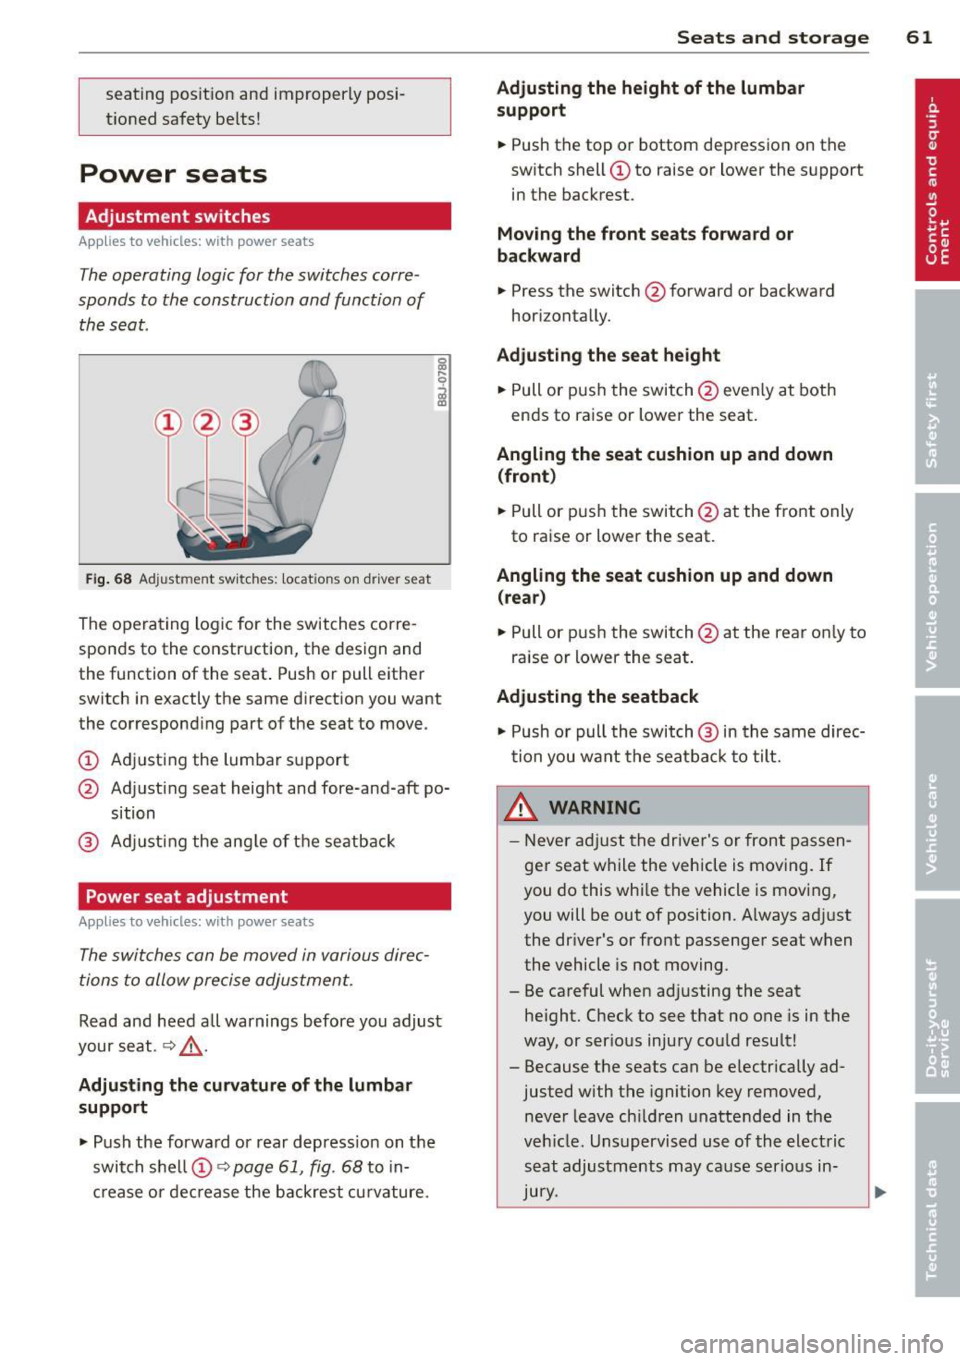
The operating logic for the switches corre
sponds to the construction and function of the seat.
Fig . 68 Adjustment switches: locations on driver seat
The operating logic for the switches corre
sponds to the construction, the design and
the function of the seat . Push or pull either
switch in exactly the same direction you want
the corresponding part of the seat to move.
(!) Adjusting the lumbar support
@ Adjusting seat height and fore-and-aft po
sition
® Adjusting the angle of the seatback
Power seat adjustment
Applies to vehicles: with power seats
The switches can be moved in various direc
tions to allow precise adjustment.
Read and heed a ll warnings before you adjust
your seat.
~ &,.
Adjusting the curvature of the lumbar
support
"' Push the forward or rear depress ion on the
switch shell@~
page 61, fig. 68 to in
crease or decrease the backrest curvature.
Seats and storage 61
Adjusting the height of the lumbar
support
"'Push the top or bottom depression on the
switch shell(!) to raise or lower the support
in the backrest.
Moving the front seats forward or
backward
"' Press the switch @forwa rd or backward
horizontally.
Adjusting the seat height
"' Pull or push the switch@even ly at both
ends to raise or lower the seat.
Angling the seat cushion up and down
(front)
"' Pull or push the switch @at the front only
to raise or lower the seat.
Angling the seat cushion up and down
(rear)
"' Pull or push the switch@at the rear on ly to
raise or lower the seat.
Adjusting the seatback
"' Push or pull the switch @ in the same direc
tion you want the seatba ck to tilt.
LD._ WARNING
- Never adjust the driver's or front passen
ger seat while the vehicle is moving. If
you do this whi le the vehicle is moving,
you will be out of position. Always adjust
the dr iver's or front passenger seat when
the vehicle is not moving.
- Be careful when adjusting the seat he ight. Check to see that no one is in the
way, or ser ious injury could result!
- Because the seats can be e lectrically ad
justed with the ignition key removed,
never leave children unattended in the
veh icle. Unsupervised use of the electric
seat adjustments may cause serious in
Jury.
Page 67 of 244
_& WARNING
The outlet plus any appliances plugged in
to it remain functional
even if the ignition
is switched off or the ignition key is re
moved. Never leave children inside the
ve
hicle without supervision.
(D Note
To avo id damag ing the socket, only use
plugs that fit properly.
@ Tips
When the engine is off and accessories are
still plugged in and are on, the vehicle bat
tery can still be dra ined.
Storage
General
_& WARNING
- Always remove objects from the instru
ment panel. Any items not put away
could slide around inside the vehicle
wh ile driving or when accelerating or
when applying the brakes or when driv
ing around a corner.
-
- When you are driving make sure that
anything you may have placed in the cen
ter console or other storage locations
cannot fall o ut into the footwells . In case
of sudden braking you would not be able
to brake or accelerate.
Seats and storage 65
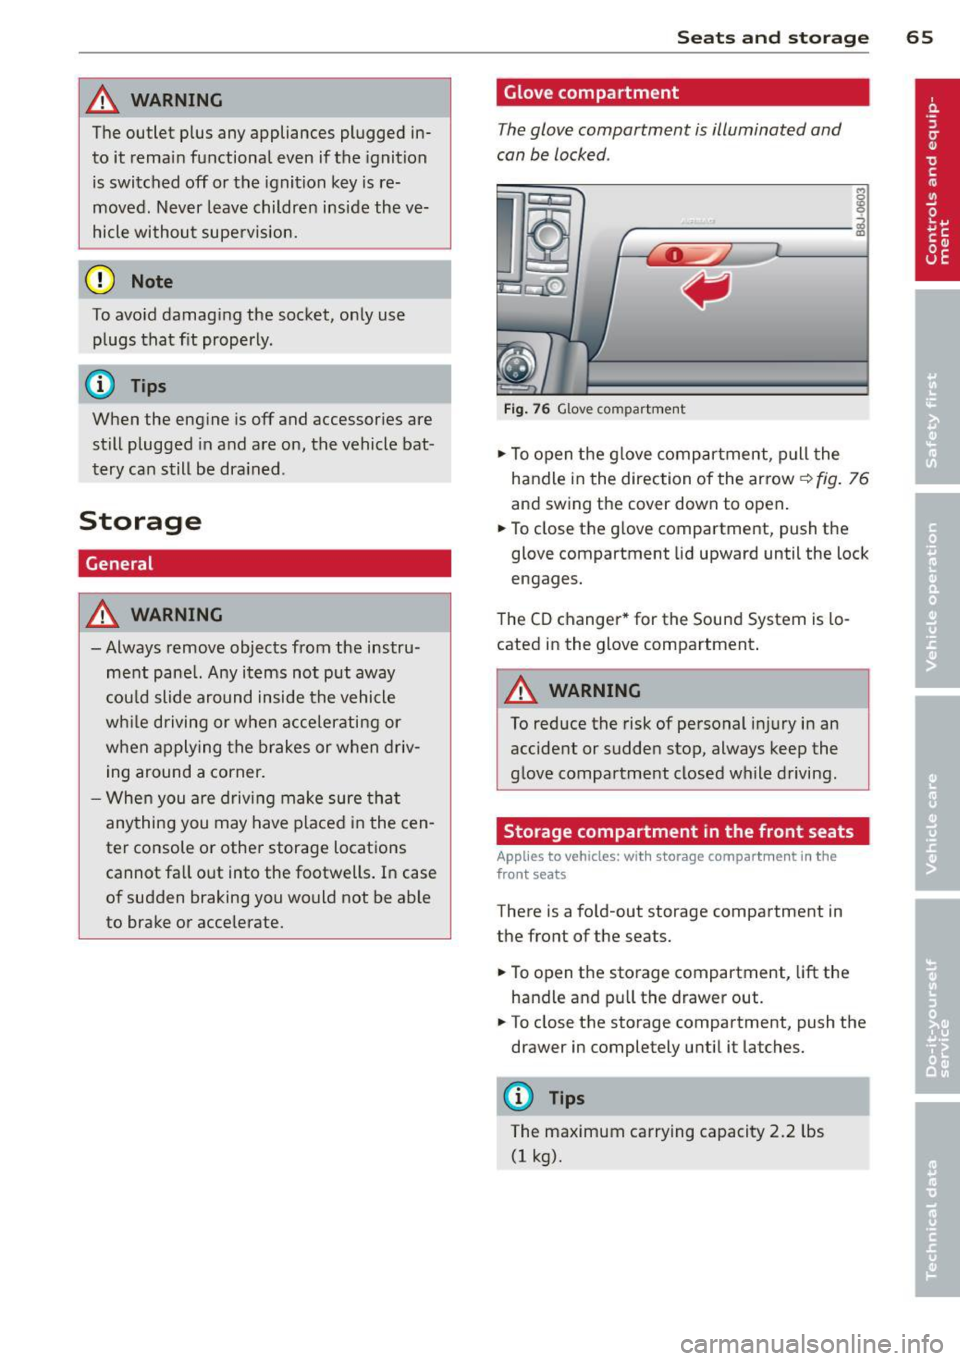
Glove compartment
The glove compartment is illuminated and
can be locked .
i
----------- i
•
Fig . 76 Glove compartme nt
.,.. To open the glove compartment, pull the
handle in the direction of the arrow~
fig. 76
and swing the cover down to open .
.. To close the glove compartment, push the
glove compartment lid upward until the lock
engages.
The CD changer * for the Sound System is lo
cated in the glove compartment .
A WARNING
To reduce the risk of personal i njury in an
accident or sudden stop, always keep the
glove compartment closed while driving.
Storage compartment in the front seats
Applies to vehicles: with storage compartment in the
front seats
There is a fold-out storage compartment in
the front of the seats .
.. To open the storage compartment,
lift the
handle and pull the drawer out .
-
.. To close the storage compartment, push the
drawer in completely until it latches.
('.I) Tips
The maximum carrying capacity 2.2 lbs
(1 kg).
Page 74 of 244

7 2 On the road
On the road
Steering
Adjusting the steering wheel column
The steering wheel position can be continu
ously adjusted in height and distance .
Fig. 80 Lever under the steer ing colu mn
~ Push the lever Q fig. 80 -Arrow- ¢&_ .
~ Move the steer ing whee l to the desired posi
tion.
~ Push the lever against the steering column
until it locks.
There must be at least 10 inches (25 cm) be
tween your chest and the center of the steer ing wheel. If you cannot sit more than 10 in
ches (25 cm) from the steering wheel, see if
adaptive equipment is available to help you
reach the pedals and increase the distance
from the steering wheel.
For detai led informat ion on how to adjust the
driver's seat, see
Q page 61.
A WARNING
Improper use of steering wheel adjust
ment and improper seating position can
cause serious personal injury .
- Adjust the steering wheel column only
when the veh icle is not moving to pre
vent loss of veh icle control.
-
- Adjust the driver's seat or steering wheel
so that there is a min imum of 10 inches
(25 cm) between your chest and the
steering wheel¢
page 92, fig . 99. If
you can not maintain this min imum dis
tance, the airbag system cannot protect
you properly.
- If physical limitations prevent you from
sitt ing 10 inches (25 cm) or more from
the steering wheel, check with your au
thorized Audi dealer to see if adaptive equ ipment is ava ilable .
- If the steer ing wheel is aligned with your
face, the supplemental dr iver's airbag
cannot provide as much protection in an
accident. Always make sure that the
steer ing whee l is aligned with your
chest.
- Always hold the steering wheel w ith your
hands at the 9 o'clock and 3 o' clock posi
tions to reduce the risk of persona l injury
if the driver's airbag dep loys .
- Never ho ld the steering wheel at the 12
o'clock position or with your hands inside
the steering wheel rim or on the steering
wheel hub . Holding the steering wheel
the wrong way can cause serious injuries
to the hands, arms and head if the driv
er's airbag deploys.
Ignition lock and ignition switch
Ignition lock
The ignition key starts or stops the engine.
F ig . 81 Ign it ion lock pos it ions
Igniti on off @
In position Q fig. 81 @ both the ignition and
engine are off, and the steering is locked .
T o
lo ck th e steering after yo u have removed
the ignition key, turn the steering whee l in ei
ther direction unti l you hear it lock into place .
You should a lways lock the steering whenever
II>
Page 75 of 244
you leave your vehicle. This makes a vehicle
theft even more difficult ¢ .&. .
Ign ition key safety lock
Afte r switch ing off the ignition, the ig nit ion
key ca n only be removed from the ig nition
l ock when the se lector lever is in the "P"
(Park) position . After you have removed the
key, the selector lever is locked and cannot be
moved.
Ign ition on (D
If it is diffic ult to turn the key afte r you have
inse rted it into the ignition lock, turn the
steering whee l back and forth. This will take
the load
off the steering lock mechanism and
you will be able to turn the key freely and start the engine.
Starting th e engine @
In this position the engine starts . While the
engine is starting, the power supply to the headlights and other e lectrica l consumers is
temporari ly interrupted to conserve battery
power. After the engine has started, release
the key and it will return to posit io n
(D .
Before the starter can be operated again the
key must be turned back to position @. The
non-repeat lock prevents you from damaging
the starter when the engine is runn ing .
A WARNING
-Never remove the key from the ign ition
lock whi le the vehicle is mov ing . The
steering wheel will lock causing loss of
co ntrol.
- If you have to leave your veh icle - even
for just a m inute - a lways remove t he ig
ni tion key and take it with you. This is es
pecially important if you are going to
leave ch ildren behind in the vehicle. The
children co uld start the engine or use
other vehicle controls. Unsupervised use
of vehicle controls (for example, power
windows) can cause serious personal in
jur ies .
-
On th e ro ad 73
(D Tips
If the vehicle battery has been disconnect
ed and then reconnected, then yo u must
l eave the key in posit ion
(D for about 5
seconds before you can start the engine.
Starting and stopping
the engine
' Starting the engine
The engine can only be started with an origi
nal Audi key .
.,. Se t the par king brake.
.,. Move the selector lever in P or
N q .&_ .
.,. Turn the ignition key to position @
~ page 72, fig. Bl -do not depress the gas
peda l when starting the engine!
.,. Let go of the key as soon as the engine
starts .
A cold engine may at first be loud after it has
been started. This is due to the hydraulic
valves bu ild ing up the oil pressure. Th is nor
mal and no need for concern .
If the engine does not start immediately, stop
trying after 10 seconds and then try to restart
the engine about 30 seconds later.
A WARNING
-Never start or let the eng ine run in a con-
fined o r enclosed area . Exhaust fumes
from the engine co ntain carbon monoxide,
a colorless and odo rless gas. Ca rbon mon
oxide can be f atal if inhaled.
- Never leave the engine id ling unattend
ed. An una ttended veh icle w ith a runn ing
engine poses a danger o f personal injury
or theft .
(D Note
-Avo id high engine speeds, fast accelera
tion or heavy engine loads while the en
gine is still cold. This could damage the
engine.
- The e ngine cannot be started by pushing
or towing the vehicle . .,..
Page 76 of 244
7 4 On the road
@ For the sake of the environment
To avoid unnecessary engine wear and to reduce exhaust emissions, do not let your
veh icle stand and warm up. Be ready to
drive off immediately after start ing your
veh icle. Maintain moderate speed until the
engine is comp letely warm. Remember,
the engine performs best at operating
temperature.
Stopping the engine
• Turn the ign ition key to position@
~ page 72, fig. 81.
&_ WARNING
-Never turn off the engine before the ve
hicle has come to a complete stop. The
full function of the brake booster and the
power steering is not guaranteed. You
must use more force to turn or brake if
necessary. Because you cannot steer and
brake as you usually would, this could
lead to crashes and serious injuries.
- The radiator fan can continue to run for
up to 10 minutes even after you have
turned off the engine and removed the
ignition key . The radiator fan can also
turn on again if the engine coolant heats up because of intense sunlight or heat
build-up in the engine compartment.
(D Note
Do not stop the engine immediate ly after
hard or extended driving. Keep the engine
running for approximately two minutes to
prevent excessive heat build-up.
Parking brake
Parking brake
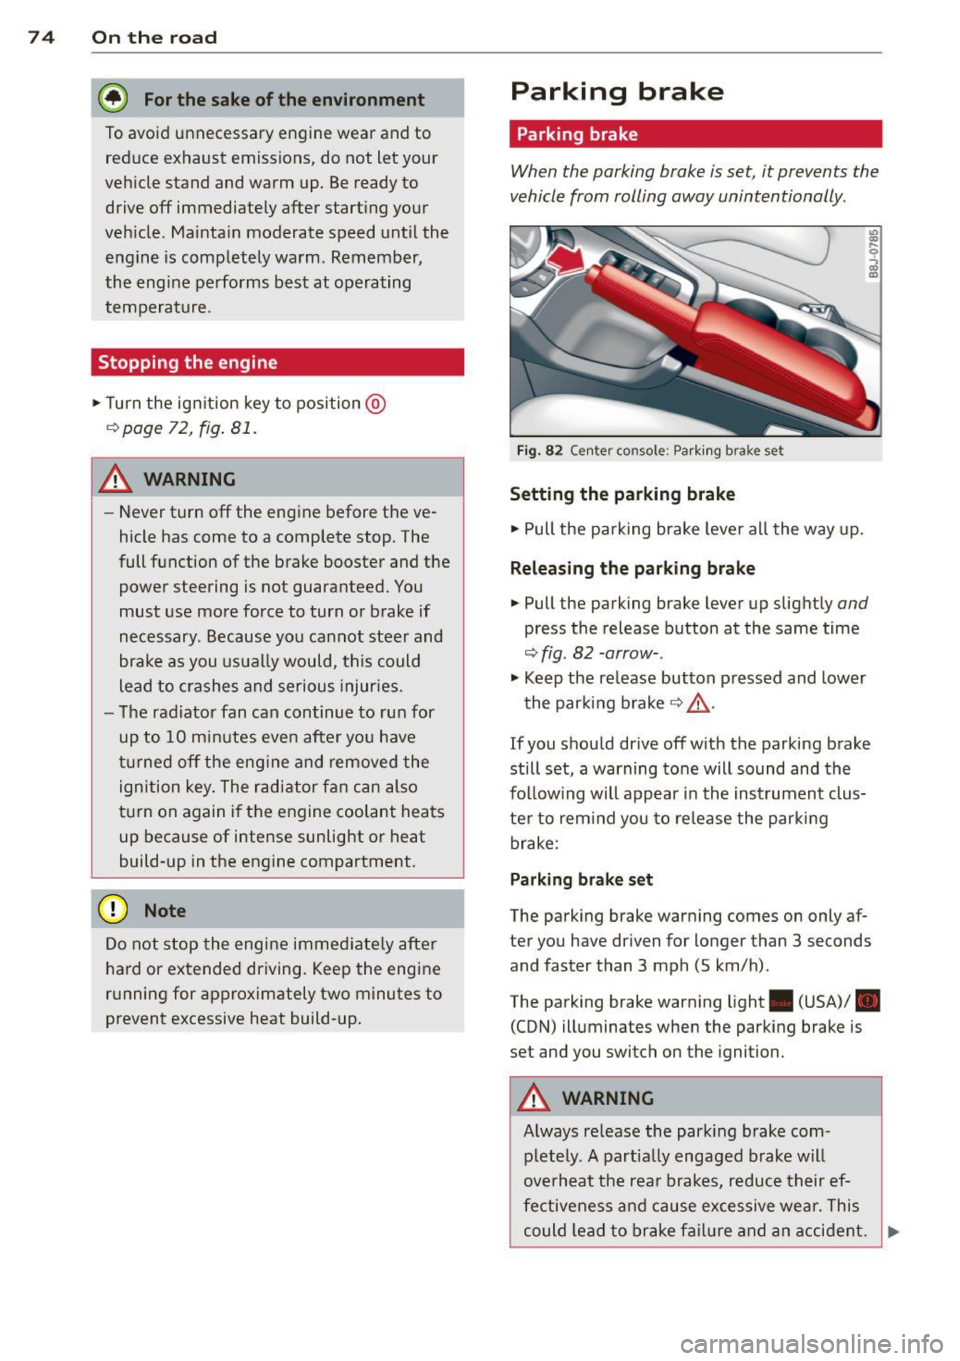
When the parking brake is set, it prevents the
vehicle from rolling away unintentionally.
Fi g. 82 Center console: Park ing brake set
Setting the parking brake
• Pull the pa rking brake lever all the way up.
Releasing the parking brake
• Pull the parking brake lever up slightly and
press the release button at the same time
~fig. 82 -arrow-.
• Keep the release button pressed and lower
the parking brake~.&,.
If you should drive off with the parking brake
still set, a warning tone will sound and the
fol low ing will appear in the instrument clus
ter to remind you to release the parking
brake:
Parking brake set
The parking brake warning comes on only af
ter you have driven for longer than 3 seconds
and faster than 3 mph (5 km/h).
The parking brake warning light . (USA)/ .
(CON) illuminates when the parking brake is
set and you switch on the ignition.
&_ WARNING
Always release the park ing brake com-
pletely. A partially engaged brake will
overheat the rear brakes, reduce their ef
fectiveness and cause excessive wear. This
could lead to brake failure and an accident. .,..
Page 84 of 244
82 Transmi ssion
engag ed, the engine shou ld neve r be
spe eded up unintentionally (e.g. manual
ly from under the hood). Otherwise the
vehicle will immediately start to move -
sometimes even if the parking brake is
firmly applied -risk of an accident!
- Before you or other persons open the
hood and work on a running eng ine, the
selector lever must be move d to P and
t h e parking bra ke applied fi rm ly -ris k of
an a ccident! Fo ll ow the warning stickers .
a) Tips
If you have inadvertently s hifted into N
while the veh icle is moving, you should r e
move your foo t from the accelerato r and
wait until the eng ine speed h as droppe d to
id le before shifting back to Dor S.
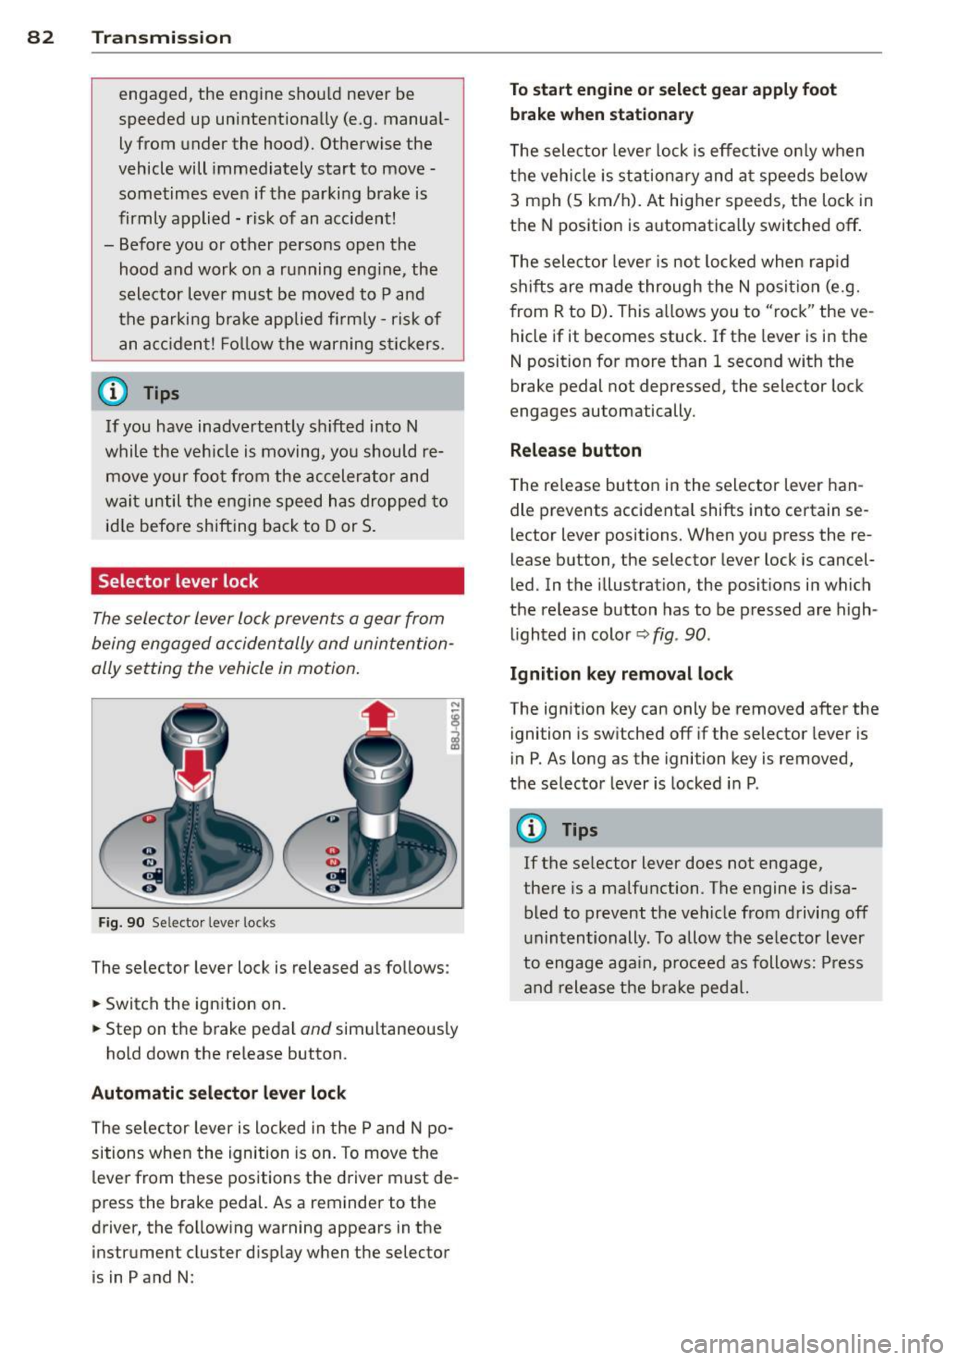
Selector lever lock
The selec tor Lever Lo ck prevents a gear from
being engaged occidentally and unintention
ally setting the vehicle in motion .
Fig. 90 Selecto r lever lo cks
The selector lever lock is released as follows:
.. Switch the ign ition on .
.. Step on the brake pedal
and simultaneous ly
hold down the release button .
Automatic selector lever lock
The selector lever is locked in the P and N po
sitions when the ignition is on. To move the
leve r from t hese positions the d river m ust de
press the brake pedal. As a reminder to the
driver, the fo llowing warning appears in the
inst rument cluster d isp lay when the selector
is in P and N :
To start engine or select gear apply foot
brake when stationar y
The selec tor leve r lock is effec tive on ly w hen
t h e veh icle is stationary and a t speeds below
3 m ph (5 km/h). At higher speeds, the lock in
t h e N position is automatica lly switched off .
T he selec tor leve r is not locked whe n rap id
shifts are made through the N posi tion (e.g.
from R to D). This a llows you to "rock" the ve
hicle if it becomes stuck. If the lever is in the
N position for more than 1 second with the
brake pedal not depre ssed, the selector lock
engages au tomatically.
Release button
T he re lease bu tton in the selector lever han
dle prevents accidenta l shifts into certain se
lector leve r positions. When you press the re
lease button, the selector lever lock is cancel
led. In the illustration, the posit ions i n which
the re lease button has to be p res sed are high
lighted in color ~
fig. 90 .
Ignition key remo val lock
The ign it ion key can only be removed after the
ignition is sw itched off if the selector lever is
in P . As long as the igni tion key is removed ,
the selector lever is locked in P.
(D Tips
If the se lector lever does not engage,
the re is a malfunction. The engine is disa
bled to prevent t he veh icle from drivi ng off
unintentionally . To allow the selector lever
to engage aga in, p roceed as follows: Press
an d release the bra ke peda l.
Page 90 of 244
88 Homelin k
Homelink
Universal remote
control
General information
The Homelink universal remote control can
be programmed with hand-held transmitters
from existing equipment .
You must first program the Homelink trans
mitter before you can use the system
~ page 88 , Programming the Homelink
transmitter.
In order to program the Homelink transmit
ter for devices utilizing rolling code, a second
person on a ladder who can safely reach the
garage door opener motor is recommended.
It is also necessary to locate the "learn" but
ton on your garag e door open er motor . Refer
to the ope rating instructions for the opener ,
as the location and color of this bu tton may
vary by manufacturer .
You can still use the original remote control
for the device at any time.
A WARNING
-
- Never use the Homelink transmitter
with any garage door opener that does
have not the safety stop and reverse fea
ture as required by federal safety stand
ards. This includes any garage door open
er model manufactured before April 1,
1982.
- A garage door opener which cannot de
tect an object, signaling the door to stop
and reverse does not meet current feder
al safety standards. Using a garage door
opener without these features increases
risk of serious injury or death.
- For safety reasons never release the
parking brake or start the engine while
anyone is standing in front of the vehicle.
- A garage door or an estate gate may
sometimes be set in motion when the
Homelink remote control is being pro
grammed. If the device is repeatedly ac- tivated, this can overstrain motor and
damage its electrical components - an
overheated motor
is a fire hazard!
- To avoid possible injuries or property
damage, please always make absolutely
certain that no persons or objects are lo
cated in the range of motion of any
equipment being operated.
(!) Tips
- If you would like more information on
Homelink, where to purchase the Home
Link compatible products, or would like
to purchase the Homelink Home Light
ing Package, please call toll-free :
1-800-355-3515.
- For Declaration of Compliance to United
States FCC and Industry Canada regula
tions ~
page 228.
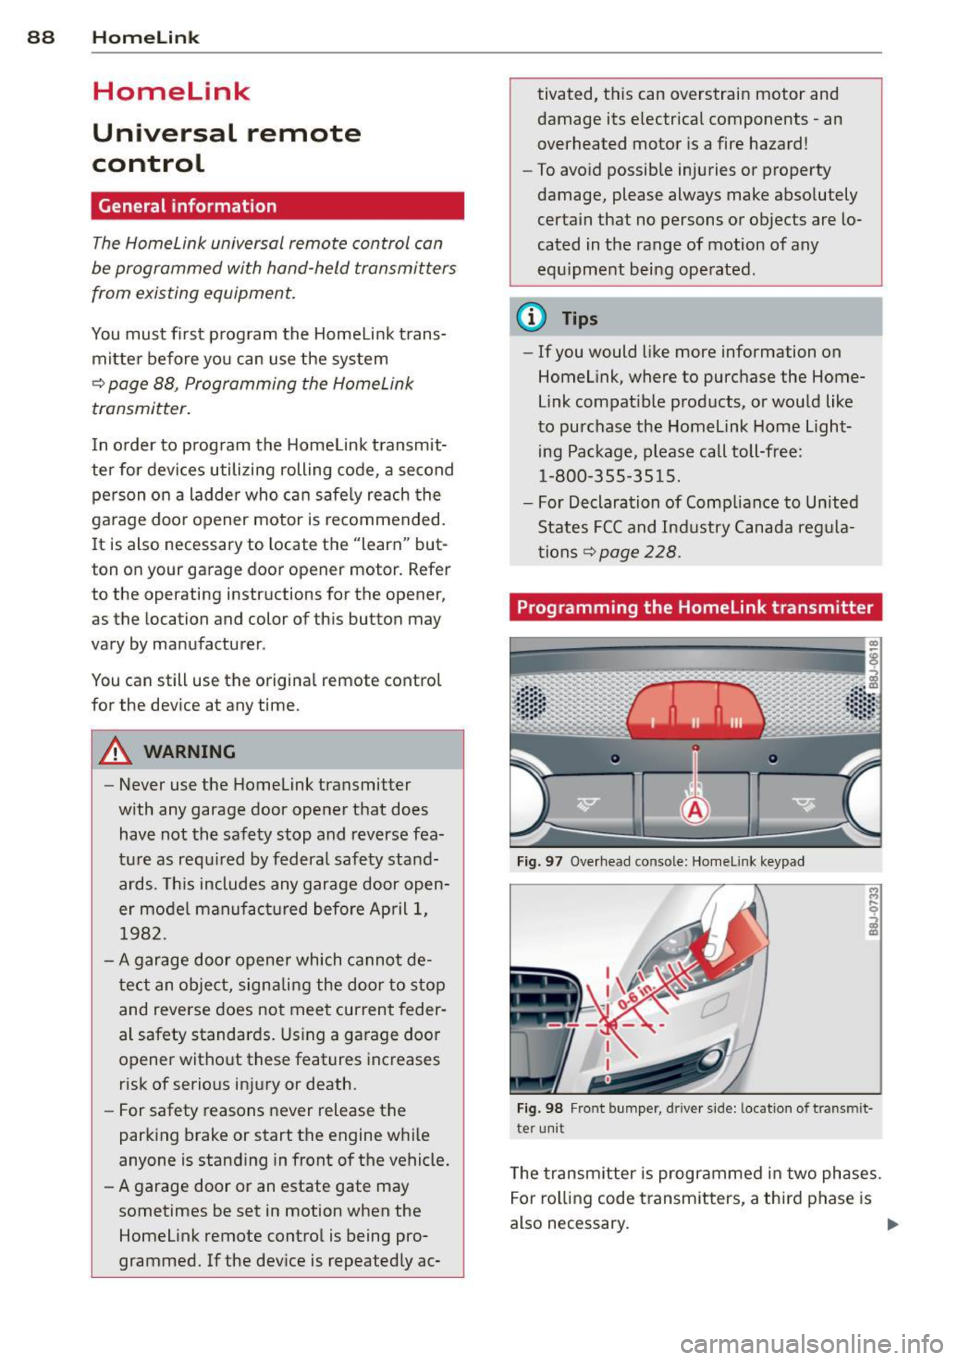
Programming the Homelink transmitter
Fig. 97 Overhead co nsole: Homelink keypad
Fig. 98 Front bumper , driver side: lo catio n of tra n smi t
te r unit
The transmitter is programmed in two phases.
For rolling code transmitters, a third phase is
also necessary.
ll-
Page 91 of 244
Phase 1:
p rogramming th e overh ead keypad
1. Make sure yo ur vehicle is wit hin ope rating
range of the remote contro lled garage
door opener .
2. Set the parking brake
q A in General in
formation on page 88 .
3. Tur n the ignition on . Do not sta rt the en
g ine!
4. P ress and hold the two o utside Home Link
b uttons
(D and @for app rox ima tely 20
seconds until indicator light @
q fig . 97
begins to flash. Then release both but
tons . Do not hold the buttons for longer
than 30 seconds.
.,. This procedure only needs to be performed
once . It erases the factory-set defau lt codes
and does not have to be repeated to pro
gram add it ional remote controls .
S. Pr ess and hold t he Home link button (D ,
® or@ unt il the indicato r ligh t@
starts flashing
slowly . Release the bu tton.
.,. The system will remain in programming
mode for 5 minutes . Co to the front of the
vehicle and proceed with phase 2 .
Phase 2:
programming the bumper mounted trans
mitter
6. Hold the original remote control at a dis
tance between 0 -6 in . (0 -15 cm) from the
bumper below the appropriate head light
for your vehicle
q fig . 98 (use th e sho rtest
d istance possible) .
7. A im t he remote con trol jus t be low the
driver side head ligh t.
8 . Pr ess and hold the activa tion button on
the remote cont ro l.
.,. May be different in Canada.
If so, press and
re -press (cycle) the act ivat ion button on your
remote control every two seconds.
9 . The emergency flashers will flash
three
time s
(after about 15 -60 seconds) when
the prog ramm ing is successful. Release
the butto n on the re m ote control.
.,. To program more devi ces, repeat steps 4 to
9.
Homelink 89
10. Press and ho ld the t rained Home link b ut
ton and observe t he indicator light @
qfig. 97.
.,. If the ind icator light is solid/contin uous,
programm ing is comp lete and your device
should activate w hen you press and release
t he t ra ined Homel ink button .
.,. If the ind icator light blinks rapidly fo r 2 sec
onds and is t hen a so lid/continuous light,
p roceed w it h phase 3 to progr am a roll ing
code device.
Phase 3: rolling code programming
.,. A second pe rson o n a ladde r who can safely
reach th e garage door opene r motor is rec
ommended .
11. Loc ate t he "lea rn" bu tton on t he g arage
doo r opener motor ( re fer to the operating
inst ruct ions for the opener, as t he loca
t ion of t his button may va ry by man ufac
turer) .
12 . Press and release the learn b utton on the
garage door opener motor .
.,. Note : once the b utton is p ressed, there are
30 seconds in w hich to initiate the next
step.
13 . On t he Home link keypad ins ide t he ve hi
cl e, firmly press and hold t he Home link
bu tton prev iously progr ammed in phases
1 and 2 fo r two seconds and release . R e
peat this seque nce
twice.
.,. Some vehicles may require the press/ho ld/
re lease sequence up to three t imes to com
plete t he trai ning process .
.,. Homelink should now activate your rolling
code equipped device .
If the S minute time limit is exceeded , the
emergency flashers will flash one time to in
dicate that the p rocess has been te rm ina ted .
In this case, repeat steps 4 t hrough 9.
If the emergency flashers do not flash
three
times (afte r about lS -60 seconds) , program
ming was not successful. In this case, repeat
steps 4 through 9 .
Remote contro l units for garage door openers
in Canada are set to stop transmitting radio
fr eque ncy signa ls afte r two seconds . This t ime
Ill-