2015 AUDI TT ROADSTER mirror
[x] Cancel search: mirrorPage 51 of 244

light sensor checked as soon as possible at a
dealership.
Adaptive light *
The benefit of adaptive l ight is that the curve
and the edge of the road are better i llum inat
ed . The adaptive light is contro lled automati
cally, depending on vehicle speed and steering
wheel angle.
When driving a round bends, the head lights
are contro lled according to steering wheel an
g le . So that there is no black area ahead of the
ve hic le, the two main beams pivot at different
angles. The system works above a speed of
about 6 mph (10 km/h).
Com ing home /le avi ng home function *
The function is swit ched on when the switch is
in the AUTO* position and the function is
shown as active in the driver information sys
tem.
The
coming hom e function illuminates the
area around the vehicle when the ign ition is
switched off and the driver's door is ope ned.
The length of time the lights remain on can be
set in the menu display
( Illumination > Exte
rior lights > coming home ).
The leavi ng home function i lluminates the
area around the vehicle when unlocking it.
A WARNING
- Never use dayt ime running l ights to see
where you are going. They are not bright
enough and w ill not let you see far
enough ahead for safety, especially at
dusk or when it is dar k. Always switch on
the low beams at dusk or when i t is dar k.
- Automatic headlights a re only intended
to assist the dr iver. They do not re lieve
t he driver of his responsibi lity to check
t he headlights and to turn them on man
ually according to the current light and
visibility conditions. For example, fog
and rain cannot be detected by the light
sensors. So a lways switch on the head
lights under these weather cond itions
and when driving in the dark
jO .
Clear vis ion 49
- Crashes can happen when you cannot see
the road ahead and when you cannot be
seen by other motorists.
- Always turn on the headlights so that
youcanseeahe adandsothatothe ~
can see your car from the back .
- Please observe legal regulat ions w hen
using the ligh ting systems des cribed.
(D Tips
- T he light sensor for head light control is
located in the rear view mirror mount.
Do not apply any stickers to t he wind
shield in th is area to preven t malfunc
tions or fa ilures.
- Some exter io r l ighting funct ions can be
adjusted in t he driver i nformat ion sys
t em
~page 24.
- I f you remove the igni tion from t he igni
t ion lock while the headligh ts are s till
on, a buzzer wi ll sound as long as the
driver's door is o pen to remind yo u to
t u rn off the lights.
- Always observe the specific local regula
tions for your area as to when to use your
lights.
- With automatic headlights, the high
beam f unction is also available, but w ith
one restrict ion: If you have not sw itched
the high beams back to low beams dur
ing automatic headlight operation (for
example, after d riving throug h a tunnel),
only the low beams come on the next
t ime au tomati c headlights a re swi tched
on. To use the high beams , you firs t have
t o pull the hig h beam lever back and
then push the lever fo rward again .
- In coo l or damp weather, the inside of
the headlights, turn signals an d tail
lights can fog over due to the tempera
t u re difference between the inside and
outside. They w ill clear shortly after
switching them on. This does not affect
the se rv ice life of the lighting.
Page 54 of 244
52 Clear vis ion
Instrument panel illumination
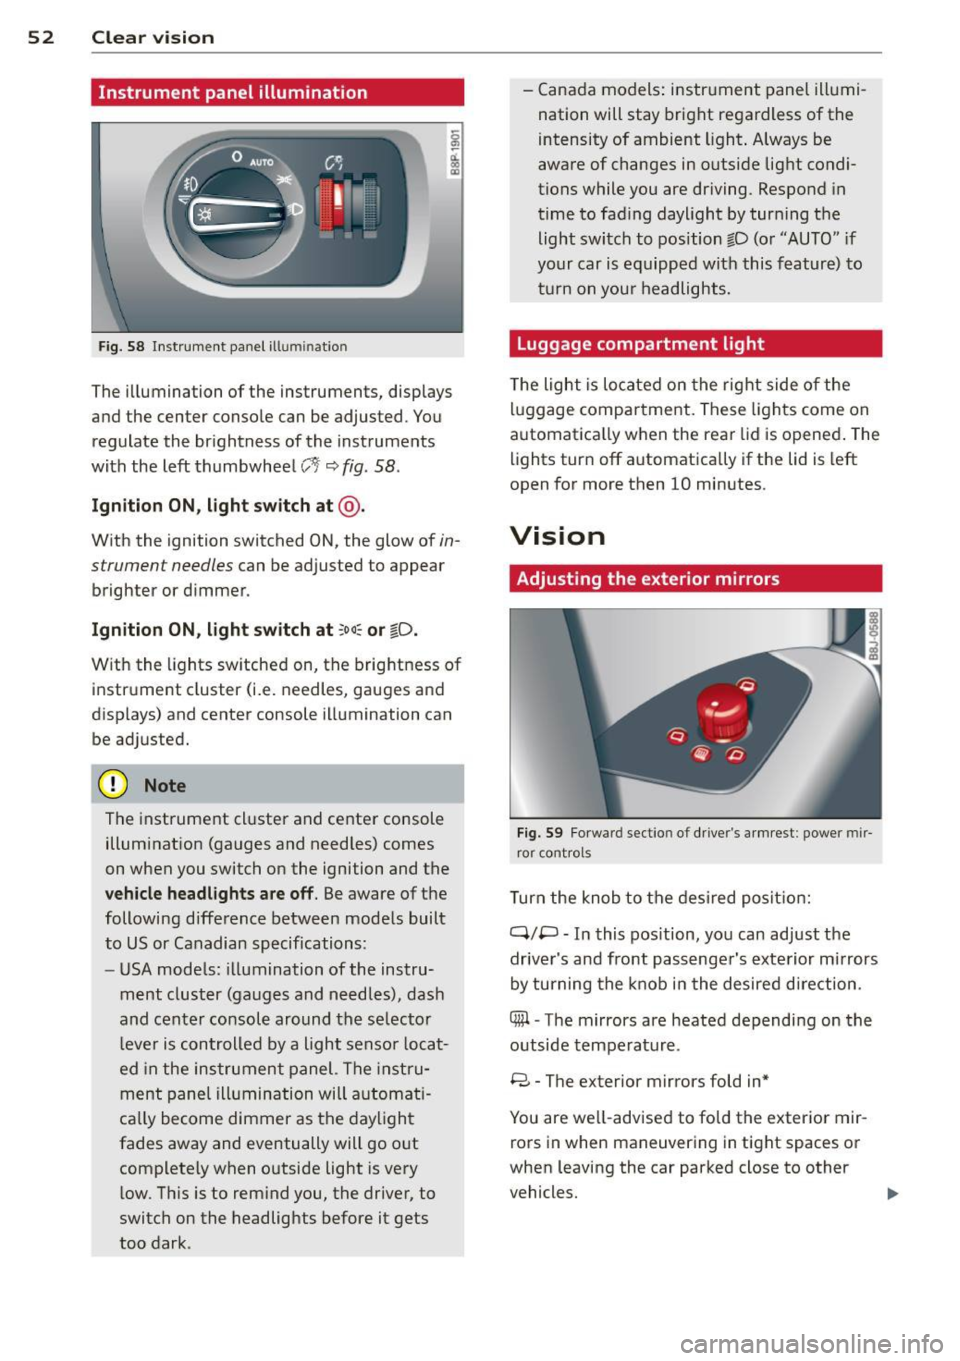
F ig. 58 Instrument panel ill umination
The illumination of the instruments, displays
and the center console can be adjusted. You
regulate the brightness of the instruments
with the left thumbwheel
CJ:J ~ fig. 58.
Ignition ON, light switch at @ .
With the ignition switched ON, the glow of in
strument needles can be adjusted to appear
brighter or dimmer.
Ignition ON , light switch at ;oo~ or io .
With the l ights sw itched on, the brightness of
instrument cluster (i.e. needles, gauges and
displays) and center console illumination can
be adjusted.
@ Note
The instrument cl uster and cente r console
illumination (gauges and needles) comes
on when you switch on the ignition and the
vehicle headligh ts ar e off . Be aware of the
following difference between mode ls built
to US or Canadian specifications:
- USA mode ls: illumination of the instru
ment cluster (gauges and needles), dash
and center consol e around the se lector
l ever is controlled by a light senso r locat
ed in the instrument panel. The instru
ment pane l illumination will a utomat i
cally become dimmer as the daylight
fades away and eventually will go out
complete ly when outside light is very
l ow . Th is is to rem ind you, the driver, to
switch on the headlights before it gets
too dark . -
Canada models: instrument panel illumi
nation will stay bright regardless of the
intensity of ambient light . Always be
aware of changes in outside light condi
tions while you are driving. Respond in
time to fading daylight by tur ning the
light switch to position fD (o r "AUTO" if
your car is equipped with this feature) to
t ur n on you r headlights.
Luggage compartment light
The light is located on the right side of the
lu ggage compartme nt. These lights come on
automat ica lly when the rear lid is opened . The
lights turn off automatica lly if the lid is left
open for more then 10 minutes.
Vision
Adjusting the exterior mirrors
Fig. 59 Fo rwa rd section of driver's a rmrest: power mir
ror controls
Turn the knob to the desired posit ion:
Q/ P -In this pos ition, you can adjust the
driver's and front passenger's exte rior m irrors
by turning the knob in the desired d irection.
4iil -The mirrors are heated depending on the
outside temperature .
8 -The exterior mirrors fold in*
You are we ll-advised to fold the exterior mir
rors in when maneuvering in tight spaces or
when leaving the car parked close to other
vehicles. ..,,.
Page 55 of 244
_& WARNING
- Curved (i. e. convex) mirror surfaces in
crease your field of view. Remember that
vehicles or other objects will appear
smaller and farther away than when seen
in a flat mirror.
If you use this mirror to
estimate distances of following vehicles
when changing lanes, you could estimate
incorrectly and cause an accident.
CD Note
- If the mirror housing is moved uninten
tionally (for example, while parking your
vehicle), then you must first fold the mir ror electrically. Do not readjust the mir
ror housing manually. You could damage
the motor which controls the mirror .
- If you wash the vehicle in an automatic
car wash, you must fold the exterior mir
rors in to reduce the risk of damage to
the mirrors . Never fold power folding ex
terior mirrors* by hand. Only fold them in and out using the power controls .
@ Tips
If there should be a malfunction in the
electrical system, you can still adjust the
exterior mirrors by pressing the edge of
the mirror .
Dimming the mirrors
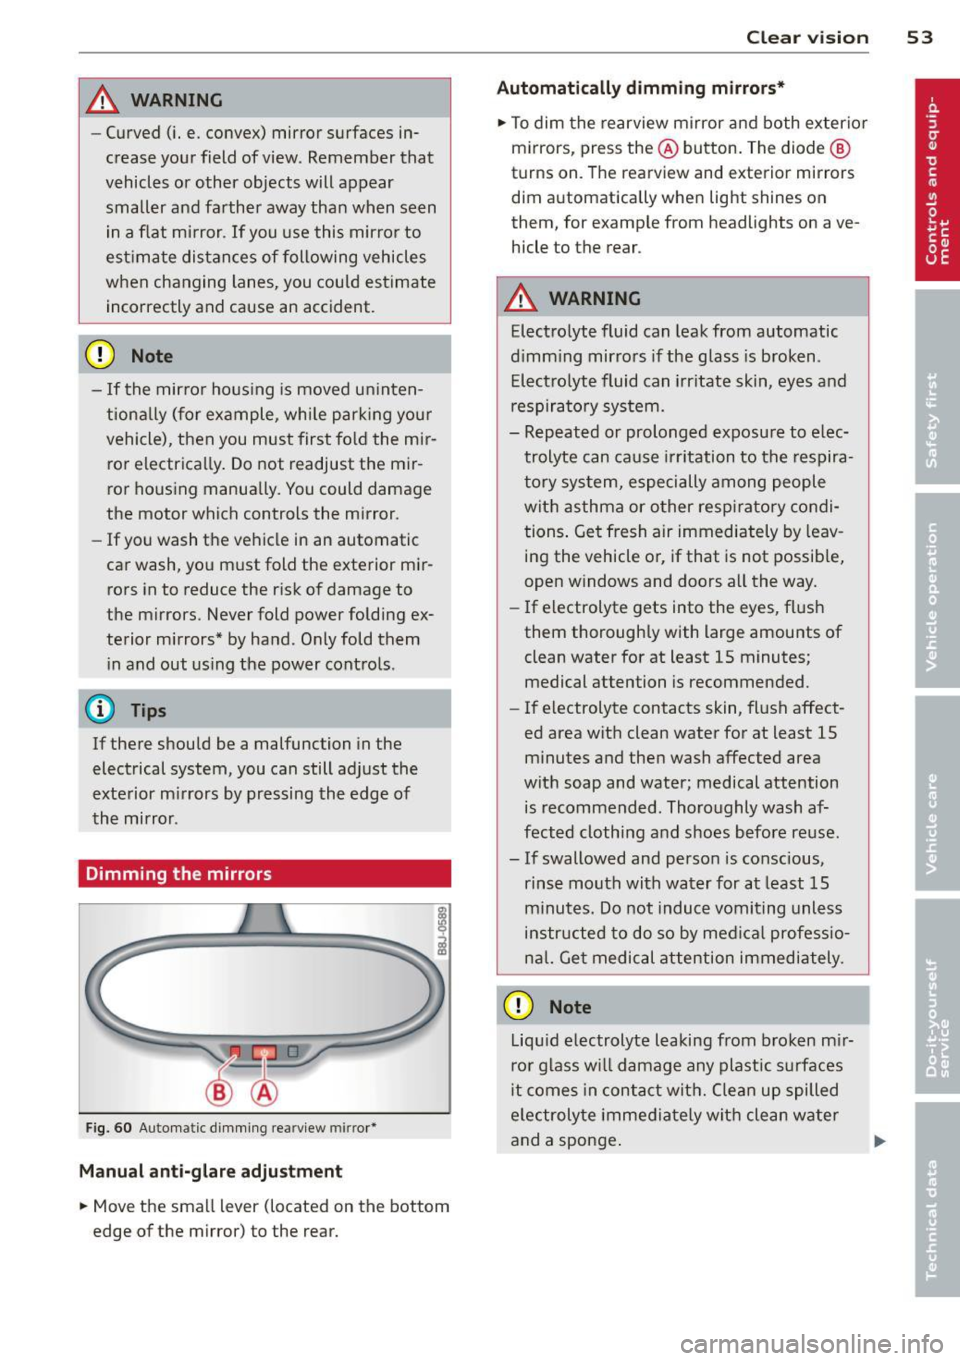
Fig. 60 Automa tic dimming re arview mirror•
Manual anti-glare adjustment
• Move the small l ever (located on the bottom
edge of the mirror) to the rear.
Clear vision 53
Automatically dimming mirrors*
• To dim the rearview mirror and both exterior
mirrors, press the @button. The diode @
turns on . The rearview and exterior mirrors
dim automatically when light shines on
them, fo r ex ample from headlights on ave
hicle to the rear .
_& WARNING
Electrolyte fluid can leak from automatic
dimming mirrors if the glass is broken .
Electrolyte fluid can irritate skin, eyes and
respiratory system.
- Repeated or prolonged exposure to elec
trolyte can cause irritation to the respira
tory system, especially among people
with asthma or other respiratory condi
tions. Get fresh air immediately by leav
ing the vehicle or, if that is not possible,
open windows and doors all the way.
- If electrolyte gets into the eyes, flush
them thoroughly with large amounts of
clean water for at least 15 minutes·
. '
medical attention is recommended.
- If electrolyte contacts skin, flush affect
ed area with clean water for at least 15 minutes and then wash affected area
with soap and water; medical attention is recommended. Thoroughly wash af
fected clothing and shoes before reuse .
- If swallowed and person is conscious, rinse mouth with water for at least 15
minutes. Do not induce vomiting unless
instructed to do so by medical professio
nal. Get medical attention immediately .
CD Note
Liquid electrolyte leaking from broken mir
ror glass will damage any plastic surfaces
it comes in contact with. Clean up spilled
electrolyte immediately with clean water
and a sponge. .,..
Page 56 of 244

54 Clear vision
@ Tips
-Switching off the dimming function of
the inside rear view mirror also deact i
vates the automatic dimming f unction of
the exterior m irrors.
- The automatic dimming mirrors do not
dim when the interior lighting is turned
on or the reverse gear is selected .
-Automat ic dimming for the m irror only
operates properly if the light striking the inside mirror is not hindered in any way.
Sun visors
Using the sun visors makes driving safer.
Fig. 61 Sun viso r
The vanity mirrors in the sun v isors are equip
ped with lids. Push lid in direction of arrow to
open.
Wiper and washer system
Windshield wiper
The windshield wiper lever controls both the
windshield wipers and the washer system .
Fig. 62 Wiper lever: wind shi eld w iper lever pos it ions
T he windshield wiper lever i=:> fig. 62 has the
following positions:
Intermittent wiping ~l (activating rain
sensor)*
.. Move the lever up to position (D.
.. Move the interval set switch @, to change
the intervals.
Low wiper speed
.. Move the lever up to position @.
High wiper speed
.. Move the lever up to posit ion @.
One-touch wiping
.. Move the lever to position @, when you
want to wipe the windshield
briefly.
Automatic wiper/washer
.. Pull the lever to position ® (to ward the
steering whee l) and hold .
.. Release the lever . The washer stops and the
w ipers keep going for about four seconds.
Turning off the wipers
.. Move the lever back to position @ .
The windshield w ipers and washer only work
when the ignition is turned on. If you switch
off the igni tion with the windshie ld wipe r lev
er still in the interval wipe position and then
come back a while later and drive off, the ra in
sensor will reactivate itself after the vehicle
speed has exceeded 4 mph (6 km/h).
Th e rai n sensor* is only activated with the
wiper lever set to position
(D. When it starts
to rain, the rain senso r will a utomat ically acti
vate the intermittent wiping mode .
To reduce the sensitivity of the sensor, move
swi tch @ down. To increase the sensitivity,
move the switc h up. The higher you adjust the
sensitivity, the faster the sensor will react
when it senses moisture on the windshield.
The pauses between wiper turns depend not
only on the sensitivity setting, but on the ve-
hicle speed as well. ..,.
Page 60 of 244
58 Clear vision
-To help prevent damage to the wiper
arms or oth er components, do not at
tempt to move the wipers by hand.
@ Tips
- Commercial hot waxes applied by auto
matic car washes aff ect the cleanability
of the glass surface .
- The front wiper blades are different
lengths; the blade on the driver's side is
longer .
Digital compass
Activating or deactivating the compass
Applies to vehicles: with digital compass
Fig. 65 Inside re ar view mirro r: di gital compass ac ti
va ted
• To activate or deactivate , hold the@
¢ fig. 65 button down until the red display
appears or disappears.
The digital compass only works with the igni
tion turned on . The directions are displayed as
initials:
N (North), NE (Northeast) , E (East),
SE (Southeast) , S (South), SW (Southwest),
W (West), NW (Northwest).
The compass has to be recalibrated if the dis
play is wrong or inaccurate
¢ page 58.
(j) Tips
-To avoid inaccurate directions, do not al
low any remote controls, electrical sys
tems, or metal parts close to the mirror.
- The correct magnetic deflection zone
must be set in order to display the direc
tions correctly.
Setting the magnetic deflection zone
Applies to vehicles: with digital compass
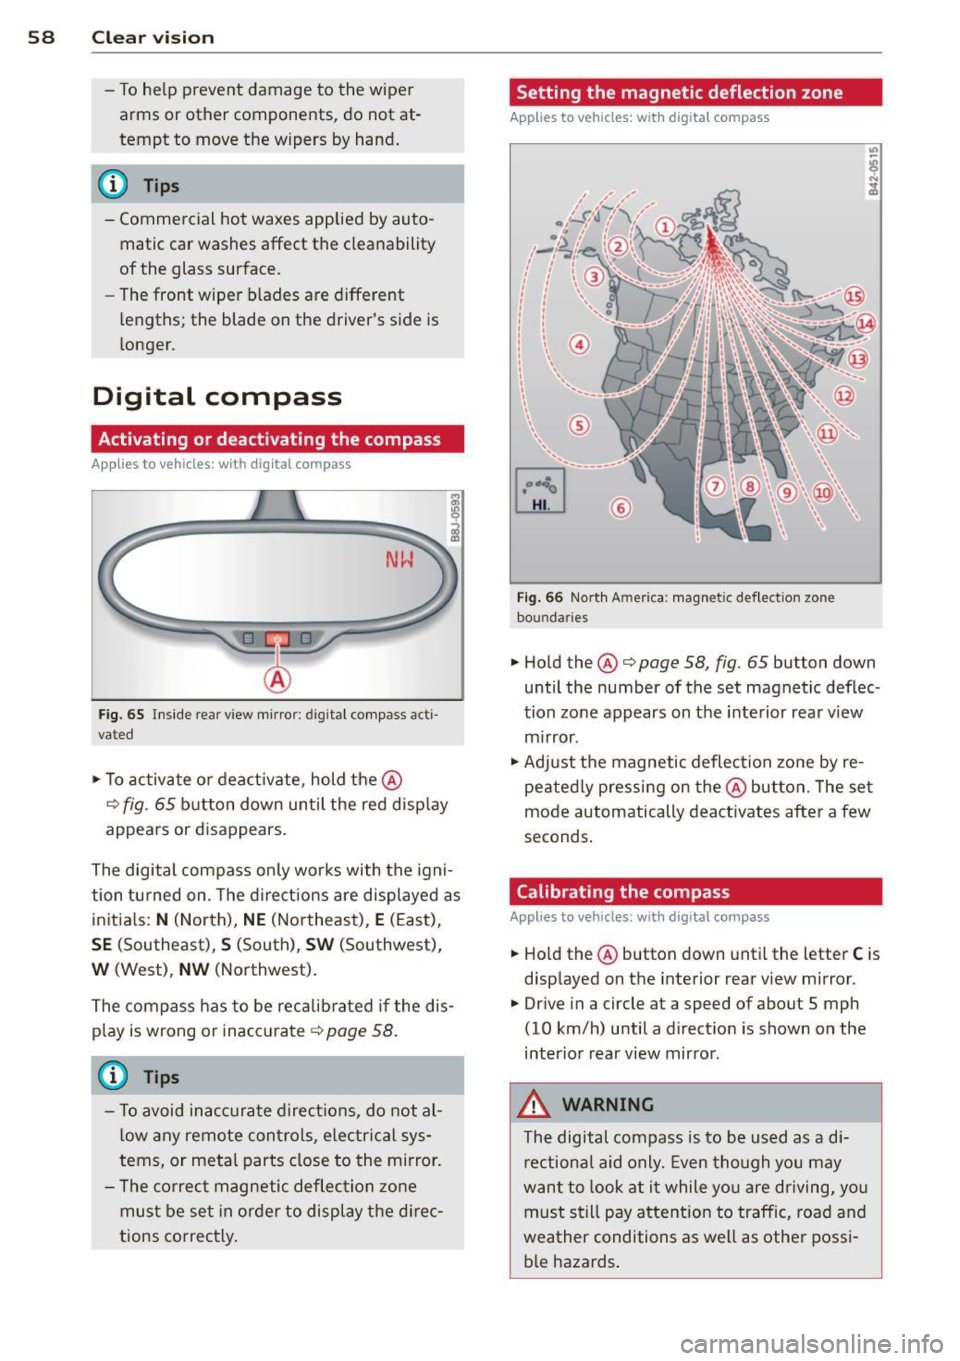
Fig. 66 North A meri ca : magn etic defle ction zo ne
bo undaries
• Hold the@¢ page 58, fig. 65 button down
until the number of the set magnetic deflec
tion zone appears on the interior rear view
mirror .
• Adjust the magnetic deflection zone by re
peatedly pressing on the@button. The set
mode automatically deactivates after a few
seconds.
Calibrating the compass
Applies to vehicles: with digital compass
• Hold the @button down until the letter C is
displayed on the interior rear view mirror .
• Drive in a circle at a speed of about S mph
(10 km/h) until a direction is shown on the
interior rear view mirror.
_&. WARNING
The digital compass is to be used as a di
rectional aid only. Even though you may
want to look at it while you are driving, you
must still pay attention to traffic, road and
weather conditions as well as other possi
ble hazards.
-
Page 93 of 244
Driving Safely
General notes
Safe driving habits
Please remember -safety first!
This chapter contains important information,
tips, instructions and warnings that you need
to read and observe for your own safety, the
safety of your passengers and others . We have
summarized here what you need to know
about safety belts, airbags, child restraints as
well as child safety. Your safety is for us
priori
ty number 1.
Always observe the information
and warnings in this section - for your own
safety as well as for that of your passengers.
The information in this section applies to all
model versions of your vehicle . Some of the
features described in this sections may be
standard equipment on some models, or may
be optional equipment on others. If you are
not sure, ask your authorized Audi dealer.
A WARNING
- Make certain that you follow the instruc
tions and heed the WARNINGS in this
Manual. It is in your interest and in the
interest of your passengers.
- Always keep the complete Owner's Liter
ature in your Audi when you lend or sell
your vehicle so that this important infor
mation will always be available to the
driver and passengers.
- Always keep the Owner's literature handy
so that you can find it easily if you have
questions.
Safety equipment
The safety features are part of the occupant
restraint system and work together to help
reduce the risk of injury in a wide variety of
accident situations .
Your safety and the safety of your passengers
should not be left to chance. Advances in
technology have made a variety of features
available to help reduce the risk of injury in an
Driving Safely 91
accident. The following is a listing of just a
few of the safety features in your Audi:
- sophisticated safety belts for driver and all
passenger seating positions,
- safety belt pre-tensioners,
- front airbags,
- knee airbags for the front seats,
- side airbags in the front seats,
- LATCH anchorages for child restraints,
- adjustable steering column.
These individual safety features can work to
gether as a system to help protect you and
your passengers in a wide range of accidents.
These features cannot work as a system if
they are not always properly adjusted and
properly used!
Safety is everybody's responsibility!
Important things to do before driving
Safety is everybody's job! Vehicle and occu
pant safety always depends on the informed and careful driver.
For your safety and the safety of your passen
gers,
before driving always:
~ Make sure that all lights and signals are op
erating correctly .
~ Make sure that the tire pressure is correct.
~ Make sure that all windows are clean and af
ford good visibility to the outside.
~ Secure all luggage and other items carefully
c::> page 65.
~ Make sure that nothing can interfere with
the pedals.
~ Adjust front seat, head restraint and mirrors
correctly for your height .
~ Instruct passengers to adjust the head re
straints according to their height .
~ Make sure to use the right child restraint
correctly to protect children¢
page 129,
Child Safety.
~ Sit properly in your seat and make sure that
your passengers do the same¢
page 59,
General recommendations. .,..
•
•
Page 159 of 244
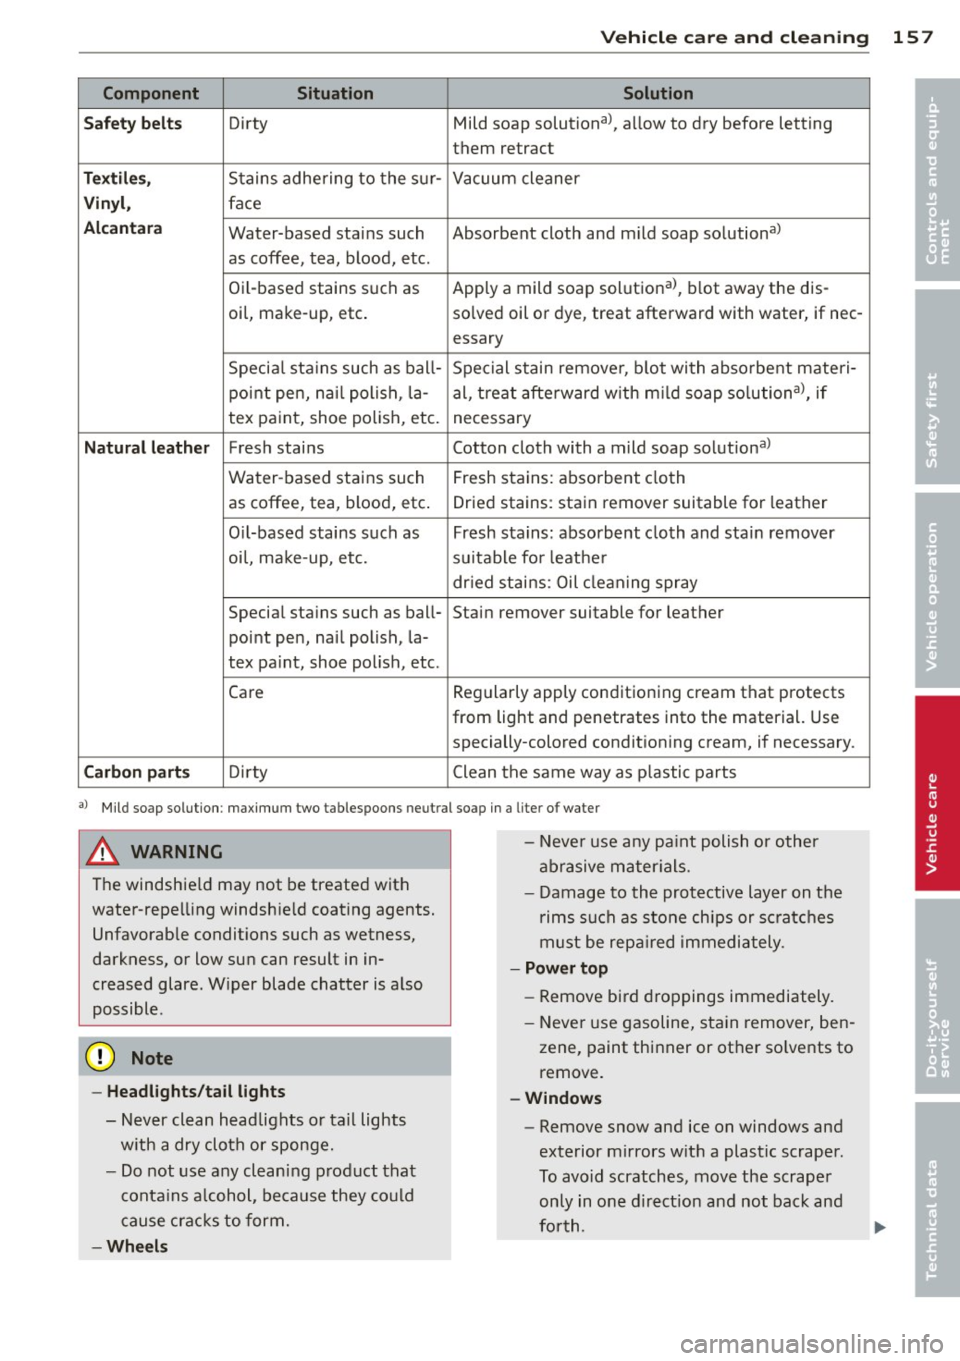
Vehicl e ca re a nd cl eanin g 157
Component Situation Solution
•
Sa fe ty be lt s Dirty Mild soap solutional, allow to dry before letting
• them retract
Tex til es, Stains adhering to the sur- Vacuum cleaner
Vinyl , face
Alcanta ra Water-based stains such Absorbent cloth and mild soap solutional
as coffee, tea, blood, etc.
Oil-based stains such as Apply a mild soap solutional, blot away the dis-
oil, make-up, etc. solved oil or dye, treat afterward with water, if nee-
essary
Specia l sta ins such as ball- Special stain remover, blot with absorbent materi-
point pen, nai l polish, la- al, treat afterward w ith m ild soap solutional, if
tex paint, shoe polish, etc.
necessary
Natura l lea ther Fresh stains Cotton cloth with a m ild soap solutional
Water-based stains such Fresh stains: absorbent cloth
as coffee, tea, blood, etc. Dried stains: sta in remover suitable for leather
O il-based stains such as Fresh stains: absorbent cloth and stain remover
oi l, make-up, etc. suitable for leather
dr ied stains: Oil clean ing spray
Special stains such as ball- Stain remover suitable for leather
point pen, nail polish, la-
tex pa int, shoe pol ish, etc .
Care Regularly
apply conditioning cream that protects
from light and penetrates into the material. Use specially-colored conditioning cream, if necessary.
Carbon part s Dirty Clean the same way as plastic parts
al Mild soap solution: maximum two tablespoons neut ral soap in a lit er of water
A WARNING
The windshie ld may not be treated with
water-repelling windshie ld coating agents.
Unfavorable conditions such as wetness,
darkness, or low sun can result in in
creased glare. W iper blade chatter is also
possible.
(D Note
- Headl ights /ta il li ghts
- Never clean headlights or tail lights
w ith a dry cloth or sponge.
- Do not use any cleaning p roduct that
contains a lcohol, because they could
cause cracks to form.
-W heels
- Neve r use any pa int polish or other
abrasive mater ials.
- Damage to the protective layer on the rims such as stone chips or sc ratches
must be repa ired immediately.
- Po wer top
- Remove bird droppings immediately.
- Never use gasoline, stain remover, ben-
zene, paint thinner or other so lvents to
remove.
- W ind ow s
-Remove snow and ice on windows and
exterior mirrors with a plastic scraper.
To avoid scratches, move the scrape r
only in one d irect ion and not back and
forth.
Page 160 of 244
158 Vehicle care and cleaning
- Never remove snow or ice from win
dows and mirrors using warm or hot
water because this could cause cracks to form .
- To avoid damage to the rear window
defogger, do not apply any stickers on
the heating wires on the inside of the
window.
- Decorative parts/trim
-Never use chrome care or cleaning
products.
- Paint
- To reduce the risk of scratches, the ve-
hicle must be free of dirt and dust be
fore polishing or waxing.
- To prevent paint damage, do not polish or wax the vehicle in direct sunlight.
- To reduce the risk of paint damage, do
not polish away rust film .
-Trim
-To reduce the risk of damage, do not
treat the trim around the panorama
sunroof with paint polish.
- Decorative decals
-To reduce the risk of damage, do not
use any rough powder or abrasive
cleaning products.
- To reduce the risk of damage , do not
polish decorative parts that have a
matte finish.
- Displays
-To avoid scratches, do not use dry
cleaning methods on displays.
- Controls
- Make sure that no fluids enter the con -
trols, because this could cause dam age.
- Safety belts
- Do not remove the safety belts to clean
them.
- Never clean safety belts or their com
ponents chemically or with corrosive
fluids or solvents and never allow sharp objects to come into contact
with the safety belts. This could cause damage to the belt webbing. - If there is damage to the webbing, the
connections, the retractors or the buckles, have them replaced by an author
i z ed Audi dealer or a qualified work
shop.
- Textiles/Vinyl/Alcantara
- Never treat Vinyl/Alcantara with leath-
er care products , solvents, floor polish ,
shoe polish , stain remover or similar
products.
- To avoid damage, have stubborn stains
removed by an authorized Audi dealer
or a qualified workshop.
- Never use steam cleaners, brushes,
hard sponges, etc. when cleaning.
- Do not turn on the seat heating* to dry
the seat.
- Objects with sharp edges such as zip
pers , rivets on clothing or belts can
cause damage to the surface.
- Open hook and loop fasteners, for ex
ample on clothing, can damage seat
covers. Make sure hook and loop fas
teners are closed.
-Natural leather
-Never treat leather with solvents, floor
polish, shoe polish, stain remover or
similar products.
- Objects with sharp edges such as zip
pers, rivets on clothing or belts can
cause damage to the surface .
- Never use steam cleaners, brushes,
hard sponges, etc. when cleaning.
- Do not turn on the seat heating* to dry
the seat.
- To help prevent the leather from fad
ing, do not leave the vehicle in direct
sunlight for long periods of time . If
leaving the vehicle parked for long pe
riods of time, you should cover the
leather to protect it from direct sun
light.
@ Tips
- Insects are easier to remove from paint
that has been freshly waxed.