2015 AUDI S3 SEDAN fold seats
[x] Cancel search: fold seatsPage 57 of 282
....,
N
0 > co
rl I.O
"'
"'
"'
rl
Power seat adjustment
Applies to vehicles: with power adjustable seats
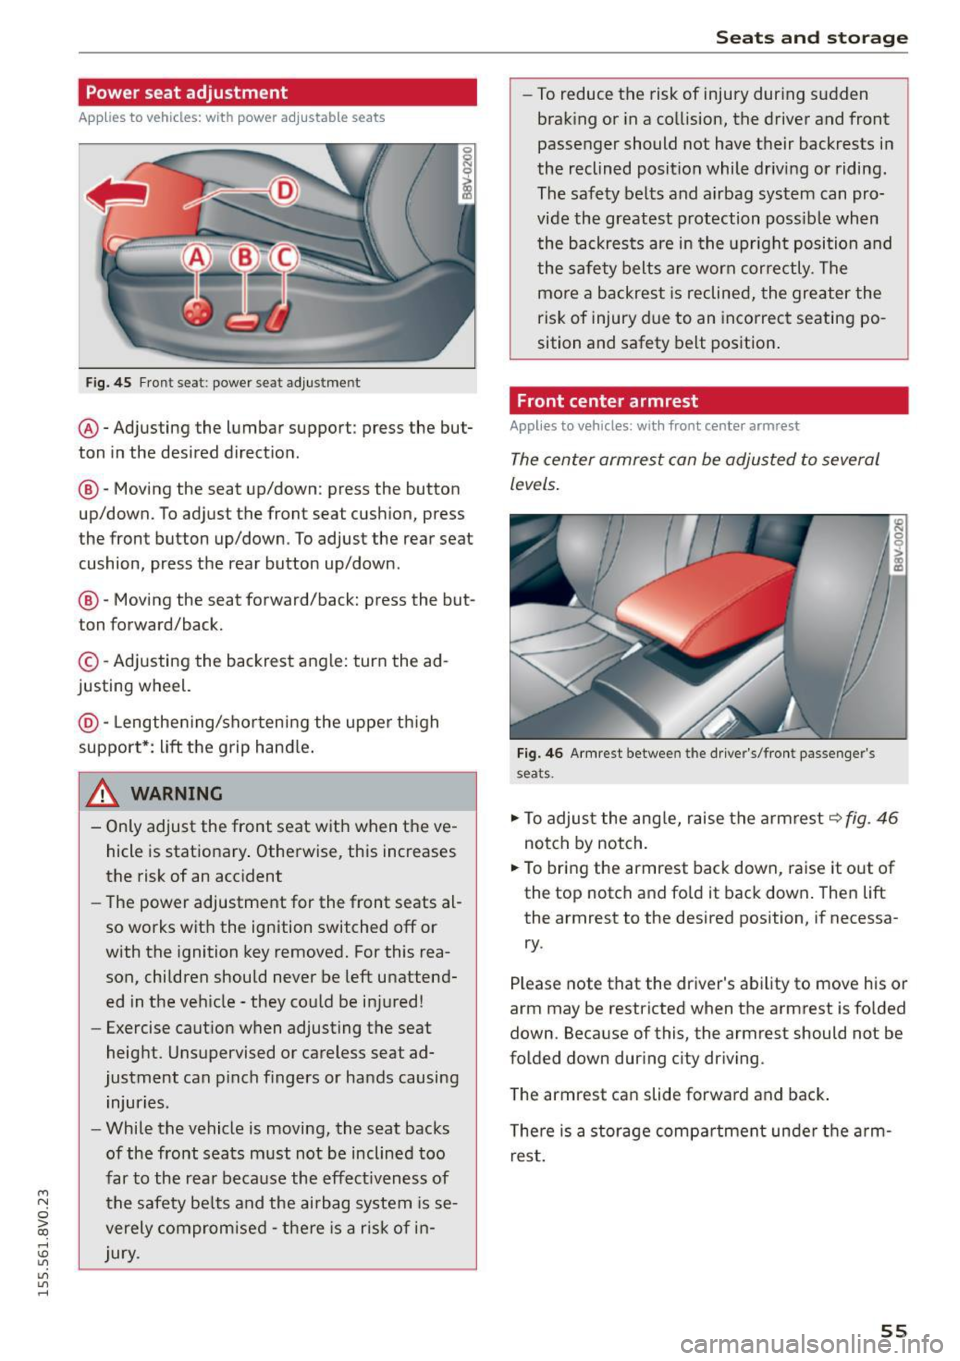
Fig. 45 Front seat: power seat adjus tment
@ -Adjusting the lumbar support: press the but
ton in the desired direction .
®-Moving the seat up/down: press the button
up/down. To adjust the front seat cush ion, press
the front button up/down . To adjust the rear seat
cushion, press the rear button up/down.
@ -Moving the seat forward/back: press the but
ton forward/back.
© -Adjusting the backrest angle: turn the ad
justing wheel.
@ -Lengthening/shortening the upper thigh
support*: lift the grip hand le.
A WARNING
- Only adjust the front seat with when the ve
hicle is stationary . Otherwise, this increases
the risk of an accident
- The power adjustment for the front seats al
so works with the ignition switched off or
with the ignition key removed. For this rea
son, children should never be left unattend ed in the vehicle - they could be injured!
- Exercise caution when adjusting the seat
height. Unsupervised or careless seat ad
justment can pinch fingers or hands causing
injuries.
- While the vehicle is moving, the seat backs
of the front seats must not be inclined too
far to the rear because the effect iveness of
the safety be lts and the airbag system is se
verely compromised -there is a risk of in
jury.
Seats and storage
- To reduce the risk of injury during sudden
braking or in a collision, the driver and front
passenger should not have their backrests in
the reclined position while driving or riding.
The safety belts and airbag system can pro
vide the greatest protection possible when
the backrests are in the upright position and
the safety belts are worn correctly. The
more a backrest is reclined, the greater the
risk of injury due to an incorrect seating po
sition and safety belt position.
Front center armrest
Applies to vehicles: wit h front center armrest
The center armrest can be adjusted to several
levels.
Fig. 46 Armrest between the driver's/front passenger's
seats .
.,.. To adjust the angle, raise the armrest ~fig. 46
notch by notch.
.,.. To bring the armrest back down, raise it out of
the top notch and fold it back down. Then lift
the armrest to the desired position, if necessa
ry.
Please note tha t the driver's ability to move his or
arm may be restricted when the armrest is folded
down. Because of this, the armrest should not be
folded down during city driving.
The armrest can slide forward and back.
There is a storage compartment under the arm
rest.
55
Page 58 of 282
Seats and storag e
Rear center armrest
Applies to vehicles: with rear center armrest
The storage compartment and cup holder are in
tegrated in the armrest.
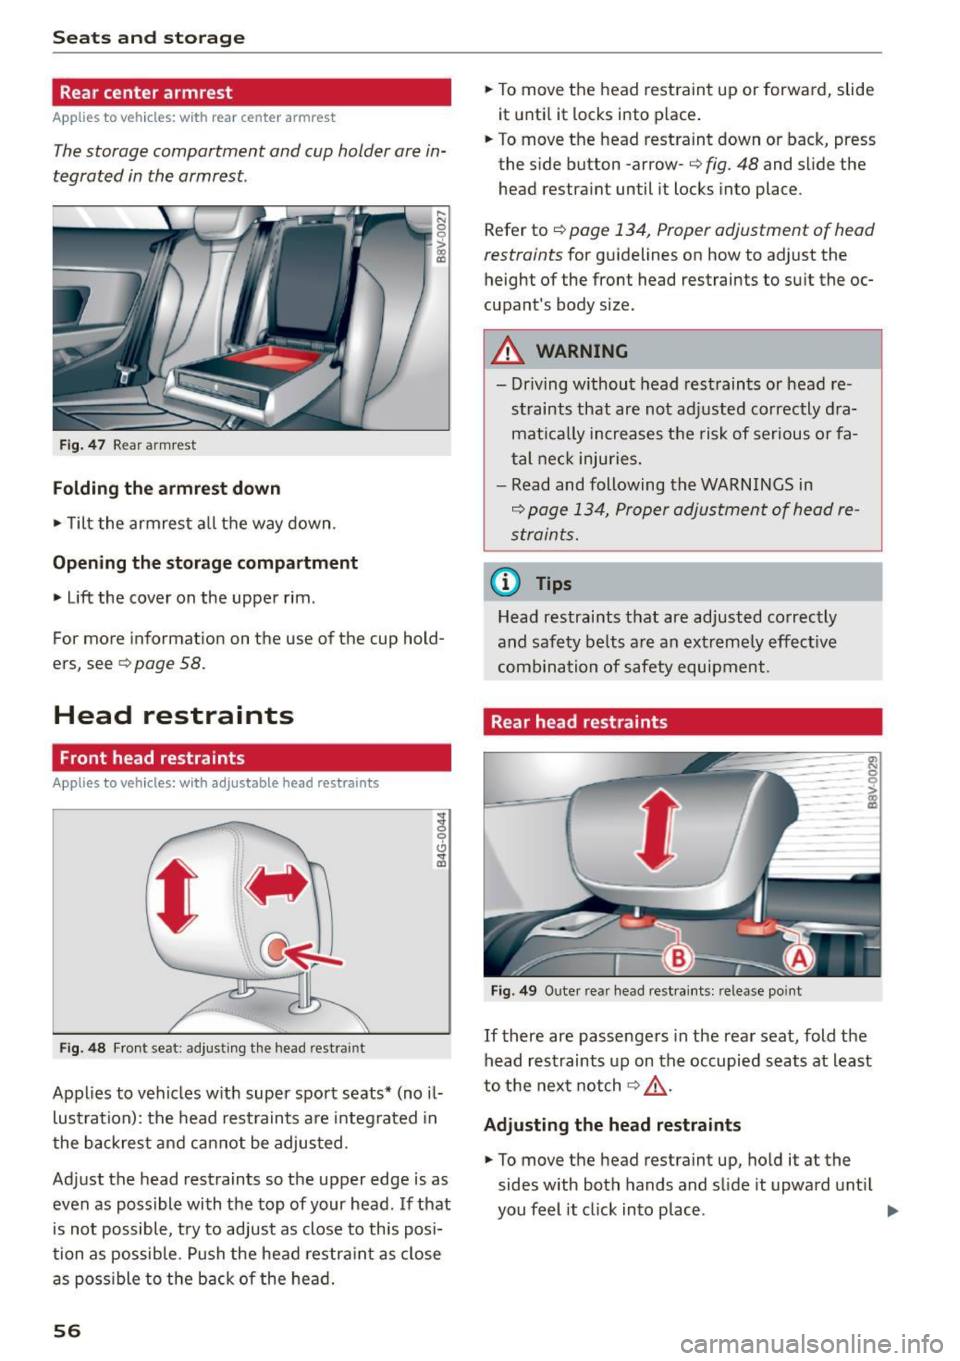
Fig . 47 Rear armrest
Folding the armre st d own
• Tilt the armrest a ll the way down.
Opening the sto rage c omp artment
• Lift the cover on the upper rim .
~I
gl
~
For more information on the use of the cup hold
ers, see
c> page 58.
Head restraints
Front head restraints
Applies to veh icles: with adjustable head restraints
-
'
' F ig. 48 Front seat : ad just ing the head restraint
Applies to vehicles w ith super sport seats* (no il
lustration): the head restraints are integrated in
the backrest and cannot be adjusted.
Adjust the head restraints so the upper edge is as
even as possible with the top of your head. If that is not possible, try to adjust as close to this posi
tion as possib le. Push the head restra int as close
as poss ible to the back of the head.
56
• To move the head restraint up or forward, slide
it unti l it locks into place .
• To move the head restraint down or back, press
the side button -arrow-
c> fig. 48 and s lide the
head restraint until it locks into place.
Refer to
c> page 134, Proper adjustment of head
restraints
for guidelines on how to adjust the
height of the front head restraints to suit the oc
cupant's body size.
A WARNING
- Dr iving without head restraints or head re
straints that are not adjusted correctly dra
mat ica lly increases the risk of serious o r fa
tal neck inju ries.
- Read and following the WARNINGS in
c> page 134, Proper adjustment of head re
straints.
@ Tips
Head restraints that are adjusted correctly
and safety belts are an extreme ly effect ive
combination of safety equipment.
Rear head restraints
ro -0
Fig. 49 Outer rear head rest raints: release point
-0 > :g
If there are passengers in the rear seat, fold the
head restraints up on the occupied seats at least
to the next notch
c> ,& .
Adju sting the head restraints
• To move the head restraint up, hold it at the
sides with both hands and slide it upward unt il
you feel it click into place. .,.
Page 59 of 282
....,
N
0 > co
rl I.O
"'
"'
"'
rl
.. To move the head restraint down, press the
button ®
<::>fig . 49 and slide the head restraint
downward.
Removing the h ead restraints
To remove the head restraints, the backrest m ust
be folded forwa rd partia lly .
.. Remove the screwdrive r from the vehicle too l
k it
9 page 241 .
.. Re lease the backrest<::> page 60 .
.. Press the but ton @ c:? fig. 49 and s lide the head
restraint up as far as it can go<::>
_A .
.. Place the screwdriver in position @ in the
opening, press the button ® and pu ll the head
restraint out of the backrest at the same time
t::>_& .
.. Fold the backrest down unt il it latches securely
t::> .A in Increasing the size of the luggage
compartment on page 60 .
Installing the head re st ra int s
To install the head restraints, the backrest must
be folded forward partially .
.. Re lease the backrest <::>
page 60 .
.. Slide the posts on the head restra int down into
the guides until you feel the posts click into
place. You should not be able to pull the head
restraint out of the backrest .
.,. Fold the backrest down unt il it latches securely
9 .A in Increasing the si ze of the luggage
compartmen t on page 60.
A WARNING
- Only remove the rear seat head restraints
w hen necessary in o rder to i nstall a chi ld
seat . Install the head restraint again imme
diately once the chi ld seat is removed. Driv
ing with the head restraints removed or
head restraints not in the highest position
increases the risk of ser ious injury .
- Read and fo llow ing the WARNINGS in
<::>
page 134.
-
Seats and storage
Socket
Applies to veh icles: w it h socket
Electrical accessories can be connected in the 12
volt socket.
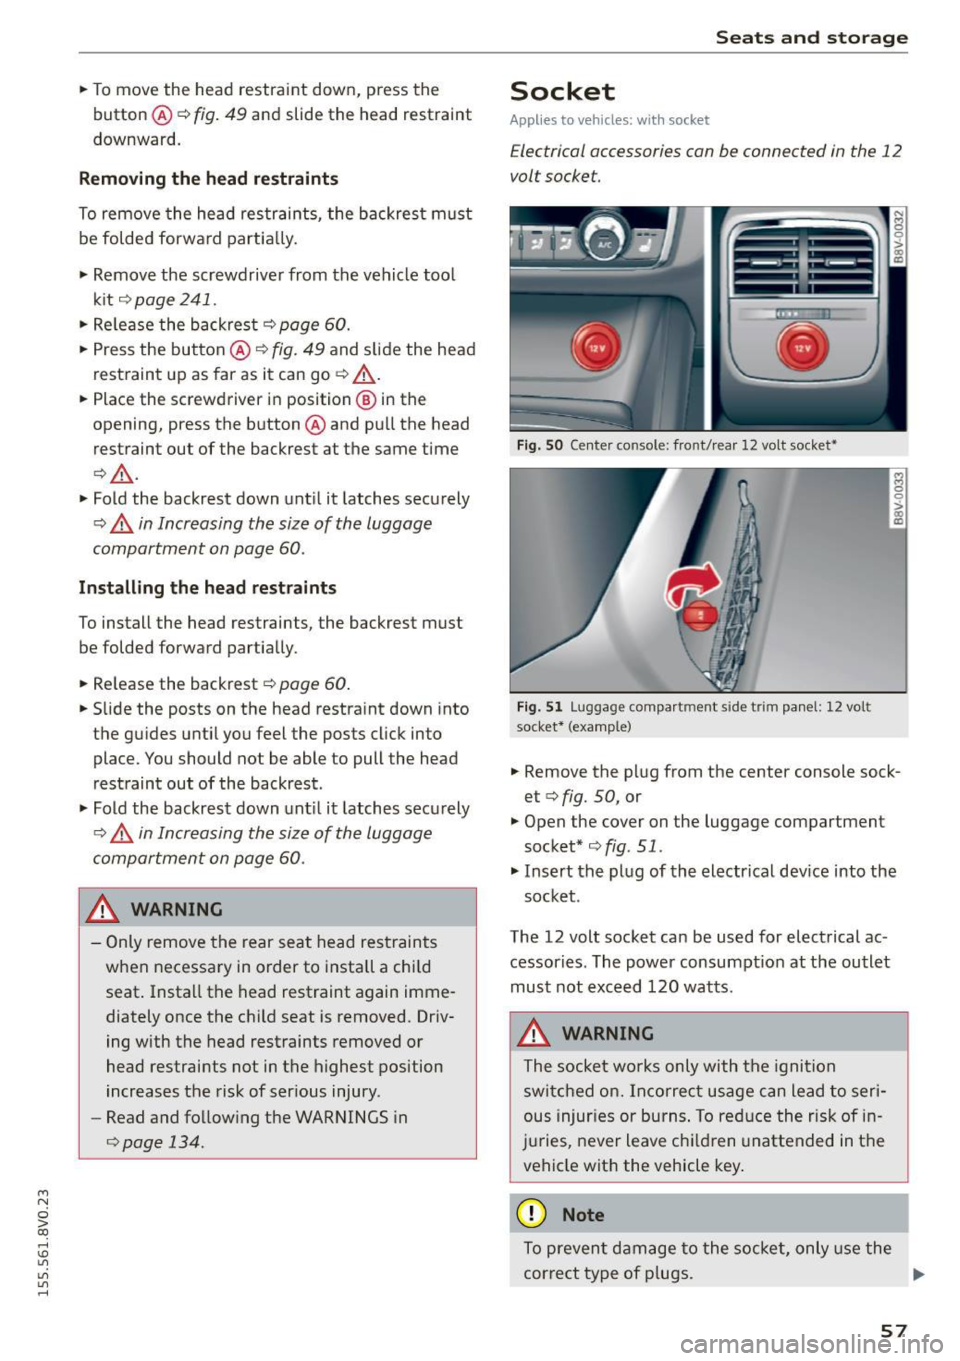
F ig. S O Center co nsole: front/ rear 12 volt socket•
F ig. 5 1 Luggage compartm ent side trim panel: 12 volt
socket* (examp le)
.. Remove the plug from the center console sock
et <::>
fig. 50, or
.,. Open the cover on the luggage compartment
socket* <::>
fig. 51.
.,. Insert the plug of the electrical dev ice into the
socket .
The 12 volt socket can be used for electrical ac
cessories . The power consumpt ion at the outlet
must not exceed 120 watts.
A WARNING
The socket wo rks only with the igni tion
switc hed on. Inco rrect usage can lead to ser i
ous injur ies or burns . To red uce the risk of in
j u ries, never leave c hildren unattended in the
vehicle with the vehicle key .
@ Note
To prevent damage to the socket, only use the
correct type of p lugs. .,,.
57
Page 61 of 282
....,
N
0 > co
rl I.O
"'
"'
"'
rl
_& WARNING
Always leave the lid on the glove compartment cover closed while driving to reduce the
risk of injury.
Additional storage compartments
There are additional storage compartments,
compartments and holders at other locations in
the vehicle :
- In the upper part of the glove compartment.
- In the center console under the center arm-
rest* .
- On the back of the right front seat . The com
partment* can hold a maximum weight of
2 lbs
(1 kg).
- Garment hooks on the B-pillar ¢
&.
_& WARNING
-Do not place any objects on the instrument
panel. Objects that are not stored securely
can slide around in the vehicle while driving,
when accelerating or braking or when turn
ing.
- Make sure that objects cannot fall out of the
center console storage compartment or oth
er compartments and into the footwell
while driving. These objects could prevent
you from braking or accelerating during sud
den braking maneuvers.
- Garments hung on the hooks must not ob
struct the driver's view. The garment hooks
are only designed for light objects . Do not
hang any garments with hard, sharp or
heavy objects in the pockets on the garment
hooks . These objects could injure vehicle oc
cupants during sudden brak ing or in a colli
sion - especially if the airbags deploy.
- Always keep the glove compartment closed
while driving to reduce the risk of injury dur
ing a collision or heavy brak ing.
- Read and following the WARNINGS in
¢ page 168, Important safety instructions
on the side airbag system.
-Hang garments so that they do not obstruct
the driver's view.
Seats and storage
-The garment hooks should only be used for
light articles of clothing . Do not leave any
heavy or sharp-edged objects in the pockets
that could interfere with the side airbags unfolding and cause injuries in the event of
a collision .
- Do not use coat hangers to hang garments,
because this could reduce the effectiveness
of the side curtain airbags.
- Do not hang any heavy objects on the gar
ment hooks, because they could cause injury
during heavy braking.
- Because of their load capacity, the hooks
should only be used to secure objects that
weigh a max imum of 10 lb (5 kg). Heavy ob
jects will not be secured sufficiently, and
this increases the risk of injury.
luggage compartment
Loading luggage compartment
Luggage items must be stowed securely.
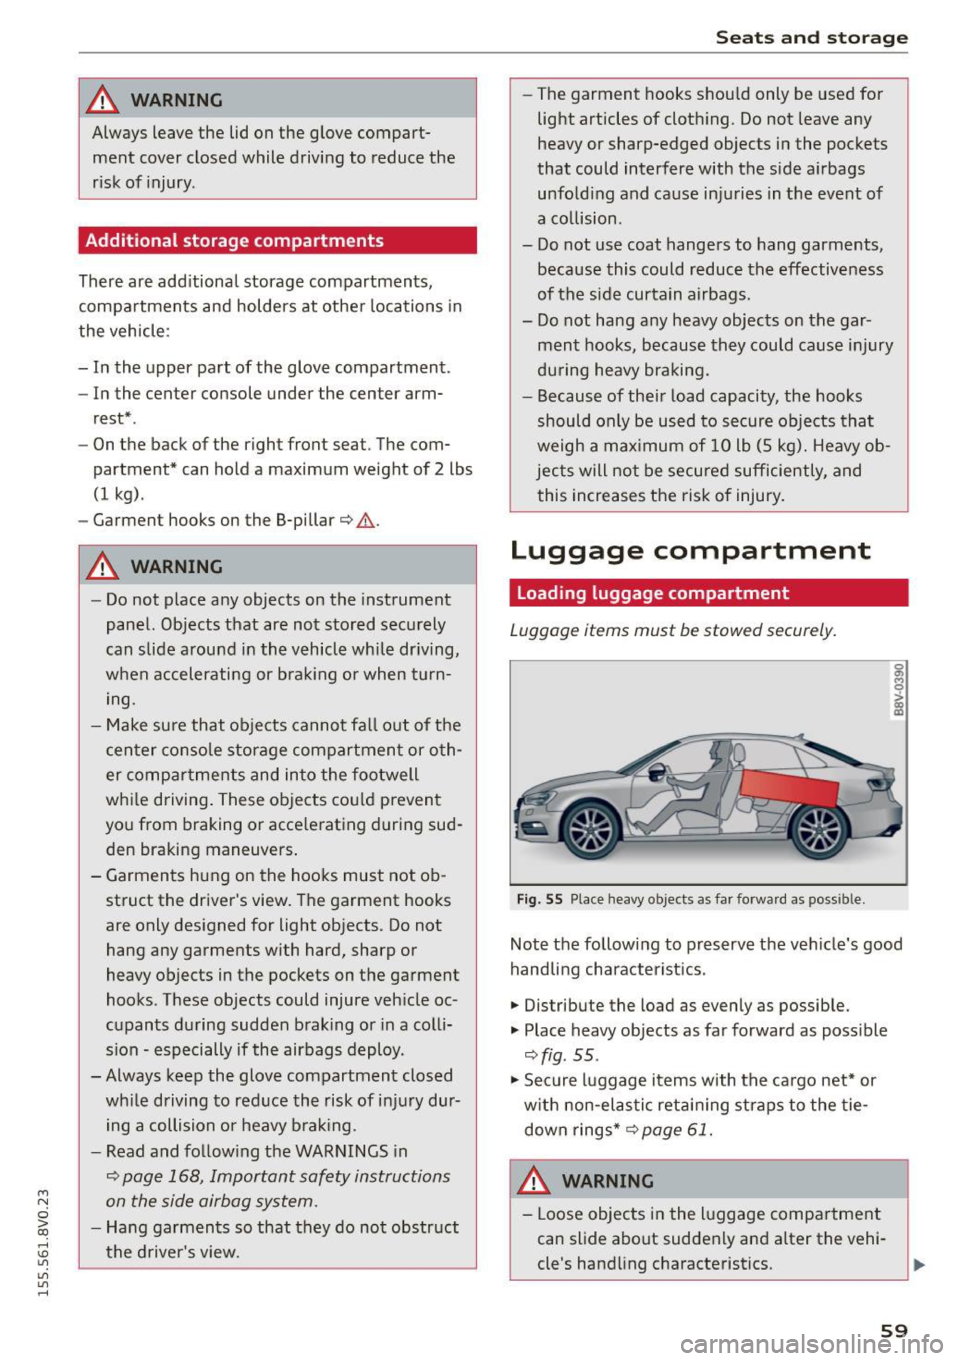
Fig. 55 Place heavy objects as far forward as poss ib le.
Note the following to preserve the vehicle's good
handling characteristics .
.,. Distribute the load as evenly as possible.
.,. Place heavy objects as far forward as possible
¢ fig . 55 .
.,. Secure luggage items with the cargo net* or
with non-elastic retaining straps to the tie
down rings* ¢
page 61.
WARNING
-Loose objects in the luggage compartment
can slide about suddenly and alter the vehi
cle's handling characteristics.
59
Page 62 of 282
Seats and storag e
-Loose objects in the passenger compart
ment can fly forward during abrupt maneu
vers or acc idents and injure occupants.
- Always store objects in the luggage com
partment and use suitable straps, particu
larly with heavy objects.
- When you transport heavy objects, a lways
remember that a change in the center of
gravity may result in a change in the veh i
cle's handling character istics.
- Follow all warnings
Q page 130, Driving
safety .
(D Tips
The tire pressure must be adjusted to the load
- see the tire pressure sticker located on the
driver's side B-pillar.
General information
.&, WARNING
Refer to the chapter Dr iving Safely
Q page 130, Driving safety for important in
formation, tips, suggestions and warnings that you should read and fo llow for your own
safety and the safety of your passengers.
Increasing the size of the luggage
compartment
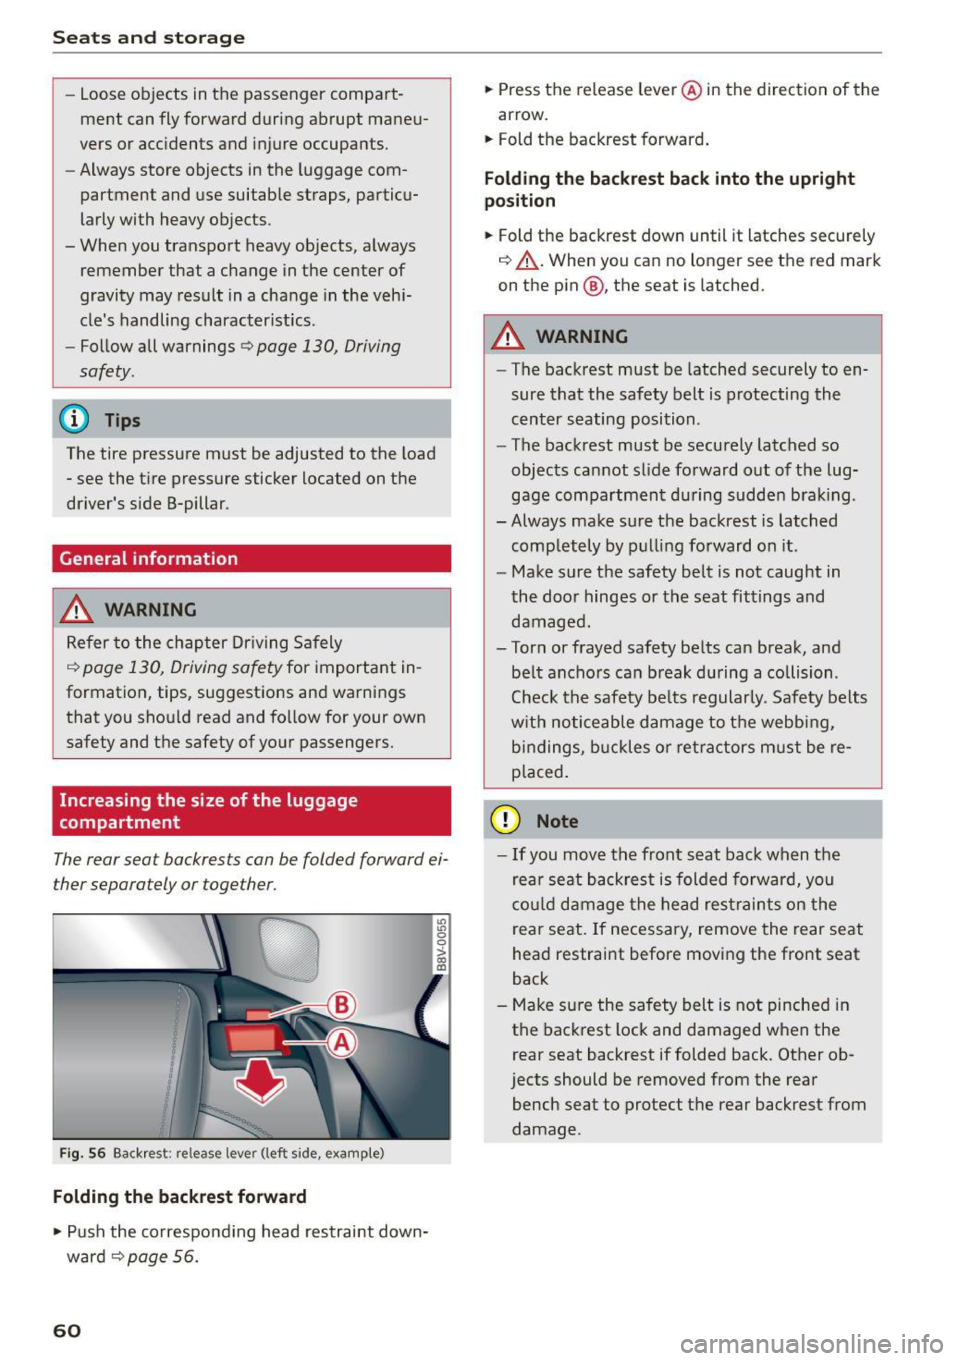
The rear seat backrests can be folded forward ei
ther separately or together.
Fig. 56 Backrest: release lever (left side, example)
Folding the backrest forward
.,. Push the co rresponding head restraint down
ward ¢
page 56.
60
.,. Press the release leve r@ in the direction of the
arrow.
.,. Fold the backrest forward .
Folding th e backre st back into the upright
po sition
.,. Fold the backrest down until it latches securely
¢ ,&. .When you can no longer see the red mark
on the pin@, the seat is latched.
.&, WARNING
- The backrest must be latched securely to en
sure that the safety belt is protecting the
cent er seating position .
- The backrest must be securely latched so
objects cannot slide forward o ut of the lug
gage compartment du ring sudde n brak ing .
- Always make sure the backrest is latched
comp letely by pulling forward on it .
- Make sure the safety belt is not caught in
the doo r hinges or the seat fittings and
damaged.
- Torn or frayed safety be lts can break, and
be lt ancho rs can b reak du ring a collision .
Check the safety be lts regularly. Safety belts
w it h noticeable damage to t he webb ing,
bi ndings, b uckles o r ret ra ctors m ust be re
placed.
(D Note
- If you move the front seat back when the
rear seat backrest is folded forward, you
c o ul d damage the head res traints on the
rear seat. If necessary, remove the rear seat
head restraint before moving the front seat
back
- Make su re the safety belt is not pinched in
the back rest lock and damaged when the
rear seat backrest if folded back. Other ob
jects should be removed from the rear
bench seat to protect the rear backrest from
damage .
Page 63 of 282
....,
N
0 > co
rl I.O
"'
"'
"'
rl
Tie-downs and cargo net
The cargo net* prevents small objects from slid
ing .
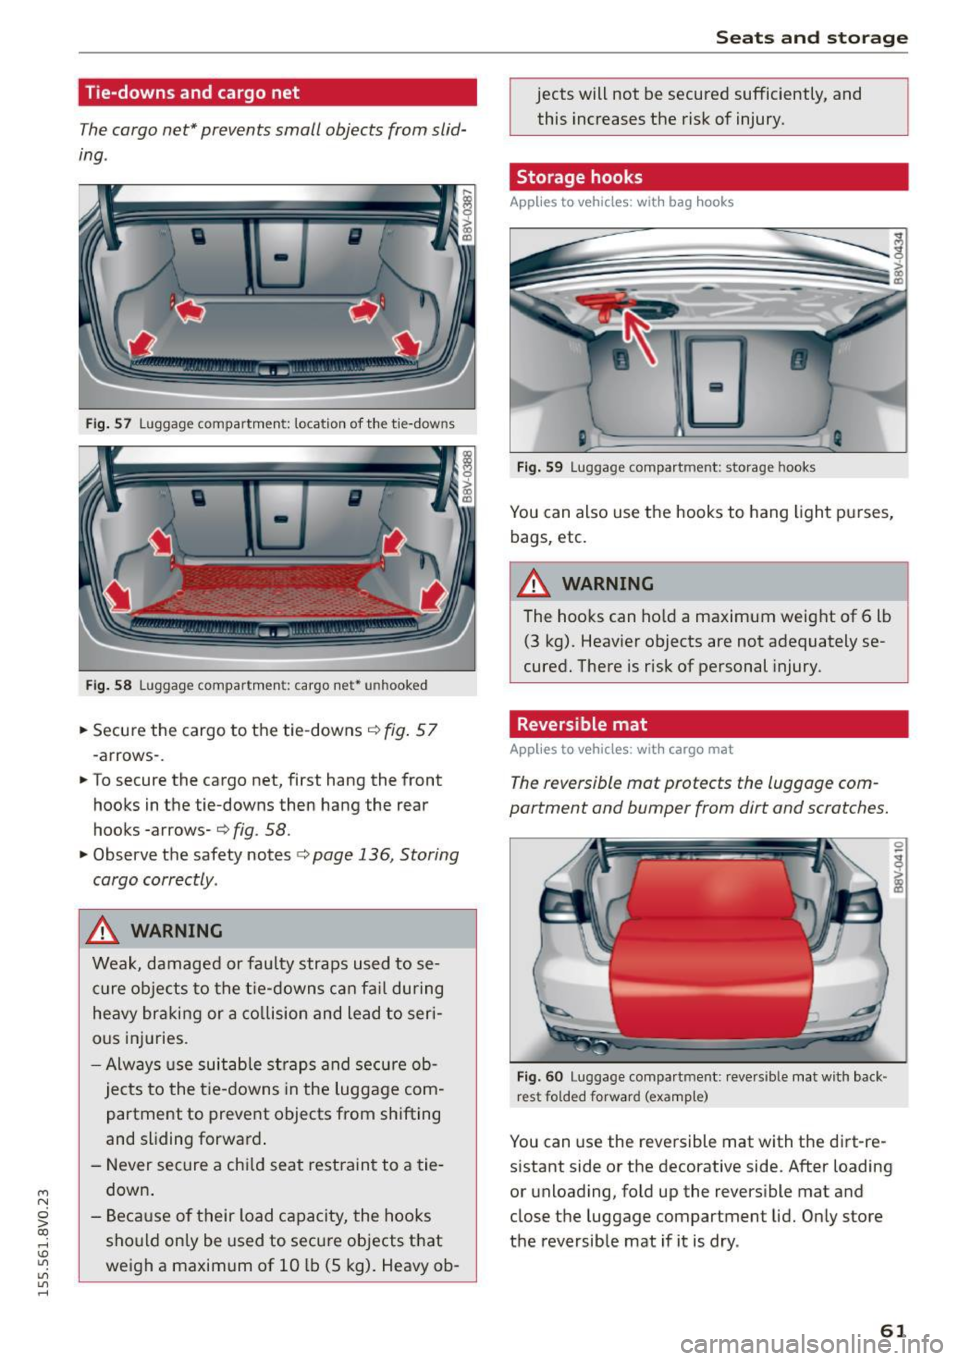
Fig. 57 Luggage compartment: location of the tie-downs
Fi g. 58 Luggage compartment: cargo net• unhooked
.. Secu re the cargo to the tie-downs¢ fig. 57
-arrows- .
.. To secure the cargo net, first hang the front
hooks in the tie-downs then hang the rear
hooks -arrows-
¢ fig. 58 .
.. Observe the safety notes c> page 136, Storing
cargo correctly .
A WARNING
Weak, damaged or faulty straps used to se
c u re obje cts to the t ie-downs ca n fa il du ring
he avy braking or a co llision and lead to seri
ous inj uries.
- Alw ays use suitab le st raps and se cure ob
jects to the t ie-downs in the luggage com
partment to preve nt objects from sh ifting
and sliding forward .
- Never sec ure a ch ild seat restrain t to a tie
down .
- Be ca use of their load capacity, the hooks
sho uld on ly be used to secu re objects t hat
weigh a maximum of 10 lb (5 kg). Heavy ob-
-
Seats and storage
jects will not be secured sufficiently, and
this increases the risk of injury.
Storage hooks
Applies to vehicles: wit h bag hooks
Fig. 59 Luggage compart ment: storage hooks
You can also use the hooks to hang ligh t pu rses,
bags, etc.
A WARNING
The hooks can ho ld a maximum weight of 6 lb
(3 kg). Heav ier objects are not adequately se
cured. There is risk of personal injury.
Reversible mat
Applies to vehicles: wit h cargo mat
The reversible mot protects the luggage com
partment and bumper from dirt and scratches.
Fig . 60 Luggage co mpa rtment: revers ible mat with back ·
rest folded forward (examp le)
You can use the reve rsible mat with t he dirt-re
s istant side or the decorative side. After loading
or unloading, fo ld up the revers ible mat and
close the luggage compartment lid. Only store
the reversib le mat if it is dry .
61
Page 64 of 282
Seats and storag e
Pass-through
Applies to veh icles: w ith pass-t hro ug h
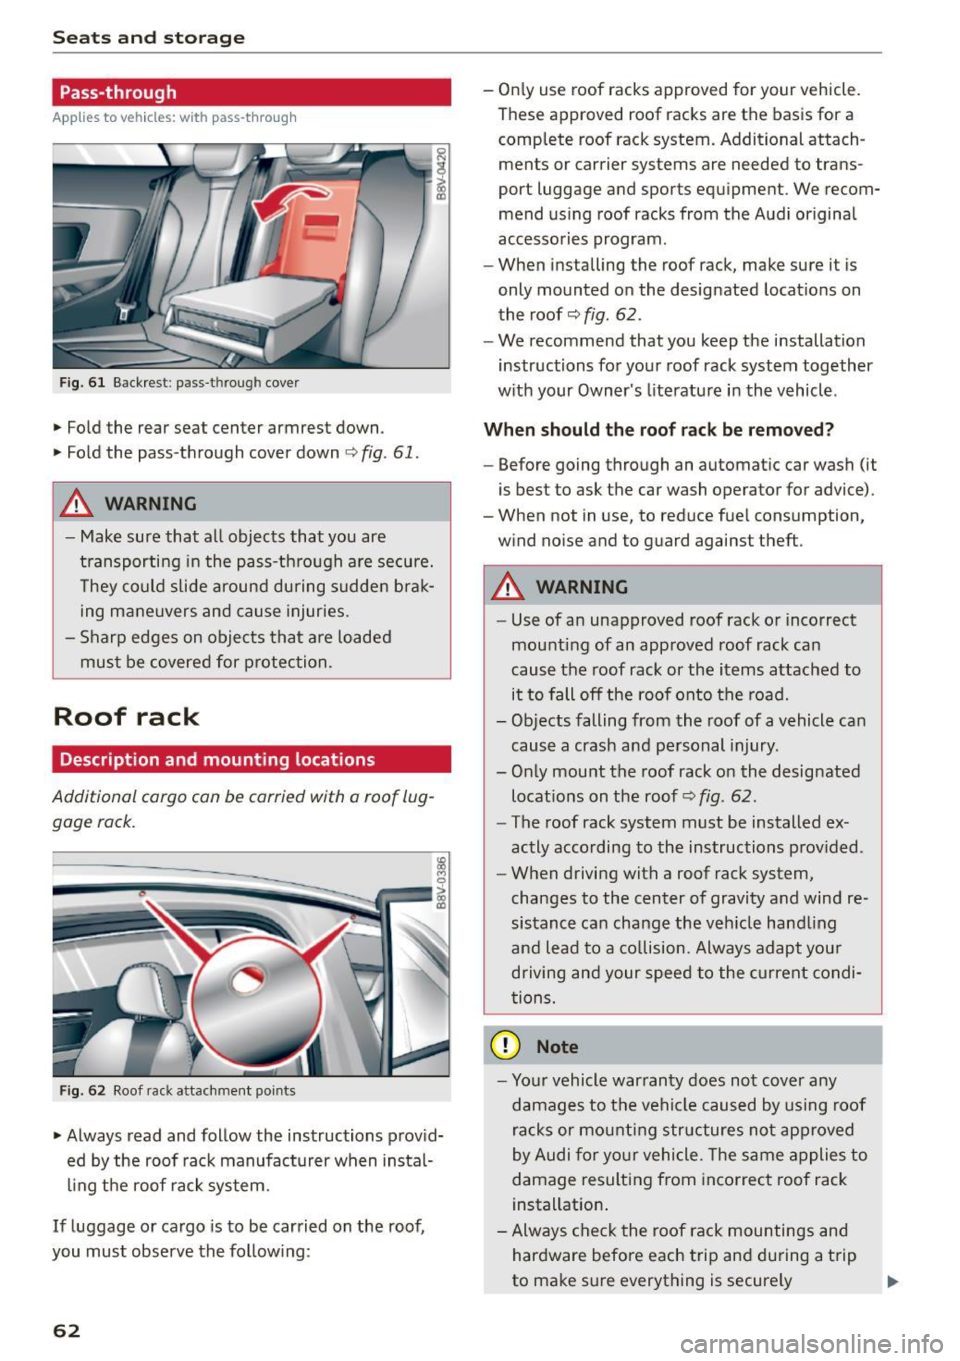
Fig. 6 1 Back rest : pass -through cover
.,. Fold the rear seat center armrest down.
.,. Fo ld the pass-through cover down ¢
fig. 61 .
A WARNING
0 N
i (D
-
- M ake sure that all objects that you are
transporting in the pass-th rough a re secu re.
T hey co uld slide around during sudden brak
ing mane uvers and cause injuries.
- Sharp edges on objects that are loaded
must be covered for protection.
Roof rack
Description and mounting locations
Additional cargo con be carried with a roof lug
gage rock.
Fig. 62 Roof rack attachment points
.,. Always read and follow the instructions provid
ed by the roof rack manufacturer when instal
ling the roof rack sys tem.
If luggage or cargo is to be carried on the roof,
you must observe the follow ing:
62
- On ly use roof racks approved for your vehicle.
These approved roof racks are the basis for a
complete roof rack system. Additional attach
ments or carrier systems are needed to trans
port luggage and sports equipment. We recom
mend us ing roof racks from the Audi original
accessories program.
- When installing the roof rack, make sure it is
only mounted on the designated locat ions on
the roof¢
fig. 62.
- We recommend that you keep the installation
instructions for yo ur roof rack system together
w ith your Owner's literature in the vehicle .
When should the roof rack be remo ved?
- Before going through an automatic car wash (it
is best to ask the car wash operator for advice).
- When not in use, to reduce fuel consumption,
w ind no ise and to guard against theft .
A WARNING
-Use of an unapproved roof rack o r incorrect
mounting of an approved roof rack can
cause the roof rack or the items attached to
it to fall off the roof onto the road.
- Objects falling from the roof of a vehicle can
cause a crash and personal injury.
- Only mount the roof rack on the designated
locat ions on the roof¢
fig . 62.
- The roof rack system must be installed ex
actly according to the instructions p rov ided.
- When driving with a roof rack system,
changes to the center of gravi ty and wind re
sistance ca n change the veh icle hand ling
and lead to a co llision. Always adapt you r
driving and your speed to the current condi
t ions.
(D Note
- Yo ur vehicle war ranty does not cov er any
damages to t he vehi cle caused by using roof
racks or mounting structures not ap proved
by Audi for yo ur vehicle. The same a pplies to
damage resulting from incorrec t roof rack
installation .
- Always che ck the roof rack mountings and
hardware before each trip and du ring a t rip
to make sure everything is secure ly
Page 134 of 282
Driving safety
is as close to this position as possible. Move the
head restraint so that it is as close to the back
of the head as possible.
.. Fa sten and wear safety belt s correctly
<=> page 143.
.. Always keep both feet in the footwell so that
you are in control of the veh icle at all times.
For detailed information on how to adjust the
driver's seat, see
<=> page 55 .
A WARNING
Drivers who are unbelted, out of position or
too close to the airbag can be seriously in
jured by an airbag as it unfolds. To help re
duce the risk of serious personal injury:
- Always adjust the dr iver's seat and the
steering wheel so that there are at least
10 inches (25 cm) between your breastbone
and the steering wheel.
- Always adjust the driver's seat and the
steering wheel so that there are at least
4 inches (10 cm) between the knees and the
lower part of the instrument panel.
- Always hold the steering wheel on the out
side of the steering wheel rim with your
hands at the 9 o'clock and 3 o'clock posi
tions to help reduce the risk of personal in
jury if the driver's airbag inflates .
- Never hold the steering wheel at the
12 o'clock position or with your hands at
other positions inside the steering wheel
rim or on the steering wheel hub . Holding
the steering wheel the wrong way can cause
serious injuries to the hands, arms and head
if the driver's airbag inflates.
- Pointing the steering wheel toward your
face decreases the ability of the supplemen
tal driver's airbag to protect you in a colli
sion.
- Always sit in an upright position and never
lean against or place any part of your body
too close to the area where the airbags are
located.
- Before driving, always adjust the front seats
properly and make sure that all passengers
are properly restrained.
132
- For adjustable head restraints: before driv
ing, always also adjust the head restraints
properly .
- Never adjust the seats while the vehicle is
moving. Your seat may move unexpectedly
and you could lose control of the vehicle.
- Never drive with the backrest reclined or tilted far back! The farther the backrests are
tilted back, the greater the risk of injury due
to incorrect positioning of the safety belt
and improper seating position .
- Children must always ride in child seats
<=> page 172 . Special precautions apply
when installing a child seat on the front pas senger seat<=>
page 148.
· Proper seating position for the front
passenger
The proper front passenger seating position is
important for safe , relaxed driving.
For your own safety and to reduce the risk of in
jury in the event of an accident, we recommend
that you adjust the seat for the front passenger
to the following position :
.. Adjust the angle of the seatback so that it is in
an upright position and your back comes in full
contact with it whenever the vehicle is moving .
.. For adjustab le head restraints: adjust the head
restraint so the upper edge is as even as possi
ble with the top of your head. If that is not pos
sible, try to adjust the head restraint so that it
is as close to this position as possible
<=> page 134 . Move the head restraint so that it
is as close to the back of the head as possible.
.. Keep both feet flat on the floor in front of the
front passenger seat .
.. Fasten and wear safety belts correctly
<=> page 143.
For detailed information on how to adjust the
front passenger's seat, see
c> page 54.
A WARNING
Front seat passengers who are unbelted, out
of position or too close to the airbag can be