2015 Alfa Romeo Giulietta display
[x] Cancel search: displayPage 44 of 288

In the event of malfunction of the rain
sensor whilst it is active, the
windscreen wiper operates
intermittently at a speed consistent with
the sensitivity setting of the rain sensor,
regardless of whether there is rain on
the glass (sensor failure is indicated on
the display).
The sensor continues to operate and it
is possible to set the windscreen wiper
to continuous mode (1
stor 2ndspeed).
The failure indication remains for as
long as the sensor is active.
REAR WINDOW
WASHER/WIPER
(for versions/markets, where provided)
Activation
This operates only with the ignition key
turned to MAR.
Turn ring nut B fig. 32 from positionO
to position
to operate the rear
window wiper as follows:
❒in intermittent mode when the
windscreen wiper is not operating;
❒in synchronous mode (at half the
speed of the windscreen wiper) when
the windscreen wiper is operating;
❒in continuous mode with reverse gear
engaged and the control active.With reverse gear engaged and
windscreen wiper on, the rear window
wiper is activated in continuous mode.
Pushing the stalk towards the
dashboard (unstable position) will
activate the rear window washer jet.
Keep the stalk pushed for more than
half a second to activate the rear
window wiper as well. Releasing the
stalk will activate the smart washing
function, as described for the
windscreen wiper.
WARNING
13) Do not use the screen wiper to
remove layers of snow or ice
from the windscreen. In such
conditions, the windscreen wiper
may be subjected to excessive
stress and the motor cut-out
switch, which prevents operation
for a few seconds, may intervene.
If operation is not restored (even
after restarting that car with the
key), contact an Alfa Romeo
Dealership.
14) Do not operate the windscreen
wiper with the blades lifted from
the windscreen.
CRUISE CONTROL
(for versions/markets, where provided)
IN BRIEF
This is an electronically controlled
driving assistance device that allows
the desired car speed to be
maintained, without having to press
the accelerator pedal. This device
can be used at a speed above
30 km/h on long stretches of dry,
straight roads with few variations
(e.g. motorways).
The use of this device on extra-urban
roads with traffic is not therefore
recommended. Do not use it in town.
TURNING THE DEVICE
ON
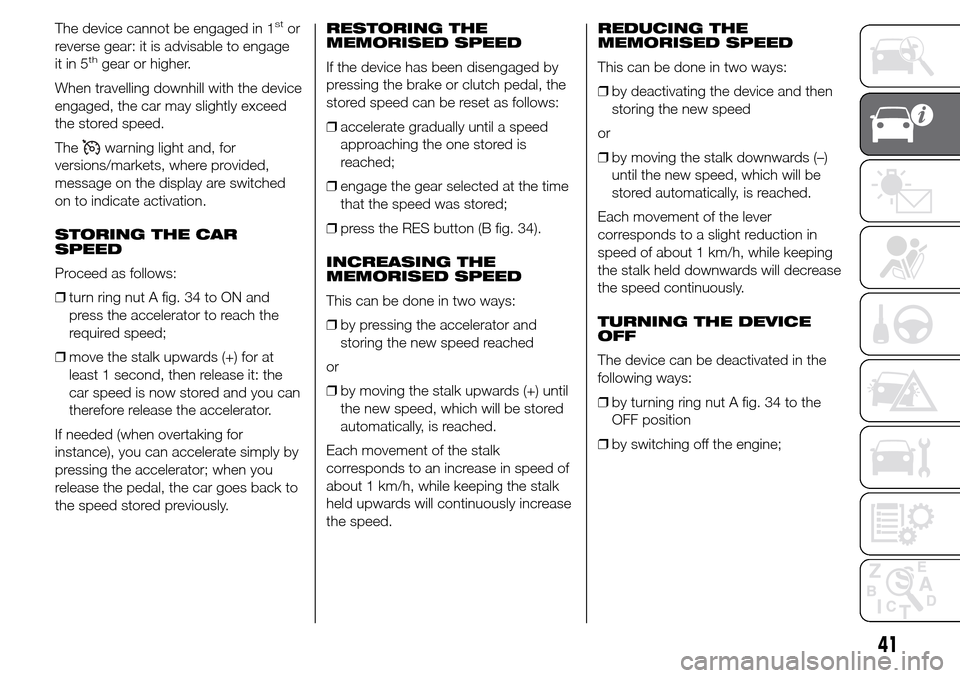
Turn ring nut A fig. 34 to ON.
34A0K0559
40
GETTING TO KNOW YOUR CAR
Page 45 of 288

The device cannot be engaged in 1stor
reverse gear: it is advisable to engage
it in 5
thgear or higher.
When travelling downhill with the device
engaged, the car may slightly exceed
the stored speed.
The
warning light and, for
versions/markets, where provided,
message on the display are switched
on to indicate activation.
STORING THE CAR
SPEED
Proceed as follows:
❒turn ring nut A fig. 34 to ON and
press the accelerator to reach the
required speed;
❒move the stalk upwards (+) for at
least 1 second, then release it: the
car speed is now stored and you can
therefore release the accelerator.
If needed (when overtaking for
instance), you can accelerate simply by
pressing the accelerator; when you
release the pedal, the car goes back to
the speed stored previously.RESTORING THE
MEMORISED SPEED
If the device has been disengaged by
pressing the brake or clutch pedal, the
stored speed can be reset as follows:
❒accelerate gradually until a speed
approaching the one stored is
reached;
❒engage the gear selected at the time
that the speed was stored;
❒press the RES button (B fig. 34).
INCREASING THE
MEMORISED SPEED
This can be done in two ways:
❒by pressing the accelerator and
storing the new speed reached
or
❒by moving the stalk upwards (+) until
the new speed, which will be stored
automatically, is reached.
Each movement of the stalk
corresponds to an increase in speed of
about 1 km/h, while keeping the stalk
held upwards will continuously increase
the speed.REDUCING THE
MEMORISED SPEED
This can be done in two ways:
❒by deactivating the device and then
storing the new speed
or
❒by moving the stalk downwards (–)
until the new speed, which will be
stored automatically, is reached.
Each movement of the lever
corresponds to a slight reduction in
speed of about 1 km/h, while keeping
the stalk held downwards will decrease
the speed continuously.
TURNING THE DEVICE
OFF
The device can be deactivated in the
following ways:
❒by turning ring nut A fig. 34 to the
OFF position
❒by switching off the engine;
41
Page 49 of 288

CENTRAL LOCKING
Operation
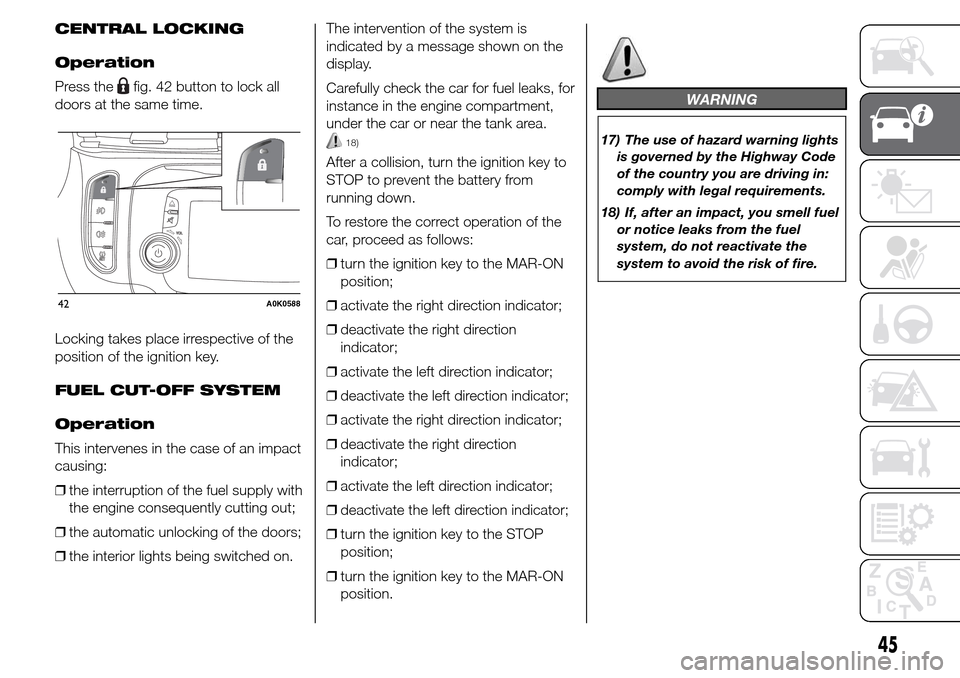
Press the
fig. 42 button to lock all
doors at the same time.
Locking takes place irrespective of the
position of the ignition key.
FUEL CUT-OFF SYSTEM
Operation
This intervenes in the case of an impact
causing:
❒the interruption of the fuel supply with
the engine consequently cutting out;
❒the automatic unlocking of the doors;
❒the interior lights being switched on.The intervention of the system is
indicated by a message shown on the
display.
Carefully check the car for fuel leaks, for
instance in the engine compartment,
under the car or near the tank area.
18)
After a collision, turn the ignition key to
STOP to prevent the battery from
running down.
To restore the correct operation of the
car, proceed as follows:
❒turn the ignition key to the MAR-ON
position;
❒activate the right direction indicator;
❒deactivate the right direction
indicator;
❒activate the left direction indicator;
❒deactivate the left direction indicator;
❒activate the right direction indicator;
❒deactivate the right direction
indicator;
❒activate the left direction indicator;
❒deactivate the left direction indicator;
❒turn the ignition key to the STOP
position;
❒turn the ignition key to the MAR-ON
position.
WARNING
17) The use of hazard warning lights
is governed by the Highway Code
of the country you are driving in:
comply with legal requirements.
18) If, after an impact, you smell fuel
or notice leaks from the fuel
system, do not reactivate the
system to avoid the risk of fire.
42A0K0588
45
Page 65 of 288

HEADLIGHTS
LIGHT BEAM DIRECTION
The correct orientation of the headlights
is important for the driver's comfort
and safety as well as for all other road
users. This is also covered by a specific
rule of the highway code.
The headlights must be correctly
directed to ensure the best visibility
conditions for all drivers. Contact a Alfa
Romeo Dealership to have the
headlights checked and adjusted, if
necessary.
HEADLIGHT ALIGNMENT
CORRECTOR
This device works with the ignition key
in the MAR position and the dipped
headlights on.
Headlight alignment
adjustment
To adjust, press the
andfig. 74
buttons. The adjustment position is
shown on the display.
Position 0: one or two occupants in the
front seats.
Position 1: 4 people.
Position 2: 4 people + load in luggage
compartment.
Position 3: driver + maximum permitted
load stowed in the luggage
compartment.
IMPORTANT Check the alignment
every time that the load carried
changes.
IMPORTANT If the car is equipped with
Bixenon headlights, the headlight
alignment is controlled electronically, as
a consequence the
andbuttons
are not present.
FOG LIGHT ALIGNMENT
(for versions/markets, where provided)
Contact a Alfa Romeo Dealership to
have the headlights checked and
adjusted, if necessary.ADJUSTING THE
HEADLIGHTS ABROAD
The dipped headlights are aligned to
comply with the regulations of the
country of purchase. When travelling in
countries with opposite driving
direction, to avoid dazzling the drivers
on the other side of the road, you need
to cover areas of the headlight
according to the Highway code of the
country you are travelling in.
74A0K0541
61
Page 70 of 288

47) The capability of the HBA system
must never be tested irresponsibly
and dangerously, in such a way
as to compromise the safety of
the driver, the other occupants of
the car or any other road user.“Alfa DNA” SYSTEM
(Car dynamic
control system)
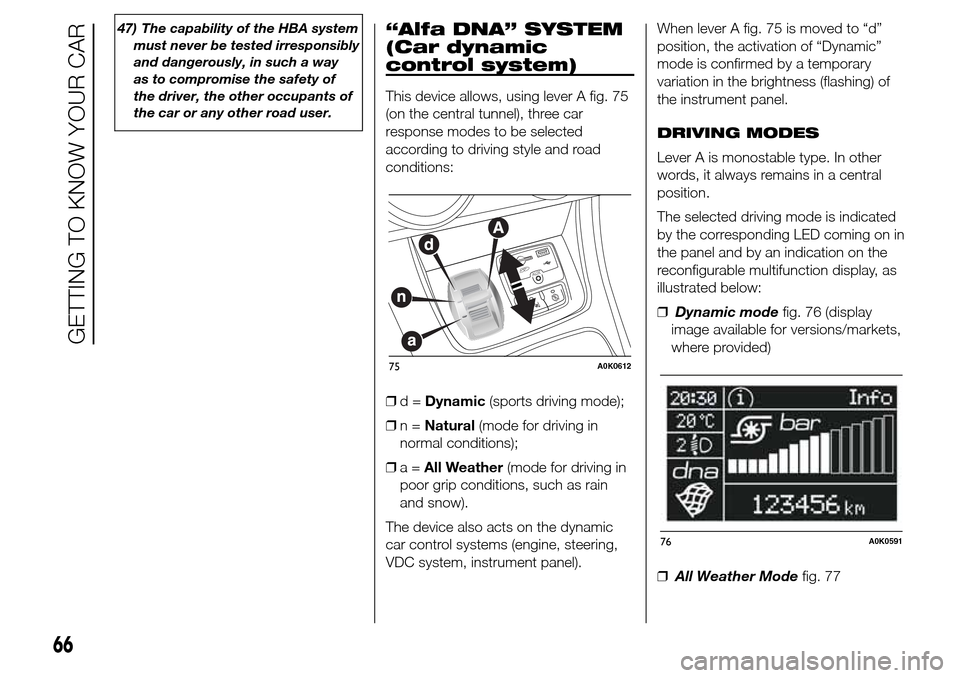
This device allows, using lever A fig. 75
(on the central tunnel), three car
response modes to be selected
according to driving style and road
conditions:
❒d=Dynamic(sports driving mode);
❒n=Natural(mode for driving in
normal conditions);
❒a=All Weather(mode for driving in
poor grip conditions, such as rain
and snow).
The device also acts on the dynamic
car control systems (engine, steering,
VDC system, instrument panel).When lever A fig. 75 is moved to “d”
position, the activation of “Dynamic”
mode is confirmed by a temporary
variation in the brightness (flashing) of
the instrument panel.
DRIVING MODES
Lever A is monostable type. In other
words, it always remains in a central
position.
The selected driving mode is indicated
by the corresponding LED coming on in
the panel and by an indication on the
reconfigurable multifunction display, as
illustrated below:
❒Dynamic modefig. 76 (display
image available for versions/markets,
where provided)
❒All Weather Modefig. 77
75A0K0612
76A0K0591
66
GETTING TO KNOW YOUR CAR
Page 71 of 288

“Natural” mode
When “Natural” mode is selected, no
messages or symbols are shown on the
display.
ESC and ASR systems:intervention
thresholds aimed at comfort and safety
in normal grip and driving conditions.
"ELECTRONIC Q2" system:the
system is calibrated to ensure the best
driving comfort.
Steering wheel tuning:functions
aimed at comfort in normal conditions
of use.
DST:braking standard control
coordinated with ABS/ESC. Standard
control over lateral acceleration.
Oversteer compensation: a slight pulse
on the steering wheel encourages the
driver to carry out the most appropriate
manoeuvre.
Engine:standard response.ENGAGEMENT/
DISENGAGEMENT OF
“Dynamic” MODE
Engagement
Move lever A fig. 75 upwards (next to
the letter “d”) and hold in this position
for 0.5 seconds until the corresponding
LED lights up or the word “Dynamic”
appears on the display (see fig. 78).Upon release, lever A returns to the
central position.
ESC and ASR:intervention thresholds
that allow more enjoyable, sportier
driving whilst guaranteeing stability of
the vehicle.
"ELECTRONIC Q2" system:the
system is calibrated to increase traction
whilst accelerating on bends,
improving the vehicle agility
Steering wheel tuning:uses the
sports mode function.
DST:braking standard control
coordinated with ABS/ESC. Standard
control over lateral acceleration.
Oversteering compensation depending
on the ESC/ASR intervention
thresholds: a slight movement on the
steering wheel encourages the driver to
carry out the most appropriate
manoeuvre.
Engine:prompter response +
Overboost to maximise torque (for
versions/markets, where provided).
RAB:by pre-positioning of the brake
pads (front and rear) following a rapid
release of the accelerator pedal to
reduce braking times, shorten stopping
distances and improve the brake pedal
feeling.
77A0K0592
78A0K1510
67
IMPORTANT For versions/markets,
where provided, switching to "Dynamic"
mode is automatically disabled in the
first kilometres in order to guarantee
correct settling of the mechanical
components. If an attempt to activate
the system is made before this limit, the
display will show a dedicated message
to remind the driver that this request
cannot be fulfilled.
Page 72 of 288

The activation of the Dynamic mode is
also shown by the change in the
instrument panel lighting that, after
decreasing, reaches the highest
luminosity and then returns to the
previously set values.
Disengagement
To deactivate “Dynamic” mode and
return to “Natural”, repeat the same
movement of the lever within the same
times. In this case, the LED
corresponding to “Natural” mode will
light up and the words “Natural on” will
appear on the display (see fig. 79).ENGAGEMENT/
DISENGAGEMENT OF “All
Weather” MODE
Engagement
Move lever A fig. 75 downwards (to the
letter “a”) and hold in this position for
0.5 seconds until the corresponding
LED lights up or the word “All Weather”
appears on the display (see fig. 80).
ESC and ASR systems:intervention
thresholds aimed at guaranteeing
the maximum safety in low grip driving
conditions. It is recommended to
activate the "All Weather" mode when
fitting snow chains.
"ELECTRONIC Q2" system:the
system is deactivated.
Steering wheel tuning:maximum
comfort.DST:higher braking control
coordinated with ABS/ESC. Standard
control over lateral acceleration.
Oversteering compensation depending
on the ESC/ASR intervention
thresholds: a slight movement on the
steering wheel encourages the driver to
carry out the most appropriate
manoeuvre.
Engine:standard response.
Disengagement
To deactivate “All Weather” mode and
return to “Natural”, carry out the same
procedure described for “Dynamic”
mode, but move lever A fig. 75 to “a”.
IMPORTANT
❒It is not possible to switch directly
from “Dynamic” mode to “All
Weather” mode and vice versa. You
must always first go back to “Natural”
mode and then select the other
mode.
❒The driving mode engaged before the
engine stops is maintained when it is
next started.
❒In the event of system failure or a
fault with lever A, no driving modes
can be selected. The display will
show a warning message.
79A0K1059
80A0K1511
68
GETTING TO KNOW YOUR CAR
Page 73 of 288

START&STOP
SYSTEM
(for versions/markets, where provided)
IN BRIEF
The Start&Stop system automatically
stops the engine each time the car
is stationary and starts it again when
the driver wants to move off.
In this way, the efficiency of the car is
increased, by reducing consumption,
emissions of harmful gases and
noise pollution.
OPERATING MODES
Engine stopping mode
With the car stopped, the engine stops
with gearbox in neutral and clutch
pedal released.
NOTE The engine can only be stopped
automatically after exceeding about
10 km/h, to prevent the engine from
being repeatedly stopped when driving
at walking pace.
The
fig. 81 symbol appears on the
display when the engine stops.Restarting the engine
Press the clutch pedal to restart the
engine.
SYSTEM MANUAL
ACTIVATION/
DEACTIVATION
To activate/deactivate the system
manually, press the
button located
on the central tunnel fig. 82.Start&Stop system
activation
A message will be displayed when the
Start&Stop system is activated. In
this condition, the LED on the button
is off.
Turning the Start&Stop
off
❒Versions with multifunction display:a
message is displayed when the
Start&Stop system is deactivated.
❒Versions with reconfigurable
multifunction display:the
symbol
is displayed + a message when
the Start&Stop system is
deactivated.
The LED on the button
switches on
when the system is deactivated.
ENGINE STOPPING
FAILURE CONDITIONS
When the system is active, due to
comfort, emission control and safety
reasons, the engine does not stop
in some conditions, among which
10):
❒engine still cold;
❒especially cold outside temperature;
❒battery not sufficiently charged;
❒particulate filter regeneration (DPF) in
progress (diesel engines only);
81A0K0163
82A0K0613
69