Page 41 of 71

74 || 75
NAVIGATION
NAVIGATION
TABLE OF
CONTENTS
VISUAL INDEX
SAFETY
INFORMATION
INSTRUMENT PANEL
VEHICLE
CONTROLS
AUDIO AND
CONNECTIVITY
BLUETOOTH®
HANDSFREELINK®
ACURALINK®
INDEX
VOICE COMMAND INDEX
CLIENT
INFORMATION
SPECIFICATIONS
MAINTENANCE
HANDLING THE UNEXPECTED
DRIVING
NAVIGATION
Interface Dial Feedback
Configure the system to read aloud selections made using the interface dial. Use
the interface dial to make and enter selections.
1. Press INFO.
2. Select Setup.
3. Select Interface Dial Feedback.
4. Select Off, Auto, or On.
ON: Always reads the selection.
AUTO: Reads the selection only when the vehicle is moving.
OFF: Turns interface dial feedback off.
System Volume
Adjust the navigation system volume. This does not affect audio or Bluetooth®
HandsFreeLink® volume, which is controlled by the volume knob. Use the
interface dial to make and enter selections.
1. Press INFO.
2. Select Setup.
3. Select Volume.
4. Use the interface dial to adjust the level, or
select OFF.
Voice Recognition Tutor
Turn the voice feedback feature on or off. Use the interface dial to make and
enter selections.
1. Press INFO.
2. Select Setup, then select Other.
3. Select Voice Recognition Tutor.
4. Select Off or On.
ON: Provides voice prompts.
OFF: Voice prompts are disabled.
Entering a Destination
Use several methods to enter a destination.
Home Address
Store your home address in the system so you can easily route to it. Use the
interface dial to make and enter selections.
1. Press INFO.
2. Select Setup.
3. Select Personal Information.
4. Select Home Address 1 or 2.
5. Enter the address and select OK.
When your home address is stored, you can press the Talk button and say “Go
home” at any time. You can also select Go Home from the destination menu.
Street Address
Enter a street address using voice commands. Press the Talk button before saying
each command.
1. Say “Address.”
2. Say “Street,” then say the street name on the
next screen. For Canadian vehicles, spell the
street name one letter at a time. Do not include
the direction (N, S, E, W) or type (St., Ave., etc.).
3. A list of street names appears. Say the number
next to the street you want to select.
4. Say the entire street address number. For
example, “1-2-3-4.” If necessary, say “OK” to
proceed.
5. If the street address is in more than one city, a
list of city names appears. Say the number next
to the city you want to select.
6. Say “OK” to set the route.
Page 42 of 71

76 || 77
NAVIGATION
NAVIGATION
TABLE OF
CONTENTS
VISUAL INDEX
SAFETY
INFORMATION
INSTRUMENT PANEL
VEHICLE
CONTROLS
AUDIO AND
CONNECTIVITY
BLUETOOTH®
HANDSFREELINK®
ACURALINK®
INDEX
VOICE COMMAND INDEX
CLIENT
INFORMATION
SPECIFICATIONS
MAINTENANCE
HANDLING THE UNEXPECTED
DRIVING
NAVIGATION
Place Category
Enter a destination using a point of interest or landmark. Use the interface dial to
make and enter selections.
1. Press DEST/ROUTE.
2. Select Place Category.
3. Select a category and a subcategory. For
example, Auto Service followed by Acura
Dealers.
4. Select a search method, such as Sort by Distance
to Travel.
5. A list of places appears. Scroll the list to select
the place you want.
6. Select OK to set the route.
Find Nearest Place
Enter a destination by category and distance using voice commands. Press the
Talk button before saying each command.
1. Say “Find nearest” and a place. For example,
“Find nearest ATM.”
2. A list of the nearest places in your area is
displayed by shortest distance to destination.
3. Say the number next to the destination you
want to select.
4. Say “OK” to set the route.
Routing
After a destination is set, you can alter or cancel your route.
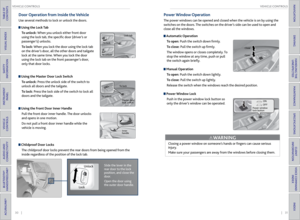
Map Legend
During Route Guidance
Next
guidance
point
Distance to
destination Calculated
route
Estimated
time to
destination Destination
Taking a
Detour
You can calculate a detour route manually if you encounter a road closure or
other obstacle. Use the interface dial to make and enter selections.
1. When en route, press DEST/ROUTE.
2. Select Detour. The system attempts to calculate
a new route by avoiding the next 5 miles (8 km)
while on a freeway or 1 mile (1 km) while on a
surface street.
AcuraLink Real-Time Traffic™
If you have a subscription to AcuraLink Real-Time Traffic*, you can view traffic
flow, incidents, and construction in major metro areas. You can also route around
congestion or incidents using voice commands. Press the Talk button before
saying each command. Available in the U.S. only.
1. When en route, say “Display traffic on my route.”
A list of incidents on your route appears.
2. Say the number of the incident you want to
avoid.
3. Say “Avoid” and the incident list returns.
4. Say “Reroute” to set the new route.
Canceling Your Route
You can cancel your route at any time. Use the interface dial to make and enter
selections.
1. When en route, press DEST/ROUTE.
2. Select Cancel Route. The route is cleared and the
map screen returns.
*Complimentary for the first 90 days of new vehicle ownership.
Page 43 of 71

78 || 79
DRIVING
DRIVING
TABLE OF
CONTENTS
VISUAL INDEX
SAFETY
INFORMATION
INSTRUMENT PANEL
VEHICLE
CONTROLS
AUDIO AND
CONNECTIVITY
BLUETOOTH®
HANDSFREELINK®
ACURALINK®
INDEX
VOICE COMMAND INDEX
CLIENT
INFORMATION
SPECIFICATIONS
MAINTENANCE
HANDLING THE UNEXPECTED
DRIVING
NAVIGATION
Learn about preparation for driving and other features.
Before Driving
Check the following items before you begin driving.
Exterior Checks
• Make sure there are no obstructions on the windows, door mirrors, exterior
lights, or other parts of the vehicle.
• Remove any frost, snow, or ice.
• Make sure the hood is securely closed.
• Heat from the engine and exhaust can ignite flammable materials left under
the hood, causing a fire. If you’ve parked your vehicle for an extended period,
inspect and remove any debris that may have collected, such as dried grass
and leaves that have fallen or have been carried in for use as a nest by a small
animal. Also check under the hood for leftover flammable materials after you
or someone else has performed maintenance on your vehicle.
• Make sure the tires are in good condition.
• Make sure there are no people or objects behind or around the vehicle.
DRIVING
If the doors are frozen shut, use warm water around the door edges to melt any
ice. Do not try to force them open, as this can damage the rubber trim around the
doors. When done, wipe dry to avoid further freezing.
NOTICE
Interior Checks
• Store or secure all items on board properly.
• Do not pile items higher than the seat height.
• Do not place anything in the front seat footwells. Make sure to secure the floor
mats.
• If you have any animals on board, do not let them move freely in the vehicle.
• Securely close and lock all doors and the tailgate.
• Adjust your seating position, mirrors, and steering wheel properly.
• Be sure items placed on the floor behind the front seats cannot roll under the
seats.
• Everyone in the vehicle must fasten their seat belt.
Make sure that the indicators in the instrument panel come on when you start the
vehicle, and go off soon after.
Driving Guidelines for Your Utility Vehicle
Utility vehicles have a significantly higher rollover rate than other types of
vehicles. To prevent rollovers or loss of control:
• Take corners at slower speeds than you would with a passenger vehicle.
• Avoid sharp turns and abrupt maneuvers whenever possible.
• Do not modify your vehicle in any way that raises its center of gravity.
• Never carry more than 165 lbs (75 kg) of cargo on the roof rack (Acura
accessory).
In addition:
• During the first 600 miles (1,000 km) of operation, avoid sudden acceleration
or full throttle operation so as not to damage the engine or powertrain.
• Avoid hard braking for the first 200 miles (300 km). You should also follow this
when the brake pads are replaced.
Improperly operating this vehicle on or off pavement can cause a crash or
rollover in which you and your passengers can be seriously injured or killed.
Follow all instructions and guidelines in this guide.
Keep your speed low, and don’t drive faster than conditions permit.
WARNING
Improper accessories or modifications can affect your vehicle’s handling,
stability, and performance, and cause a crash in which you can be seriously hurt
or killed.
Follow all instructions in the vehicle owner’s manual regarding accessories and
modifications.
WARNING
Page 44 of 71

80 || 81
DRIVING
DRIVING
TABLE OF
CONTENTS
VISUAL INDEX
SAFETY
INFORMATION
INSTRUMENT PANEL
VEHICLE
CONTROLS
AUDIO AND
CONNECTIVITY
BLUETOOTH®
HANDSFREELINK®
ACURALINK®
INDEX
VOICE COMMAND INDEX
CLIENT
INFORMATION
SPECIFICATIONS
MAINTENANCE
HANDLING THE UNEXPECTED
DRIVING
NAVIGATION
This figure includes the total weight of all occupants, cargo, and
accessories, and the tongue load if you are towing a trailer. Below are the
steps for determining the correct load limit:
1. Locate the statement “The combined weight of occupants and cargo
should never exceed XXX kg or XXX lbs.” on your vehicle’s placard.
2. Determine the combined weight of the driver and passengers that will
be riding in your vehicle.
3. Subtract the combined weight of the driver and passengers from XXX kg
or XXX lbs.
4. The resulting figure equals the available amount of cargo and luggage
load capacity. For example, if the “XXX” amount equals 1,400 lbs. and
there will be five 150 lb. passengers in your vehicle, the amount of
available cargo and luggage load capacity is 650 lbs. (1,400 - 750 (5 x
150) = 650 lbs.)
5. Determine the combined weight of luggage and cargo being loaded on
the vehicle. That weight may not safely exceed the available cargo and
luggage load capacity calculated in step 4.
6. If your vehicle will be towing a trailer, load from your trailer will be
transferred to your vehicle. Consult the Owner’s Manual to determine
how this reduces the available cargo and luggage load capacity of your
vehicle.
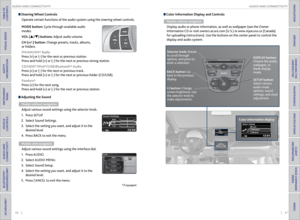
Maximum Load Limit
Carrying too much cargo or improperly storing it can affect your vehicle’s handling,
stability, stopping distance, and tires, and make it unsafe.
The maximum load for your vehicle is 870 lbs (395 kg). See the Tire and Loading
Information label on the driver’s doorjamb.
Label Example
Load limits example
Example 1
Max load
870 lbs
(395 kg ) Passenger weight
150 lbs x 2 = 300 lbs
(68 kg x 2 = 136 kg) Cargo
weight
570 lbs
(259 kg)
Example 2
Max load
870 lbs
(395 kg ) Passenger weight
150 lbs x 5 = 750 lbs
(68 kg x 5 = 340 kg) Ca
rgo weight
120 lbs (55 kg )
Overloading or improper loading can affect handling and stability and cause a
crash in which you can be hurt or killed.
Follow all load limits and other loading guidelines in this guide.
WARNING
The headlight aim on your vehicle was set by the factory, and does not need to be
adjusted. However, if you regularly carry heavy items in the cargo area or pull a
trailer, have the aiming readjusted at your dealer or by a qualified technician.
In addition, the total weight of the vehicle, all occupants, accessories,
cargo, and trailer tongue load must not exceed the Gross Vehicle Weight
Rating (GVWR) or the Gross Axle Weight Rating (GAWR). Both are on a
label on the driver’s doorjamb.
Page 45 of 71

82 || 83
DRIVING
DRIVING
TABLE OF
CONTENTS
VISUAL INDEX
SAFETY
INFORMATION
INSTRUMENT PANEL
VEHICLE
CONTROLS
AUDIO AND
CONNECTIVITY
BLUETOOTH®
HANDSFREELINK®
ACURALINK®
INDEX
VOICE COMMAND INDEX
CLIENT
INFORMATION
SPECIFICATIONS
MAINTENANCE
HANDLING THE UNEXPECTED
DRIVING
NAVIGATION
Pre-tow checklist
When preparing to tow, and before driving away, be sure to check the following:
• Avoid towing a trailer during your vehicle’s first 600 miles (1,000 km).
• The vehicle has been properly serviced, and the suspension and the cooling
system are in good operating condition.
• The trailer has been properly serviced and is in good condition.
• All weights and loads are within limits. Never exceed the gross weight ratings.
• Check if all loads are within limits at a public scale. If a public scale is not
available, add the estimated weight of your cargo load to the weight of your
trailer (as quoted by the manufacturer) and the tongue load.
• The hitch, safety chains, and any other attachments are secure.
• All items in or on the trailer are properly secured and cannot shift while you
drive.
Towing a Trailer
Your vehicle can tow a trailer if you carefully observe the load limits, use the
proper equipment, and follow the towing guidelines. See the Owner’s Manual on
the Owner Information CD or visit owners.acura.com (U.S.) or www.myacura.com
(Canada) for more information.
Towing Load Limits
Total trailer weight
Maximum allowable weight of the trailer, cargo,
and everything in or on it must not exceed 1,500
lbs (680 kg). Towing loads in excess of this can
seriously affect vehicle handling and performance
and can damage the engine and drivetrain.
Total load
Tongue load
The weight of the tongue with a fully loaded trailer
on the hitch should be approximately 10% of the
total trailer weight.
• Excessive tongue load reduces front tire traction
and steering control. Too little tongue load can
make the trailer unstable and cause it to sway.
• To achieve a proper tongue load, start by loading
60% of the load toward the front of the trailer
and 40% toward the rear. Readjust the load as
needed.
Tongue load
Exceeding any load limit or improperly loading your vehicle and trailer can
cause a crash in which you can be seriously hurt or killed.
Check the loading of your vehicle and trailer carefully before starting to
drive.
WARNING
Starting to Drive
The keyless access system allows simple push-button start.
Before Starting the Engine
Check that the shift lever is in Park (P), then
depress the brake pedal. Keep your foot firmly on
the brake pedal when starting the engine.
The engine is harder to start in cold weather and
in thinner air found at altitudes above 8,000
feet (2,400 m). When starting the engine in cold
weather, turn off all electrical accessories such
as the lights, climate control system, and rear
defogger in order to reduce battery drain.
Changing the Power Mode
Accessory or On mode: Press ENGINE START/
STOP once without pressing the brake pedal for
Accessory mode. Press it again for On mode.
Starting the engine: Press and hold the brake
pedal, then press ENGINE START/STOP. Keep your
foot firmly on the brake pedal when starting the
engine.
If you press the button and the shift lever is not in
Park (P), the vehicle goes into Accessory mode.
Turning the vehicle off: Shift to Park (P), then press
ENGINE START/STOP.
Brake pedal
Page 46 of 71

84 || 85
DRIVING
DRIVING
TABLE OF
CONTENTS
VISUAL INDEX
SAFETY
INFORMATION
INSTRUMENT PANEL
VEHICLE
CONTROLS
AUDIO AND
CONNECTIVITY
BLUETOOTH®
HANDSFREELINK®
ACURALINK®
INDEX
VOICE COMMAND INDEX
CLIENT
INFORMATION
SPECIFICATIONS
MAINTENANCE
HANDLING THE UNEXPECTED
DRIVING
NAVIGATION
Shifting
Park (P): Used for parking or starting/stopping the
engine. Press the brake pedal, then press the release
button to shift.
Reverse (R): Used for reversing.
Neutral (N): Used for idling.
Drive (D): Used for normal driving or temporarily
driving in sequential mode.
Drive (S): Used for driving in sequential mode.
Press the release button, and use the paddle shifters
to change between 1st and 6th gears (see page 85).
When you change the shift lever from D to R and vice versa, come to a complete
stop and keep the brake pedal depressed. Operating the shift lever before the
vehicle has come to a complete standstill can damage the transmission.
Do not operate the shift lever while pressing the accelerator pedal. You could
damage the transmission.
NOTICE
Release
button
Sequential Shift Mode
Use the paddle shifters to change between 1st and 6th gears without removing
your hands from the steering wheel.
When the shift lever is in D: The vehicle goes into sequential shift mode
momentarily, and the gear position indicator comes on. When you start traveling
at a constant speed, sequential shift mode automatically switches off, and the
gear position indicator goes off.
When the shift lever is in S: The vehicle goes into sequential shift mode, and
the M (sequential shift mode) indicator and gear position indicator co\
me on. At
speeds of 6 mph (10 km/h) or less, the vehicle automatically shifts down into 1st
gear. It does not automatically shift up, even if vehicle speed increases. You can
pull away only in 1st or 2nd gear.
When switching out of sequential shift mode, move the shift lever from S to
D. When sequential shift mode is canceled, the M indicator and gear position
indicator go off.
Second gear lock mode: If you pull the (+) paddle shifter while stopped or driving
at 6 mph (10 km/h) or less, the gear position is locked in 2nd gear. This makes it
easier to pull away on slippery surfaces such as snow-covered roads. To cancel
2nd gear lock mode, pull the (-) paddle shifter or move the shift lever from S to D.
(-) Paddle shifter:
Pull to shift down
to a lower gear. (+) Paddle shifter:
Pull to shift up to a
higher gear.
Recommended shift points
Shift up Acceleration
1st to 2nd 15 mph (24 km/h)
2nd to 3rd 25 mph (40 km/h)
3rd to 4th 40 mph (64 km/h)
4th to 5th 45 mph (72 km/h)
5th to 6th 50 mph (80 km/h)
M indicator/gear
position indicator
Page 47 of 71

86 || 87
DRIVING
DRIVING
TABLE OF
CONTENTS
VISUAL INDEX
SAFETY
INFORMATION
INSTRUMENT PANEL
VEHICLE
CONTROLS
AUDIO AND
CONNECTIVITY
BLUETOOTH®
HANDSFREELINK®
ACURALINK®
INDEX
VOICE COMMAND INDEX
CLIENT
INFORMATION
SPECIFICATIONS
MAINTENANCE
HANDLING THE UNEXPECTED
DRIVING
NAVIGATION
Braking
Slow down or stop your vehicle, and keep it from moving when parked.
Foot Brake
Press the brake pedal to slow down or stop
your vehicle from moving.
Parking BrakeKeep the vehicle from moving when it is parked.
To apply: Press the parking brake with your
foot.
To release: Press the brake pedal, then press
the parking brake until it releases. Brake Assist System
During hard or emergency braking, the system increases braking force. The brake
pedal may move slightly or make a noise; this is normal. Continue to hold the
brake pedal firmly down.
Anti-Lock Brake System (ABS)
During hard or emergency braking, the system rapidly pumps the brakes to
prevent wheel lockup and help you maintain steering control. The brake pedal
may pulsate slightly during ABS operation; this is normal. Do not pump the brake
pedal, and continue to hold it firmly down.
The ABS may not function correctly if you use an incorrect tire type and size.
Release the parking brake fully before driving. The rear brakes and axle can be
damaged if you drive with the parking brake applied.
NOTICE
NOTICE
Parking brake
Foot brake
Vehicle Stability Assist (VSA®), aka Electronic Stability Control
(ESC) System
Helps to stabilize the vehicle during cornering if the vehicle turns more or less
than what was intended. It assists in maintaining traction on slippery surfaces by
regulating engine output and selectively applying the brakes.
Turning VSA On or Off VSA is turned on every time you turn on the vehicle, even if you previously turned
it off. If you turn VSA off, your vehicle has normal braking and cornering ability,
but not VSA traction and stability enhancement.
Press and hold the VSA OFF button until you
hear a beep to turn VSA on or off. The VSA OFF
indicator appears when the system is off.
Traction control stops functioning, which may
make it easier when trying to free your vehicle
if it is stuck in mud or snow.
VSA OFF indicator
VSA OFF
button
Page 48 of 71

88 || 89
DRIVING
DRIVING
TABLE OF
CONTENTS
VISUAL INDEX
SAFETY
INFORMATION
INSTRUMENT PANEL
VEHICLE
CONTROLS
AUDIO AND
CONNECTIVITY
BLUETOOTH®
HANDSFREELINK®
ACURALINK®
INDEX
VOICE COMMAND INDEX
CLIENT
INFORMATION
SPECIFICATIONS
MAINTENANCE
HANDLING THE UNEXPECTED
DRIVING
NAVIGATION
Cruise Control
Maintain a constant vehicle speed without having to keep your foot on the
accelerator pedal. Use cruise control on freeways or open roads where you can
travel at a constant speed with little acceleration or deceleration.
Improper use of the cruise control can lead to a crash.
Use cruise control only when traveling on open highways in good weather.
WARNING
Activating and Setting the Vehicle Speed1. Press CRUISE. The CRUISE MAIN indicator appears.
2. Accelerate to the desired speed (above 25 mph).
Press DECEL/SET and take your foot off the pedal
to set the speed. The CRUISE CONTROL indicator
appears.
Adjusting the Vehicle Speed
Press RES/ACCEL to increase or DECEL/SET to decrease.
Each time you press the button, the vehicle speed is
increased or decreased by about 1 mph (1.6 km/h).
If you keep the button pressed, the vehicle speed
increases or decreases until you release it.
Canceling Cruise ControlPress CANCEL or the brake pedal. The CRUISE
CONTROL indicator goes off.
After cruise control has been canceled, you can still
resume the prior set speed by pressing RES/ACCEL
while driving at a speed of at least 25 mph (40 km/h).
Press CRUISE to turn the system off.
CRUISE button
RES/ACCEL button
DECEL/SET button
CANCEL button
Multi-View Rear Camera
When you shift into Reverse (R), a real-time image of the area behind your vehicle
is shown in the display, along with helpful parking guidelines.
The rear camera view is restricted. You cannot see the corner ends of the bumper or what is underneath
the bumper. Its unique lens also makes objects appear closer or farther than they actually are.
Visually confirm that it is safe to drive before backing up. Certain conditions (such as weather, lighting,
and high temperatures) may also restrict the rear view. Do not rely on the rearview display, which does
not give you all information about conditions at the rear of your vehicle.
Wide view Normal view Top down view
Press the
selector knob
or interface
dial to toggle
between views.
Models with navigation
Press CANCEL to turn the guidelines on or off.
Rotate the interface dial to adjust screen brightness.
This only changes the brightness of the rear view.