Page 25 of 71

42 || 43
VEHICLE CONTROLS
VEHICLE CONTROLS
TABLE OF
CONTENTS
VISUAL INDEX
SAFETY
INFORMATION
INSTRUMENT PANEL
VEHICLE
CONTROLS
AUDIO AND
CONNECTIVITY
BLUETOOTH®
HANDSFREELINK®
ACURALINK®
INDEX
VOICE COMMAND INDEX
CLIENT
INFORMATION
SPECIFICATIONS
MAINTENANCE
HANDLING THE UNEXPECTED
DRIVING
NAVIGATION
HomeLink®
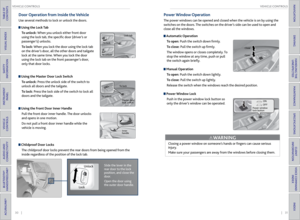
Program your vehicle to operate up to three remote-controlled devices around your
home—such as garage doors, lighting, or home security systems—using the buttons
on the ceiling.
Training a Button
Park near the system you want to program, and follow the instructions in the
flowchart below.
To retrain a button or erase codes, see the Owner’s Manual on the Owner
Information CD or visit owners.acura.com (U.S.) or www.myacura.com (Canada).
If you need help, visit www.homelink.com.
Press and hold the button on the r emote
and the HomeLink button at the same
time. Then, while continuing to hold the
HomeLink button, pr ess and release the
button on the r emote every 2 seconds.
Does the LED blink at a fa ster ra te within 20 seconds ?
Press and hold the
HomeLink button
again. T
raining
complete
YES
NO
HomeLink indicator
�ashes for 2 seconds,
then rem ains on. HomeLink LED
r
emains on.YES
NO
YES
NO
P osition the remote transmitter
1–3 inches (3–8 cm) from the
HomeLink button you want to program.1
Press and hold the desir ed HomeLink
button and the button on the r emote
transmitter .
Does the HomeLink indicat or (LED) blink at a f ast er
rate after about 10 seconds ?
2
a
The remote has a ro lling code. Press
the “learn” button on the
r emote-contr olled device (e.g., garage
door opener).
Pr ess the pr ogrammed HomeLink
button again; the remote-contr olled
device should operate.
Within 30 seconds, pr
ess and hold the
pr ogrammed HomeLink button for 2
seconds.a
Pr ess and hold the programmed
HomeLink button for about a second.
Does the devic e (garage door opener) work?
3
b
4
5
HomeLink
indicator HomeLink
buttons
Climate Control System
The automatic climate control system can maintain your preferred interior
temperature by selecting the proper mix of heated or cooled air and fan speed.
Seat Heaters
Quickly warm the front seats when the vehicle is on. An indicator in the selected
switch appears when the seat heaters are on.
LO button: Press to slowly warm the seat, or to
maintain continuous heating.
HI button: Press to quickly warm the seat. If left in
HI, the heater cycles on and off.
Return the switch to the center to turn the seat
heaters off.
Heat-induced burns are possible when using seat heaters.
Persons with a diminished ability to sense temperature (e.g., persons with diabetes,
lower-limb nerve damage, or paralysis) or with sensitive skin should not use the
seat heaters.
WARNING
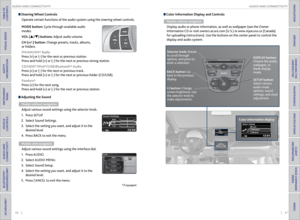
AUTO button:
Press, then use the
temperature control dial
to set your preferred
temperature.
ON/OFF
button
Fan speed
buttons Windshield
defroster
button
Passenger’s side
temperature
control dial
SYNC button:
Set the
passenger’s side
temperature to
the same as the
driver’s side.
Rear window
defogger
button
Recirculation
button:
Choose
recirculation or
fresh air.
A/C
button
Vent mode
button: Change
the vent source.
Driver’s side
temperature
control dial
Page 26 of 71

44 || 45
AUDIO AND CONNECTIVITY
VEHICLE CONTROLS
TABLE OF
CONTENTS
VISUAL INDEX
SAFETY
INFORMATION
INSTRUMENT PANEL
VEHICLE
CONTROLS
AUDIO AND
CONNECTIVITY
BLUETOOTH®
HANDSFREELINK®
ACURALINK®
INDEX
VOICE COMMAND INDEX
CLIENT
INFORMATION
SPECIFICATIONS
MAINTENANCE
HANDLING THE UNEXPECTED
DRIVING
NAVIGATION
Basic Audio Operation
Connect audio devices in the front console, and operate buttons and displays for
the audio system.
USB Adapter Cable
Connect a USB flash drive or other audio device, such as an iPod® or iPhone®.
1. Unclip the USB connector and loosen the
adapter cable.
2. Install the flash drive or cable connector to the
USB connector.
Auxiliary Input Jack
Connect standard audio devices with a 1/8-inch (3.5 mm) stereo miniplug.
1. Open the AUX cover.
2. Insert the miniplug attached to the audio
device into the jack. The audio system switches to
AUX mode. Use the device to control the audio.
iPod and iPhone are trademarks of Apple, Inc.
State or local laws may prohibit the operation of handheld electronic devices while operating a vehicle.
AUDIO AND CONNECTIVITY
Learn how to operate the vehicle’s audio system.
Setting the Clock
On vehicles without navigation, use the selector knob to adjust the time in the
clock display. On vehicles with navigation, the time is automatically set using GPS
signals.
1. Press SETUP.
2. Select Adjust Clock.
3. Select the item to change (12/24 hour
mode, hour, or minute).
4. Make the necessary changes for each item.
5. Select Set to set the time.
6. Press SETUP to return to the main display.
Clock setup
Page 27 of 71

46 || 47
AUDIO AND CONNECTIVITY
AUDIO AND CONNECTIVITY
TABLE OF
CONTENTS
VISUAL INDEX
SAFETY
INFORMATION
INSTRUMENT PANEL
VEHICLE
CONTROLS
AUDIO AND
CONNECTIVITY
BLUETOOTH®
HANDSFREELINK®
ACURALINK®
INDEX
VOICE COMMAND INDEX
CLIENT
INFORMATION
SPECIFICATIONS
MAINTENANCE
HANDLING THE UNEXPECTED
DRIVING
NAVIGATION
Adjusting the Sound
Models without navigation
Adjust various sound settings using the selector knob.
1. Press SETUP.
2. Select Sound Settings.
3. Select the setting you want, and adjust it to the
desired level.
4. Press BACK to exit the menu.
Models with navigation
Adjust various sound settings using the interface dial.
1. Press AUDIO.
2. Select AUDIO MENU.
3. Select Sound Setup.
4. Select the setting you want, and adjust it to the
desired level.
5. Press CANCEL to exit the menu.
*if equipped
Steering Wheel Controls
Operate certain functions of the audio system using the steering wheel controls.
MODE button: Cycle through available audio
modes.
VOL (p/q) buttons: Adjust audio volume.
CH (+/-) button: Change presets, tracks, albums,
or folders.
FM/AM/XM® Radio
Press (+) or (-) for the next or previous station.
Press and hold (+) or (-) for the next or previous strong station.
CD/HDD*/iPod®/USB/Bluetooth® Audio
Press (+) or (-) for the next or previous track.
Press and hold (+) or (-) for the next or previous folder (CD/USB).
Pandora®
Press (+) for the next song.
Press and hold (+) or (-) for the next or previous station. Color Information Display and Controls
Models without navigation
Display audio or phone information, as well as wallpaper (see the Owner
Information CD or visit owners.acura.com (U.S.) or www.myacura.ca (Canada)
for uploading instructions). Use the buttons on the center panel to control the
display and audio system.
Selector knob: Rotate
to scroll through
options, and press to
enter a selection.
Color information displayDISPLAY button:
Choose the audio,
wallpaper, or
blank display
mode.
SETUP button:
Select various
audio mode
options, sound
settings, and clock
adjustment.
BACK button: Go
back to the previous
display.
button: Change
screen brightness. Use
the selector knob to
make adjustments.
Page 28 of 71

48 || 49
AUDIO AND CONNECTIVITY
AUDIO AND CONNECTIVITY
TABLE OF
CONTENTS
VISUAL INDEX
SAFETY
INFORMATION
INSTRUMENT PANEL
VEHICLE
CONTROLS
AUDIO AND
CONNECTIVITY
BLUETOOTH®
HANDSFREELINK®
ACURALINK®
INDEX
VOICE COMMAND INDEX
CLIENT
INFORMATION
SPECIFICATIONS
MAINTENANCE
HANDLING THE UNEXPECTED
DRIVING
NAVIGATION
FM/AM button:
Select a band.
FM/AM radio displayPreset
buttons (1-6):
Press and hold a preset
button to store the
current station. Press a
preset button to select
a previously stored
station.
SKIP bar: Search the
selected band for a
station with a strong
signal.
A.SEL (auto select)
button: Press to scan
bands and store the
strongest stations
in each preset. Press
again to turn off scan
and restore your
original presets.
CATEGORY bar:
Display and select
an RDS category.
SCAN button: Press to
hear a 10-second sample
of each strong station on
the selected band. Press
again to turn off scan.
Selector knob: Press
and rotate to tune radio
frequency. SETUP button: Choose
RDS options to display
station text if available.
FM/AM Radio
Play FM or AM radio stations.
Models without navigation
Models with navigation
FM/AM button:
Select a band.
FM/AM radio displayPreset
buttons (1-6):
Press and hold a preset
button to store the
current station.
Press a preset button
to select a previously
stored station.
SKIP bar: Search the
selected band for a
station with a strong
signal.
A.SEL (auto select) button: Press to
scan bands and store the strongest
stations in each preset. Press again to
turn off scan and restore your original
presets.
CATEGORY bar:
Display and select
an RDS category.
SCAN button: Press to
hear a 10-second sample
of each channel. Press
again to turn off scan.
Interface dial
(from the
Audio screen): Move up,
down, left, and right.
Rotate and press ENTER to
make selections. AUDIO button: Go to
the audio screen.
TUNE bar: Go to
the next or previous
station.
Page 29 of 71

50 || 51
AUDIO AND CONNECTIVITY
AUDIO AND CONNECTIVITY
TABLE OF
CONTENTS
VISUAL INDEX
SAFETY
INFORMATION
INSTRUMENT PANEL
VEHICLE
CONTROLS
AUDIO AND
CONNECTIVITY
BLUETOOTH®
HANDSFREELINK®
ACURALINK®
INDEX
VOICE COMMAND INDEX
CLIENT
INFORMATION
SPECIFICATIONS
MAINTENANCE
HANDLING THE UNEXPECTED
DRIVING
NAVIGATION
XM® Radio
XM Radio is available on a subscription basis only. For more information or to
subscribe, contact your dealer, or visit www.siriusxm.com (U.S.) or www.siriusxm.ca
(Canada).
Models without navigation
Available in the U.S. and Canada, except Hawaii, Alaska, and Puerto Rico.
XM® is a registered trademark of Sirius XM Radio, Inc.
XM button: Select XM1
or XM2.
XM Radio displayPreset
buttons (1-6):
Press and hold a preset
button to store the
current channel.
Press a preset button
to select a previously
stored station.
SKIP bar: Go to the
previous or next
channel.
SETUP button:
Choose Channel Mode
or Category Mode.
CATEGORY bar:
Display and select
an XM category.
SCAN button: Press to
hear a 10-second sample
of each channel. Press
again to turn off scan.
Selector knob: Press
and rotate to change
channels.
Models with navigation
XM button: Select XM1
or XM2.
XM Radio displayPreset
buttons (1-6):
Press and hold a preset
button to store the
current channel.
Press a preset button
to select a previously
stored station.
SKIP bar: Go to the
previous or next
channel.
CATEGORY bar:
Display and select
an XM category.
TUNE bar: Go
to the next or
previous station.
Interface dial (from the
Audio screen): Move up,
down, left, and right.
Rotate and press ENTER
to make selections.AUDIO button: Go to
the audio screen.
SCAN button: Press
to hear a 10-second
sample of each channel.
Press again to turn off
scan.
Page 30 of 71

52 || 53
AUDIO AND CONNECTIVITY
AUDIO AND CONNECTIVITY
TABLE OF
CONTENTS
VISUAL INDEX
SAFETY
INFORMATION
INSTRUMENT PANEL
VEHICLE
CONTROLS
AUDIO AND
CONNECTIVITY
BLUETOOTH®
HANDSFREELINK®
ACURALINK®
INDEX
VOICE COMMAND INDEX
CLIENT
INFORMATION
SPECIFICATIONS
MAINTENANCE
HANDLING THE UNEXPECTED
DRIVING
NAVIGATION
Compact Disc (CD)
The audio system supports audio CDs, CD-Rs, and CD-RWs in MP3, WMA, or AAC
formats.
Models without navigation
Do not use CDs with adhesive labels or insert a damaged CD. Inserting these types
of CDs may cause them to get stuck or damage the audio unit.
NOTICE
CD eject button CD slot CD button:
Play a CD.
CD displaySKIP bar:
Change
tracks, or rewind or
fast forward within
a track.
SETUP button:
Choose various
play modes, such as
repeat and random.
CATEGORY bar: Skip
to the next folder or
the beginning of the
previous folder.
SCAN button: Press
to hear a 10-second
sample of each song.
Press again to turn
off scan. Selector knob: Rotate to
change tracks. Press and
rotate to display folders.
Models with navigation
CD eject button CD slot DISC button:
Play a CD.
SKIP bar: Change
tracks, or rewind or
fast forward within
a track.
AUDIO button: Go
to the audio screen.
CATEGORY bar: Skip
to the next folder or
the beginning of the
previous folder.
TUNE bar: Go to
the next or previous
track.
Interface dial (from the Audio
screen): Move up, down, left,
and right. Rotate and press
ENTER to make selections.
SCAN button:
Press to hear a
10-second sample
of each song on the
CD. Press again to
turn off scan.
CD display
Page 31 of 71

54 || 55
AUDIO AND CONNECTIVITY
AUDIO AND CONNECTIVITY
TABLE OF
CONTENTS
VISUAL INDEX
SAFETY
INFORMATION
INSTRUMENT PANEL
VEHICLE
CONTROLS
AUDIO AND
CONNECTIVITY
BLUETOOTH®
HANDSFREELINK®
ACURALINK®
INDEX
VOICE COMMAND INDEX
CLIENT
INFORMATION
SPECIFICATIONS
MAINTENANCE
HANDLING THE UNEXPECTED
DRIVING
NAVIGATION
iPod®
Connect your device using the USB adapter cable (see page 45).
Models without navigation
Searching for Music
Use the selector knob to search for tracks stored on the iPod using several
methods.
1. From the audio screen, press the selector knob
to enter the iPod menu.
2. Select a search type (artist, album, track, etc.).
3. Select the song you want to play.
iPod is a trademark of Apple, Inc.
iPod displaySKIP bar:
Change
tracks, or rewind or
fast forward within
a track.
SETUP button:
Choose various
play modes, such
as repeat, random,
and shuffle.
AUX button:
Play iPod.
Selector knob: Rotate
to change tracks.
Press to display the
iPod search menu,
and rotate and press
to select items.
Models with navigation
Searching for Music Use the interface dial to search for tracks stored on the iPod using several
methods.
1. Press AUDIO.
2. Select Music Search.
3. Select a search type (artist, album, track, etc.).
4. Select the song you want to play.
You can also search for and play iPod music using Song By Voice™ (see page 129).
iPod is a trademark of Apple, Inc.
iPod displaySKIP bar:
Change
tracks, or rewind or
fast forward within
a track.
AUDIO button: Go
to the audio screen.
HDD/AUX button:
Play iPod.
Interface dial (from
the Audio screen):
Move up, down, left,
and right. Rotate and
press ENTER to make
selections.
TUNE bar: Go to
the next or previous
track.
Page 32 of 71

56 || 57
AUDIO AND CONNECTIVITY
AUDIO AND CONNECTIVITY
TABLE OF
CONTENTS
VISUAL INDEX
SAFETY
INFORMATION
INSTRUMENT PANEL
VEHICLE
CONTROLS
AUDIO AND
CONNECTIVITY
BLUETOOTH®
HANDSFREELINK®
ACURALINK®
INDEX
VOICE COMMAND INDEX
CLIENT
INFORMATION
SPECIFICATIONS
MAINTENANCE
HANDLING THE UNEXPECTED
DRIVING
NAVIGATION
USB Flash Drive
Connect your USB flash drive using the USB adapter cable (see page 45). The
audio system supports MP3, WMA, or AAC files.
Models without navigation
USB display
CATEGORY bar: Skip
to the next folder or
the beginning of the
previous folder. SKIP bar:
Change
files, or rewind or
fast forward within
a file.
SETUP button:
Choose various
play modes, such as
repeat and random.
AUX button:
Play USB.
Selector knob: Rotate to
change files. Press to display
the folder list, and rotate and
press to select items.
SCAN button:
Press to
hear a 10-second sample
of each file on the folder.
Press again to turn off
scan.
Searching for Music
Use the selector knob to search for tracks stored on the USB drive using several
methods.
1. Press the selector knob to enter the USB menu.
2. Select a folder or file.
3. Select the song you want to play.
Models with navigation
Searching for Music
Use the interface dial to search for tracks stored on the USB drive using several
methods.
1. Press AUDIO.
2. Select FOLDERS.
3. Select a folder or file.
4. Select the song you want to play.
CATEGORY bar: Skip
to the next folder or
the beginning of the
previous folder.
USB displaySKIP bar:
Change
files, or rewind or
fast forward within
a file.
SCAN button: Press
to hear a 10-second
sample of each file
on the folder. Press
again to turn off
scan. HDD/AUX button:
Play USB.
Interface dial (from
the Audio screen):
Move up, down, left,
and right. Rotate and
press ENTER to make
selections. AUDIO button: Go
to the audio screen.
TUNE bar: Go to the
next or previous track.