Page 9 of 258
8
Quick Reference GuideInterface Dial/ENTER Button Operation
You will see these icons in each chapter.
They represent how you can operate the Interface Dial.
Changes scaleMap screens
Highlights menu optionsMenu screens
Rotate dial Press ENTER
Move up Move left Move down Move right
Scrolls map
(8 directions)
Map screens
Selects labeled
function
Menu screens
Selects function Selects map icon
Map screens
Selecting Icon
Selects highlighted option
Menu screens
Rotate dial i Press ENTER u
Move
e up r down w left y right
Page 10 of 258

9
Quick Reference GuideHow to Enter Information
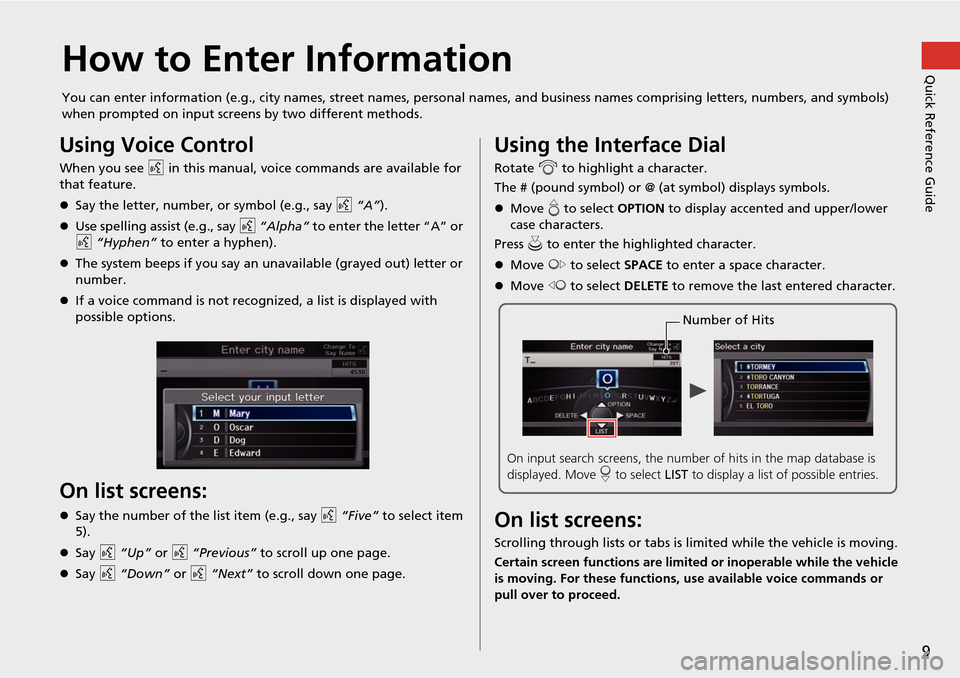
You can enter information (e.g., city names, street names, personal names, and business names comprising letters, numbers, and symbols)
when prompted on input screens by two different methods.
Using Voice Control
When you see d in this manual, voice commands are available for
that feature.
Say the letter, number, or symbol (e.g., say d “A”).
Use spelling assist (e.g., say d “Alpha” to enter the letter “A” or
d “Hyphen” to enter a hyphen).
The system beeps if you say an unavailable (grayed out) letter or
number.
If a voice command is not recognized, a list is displayed with
possible options.
On list screens:
Say the number of the list item (e.g., say d “Five” to select item
5).
Say d “Up” or d “Previous” to scroll up one page.
Say d “Down” or d “Next” to scroll down one page.
Using the Interface Dial
Rotate i to highlight a character.
The # (pound symbol) or @ (a t symbol) displays symbols.
Move e to select OPTION to display accented and upper/lower
case characters.
Press u to enter the highlighted character.
Move y to select SPACE to enter a space character.
Move w to select DELETE to remove the last entered character.
On list screens:
Scrolling through lists or tabs is limited while the vehicle is moving.
Certain screen functions are limited or inoperable while the vehicle
is moving. For these functions, use available voice commands or
pull over to proceed.
Number of Hits
On input search screens, the number of hits in the map database is
displayed. Move r to select LIST to display a list of possible entries.
Page 11 of 258
10
Quick Reference GuideMap Screen Legend
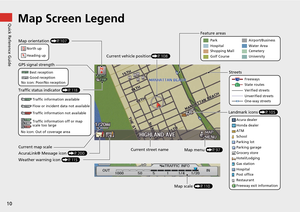
Map orientation (P107)
GPS signal strength
North up
Heading upBest reception
Good reception
No icon: Poor/No reception
Traffic status indicator (P118)
Traffic information available
Flow or incident data not available
Traffic information not available
Traffic information off or map
scale too large
No icon: Out of coverage area
Current map scale
AcuraLink® Message icon (P200)
Weather warning icon (P115) Current street name
Map menu (P97)
Map scale (P110)
Current vehicle position
(P108) Feature areas
Streets
Landmark icons (P105)
Park
Hospital
Shopping Mall
Golf Course Airport/Business
Water Area
Cemetery
University
Freeways
State routes
Verified streets
Unverified streets
One-way streets
Acura dealer
Honda dealer
ATM
School
Parking lot
Parking garage
Grocery store
Hotel/Lodging
Gas station
Hospital
Post office
Restaurant
Freeway exit information
Page 12 of 258

11
Quick Reference GuideDuring Route Guidance
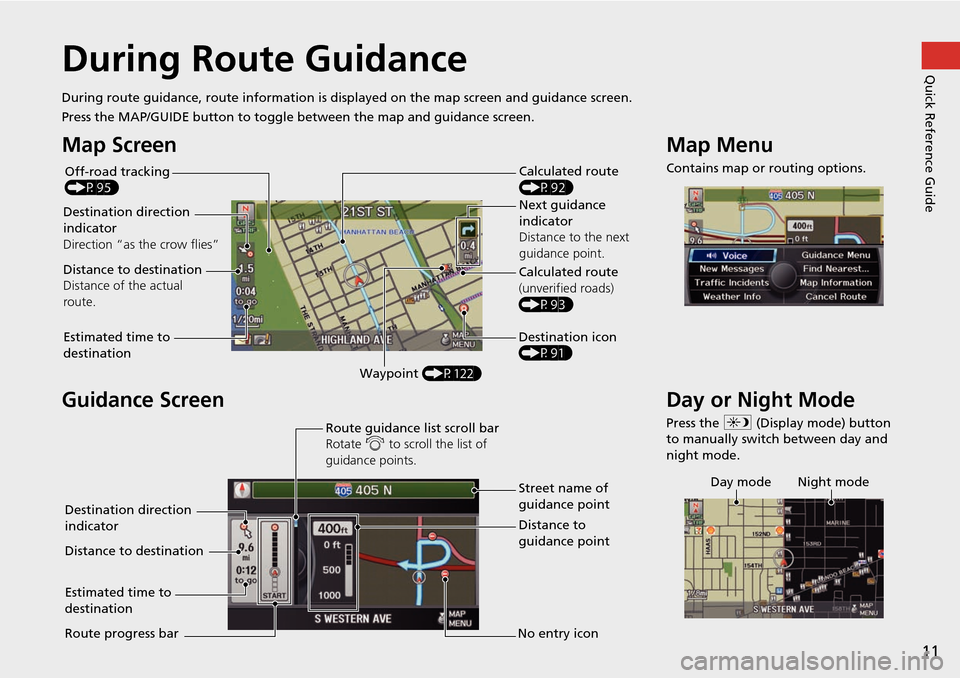
During route guidance, route information is displayed on the ma p screen and guidance screen.
Press the MAP/GUIDE button to toggle between the map and guidance screen.
Map Screen
Guidance Screen
Calculated route
(P92)
Destination direction
indicator
Direction “as th e crow flies” Next guidance
indicator
Distance to the next
guidance point.
Distance to destination
Distance of the actual
route.
Estimated time to
destination Waypoint (P122) Destination icon
(P91) Calculated route
(unverified roads)
(P93)
Off-road tracking
(P95)
Street name of
guidance point
Route guidance list scroll bar
Rotate
i to scroll the list of
guidance points.
Route progress bar Distance to
guidance point
No entry icon
Destination direction
indicator
Distance to destination
Estimated time to
destination
Map Menu
Contains map or routing options.
Day or Night Mode
Press the
a (Display mode) button
to manually switch between day and
night mode.
Day mode Night mode
Page 13 of 258

12
Quick Reference GuideNavigation—Home Addresses and Going Home
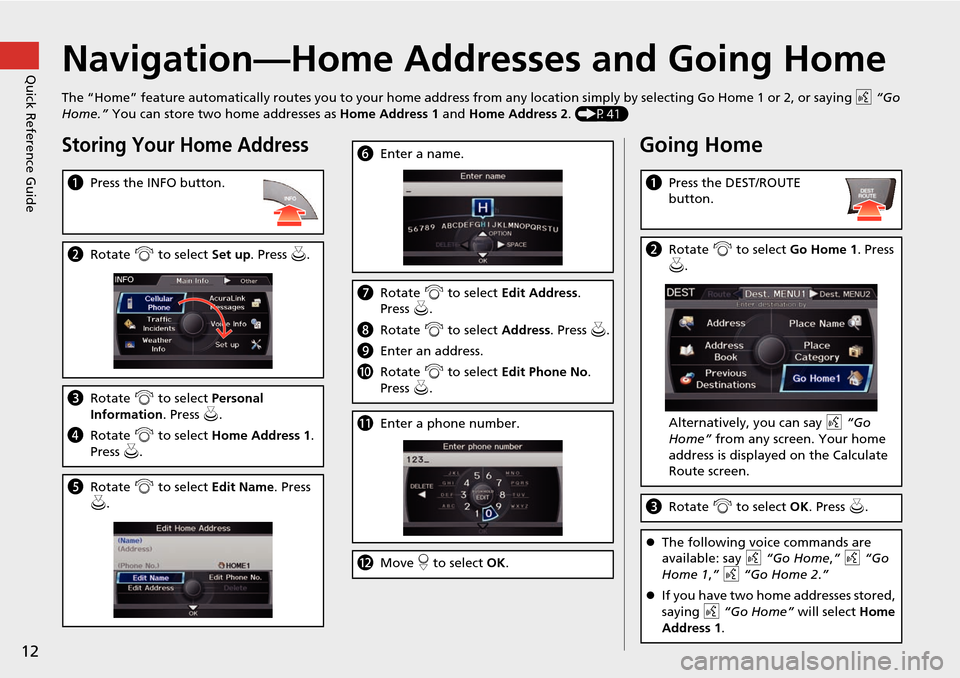
The “Home” feature automatically routes you to your home address from any location simply by selecting Go Home 1 or 2, or saying d “Go
Home.” You can store two home addresses as Home Address 1 and Home Address 2. (P41)
Storing Your Home Address
aPress the INFO button.
bRotate i to select Set up . Press u.
cRotate i to select Personal
Information . Press u.
d Rotate i to select Home Address 1.
Press u.
e Rotate i to select Edit Name. Press
u .
f Enter a name.
gRotate i to select Edit Address .
Press u.
h Rotate i to select Address. Press u.
i Enter an address.
j Rotate i to select Edit Phone No .
Press u.
k Enter a phone number.
lMove r to select OK .
Going Home
aPress the DEST/ROUTE
button.
bRotate i to select Go Home 1. Press
u .
Alternatively, you can say d “Go
Home” from any screen. Your home
address is displayed on the Calculate
Route screen.
c Rotate i to select OK . Press u.
The following voice commands are
available: say d “Go Home ,” d “Go
Home 1 ,” d “Go Home 2.”
If you have two home addresses stored,
saying d “Go Home” will select Home
Address 1.
Page 14 of 258
13
Quick Reference GuideNavigation—Entering a Destination
Enter your destination using one of several methods, then follow route guidance on the map or guidance screen to your destinati on. You
can also perform these steps using d voice control.
a Press the DEST/ROUTE
button.
bRotate i to select Address . Press u.
cRotate i to select Street . Press u.
dEnter the name of your destination
street.
eRotate i to select your destination
street from the list. Press u.
f Enter the street number. Move r to
select OK when finished.
g If there is more than one city with the
specified street, a list of cities is
displayed. Rotate i to select the
desired city from the list. Press u.
h Rotate i to select OK . Press u.
Route guidance to the destination
begins.
View Routes : Choose one of three
routes.
Route Pref. : Choose MAX or MIN for
the three settings.
Page 15 of 258

14
Quick Reference GuideNavigation—Changing Route or Destination
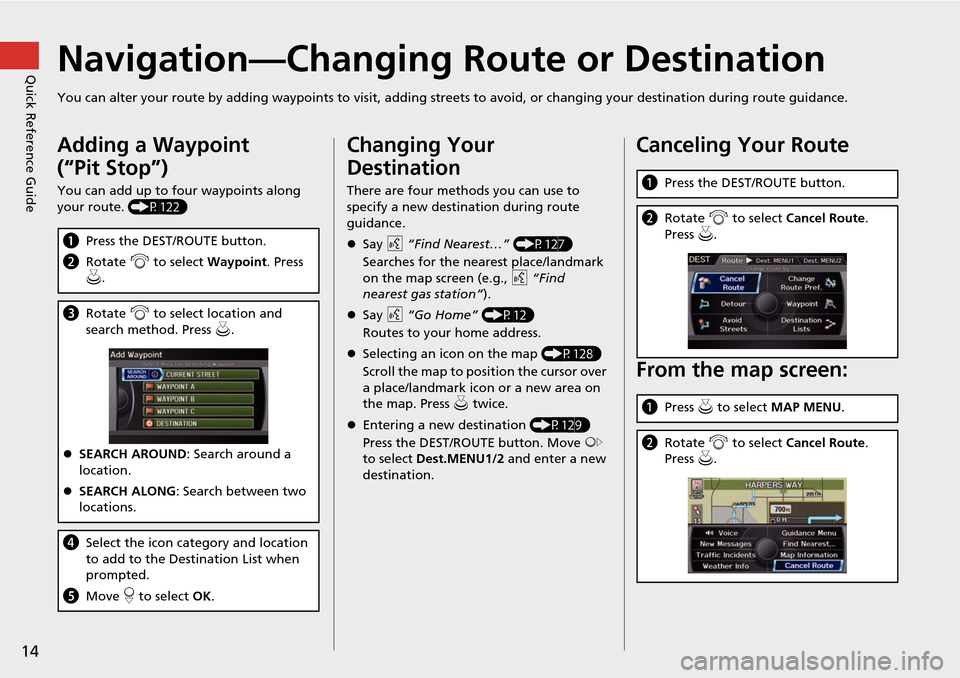
You can alter your route by adding waypoints to visit, adding streets to avoid, or changing your destination during route guida nce.
Adding a Waypoint
(“Pit Stop”)
You can add up to four waypoints along
your route. (P122)
aPress the DEST/ROUTE button.
b Rotate i to select Waypoint . Press
u .
c Rotate i to select location and
search method. Press u .
SEARCH AROUND : Search around a
location.
SEARCH ALONG : Search between two
locations.
d Select the icon category and location
to add to the Destination List when
prompted.
e Move r to select OK.
Changing Your
Destination
There are four methods you can use to
specify a new destination during route
guidance.
Say d “Find Nearest…” (P127)
Searches for the nearest place/landmark
on the map screen (e.g., d “Find
nearest gas station” ).
Say d “Go Home” (P12)
Routes to your home address.
Selecting an icon on the map (P128)
Scroll the map to positi on the cursor over
a place/landmark icon or a new area on
the map. Press u twice.
Entering a new destination (P129)
Press the DEST/ROUTE button. Move y
to select Dest.MENU1/2 and enter a new
destination.
Canceling Your Route
From the map screen:
a Press the DEST/ROUTE button.
bRotate i to select Cancel Route .
Press u.
a Press u to select MAP MENU .
bRotate i to select Cancel Route .
Press u.
Page 16 of 258

15
Quick Reference GuideAcuraLink®
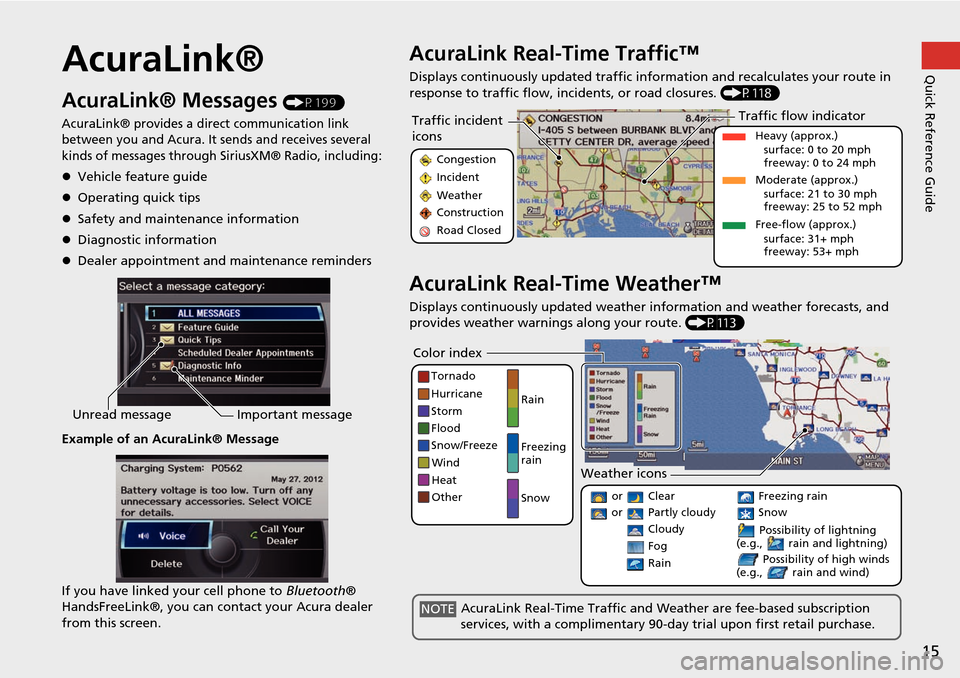
AcuraLink® Messages (P199)
AcuraLink® provides a direct communication link
between you and Acura. It sends and receives several
kinds of messages through SiriusXM® Radio, including:
Vehicle feature guide
Operating quick tips
Safety and maintenance information
Diagnostic information
Dealer appointment and maintenance reminders
Example of an AcuraLink® Message
If you have linked your cell phone to Bluetooth®
HandsFreeLink®, you can contact your Acura dealer
from this screen.
Unread message Important message
AcuraLink Real-Time Traffic™
Displays continuously updated traffic info rmation and recalculates your route in
response to traffic flow, in cidents, or road closures. (P118)
AcuraLink Real-Time Weather™
Displays continuously updated weather information and weather forecasts, and
provides weather warnings along your route. (P113)
Traffic incident
icons
Congestion
Incident
Weather
Construction
Road Closed
Traffic flow indicator
Heavy (approx.)
surface: 0 to 20 mph
freeway: 0 to 24 mph
Moderate (approx.) surface: 21 to 30 mph
freeway: 25 to 52 mph
Free-flow (approx.) surface: 31+ mph
freeway: 53+ mph
Color index
Tornado
Hurricane
Storm
Flood
Snow/Freeze
Wind
Heat
Other Rain
Freezing
rain
Snow
Weather icons
or Clear
or Partly cloudy
Cloudy Possibility of lightning
(e.g., rain and lightning)
Possibility of high winds
(e.g., rain and wind) Fog
Rain
Freezing rain
Snow
AcuraLink Real-Time Traffic and Weather are fee-based subscription
services, with a complimentary 90-day trial upon first retail purchase.NOTE