Page 459 of 505

uuIf a Tire Goes Flat uTemporarily Repairing a Flat Tire
*
458Handling the Unexpected
• Greater than 19 psi (130 kPa), but less
than 35 psi (240 kPa):
Turn the air compressor on to inflate the
tire until the tire pressure reaches 35 psi
(240 kPa).
Turn the air compressor on to inflate the
tire until the tire pressure reaches front: 35
psi (240 kPa)/rear: 33 psi (230 kPa).2 Inflating an Under-inflated Tire P. 459Then drive carefully for 10 more minutes or
until you reach the nearest service station.
Do not exceed 50 mph (80 km/h).
u You should repeat this procedure as long
as the air pressure is within this range.
7. Press the pressure relief button until the
gauge returns to 0 psi (0 kPa).
8. Repackage and properly stow the kit.
Pressure Relief Button
1Distributing the Sealant in the Tire
3 3
WARNING
Running the engine with the vehicle in an
enclosed or even partly enclosed area can
cause a rapid build-up of toxic carbon
monoxide.
Breathing this colorless, odorless gas can
cause unconsciousness and even death.
Only run the engi ne to power the air
compressor with the vehicle outdoors.
Page 460 of 505
Continued
459
uuIf a Tire Goes Flat uTemporarily Repairing a Flat Tire
*
Handling the Unexpected
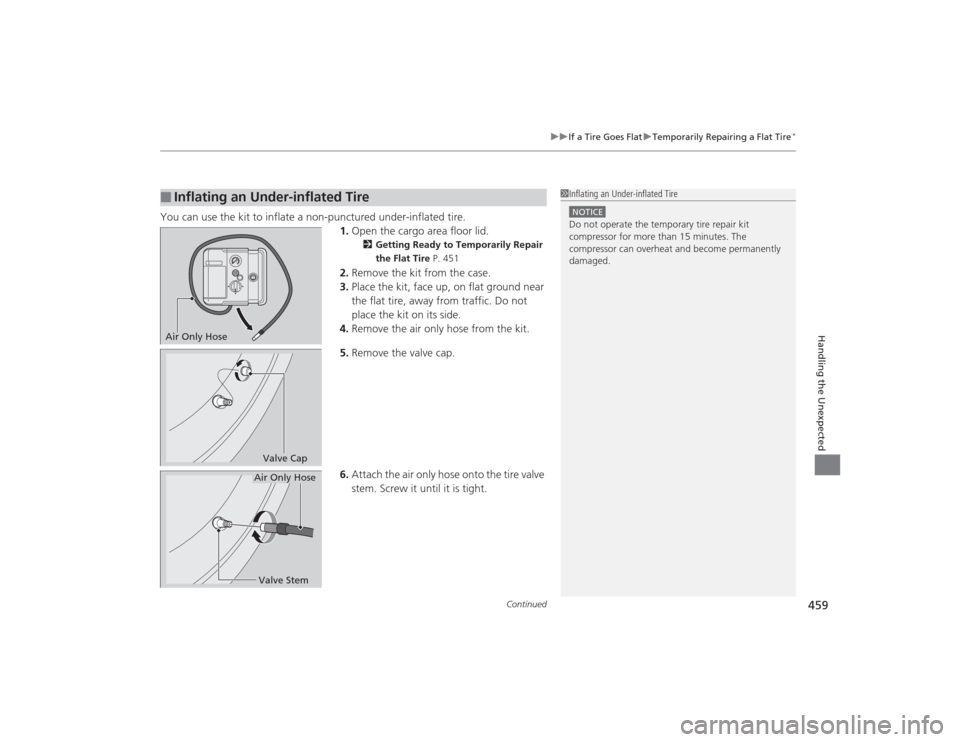
You can use the kit to inflate a non-punctured under-inflated tire.
1.Open the cargo area floor lid.
2 Getting Ready to Temporarily Repair
the Flat Tire P. 451
2.Remove the kit from the case.
3. Place the kit, face up, on flat ground near
the flat tire, away from traffic. Do not
place the kit on its side.
4. Remove the air only hose from the kit.
5. Remove the valve cap.
6. Attach the air only hose onto the tire valve
stem. Screw it until it is tight.
■
Inflating an Under-inflated Tire
1Inflating an Under-inflated TireNOTICEDo not operate the temporary tire repair kit
compressor for more than 15 minutes. The
compressor can overheat and become permanently
damaged.
Air Only Hose
Valve CapValve StemAir Only Hose
Page 461 of 505
uuIf a Tire Goes Flat uTemporarily Repairing a Flat Tire
*
460Handling the Unexpected
7. Plug in the kit to the accessory power
socket.
u Be careful not to pinch the cord in a
door or window.
u Do not plug any other electronic
devices into other accessory power
sockets.
2 Accessory Power Sockets P. 178
8.Start the engine.
u Keep the engine running while injecting
air.
2 Carbon Monoxide Gas P. 66
9.Turn the selector switch to AIR ONLY.
10. Press the inflator switch to turn on the kit.
u The compressor starts to inject air into
the tire.
11. Inflate the tire to the specified air pressure.
1Inflating an Under-inflated Tire
3
WARNING
Running the engine with the vehicle in an
enclosed or even partly enclosed area can
cause a rapid build-up of toxic carbon
monoxide.
Breathing this colorless, odorless gas can
cause unconsciousness and even death.
Only run the engi ne to power the air
compressor with the vehicle outdoors.
AIR ONLY
side
ON
Page 462 of 505
461
uuIf a Tire Goes Flat uTemporarily Repairing a Flat Tire
*
Handling the Unexpected
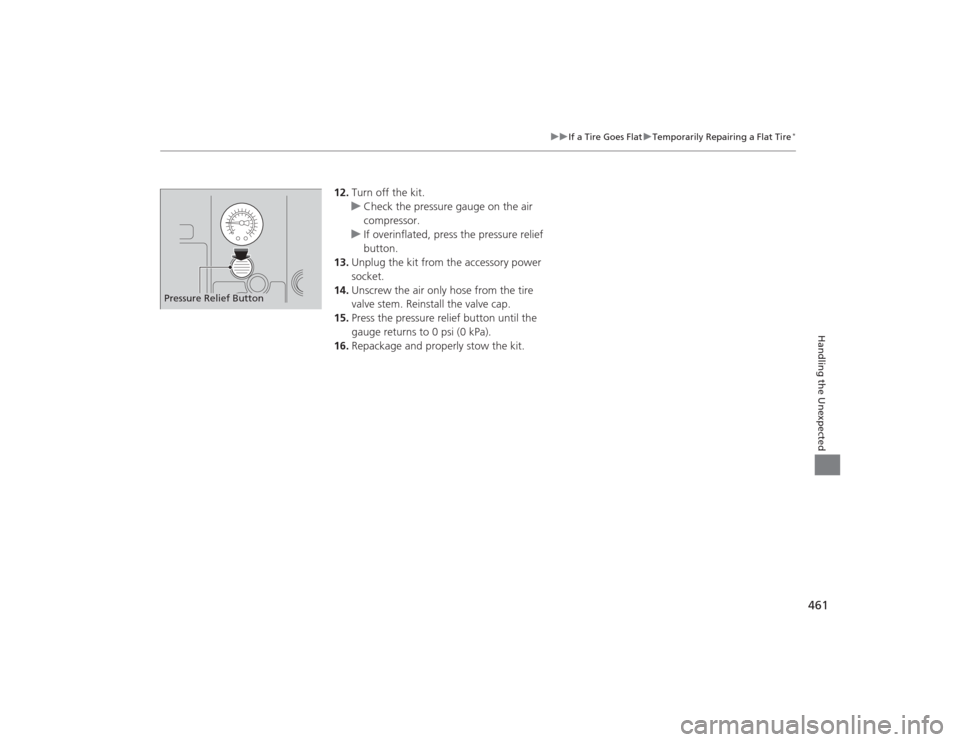
12. Turn off the kit.
u Check the pressure gauge on the air
compressor.
u If overinflated, press the pressure relief
button.
13. Unplug the kit from the accessory power
socket.
14. Unscrew the air only hose from the tire
valve stem. Reinstall the valve cap.
15. Press the pressure relief button until the
gauge returns to 0 psi (0 kPa).
16. Repackage and properly stow the kit.
Pressure Relief Button
Page 470 of 505

469
uuOverheating uHow to Handle Overheating
Handling the Unexpected
■Next thing to do
1.Check that the cooling fan is operating and
stop the engine once the temperature
gauge needle goes down.
u If the cooling fan is not operating,
immediately stop the engine.
2. Once the engine has cooled down, inspect
the coolant level and check the cooling
system components for leaks.
u If the coolant level in the reserve tank is
low, add coolant until it reaches the
MAX mark.
u If there is no coolant in the reserve tank,
check that the radiator is cool. Cover the
radiator cap with a heavy cloth and open
the cap. If necessary, add coolant up to
the base of the filler neck, and put the
cap back on.■Last thing to do
Once the engine has cooled sufficien tly, restart it and check the temperature gauge.
If the temperature gauge needle has gone down, resume driving. If it has not gone
down, contact a dealer for repairs.
1 How to Handle Overheating
If the coolant is leaking, contact a dealer for repairs.
Use water as an emergency/temporary measure only.
Have a dealer flush the system with proper antifreeze
as soon as possible.
3
WARNING
Removing the radiator cap while the
engine is hot can cause the coolant to spray
out, seriously scalding you.
Always let the engine and radiator cool
down before removing the radiator cap.
Reserve Tank
MAX
MIN
Page 471 of 505

470Handling the Unexpected
Indicator, Coming On/BlinkingIf the Low Oil Pressure Indicator Comes On
■Reasons for the indicator to come on
Comes on when the engine oil pressure is low.■What to do as soon as the indicator comes on
1. Immediately park the vehicle on level ground in a safe place.
2. If necessary, turn the hazard warning lights on.■What to do after parking the vehicle
1. Stop the engine and let it sit for about three minutes.
2. Open the hood and check the oil level.2 Oil Check P. 403
3.Start the engine and check the low oil pressure indicator.
u The indicator goes off: Start driving again.
u The indicator does not go off within 10 seconds: Stop the engine
and contact a dealer for repairs immediately.
If the Charging System Indicator Comes On
■Reasons for the indicator to come on
Comes on when the battery is not being charged.■What to do when the indicator comes on
Turn off the climate control system, rear defogger, and other electrical
systems, and immediately contact a dealer for repairs.
1 If the Low Oil Pressure Indicator Comes OnNOTICERunning the engine with low oil pressure can cause
serious mechanical damage almost immediately.1If the Charging System Indicator Comes On
If you need to stop temporarily, do not turn off the
engine. Restarting the engine may rapidly discharge
the battery.
Page 473 of 505

472
uuIndicator, Coming On/Blinking uIf the Brake System Indicator (Red) Comes On
Handling the Unexpected
If the Brake System Indicator (Red) Comes On
■Reasons for the indicator to come on
• The brake fluid is low.
• There is a malfunction in the brake system.■What to do when the indicator comes on while driving
Press the brake pedal lightly to check pedal pressure.
• If normal, check the brake fluid level the next time you stop.
• If abnormal, take immediate action. If necessary, downshift the
transmission to slow the vehicle using engine braking.
If the Speed-Sensitive Electric Power Steering (EPS) System Indicator Comes On
■Reasons for the indicator to come on
• Comes on if there is a problem with the EPS system.
• If you depress the accelerator pedal repeatedly to increase the engine
speed while the engine is idling, the indicator comes on, and
sometimes the steering wheel becomes harder to operate.■What to do when the indicator comes on
Stop the vehicle in a safe place and restart the engine.
If the indicator comes on and stays on, immediately have your vehicle
inspected by a dealer.
1 If the Brake System Indicator (Red) Comes On
Have your vehicle repaired immediately.
It is dangerous to drive with low brake fluid. If there
is no resistance from the brake pedal, stop
immediately in a safe place. If necessary downshift
the gears.
If the brake system indicator and ABS indicator come
on simultaneously, the electronic brake distribution
system is not working. This can result in vehicle
instability under sudden braking.
Have your vehicle inspected by a dealer immediately.
U.S.
Canada
Page 485 of 505

484Information
Specifications■Vehicle Specifications*1: 2WD models
*2: AWD modelsModel
Acura MDX
No. of Passengers:
Front 2
Rear 2nd Row 3 3rd Row 2
Total 7
Weights:Gross Vehicle
Weight Rating
U.S.:
5,368 lbs (2,435 kg)
*1
5,677 lbs (2,575 kg)
*2
Canada:
2,575 kg
Gross Axle Weight
Rating (Front)
U.S.:
2,811 lbs (1,275 kg)
*1
2,910 lbs (1,320 kg)
*2
Canada:
1,320 kg
Gross Axle Weight
Rating (Rear)
U.S.:
2,734 lbs (1,240 kg)
*1
2,965 lbs (1,345 kg)
*2
Canada:
1,345 kg
Gross Combined Weight
Rating U.S.: 8,036 lbs (3,645 kg)
*1
9,833 lbs (4,460 kg)
*2
Canada:
4,460 kg
Air Conditioning:Refrigerant Type
HFC-134a (R-134a)
Charge Quantity
23.8 – 25.6 oz (675 – 725 g)
Lubricant Type
RL897PAG
■
Engine Specifications
■ Fuel
■ Washer FluidDisplacement
211.8 cu-in (3,471 cm
3)
Spark Plugs NGK DILZKR7B11G
Type
Unleaded premium gasoline, Pump octane
number of 91 or higher
Fuel Tank Capacity 19.5 US gal (74 ℓ)
Tank Capacity
U.S.: 4 US qt (3.8 ℓ)
Canada: 5.6 US qt (5.3 ℓ)
■ Light Bulbs
■ Brake FluidHeadlights (High/Low Beam)
LED
Front Turn Signal/Side Marker/
Parking Lights 28/8W (Amber)
Daytime Running Lights
LED
Side Turn Signal Lights (on Door
Mirrors) LED
Brake Lights
21W
Rear Side Marker Lights LED
Taillights
LED
Back-Up Lights 21W
Rear Turn Signal Lights
21W
High-Mount Brake Light LED
Rear License Plate Light
LED
LED Puddle Lights LED
Interior Lights
Front, Second Row and Third
Row Lights
LED
Front and Rear Ambient Lights
LED
Vanity Mirror Lights
1.4W
Door Courtesy Lights
3.4W
Door Inner Handle Lights
LED
Console Compartment Light
1.4W
Glove Box Light
1.4W
Foot Lights
5W
Cargo Area Lights
5W
Specified
Acura Heavy Duty Brake Fluid DOT 3