Page 14 of 396
12
Instrument panel
1. Fuel gauge.
2. Analogue speedometer (mph or km/h).
3.
e
n
gine oil level indicator.
4.
g
e
ar shift indicator.
g
e
ar with an automatic gearbox.
5.
D
igital speedometer (mph or km/h).
6.
C
ruise control or speed limiter settings. A. M
ain lighting dimmer.
B. R eset the trip distance recorder.
I
nstantaneous information on:
-
servicing,
-
r
emaining driving range with the
emissions additive.
7. S
ervice indicator, then total distance
recorder (miles or km).
t
h
ese functions are displayed in turn when
the ignition is switched on.
8.
t
r
ip distance recorder (miles or km).
9.
R
ev counter (x 1 000 rpm or tr/min),
graduation according to engine (petrol or
Diesel).
10.
e
ng
ine coolant temperature gauge.
Dials and screens Control buttons
Instruments
Page 35 of 396
33
Lighting dimmer control
For the manual adjustment of the brightness of
the instrument panel and the touch screen.
Instrument panel
With the exterior lighting on, press this button
to adjust the brightness of the dashboard
lighting, the touch screen and the mood
lighting. As soon as the lighting reaches the
required level of brightness, release the button.
Touch screen
F Press on the "Configuration" menu.
F A djust the brightness (only on the touch
screen) by pressing on the " +" or " -" buttons.
Operates only when the vehicle's
exterior lighting is on.
1
Instruments
Page 37 of 396

35
tr i p c o m p u t e r
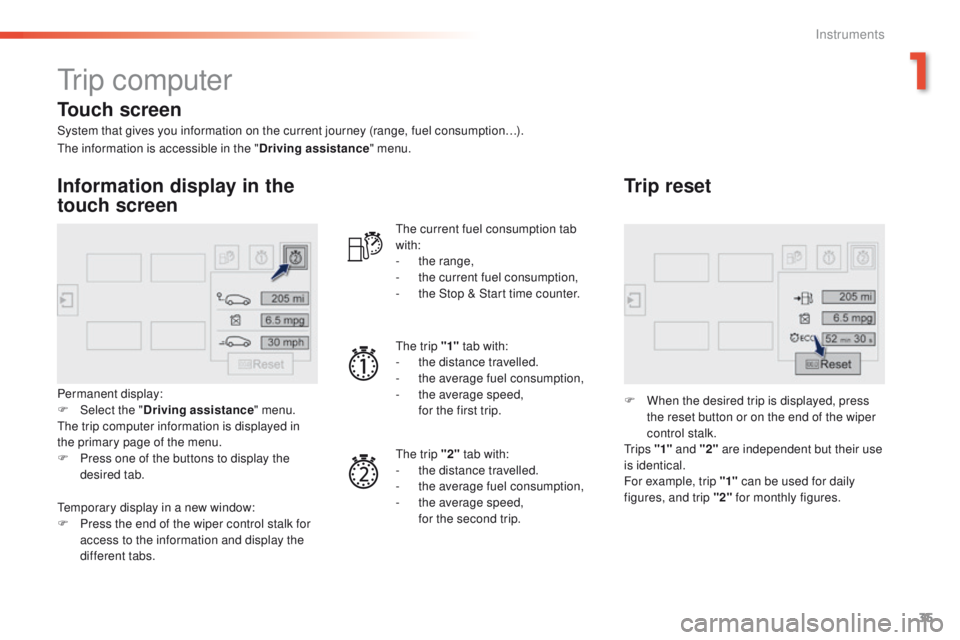
System that gives you information on the current journey (range, fuel consumption…).
Information display in the
touch screen
Permanent display:
F Sel ect the " Driving assistance " menu.
th
e trip computer information is displayed in
the primary page of the menu.
F
P
ress one of the buttons to display the
desired tab.
th
e current fuel consumption tab
with:
-
t
he range,
-
t
he current fuel consumption,
-
t
he Stop & Start time counter.
th
e trip "1"
tab with:
-
t
he distance travelled.
- t he average fuel consumption,
- t he average speed,
f
or the first trip.
th
e trip "2" tab with:
-
t
he distance travelled.
-
t
he average fuel consumption,
-
t
he average speed,
f
or the second trip.
Trip reset
F When the desired trip is displayed, press the reset button or on the end of the wiper
control stalk.
t
r i p s "1" and "2" are independent but their use
is identical.
For example, trip "1" can be used for daily
figures, and trip "2" for monthly figures.
th
e information is accessible in the "
Driving assistance" menu.
te
mporary display in a new window:
F
P
ress the end of the wiper control stalk for
access to the information and display the
different tabs.
Touch screen
1
Instruments
Page 39 of 396

37
touch screen
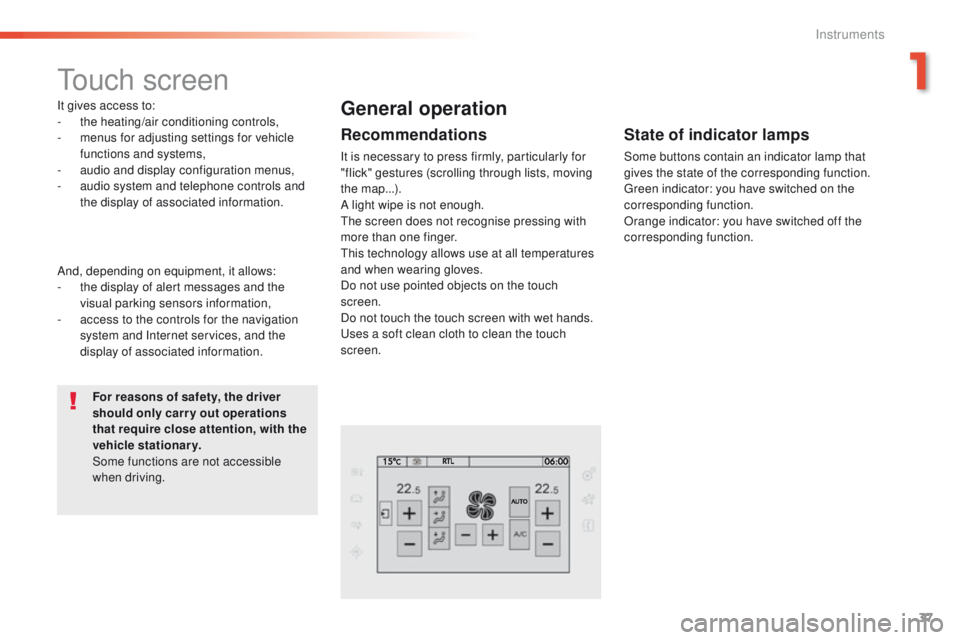
It gives access to:
- the heating/air conditioning controls,
-
m
enus for adjusting settings for vehicle
functions and systems,
-
a
udio and display configuration menus,
-
a
udio system and telephone controls and
the display of associated information.
For reasons of safety, the driver
should only carr y out operations
that require close attention, with the
vehicle stationary.
Some functions are not accessible
when driving.General operation
Recommendations
It is necessary to press firmly, particularly for
"flick" gestures (scrolling through lists, moving
the map...).
A light wipe is not enough.
th
e screen does not recognise pressing with
more than one finger.
th
is technology allows use at all temperatures
and when wearing gloves.
Do not use pointed objects on the touch
screen.
Do not touch the touch screen with wet hands.
us
es a soft clean cloth to clean the touch
screen.
And, depending on equipment, it allows:
-
t
he display of alert messages and the
visual parking sensors information,
-
a
ccess to the controls for the navigation
system and Internet services, and the
display of associated information.
State of indicator lamps
Some buttons contain an indicator lamp that
gives the state of the corresponding function.
gr
een indicator: you have switched on the
corresponding function.
Orange indicator: you have switched off the
corresponding function.
1
Instruments
Page 40 of 396

38
use this button to go to the
secondary page.
us
e this button to return to the
primary page.
us
e this button for access to
additional information and to the
settings for certain functions.
us
e this button to confirm.
us
e this button to quit.
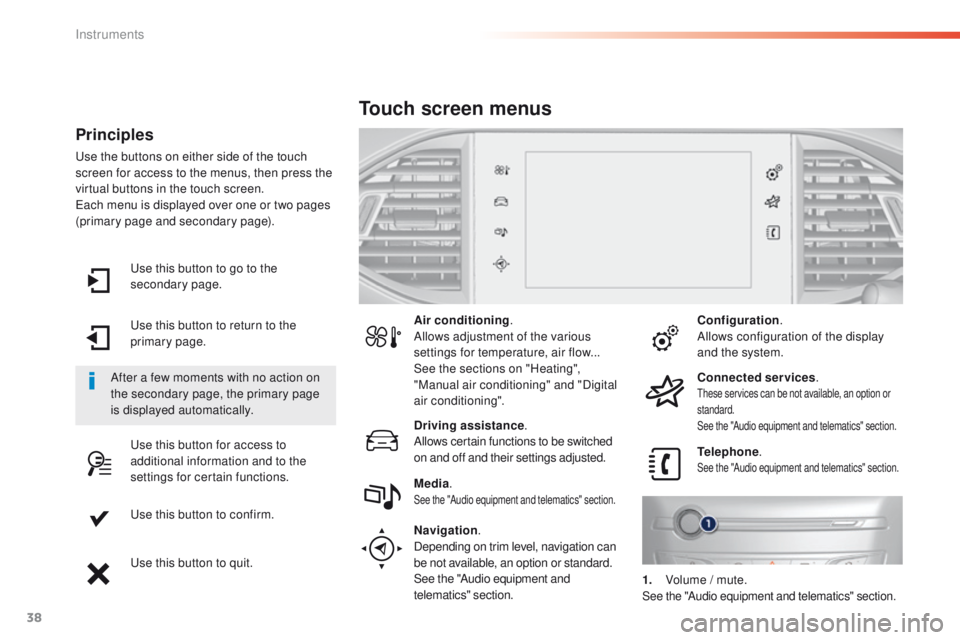
Principles
use the buttons on either side of the touch
screen for access to the menus, then press the
virtual buttons in the touch screen.
ea
ch menu is displayed over one or two pages
(primary page and secondary page).
After a few moments with no action on
the secondary page, the primary page
is displayed automatically. Air conditioning
.
Allows adjustment of the various
settings for temperature, air flow...
See the sections on "Heating",
"Manual air conditioning" and "Digital
air conditioning".
Touch screen menus
Driving assistance .
Allows certain functions to be switched
on and off and their settings adjusted. Telephone
.
See the "Audio equipment and telematics" section.Media.See the "Audio equipment and telematics" section.
Navigation .
Depending on trim level, navigation can
be not available, an option or standard.
See the "Audio equipment and
telematics" section. Configuration
.
Allows configuration of the display
and the system.
Connected services .
these services can be not available, an option or
standard.
See the "Audio equipment and telematics" section.
1. Volume / mute.See the "Audio equipment and telematics" section.
Instruments
Page 47 of 396
45
For more information on the
Multimedia menu, refer to the "Audio
and telematics" section.
Screen C
F Press the MENU button for access to the
main menu . F
P
ress the "
7" or " 8" button to select the
Personalisation-configuration menu,
then confirm by pressing the " OK" button.
F
P
ress the "
5" or " 6" and " 7" or " 8" buttons
to set the date and time, then confirm by
pressing the " OK" button.
F
P
ress the "
5" or " 6" button to select the
Display configuration menu then confirm
by pressing the the " OK" button.
1
Instruments
Page 48 of 396
46
F Press the "MENU" button to gain access
to the main menu , then press the "5"
or
"6 "
buttons to go to the Display
settings menu.
F
P
ress the "OK" button to select the menu
required. F
O
nce you have selected a setting, press
the " 7" or " 8" buttons to change its value.
You have access to the following settings:
-
year,
-
month,
-
d ay,
-
h o u r,
-
minutes,
-
1
2 or 24 hour mode.
Screen A
F Press the " 5" or " 6" buttons to switch
respectively to the previous or next setting.
F
P
ress the "OK" button to register the
change and return to the normal display or
press the "
<]" button to cancel.
Instruments
Page 49 of 396
47
Screen A (without audio system)
F Once you have selected a setting using the "5 " or " 6" buttons, press the "OK"
button to change its value.
F
W
ait for approximately ten seconds without
any action to allow the change to be
registered or press the "ESC" button to
cancel.
th
e screen then returns to the normal display.
1
Instruments