2015.5. PEUGEOT 3008 instrument panel
[x] Cancel search: instrument panelPage 4 of 344

.
.
Interior fittings 94
Front armrest 9 6
Rear multimedia
9
8
Panoramic sunroof
1
01
Boot fittings
1
03
Fittings
Child seats 109
Deactivating the passenger's front airbag 1 11
ISOFIX mountings
1
18
Child lock
1
22
Child safety
Instrument panels 1 4
Indicator and warning lamps 1 6
Indicators
2
6
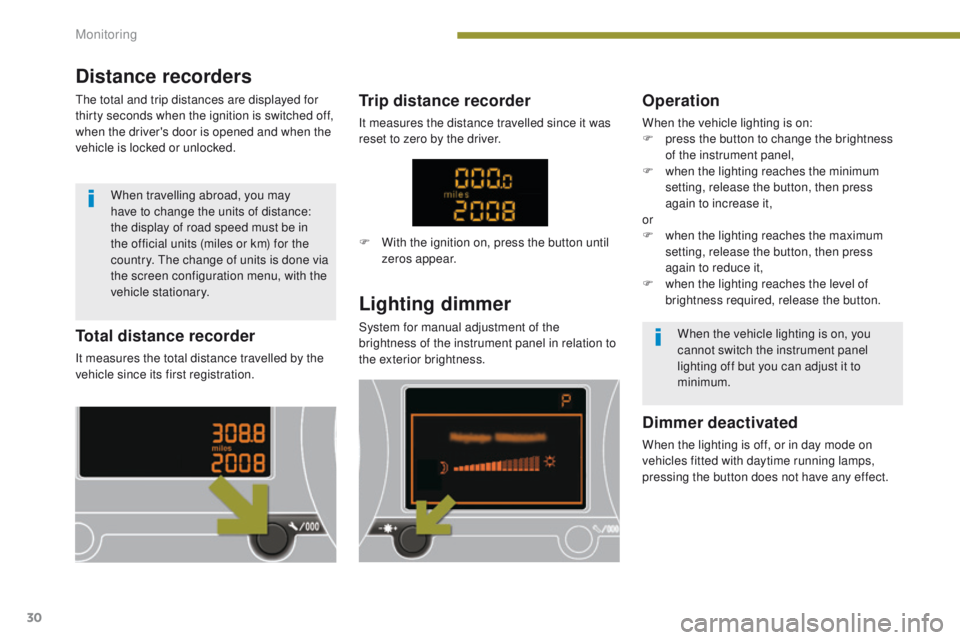
Distance recorders
3
0
Screen A without audio equipment
3
1
Screen A with audio equipment
3
3
Screen C (PEUGEOT Connect Sound (RD5))
3
5
16/9 retractable colour screen (PEUGEOT Connect Navigation (RT6))
3
8
Trip computer
4
1
MonitoringOver view
Heating and Ventilation 5
9
Manual air conditioning 6 1
Rear screen demist - defrost
6
3
Dual-zone digital air conditioning
6
4
Front seats
6
7
Rear seats
7
2
M i r r o r s
74
S
teering wheel adjustment
7
6
Comfort
Remote control key 45
Alarm 5 0
Electric windows
5
2
Doors
5
4
Boot
5
7
Lower tailgate
5
8
Access
Lighting controls 77
Daytime running lamps 8 1
Automatic illumination of headlamps
8
2
Headlamp beam adjustment
8
4
Directional lighting
8
5
Wiper controls
8
6
Automatic rain sensitive wipers
8
9
Courtesy lamps
9
1
Interior mood lighting
9
2
Visibility
Eco-driving
Contents
Page 9 of 344

7
Instruments and controls (cont.)
Head-up display 147-148
Distance alert 1 49 -151
Lighting controls
7
7- 82
Direction indicators
1
23
Speed limiter
1
52-154
Cruise control
1
55 -157 Door mirrors
7
4
Electric windows, deactivating
5
2-53
Side switch panel
8
S
top & Start
1
69 -171
Headlamp beam height adjustment
8
4
Multifunction screens
3
1-39
-
S
creen A
-
S
creen C
-
1
6/9 colour screen
Retractable screen
4
0
Screen A (setting the date/time)
3
1-34
Wiper controls
8
6 -90
Trip computer
4
1- 44
Centre switch panel
8
H
azard warning lamps
1
23
Head-up display
1
47-148
Distance alert
1
49 -151 Ignition switch, starting-switching off
1
37-139
Panoramic sunroof
1
01-102
Grip control
1
27-128 Steering wheel adjustment
7
6
H or n
123
Instrument panels, screens
1
4-15
Warning lamps
1
6-26
Indicators
2
6-30
Gear shift indicator
1
68
Buttons
2
8, 30
-
s
ervice indicator / trip
distance recorder
- d
ashboard lighting dimmer
.
Over view
Page 14 of 344

12
Eco-driving
Eco-driving is a range of everyday practices that allow the motorist to optimise their fuel consumption and CO2 emissions.
Optimise the use of your gearbox
With a manual gearbox, move off gently and change up without waiting.
During acceleration change up early.
With an automatic or electronic gearbox, give preference to automatic
mode and avoid pressing the accelerator pedal heavily or suddenly.
The gear efficiency indicator invites you engage the most suitable gear:
as soon as the indication is displayed in the instrument panel, follow it
straight away.
For vehicles fitted with an electronic or automatic gearbox, this
indicator appears only in manual mode.
Drive smoothly
Maintain a safe distance between vehicles, use engine braking rather
than the brake pedal, and press the accelerator progressively. These
practices contribute towards a reduction in fuel consumption and CO
2
emissions and also helps reduce the background traffic noise.
If your vehicle has cruise control, make use of the system at speeds
above 25 mph (40 km/h) when the traffic is flowing well.
Control the use of your electrical
equipment
Before moving off, if the passenger compartment is too warm, ventilate it
by opening the windows and air vents before using the air conditioning.
Above 30 mph (50 km/h), close the windows and leave the air vents
open.
Remember to make use of equipment that can help keep the
temperature in the passenger compartment down (sunroof and window
blinds...).
Switch off the air conditioning, unless it has automatic regulation, as
soon as the desired temperature is attained.
Switch off the demisting and defrosting controls, if not automatic.
Switch off the heated seat as soon as possible.
Switch off the headlamps and front foglamps when the level of light
does not require their use.
Avoid running the engine before moving off, particularly in winter; your
vehicle will warm up much faster while driving.
As a passenger, if you avoid connecting your multimedia devices
(film, music, video game...), you will contribute towards limiting the
consumption of electrical energy, and so of fuel.
Disconnect your portable devices before leaving the vehicle.
Eco-driving
Page 16 of 344

14
Instrument panels
Panel grouping together the vehicle operation indication dials and warning lamps.
Instruments
1. Rev counter. I
ndicates the engine speed (x 1 000 rpm).
2.
C
oolant temperature gauge.
I
ndicates the temperature of the engine
coolant (° Celsius).
3.
F
uel gauge .
I
ndicates the quantity of fuel remaining in
the tank.
4.
S
peedometer.
I
ndicates the current speed of the moving
vehicle (mph or km/h).
5.
S
creen.
6.
C
ontrol switch .
T
emporary display of the service indicator
and driving range with the AdBlue
®
additive.
D
isplay and reset the selected function (trip
distance recorder or service indicator).
7.
I
nstrument panel lighting dimmer.
A
djusts the brightness of the lighting of
the instruments and controls, if the vehicle
lighting is on.
For more information, refer to the
section corresponding to the button or
function and its associated display.
Monitoring
Page 31 of 344

29
Engine oil level indicator*
Oil level correct
Oil level lowOil level indicator fault
In the event of a fault with the electric indicator,
the engine oil level is no longer monitored.
When the system has a fault, you should check
the engine oil level using the manual dipstick
(located under the bonnet).
This is signalled by the flashing of " O I L" , or the
display of a message "Oil level incorrect" in the
instrument panel, accompanied by illumination
of the service warning lamp and an audible
signal.
If the low oil level is confirmed by a check using
the dipstick, the level must be topped up to
prevent damage to the engine.
Refer to the "Checking levels" section. This is signalled by the flashing of "OIL- -"
or the
display of a message "Oil level measurement
invalid" in the instrument panel. Contact a
PEUGEOT dealer or a qualified workshop.
On versions fitted with an electric oil level
indicator, the state of the engine oil level
is displayed in the instrument panel for a
few
seconds when the ignition is switched on,
after the service information. The level shown will only be correct
if the vehicle is on level ground and
the engine has been off for more than
30
minutes.
* Depending on version. Refer to the "Checking levels" section.
1
Monitoring
Page 32 of 344

30
Total distance recorder
It measures the total distance travelled by the
vehicle since its first registration.
Lighting dimmer
System for manual adjustment of the
brightness of the instrument panel in relation to
the exterior brightness.
Operation
When the vehicle lighting is on:
F p ress the button to change the brightness
of the instrument panel,
F
w
hen the lighting reaches the minimum
setting, release the button, then press
again to increase it,
or
F
w
hen the lighting reaches the maximum
setting, release the button, then press
again to reduce it,
F
w
hen the lighting reaches the level of
brightness required, release the button.
Dimmer deactivated
When the lighting is off, or in day mode on
vehicles fitted with daytime running lamps,
pressing the button does not have any effect.
Trip distance recorder
It measures the distance travelled since it was
reset to zero by the driver.
When the vehicle lighting is on, you
cannot switch the instrument panel
lighting off but you can adjust it to
minimum.
F
W
ith the ignition on, press the button until
zeros appear.
Distance recorders
The total and trip distances are displayed for
thirty seconds when the ignition is switched off,
when the driver's door is opened and when the
vehicle is locked or unlocked.
When travelling abroad, you may
have to change the units of distance:
the display of road speed must be in
the official units (miles or km) for the
country. The change of units is done via
the screen configuration menu, with the
vehicle stationary.
Monitoring
Page 45 of 344

43
Monochrome screen C
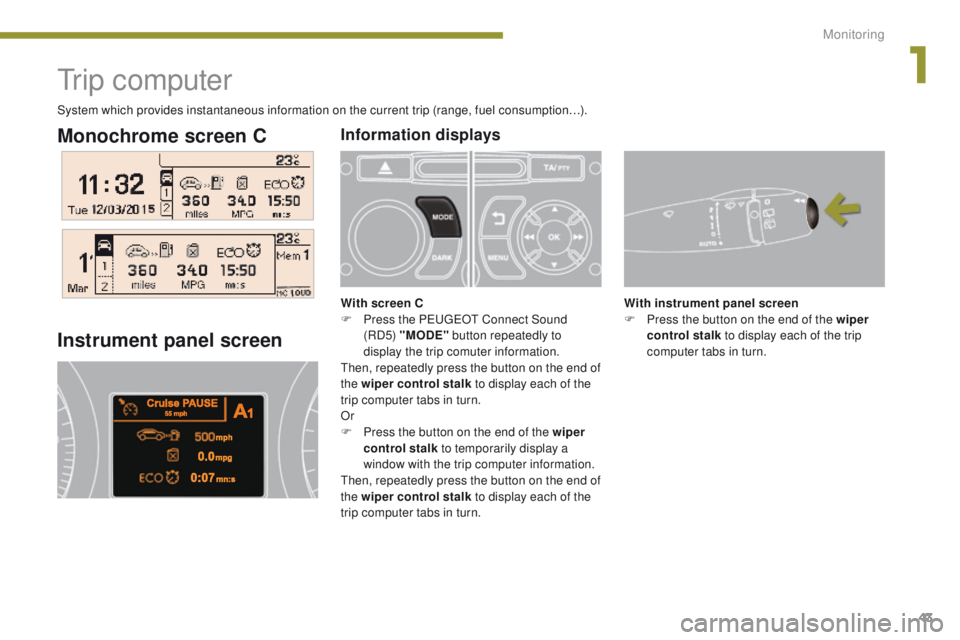
Tr i p c o m p u t e r
Instrument panel screen
With instrument panel screen
F P ress the button on the end of the wiper
control stalk to display each of the trip
computer tabs in turn.
Information displays
With screen C
F P ress the PEUGEOT Connect Sound
(RD5) "MODE" button repeatedly to
display the trip comuter information.
Then, repeatedly press the button on the end of
the wiper control stalk to display each of the
trip computer tabs in turn.
Or
F
P
ress the button on the end of the wiper
control stalk to temporarily display a
window with the trip computer information.
Then, repeatedly press the button on the end of
the wiper control stalk to display each of the
trip computer tabs in turn.
System which provides instantaneous information on the current trip (range, fuel consumption…).
1
Monitoring
Page 46 of 344

44
Depending on your vehicle's equipment, the
trip computer information appears in the
monochrome C screen or in the instrument
panel screen.
-
T
he current information with:
●
t
he range,
●
t
he current fuel consumption,
●
t
he distance remaining to be travelled or
the Stop & Start time counter.
-
T
he trip "1" tab with:
●
t
he average speed,
f
or the first trip,
●
t
he average fuel consumption,
-
T
he trip "2" tab with:
●
t
he average speed,
f
or the second trip,
●
t
he average fuel consumption, With the C screen or instrument panel
screen
F
W
hen the trip required is displayed, press
the control for more than two seconds.
Tr i p s "1" and "2" are independent but their use
is identical.
For example, trip "1" can be used for daily
figures, and trip "2" for monthly figures.
Trip reset
With the instrument panel screen
-
A b lack screen
-
A r
eminder of the navigation instructions
with the PEUGEOT Connect Navigation
(RT6) system.
Press again to return to the current display.
Monitoring