Page 194 of 344

192
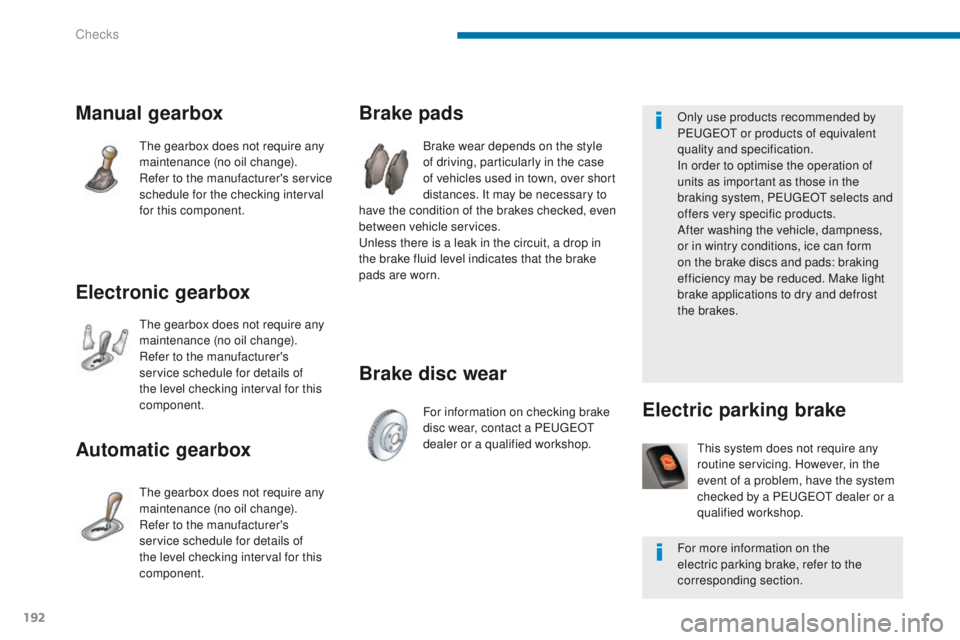
Brake disc wear Brake pads
Brake wear depends on the style
of driving, particularly in the case
of vehicles used in town, over short
distances. It may be necessary to
have the condition of the brakes checked, even
between vehicle services.
Unless there is a leak in the circuit, a drop in
the brake fluid level indicates that the brake
pads are worn.
For information on checking brake
disc wear, contact a PEUGEOT
dealer or a qualified workshop.
Manual gearbox
The gearbox does not require any
maintenance (no oil change).
Refer to the manufacturer's service
schedule for the checking interval
for this component.
Electronic gearbox
The gearbox does not require any
maintenance (no oil change).
Refer to the manufacturer's
service schedule for details of
the level checking interval for this
component.
Automatic gearbox
The gearbox does not require any
maintenance (no oil change).
Refer to the manufacturer's
service schedule for details of
the level checking interval for this
component. This system does not require any
routine servicing. However, in the
event of a problem, have the system
checked by a PEUGEOT dealer or a
qualified workshop.
Electric parking brake
Only use products recommended by
PEUGEOT or products of equivalent
quality and specification.
In order to optimise the operation of
units as important as those in the
braking system, PEUGEOT selects and
offers very specific products.
After washing the vehicle, dampness,
or in wintry conditions, ice can form
on the brake discs and pads: braking
efficiency may be reduced. Make light
brake applications to dry and defrost
the brakes.
For more information on the
electric parking brake, refer to the
corresponding section.
Checks
Page 201 of 344

199
Never store bottles of AdBlue® in your
vehicle.
Recommendations on storage
AdBlue® freezes at about -11°C and
deteriorates above 25°C. It is recommended
that bottles be stored in a cool area and
protected from direct sunlight.
Under these conditions, the additive can be
kept for at least a year.
If the additive has frozen, it can be used once it
has completely thawed out.
Procedure
Before topping-up, ensure that the vehicle is
parked on a flat and level sur face.
In wintry conditions, ensure that the
temperature of the vehicle is above -11°C.
Otherwise the AdBlue
® may be frozen and
so cannot be poured into its tank. Park your
vehicle in a warmer area for a few hours to
allow the top-up to be carried out.
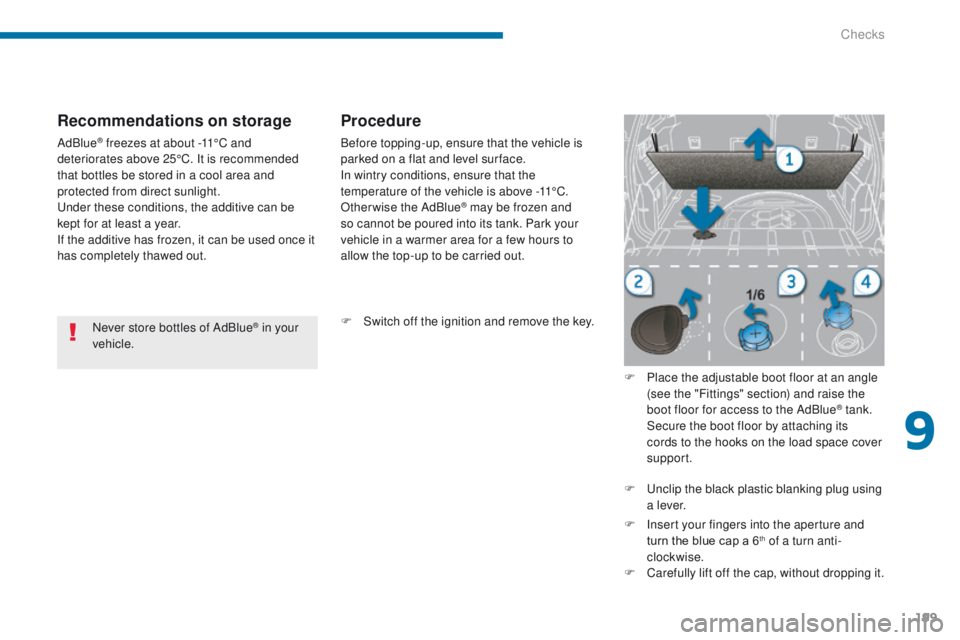
F
S
witch off the ignition and remove the key. F
P
lace the adjustable boot floor at an angle
(see the "Fittings" section) and raise the
boot floor for access to the AdBlue
® tank. S
ecure the boot floor by attaching its
cords to the hooks on the load space cover
support.
F
U
nclip the black plastic blanking plug using
a l eve r.
F
I
nsert your fingers into the aperture and
turn the blue cap a 6
th of a turn anti-
clockwise.
F
C
arefully lift off the cap, without dropping it.
9
Checks
Page 217 of 344

215
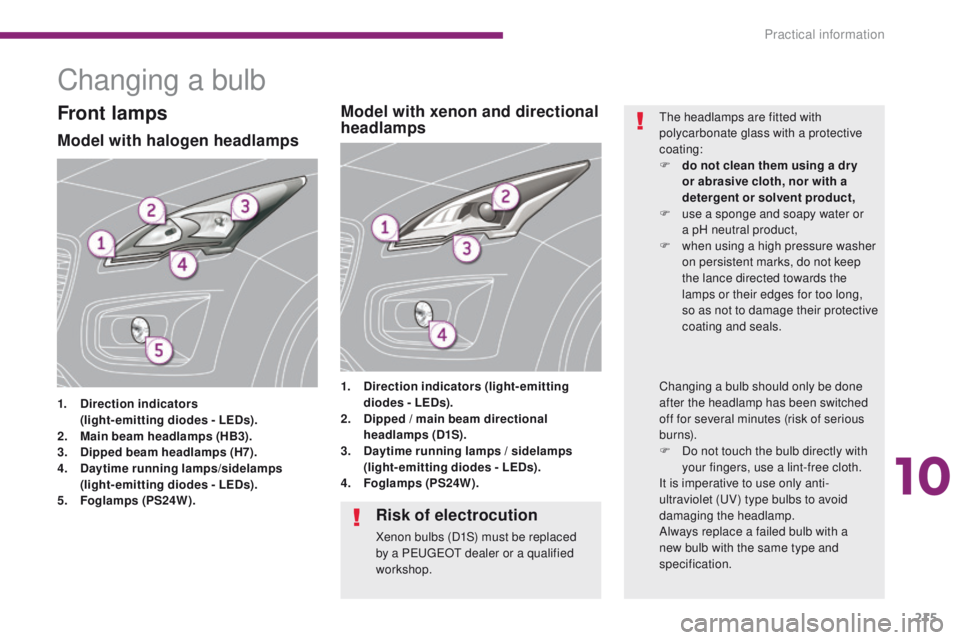
Changing a bulb
Model with halogen headlamps
1. Direction indicators (
light-emitting diodes - LEDs).
2.
M
ain beam headlamps (HB3).
3.
D
ipped beam headlamps (H7).
4.
D
aytime running lamps/sidelamps
(
light-emitting diodes - LEDs).
5.
F
oglamps (PS24W). 1.
D
irection indicators (light-emitting
diodes - LEDs).
2. D ipped / main beam directional
headlamps (D1S).
3.
D
aytime running lamps / sidelamps
(light-emitting diodes - LEDs).
4.
F
oglamps (PS24W).
Model with xenon and directional
headlampsFront lampsThe headlamps are fitted with
polycarbonate glass with a protective
coating:
F
d
o not clean them using a dr y
or abrasive cloth, nor with a
detergent or solvent product,
F
u
se a sponge and soapy water or
a
pH neutral product,
F
w
hen using a high pressure washer
on persistent marks, do not keep
the lance directed towards the
lamps or their edges for too long,
so as not to damage their protective
coating and seals.
Risk of electrocution
Xenon bulbs (D1S) must be replaced
by a PEUGEOT dealer or a qualified
workshop. Changing a bulb should only be done
after the headlamp has been switched
off for several minutes (risk of serious
burns).
F
D
o not touch the bulb directly with
your fingers, use a lint-free cloth.
It is imperative to use only anti-
ultraviolet (UV) type bulbs to avoid
damaging the headlamp.
Always replace a failed bulb with a
new bulb with the same type and
specification.
10
Practical information
Page 218 of 344
216
Changing main beam headlamp bulbs
(model with halogen headlamps)Changing dipped beam headlamp
bulbs (models with halogen
headlamps)
F Remove the protective plastic cover by pulling the tab.
F
D
isconnect the bulb connector.
F
E
xtract the bulb by pulling and change it.
To refit, carry out these operations in reverse
o r d e r. F
R emove the protective plastic cover by
pulling the tab.
F
W
ithout disconnecting the connector, turn
the body of the bulb a quarter of a turn to
the left to disengage the assembly.
F
D
isconnect the connector to release the
bulb.
To refit, carry out these operations in reverse
o r d e r.
Changing direction indicators
and daytime running lamps /
sidelamps
For the replacement of these LED (light-
emitting diode) lamps, contact a PEUGEOT
dealer or a qualified workshop.
Practical information
Page 220 of 344
218
Rear lamps
1. Brake lamps / sidelamps (
light-emitting diodes - LEDs).
2.
R
eversing lamps (W16W).
3.
D
irection indicators (P21W).
4.
S
idelamps
(
light-emitting diodes - LEDs).
5.
F
oglamps (P21W). -
T
urn the the lamp unit over.
-
P
ress the five tabs and remove the bulb
h o l d e r.
Changing reversing lamp and
direction indicator bulbs
F Raise the tailgate.
F R emove the plastic cover.
F
U
nscrew the two fixing nuts.
F
E
xtract the lamp unit carefully from the
outside.
F
D
isconnect the bulb holder connector. -
R
eversing lamp (2): pull on the bulb to
remove it.
-
D
irection indicator (3): turn the bulb
a quarter of a turn (anti-clockwise) to
remove
it.
To refit, carry out these operations in reverse
o r d e r.
Practical information
Page 221 of 344
219
Changing sidelamp
and brake lamp/sidelamp
bulbsChanging foglamp
bulbs
For the replacement of these LED (light-
emitting diode) lamps, contact a PEUGEOT
dealer or a qualified workshop. F
R each under the bumper.
F
T
urn the bulb a quarter of a turn and pull
it
out.
Changing the third brake lamp
(light emitting diodes - LEDs)
Contact a PEUGEOT dealer or a qualified
workshop.
10
Practical information
Page 224 of 344
222
The fusebox is placed in the lower dashboard.
Dashboard fuses
Fuse tables
Fuse N° Rating
(A) Functions
F1 15Rear wiper.
F2 -Not used.
F3 5Airbag control unit.
F4 10Electrochrome rear view mirror, air conditioning, switching and
protection unit, rear multimedia.
F5 30Front one-touch electric windows.
F6 30Rear one-touch electric windows.
F7 5Front and rear courtesy lamps, map reading lamps, rear
reading lamps, sun visor lighting, glove box lighting, centre
armrest lighting, boot 12 V relay control.
Practical information
Page 225 of 344
223
Access to the fuses
F Refer to the paragraph "Access to the to o ls". Fuse
N° Rating
(A) Functions
F8 20Audio equipment, audio/telephone, CD changer, multifunction
screen, tyre under-inflation detection, alarm siren, alarm control
unit, telematic unit.
F9 30Front 12 V socket, cigarette lighter, rear 12 V socket.
F10 15Steering mounted controls.
F11 15Low current ignition switch.
F12 15Trailer presence, rain
/ sunshine sensor, supply for fuses F32,
F34, F35.
F13 5Engine fusebox, airbag control unit.
F14 15Instrument panel, instrument panel screen, supply for fuse F33.
F15 30Locking and deadlocking.
F17 40Heated rear screen, supply for fuse F30.
10
Practical information