2014 VOLKSWAGEN TOUAREG alarm
[x] Cancel search: alarmPage 34 of 620

NOTICE
The remote control vehicle keys contain electrical components. Protect them from damage, moisture and rough handling.
Do not press the buttons on the remote control vehicle key unless you actually want to use the function in question. Since terrain and conditions vary, pressing a button on the remote control vehicle key when it is not necessary may unlock the vehicle or set off the panic alarm, even if you think you are out of range.
Remote control vehicle key functions can be temporarily disrupted by interference from transmitters near the vehicle that use the same frequency range (such as radio equipment or mobile phones).
Things between the remote control vehicle key and vehicle, bad weather, as well as a weak battery can reduce the operating range.
If the remote control vehicle key buttons or the power locking buttons ⇒ fig. 25 are pushed repeatedly in quick succession, the power locking system is switched off for a brief period to help keep it from being overloaded. The vehicle is then unlocked for about 30 seconds. Unless a door or the rear hatch is opened in this span of time, the vehicle is automatically locked afterwards.
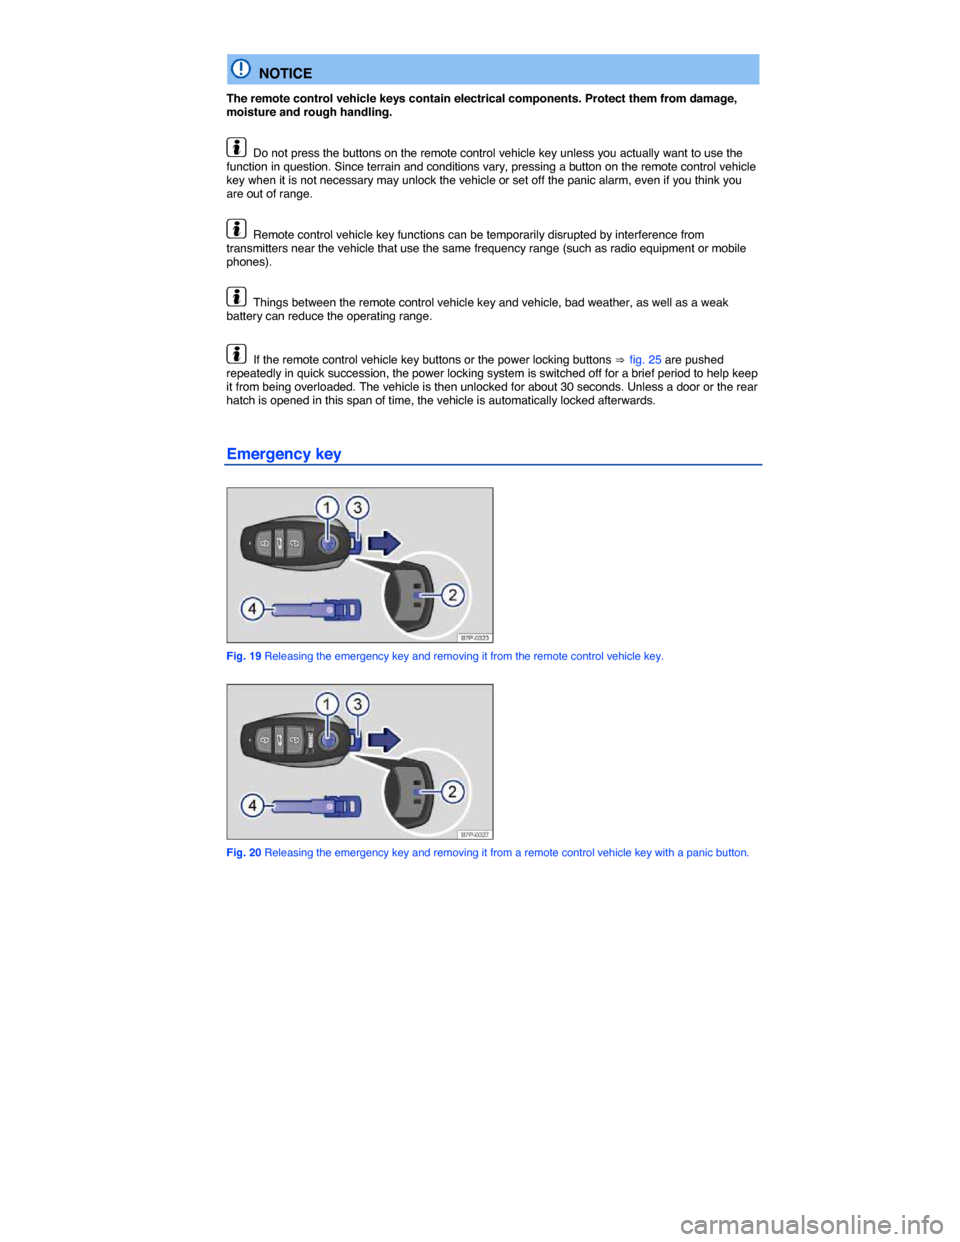
Emergency key
Fig. 19 Releasing the emergency key and removing it from the remote control vehicle key.
Fig. 20 Releasing the emergency key and removing it from a remote control vehicle key with a panic button.
Page 46 of 620

�x Switch off the ignition and remove any vehicle key in the ignition.
�x Stand in front of the middle of the rear bumper.
�x Quickly move your foot and shin as close to the bumper as possible. Your shin must be in the upper part of the sensor’s range and your foot in the lower part (1)
�x Quickly move your shin out of range (2). The rear hatch opens automatically.
If the luggage compartment lid does not open, wait a few seconds and try again.
The high-mounted brake light and the turn signals flash once to show that the Easy Open feature is opening the rear hatch.
The rear hatch locks automatically after closing if the vehicle was locked before and a valid vehicle key is not inside the vehicle.
Easy Open may not work properly or at all in the following situations (examples):
�x If the rear bumper is very dirty.
�x If the rear bumper has salty water on it after driving on salted roads.
�x If a trailer hitch has been retrofit on the vehicle.
Easy Open may be automatically deactivated in heavy rain to help prevent unintentional deployment caused by water running down the vehicle, for example.
CAUTION
If a valid vehicle key is within range of the rear hatch, the Easy Open feature can deploy unintentionally in some cases and open the rear hatch: for example, when sweeping the ground or floor below the rear bumper, if there is a strong stream of water or steam or when carrying out maintenance or repairs around the rear bumper. If the rear hatch opens unintentionally, it can injure anyone or damage anything in its way.
�x Never leave a valid vehicle key within range of the rear hatch unattended.
Anti-theft alarm system
�
Page 47 of 620

Deactivating the alarm
Unlock the vehicle with the unlock button on the remote control vehicle key and switch on the ignition with a valid remote control vehicle key.
For vehicles with Keyless Access, the alarm can be deactivated by grasping one of the door handles when a valid vehicle key is in range or by holding the remote control vehicle key to the right of the
steering column trim and pressing the starter button ⇒ Unlocking or locking vehicles with Keyless Access.
After the alarm has stopped and the vehicle is opened again in the same or a different area that is protected by the alarm, the alarm is triggered again. For example, the alarm will sound again if the rear hatch is opened after one of the doors has been opened.
The anti-theft alarm system is not activated when the vehicle is locked with the power lock switch �1 on the inside of the driver or front passenger doors.
If the driver door is mechanically unlocked with the emergency key, only the driver door is unlocked, but not the entire vehicle. Switching on the ignition deactivates the anti-theft alarm system and activates the central locking button. To unlock the doors, use the central locking button or remote control vehicle key.
If the vehicle battery is dead or weak, the anti-theft alarm system will not work properly.
Page 69 of 620

The buttons 1 , 2 , and 3 on the roof keypad ⇒ fig. 40 between the sun visors can operate up to 3 separate remote control devices (for example, a gate and garage door, a house alarm, or a lighting system).
Getting ready to program
�x Please read the product manufacturer's instructions before programming the garage door opener or other device.
�x Safely park the vehicle within range of the device to be programmed.
�x Switch the ignition on, but do not start the engine.
Menu Garage door opener in the Infotainment System
Call up the Garage door opener menu in the Infotainment System ⇒ fig. 41.
�x Press the CAR Infotainment button.
�x Tap the Settings function key on the screen.
�x Select Garage door opener from the list.
Function key: Effect
Program buttons : Buttons 1 , 2 or 3 can be programmed after you tap the function key. Follow the instructions on the Infotainment System screen.
Delete button assignment : Deletes the programming of buttons 1 , 2 , and 3 ⇒ fig. 40.
Version information : Most recent programming information for your authorized Volkswagen dealer or authorized Volkswagen Service Facility.
Programming information
You must complete the programming process within 5 minutes. If you exceed this time limit, the programming is cancelled.
If programming is cancelled, a red LED lights up in the keypad and the turn signals flash once.
Programming unassigned buttons
�x Complete the programming preparation steps described above
�x Press unassigned button in the roof keypad .
�x Follow the instructions on the Infotainment System screen.
The orange LED in the keypad also blinks to indicate that programming is in progress.
If programming is successful, a green LED in the keypad will light up and the turn signals will flash 3 times.
Repeat these steps with another unassigned garage door opener button to use that button to control another device.
Programming previously assigned buttons
�x Complete the programming preparation steps described above ⇒ Getting ready to program.
�x Press the CAR Infotainment button.
�x Tap the Settings function key on the screen.
�x Select Garage door opener from the list.
�x Tap the Program button function key and follow the instructions on the Infotainment System screen.
The orange LED in the keypad also blinks to indicate that programming is in progress.
Page 469 of 620

WARNING
High voltage systems in the engine compartment can cause electrical shocks or even electrocution, severe burns, other serious injuries, and even death!
�x Never short-circuit the electrical system. Be especially careful when using jumper cables. The vehicle's battery could explode!
�x To reduce the risk of electrical shock and personal injury while the engine is running or being started:
– Never touch ignition cables. Never touch other components of the high-voltage electronic ignition system.
– Never touch the wiring of the HID – High Intensity Discharge (Xenon) headlights.
�x Read and heed the important information and warnings on cleaning the engine
compartment ⇒ Cleaning the engine compartment.
WARNING
Moving parts in the engine compartment can cause serious personal injury on contact.
�x Never reach into the area around or touch the radiator fan. Contact with the blades can cause serious personal injury. Always remember that the radiator fan is temperature-controlled and can come on suddenly even when the engine has been switched off for a while and the key has been removed from the ignition.
�x If you have to perform a check or repair when the engine is running, there are more risks from the rotating parts, such as the drive belts, alternator, radiator fan, etc., and from the high-voltage ignition system. Always use extreme care.
– Always make sure that jewelry, loose clothing and long hair do not get caught in rotating engine parts. Before starting any work remove your jewelry, take off your necktie, tie back and cover your hair, and do not wear clothing that can hang down and get caught in moving engine parts.
– Always use extreme caution if the accelerator pedal has to be depressed to perform a check. The vehicle will start to move even if the parking brake is on.
�x Never leave any objects in the engine compartment, for example cleaning rags and tools. Objects left behind can cause malfunctions, engine damage, and even fires.
WARNING
Operating fluids and some materials in the engine compartment can catch fire easily, causing burns and other serious personal injuries!
�x Do not smoke.
�x Never work next to open flames or sparks.
�x Never pour or spill operating fluids or other flammable liquids on the engine. These fluids can ignite on hot engine parts and cause injuries.
�x If work on the fuel system or the electrical system is necessary:
– Always disconnect the 12 Volt vehicle battery. Make sure the vehicle is unlocked when you disconnect the battery, or the alarm will go off. Never touch the electrical wiring of the ignition system.
– Never work near heaters, water heaters, or other open flames.
�x Always have a functional, approved fire extinguisher nearby.
Page 489 of 620

Charging the vehicle battery
Vehicle batteries should be charged by an authorized Volkswagen dealer or an authorized Volkswagen Service Facility because the factory-installed battery requires a charger with overload
protection ⇒ .
Replacing the vehicle battery
The battery in your vehicle is specially developed for its location, with special dimensions and safety features. Before buying a new battery, ask an authorized Volkswagen dealer or authorized Volkswagen Service Facility what batteries are suitable with regard to electro-magnetic compatibility, dimensions, required maintenance, performance, and safety specifications. Have the battery replaced by an authorized Volkswagen dealer or an authorized Volkswagen Service Facility.
Only use maintenance-free vehicle batteries meeting standards TL 825 06 and VW 7 50 73. These standards must date from August 2008 or later.
Checking the electrolyte level
The 12 Volt vehicle battery is located under the left front seat, do not check the electrolyte level. Specialized knowledge and tools are required to access the vehicle battery. For this reason, have an authorized Volkswagen dealer or an authorized Volkswagen Service Facility check the electrolyte level of the vehicle battery for you.
Disconnecting the vehicle battery
If the battery must be disconnected from the vehicle's electrical system, note the following:
�x Switch off all electrical systems and devices and the ignition.
�x Unlock the vehicle before disconnecting the battery; otherwise the alarm system will go off.
�x First disconnect the negative cable (-) and then the positive cable (+) ⇒ .
Connecting the vehicle battery
�x Prior to reconnecting the battery, switch off all electrical systems and devices and the ignition.
�x Connect the positive cable (+) first and then the negative cable (-) ⇒ .
After the battery is connected and the ignition is switched on, different indicator lights may come on. They should go out after you drive a short distance at 10 – 12 mph (15 – 20 km/h). If the indicator lights do not go out , contact an authorized Volkswagen dealer or an authorized Volkswagen Service Facility and have the vehicle checked.
If the battery was disconnected for a long time, the next scheduled service may not be correctly calculated and displayed. The maximum permissible service and maintenance intervals are shown in
the ⇒ booklet Warranty and Maintenance.
Vehicles with Keyless Access
If the ignition will not start after reconnecting the vehicle battery, lock the vehicle from the outside and unlock it again. Then try to start the ignition again. If the ignition cannot be switched on, contact an authorized Volkswagen dealer, an authorized Volkswagen Service Facility, or another qualified workshop for assistance.
Automatic electrical load deactivation
If the vehicle battery drain is high, the intelligent on-board electrical system management automatically takes steps to help prevent battery drain.
�x The idle speed is increased so that the alternator provides more power.
�x The power to devices that consume a lot of electricity is cut back or switched off completely.
�x When the engine is started, the power supply to the 12 Volt sockets and the cigarette lighter is temporarily interrupted.
Page 535 of 620

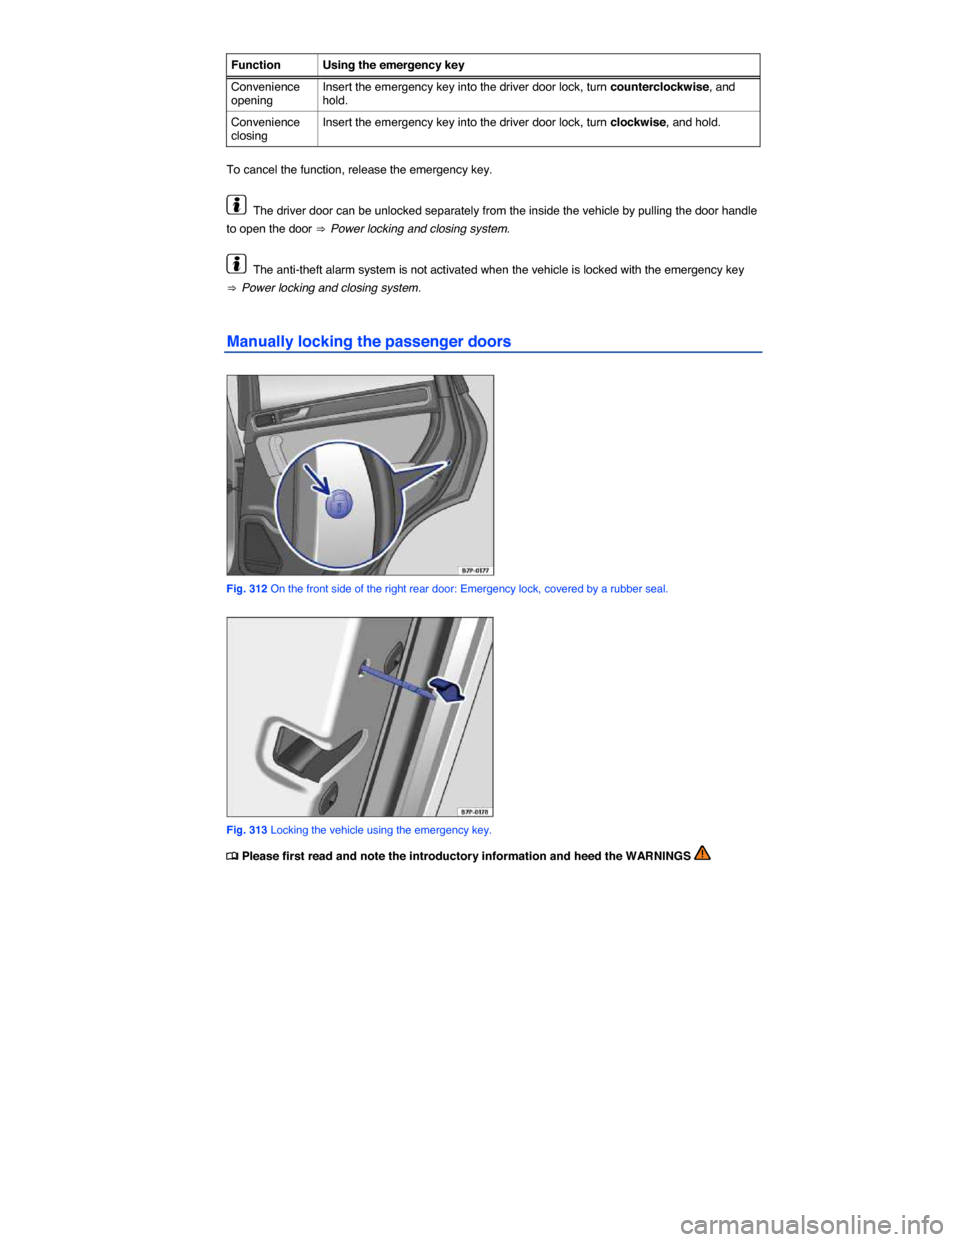
Function Using the emergency key
Convenience opening Insert the emergency key into the driver door lock, turn counterclockwise, and hold.
Convenience closing Insert the emergency key into the driver door lock, turn clockwise, and hold.
To cancel the function, release the emergency key.
The driver door can be unlocked separately from the inside the vehicle by pulling the door handle
to open the door ⇒ Power locking and closing system.
The anti-theft alarm system is not activated when the vehicle is locked with the emergency key
⇒ Power locking and closing system.
Manually locking the passenger doors
Fig. 312 On the front side of the right rear door: Emergency lock, covered by a rubber seal.
Fig. 313 Locking the vehicle using the emergency key.
�
Page 536 of 620

The passenger door and rear doors can each be locked manually. This will not activate the anti-theft alarm system.
�x Open the door.
�x Remove the rubber seal on the front side of the door. The seal is marked with a lock �1 ⇒ fig. 312.
�x Take the emergency key out of the remote control vehicle key ⇒ Vehicle key set.
�x Insert the emergency key into the vertical slit and turn the key away from the vehicle ⇒ fig. 313.
�x Re-insert the rubber seal and completely close the door.
�x Make sure that the door is locked.
�x Repeat the procedure for other doors if necessary.
�x Have the vehicle checked immediately by an authorized Volkswagen dealer or an authorized Volkswagen Service Facility.
Doors can be unlocked separately from the inside the vehicle by pulling the door handle once. If
necessary, pull the door handle again ⇒ Power locking and closing system.
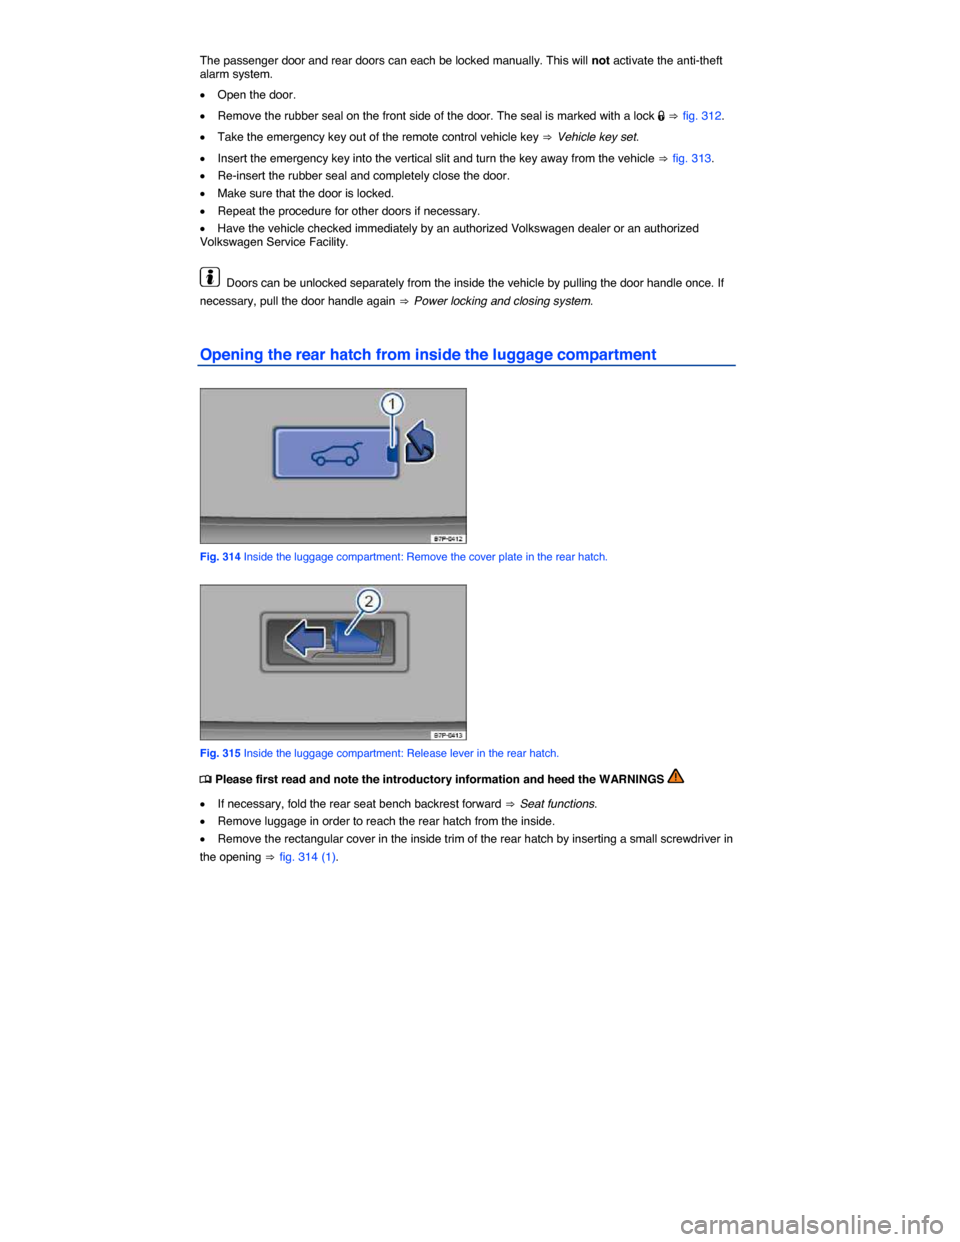
Opening the rear hatch from inside the luggage compartment
Fig. 314 Inside the luggage compartment: Remove the cover plate in the rear hatch.
Fig. 315 Inside the luggage compartment: Release lever in the rear hatch.
�