Page 71 of 724

71
1-3. Adjustable components (s
eats, mirrors, steering wheel)
1
Before driving
LC200_OM_OM60L09U_(U)
■Canceling the linked door unlock operation
Turn the “ENGINE START STOP” switch to OFF after closing the
driver’s door.
Using the wireless remote control: While pressing “SET” button,
press button on the wireless remote control until the signal
beeps.
Using the door lock switch: While pressing “SET” button, press the
lock or unlock side on the door lock switch until the signal beeps.
■ Retained accessory power
●Each memorized position (except for the steering wheel position) can be
activated within 3 minutes after the driver’s door is opened, even if the
“ENGINE START STOP” switch is turned off.
● Each memorized position (except for the steering wheel position) can be
activated within 60 seconds after the driver’s door is closed, even if the
“ENGINE START STOP” switch is turned off.
■ To cancel seat position recall
Perform any one of the following operations.
●Press the “SET” button
● Press button “1”, “2” or “3”.
● Adjust the seat using the switches (only cancels seat position recall)
● Adjust the steering wheel using the tilt and telescopic steering control
switch (only cancels steering wheel position recall)
■ If the battery is disconnected
The memorized positions must be reset because the computer’s memory is
erased when the battery is disconnected.
CAUTION
■Seat adjustment caution
Take care during seat adjustment that the seat does not strike the rear pas-
senger or squeeze your body against the steering wheel.
STEP1
STEP2
Page 74 of 724
74 1-3. Adjustable components (seats, mirrors, steering wheel)
LC200_OM_OM60L09U_(U)
■Removing the head restraints
Front seats
While pressing in the flathead screwdriver, pull up the head
restraint.
Second seats
Third center seat
Push a flathead screwdriver into the slot.
The slot is located on the right side of the
right head restraint anchor.STEP1
STEP2
Pull the head restraint up while pressing
the lock release button.
Lock release button
Pull the head restraint up while pressing
the lock release button.
Lock release button
Page 75 of 724

75
1-3. Adjustable components (s
eats, mirrors, steering wheel)
1
Before driving
LC200_OM_OM60L09U_(U)
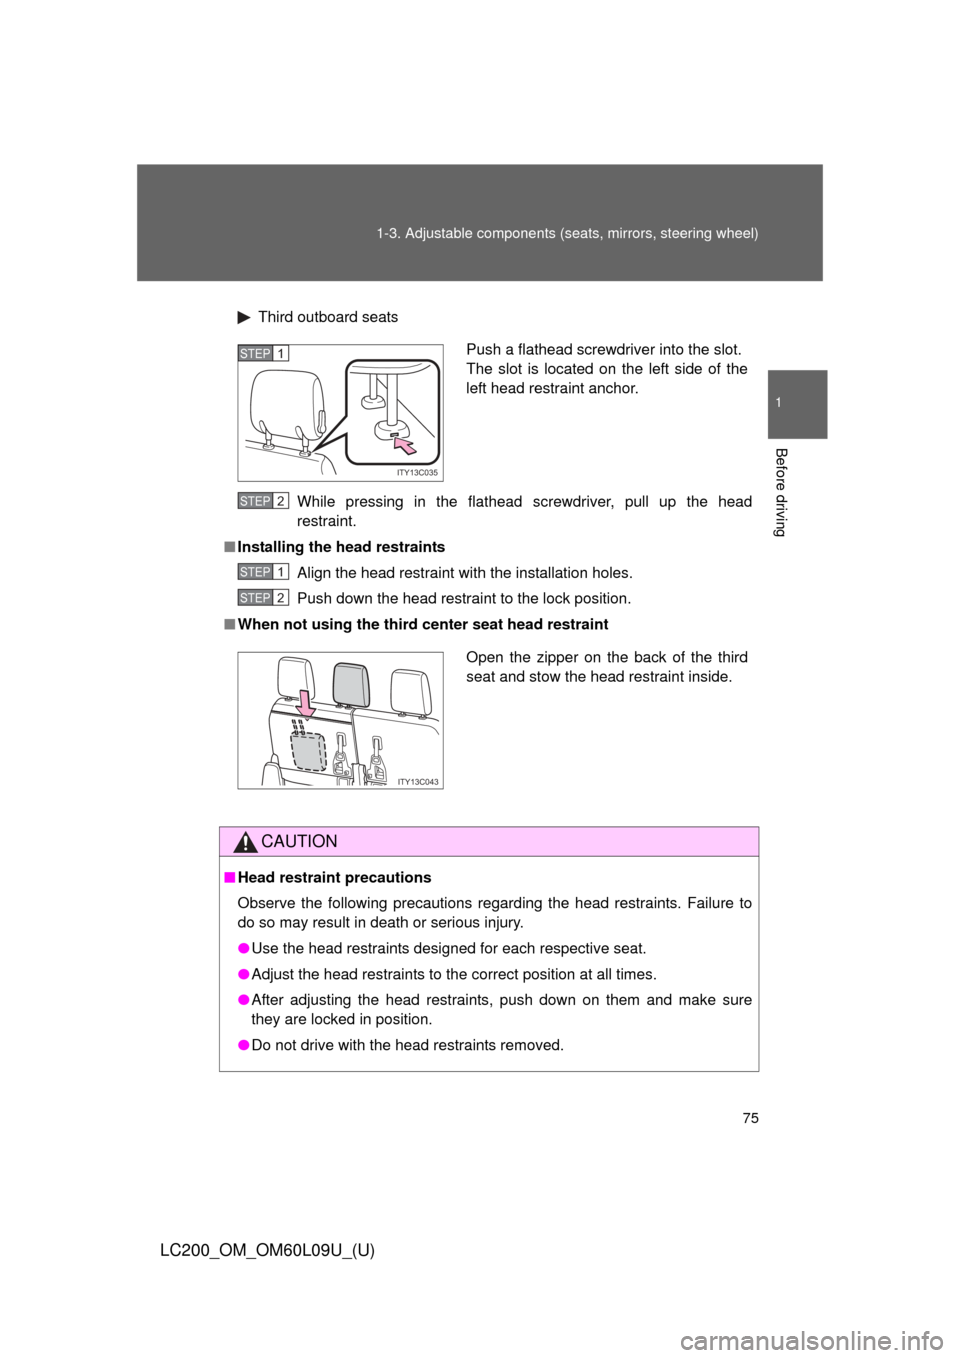
Third outboard seats
While pressing in the flathead screwdriver, pull up the head
restraint.
■ Installing the head restraints
Align the head restraint with the installation holes.
Push down the head restraint to the lock position.
■ When not using the third center seat head restraint
CAUTION
■Head restraint precautions
Observe the following precautions regarding the head restraints. Failure to
do so may result in death or serious injury.
●Use the head restraints designed for each respective seat.
● Adjust the head restraints to the correct position at all times.
● After adjusting the head restraints, push down on them and make sure
they are locked in position.
● Do not drive with the head restraints removed.
Push a flathead screwdriver into the slot.
The slot is located on the left side of the
left head restraint anchor.
ITY13C035
STEP1
STEP2
STEP1
STEP2
Open the zipper on the back of the third
seat and stow the head restraint inside.
ITY13C043
Page 79 of 724
79
1-3. Adjustable components (s
eats, mirrors, steering wheel)
1
Before driving
LC200_OM_OM60L09U_(U)
Seat belt pretensioners (front and second outboard seats)
The pretensioner helps the seat
belt to quickly restrain the occu-
pant by retracting the seat belt
when the vehicle is subjected to
certain types of severe frontal
collision or a vehicle rollover.
The pretensioner may not acti-
vate in the event of a minor frontal
impact, a side impact or a rear
impact.
■Adjusting the height of the belt (front and second outboard
seats)
Down
Up
Move the height adjuster up
and down as needed until you
hear a click.
1
2
ITY13C055
Page 88 of 724
88
1-3. Adjustable components (seats, mirrors, steering wheel)
LC200_OM_OM60L09U_(U)
Inside rear view mirror
Adjusting the height of the rear view mirrorAdjust the height of the rear view
mirror by moving it up and down.
Automatic anti-glare functionResponding to the level of brightness of the headlights of vehicles
behind, the reflected light is automatically reduced.
Changing automatic anti-glare
function mode ON/OFFON
OFF
When the automatic anti-glare
function is in ON mode, the indi-
cator illuminates.
The function will be set to ON
mode each time the “ENGINE
START STOP” switch is turned to
IGNITION ON mode.
Pressing the button turns the
function to OFF mode. (The indi-
cator also turns off.)
The rear view mirror’s position can be adjusted to enable sufficient
confirmation of the rear view in accordance with the driver’s seating
posture.
Page 90 of 724
90
1-3. Adjustable components (seats, mirrors, steering wheel)
LC200_OM_OM60L09U_(U)
Outside rear view mirrors
Folding back the mirrorsPress the switch
Pressing again will extended the
mirrors.
Mirror angle can be adjusted.
Select a mirror to adjust
Left
Right
Adjust the mirror Up
Right
Down
LeftSTEP1
STEP2
Page 91 of 724

91
1-3. Adjustable components (s
eats, mirrors, steering wheel)
1
Before driving
LC200_OM_OM60L09U_(U)
■Mirror angle can be adjusted when
The “ENGINE START STOP” switch is in ACCESSORY or IGNITION ON
mode.
■ When the mirrors are fogged up
The outside rear view mirrors can be cleared using the mirror defoggers.
Turn on the rear window defogger to turn on the outside rear view mirror
defoggers. ( P. 351)
■ Auto anti-glare function
When the anti-glare inside rear view mirror is set to auto mode, the outside
rear view mirrors will activate in c onjunction with the anti-glare inside rear
view mirror to reduce reflected light. ( P. 88)
■ Linked mirror function when reversing
When the mirror select switch is in the “L” or “R” position, the outside rear
view mirrors will automatically angle downwards when the vehicle is revers-
ing in order to give a better view of the ground. To disable this function, move
the mirror select switch to the neutral position (between “L” and “R”).
■ One-touch adjustment of the mirror angle
A desired mirror face angle can be entered to memory and adjusted with the
touch of a button. ( P. 68)
Page 158 of 724

158 2-1. Driving procedures
LC200_OM_OM60L09U_(U)
CAUTION
●Do not shift the shift lever to “P” while the vehicle is moving.
Doing so can damage the transmission and may result in a loss of vehicle\
control.
● Do not shift the shift lever to “R” while the vehicle is moving forward.
Doing so can damage the transmission and may result in a loss of vehicle\
control.
● Do not shift the shift lever to “D” while the vehicle is moving backward.
Doing so can damage the transmission and may result in a loss of vehicle\
control.
● Moving the shift lever to “N” while the vehicle is moving will disengage the
engine from the transmission. Engine br aking is not available when “N” is
selected.
● During normal driving, do not turn off the engine. Turning the engine off
while driving will not cause loss of steering or braking control, but the
power assist to these systems will be lost. This will make it more difficult to
steer and brake, so you should pull over and stop the vehicle as soon as it
is safe to do so.
However, in the event of an emergency, such as if it becomes impossible
to stop the vehicle in the normal way: P. 664
● Use engine braking (downshift) to maintain a safe speed when driving
down a steep hill.
Using the brakes continuously may cause the brakes to overheat and lose
effectiveness. ( P. 171)
● When stopped on an inclined surface, use the brake pedal and parking
brake to prevent the vehicle from rolling backward or forward and causing
an accident.
● Do not adjust the position of the steering wheel, the seat, or the inside or
outside rear view mirrors while driving.
Doing so may result in a loss of vehicle control that can cause accidents
that may result in death or serious injury.
● Always check that all passengers’ arms, heads or other parts of their bod-
ies are not outside the vehicle, as this may result in death or serious injury.