Page 575 of 724
575
4-3. Do-it-yourself maintenance
4
Maintenance and care
LC200_OM_OM60L09U_(U)
■
Driver’s side instrument panel
FuseAmpereCircuit
1CIG15 A Cigarette lighter
2BK/UP LP10 A Back-up lights, trailer
3ACC7.5 A Audio system, multi-display
assembly, main body ECU,
mirror ECU, rear seat enter-
tainment, smart key system,
clock
4PA N E L10 AFour-wheel drive system, ash-
tray, cigarette lighter, brake
controller, cool box, cruise con-
trol, center differential lock,
multi-display assembly, seat
heater, air conditioning system,
glove box light, emergency
flashers, audio system, head-
light cleaner switch, inverter,
driving position memory sys-
tem, outside rear view mirror
switches, overhead module,
roll sensing of curtain shield
airbags off switch, shift lever
switch, steering switches, VSC
OFF switch, console switch
Page 576 of 724

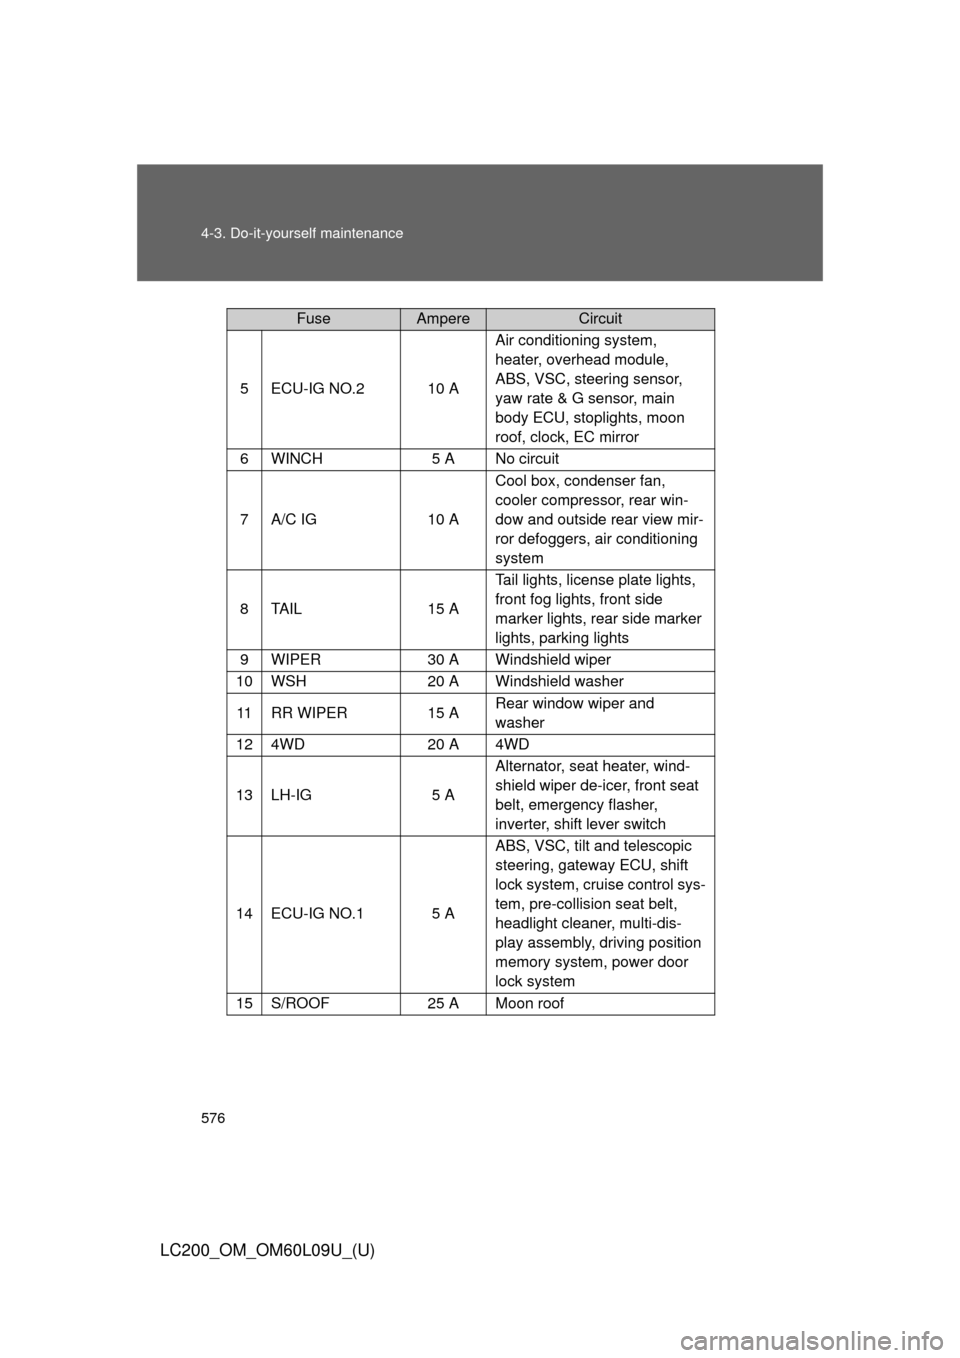
576 4-3. Do-it-yourself maintenance
LC200_OM_OM60L09U_(U)
5ECU-IG NO.210 AAir conditioning system,
heater, overhead module,
ABS, VSC, steering sensor,
yaw rate & G sensor, main
body ECU, stoplights, moon
roof, clock, EC mirror
6WINCH5 A No circuit
7A/C IG10 A
Cool box, condenser fan,
cooler compressor, rear win-
dow and outside rear view mir-
ror defoggers, air conditioning
system
8TA I L15 A
Tail lights, license plate lights,
front fog lights, front side
marker lights, rear side marker
lights, parking lights
9WIPER30 A Windshield wiper
10WSH20 A Windshield washer
11RR WIPER15 A
Rear window wiper and
washer
124WD20 A 4WD
13LH-IG5 AAlternator, seat heater, wind-
shield wiper de-icer, front seat
belt, emergency flasher,
inverter, shift lever switch
14ECU-IG NO.15 AABS, VSC, tilt and telescopic
steering, gateway ECU, shift
lock system, cruise control sys-
tem, pre-collision seat belt,
headlight cleaner, multi-dis-
play assembly, driving position
memory system, power door
lock system
15S/ROOF25 A Moon roof
FuseAmpereCircuit
Page 584 of 724
584 4-3. Do-it-yourself maintenance
LC200_OM_OM60L09U_(U)
Replacing light bulbs■ Headlight high beam and daytime running light
Turn the bulb base counterclock-
wise.
Unplug the connector while
depressing the lock release.
STEP1
ITY43C041
STEP2
Page 586 of 724
586 4-3. Do-it-yourself maintenance
LC200_OM_OM60L09U_(U)■
Fog light
Remove the fender liner bolts,
loose the fender liner nut and
pull down the fender liner.
Fender liner bolts
Fender liner nut
Unplug the connector while
depressing the lock release.
Turn the light bulb counterclock-
wise.
STEP1
STEP2
STEP3
Page 588 of 724
588 4-3. Do-it-yourself maintenance
LC200_OM_OM60L09U_(U)■
Front turn signal light
For the left side only: Remove
the securing bolt and move the
washer fluid filler opening.
Turn the bulb base counterclock-
wise.
Remove the light bulb.
When installing, reverse the steps listed.
ITY43C012
STEP1
STEP2
STEP3
STEP4
Page 589 of 724
589
4-3. Do-it-yourself maintenance
4
Maintenance and care
LC200_OM_OM60L09U_(U)
■
Front side marker light
For the left side only: Remove
the securing bolt and move the
washer fluid filler opening.
Turn the bulb base counterclock-
wise.
Remove the light bulb.
When installing, reverse the steps listed.
ITY43C012
STEP1
ITY43C050
STEP2
ITY43C051
STEP3
STEP4
Page 590 of 724
590 4-3. Do-it-yourself maintenance
LC200_OM_OM60L09U_(U)■
Back-up light
Open the back door and remove
the nuts and lamp assembly.
Remove the cover.
Unclip the connector wire and
turn the bulb bases counter-
clockwise.
STEP1
STEP2
STEP3
Page 592 of 724
592 4-3. Do-it-yourself maintenance
LC200_OM_OM60L09U_(U)■
Rear turn signal light
Open the back door and remove
the bolts and lamp assembly.
Use a cloth to prevent scratches.
Unclip the connector wire.
Turn the bulb bases counter-
clockwise.
STEP1
STEP2
STEP3