Page 544 of 724
544
4-3. Do-it-yourself maintenance
LC200_OM_OM60L09U_(U)
Tires
Replace or rotate tires in accordance with maintenance sched-
ules and treadwear.
■Checking tires
New tread
Treadwear indicator
Worn tread
The location of treadwear
indicators is shown by the
“TWI” or “” marks, etc.,
molded on the sidewall of
each tire.
Check spare tire condition
and inflation pressure if not
rotated.
■ Tire rotation
Rotate the tires in the order
shown.
To equalize tire wear and
extend tire life, Toyota recom-
mends that tire rotation is
carried out at the same inter-
val as tire inspection.
Do not fail to initialize the tire
pressure warning system
after tire rotation.
■The tire pressure warning system
Your Toyota is equipped with a tire pressure warning system that
uses tire pressure warning valves and transmitters to detect low
tire inflation pressure before serious problems arise. (P. 611)
Front
Page 554 of 724

554 4-3. Do-it-yourself maintenance
LC200_OM_OM60L09U_(U)
■Tire inflation pressure check interval
You should check tire inflation pressure every 2 weeks, or at least once a
month.
Do not forget to check the spare.
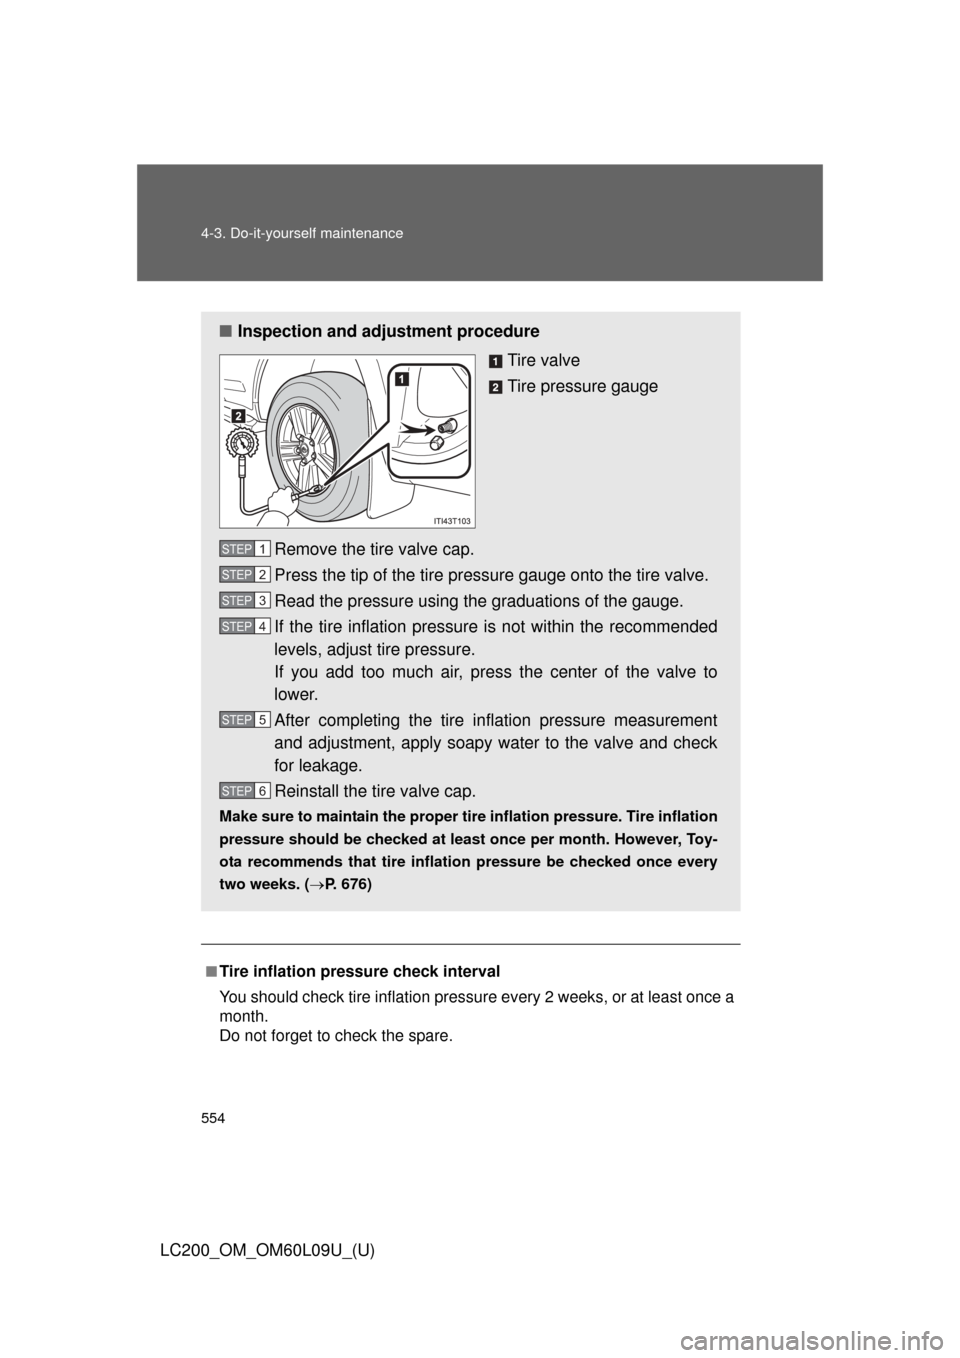
■ Inspection and adjustment procedure
Tire valve
Tire pressure gauge
Remove the tire valve cap.
Press the tip of the tire pressure gauge onto the tire valve.
Read the pressure using the graduations of the gauge.
If the tire inflation pressure is not within the recommended
levels, adjust tire pressure.
If you add too much air, pres s the center of the valve to
lower.
After completing the tire inflation pressure measurement
and adjustment, apply soapy water to the valve and check
for leakage.
Reinstall the tire valve cap.
Make sure to maintain the proper ti re inflation pressure. Tire inflation
pressure should be checked at least once per month. However, Toy-
ota recommends that tire inflat ion pressure be checked once every
two weeks. ( P. 676)
STEP1
STEP2
STEP3
STEP4
STEP5
STEP6
Page 611 of 724

5
When trouble arises
611
5-2. Steps to take in an emergency
LC200_OM_OM60L09U_(U)
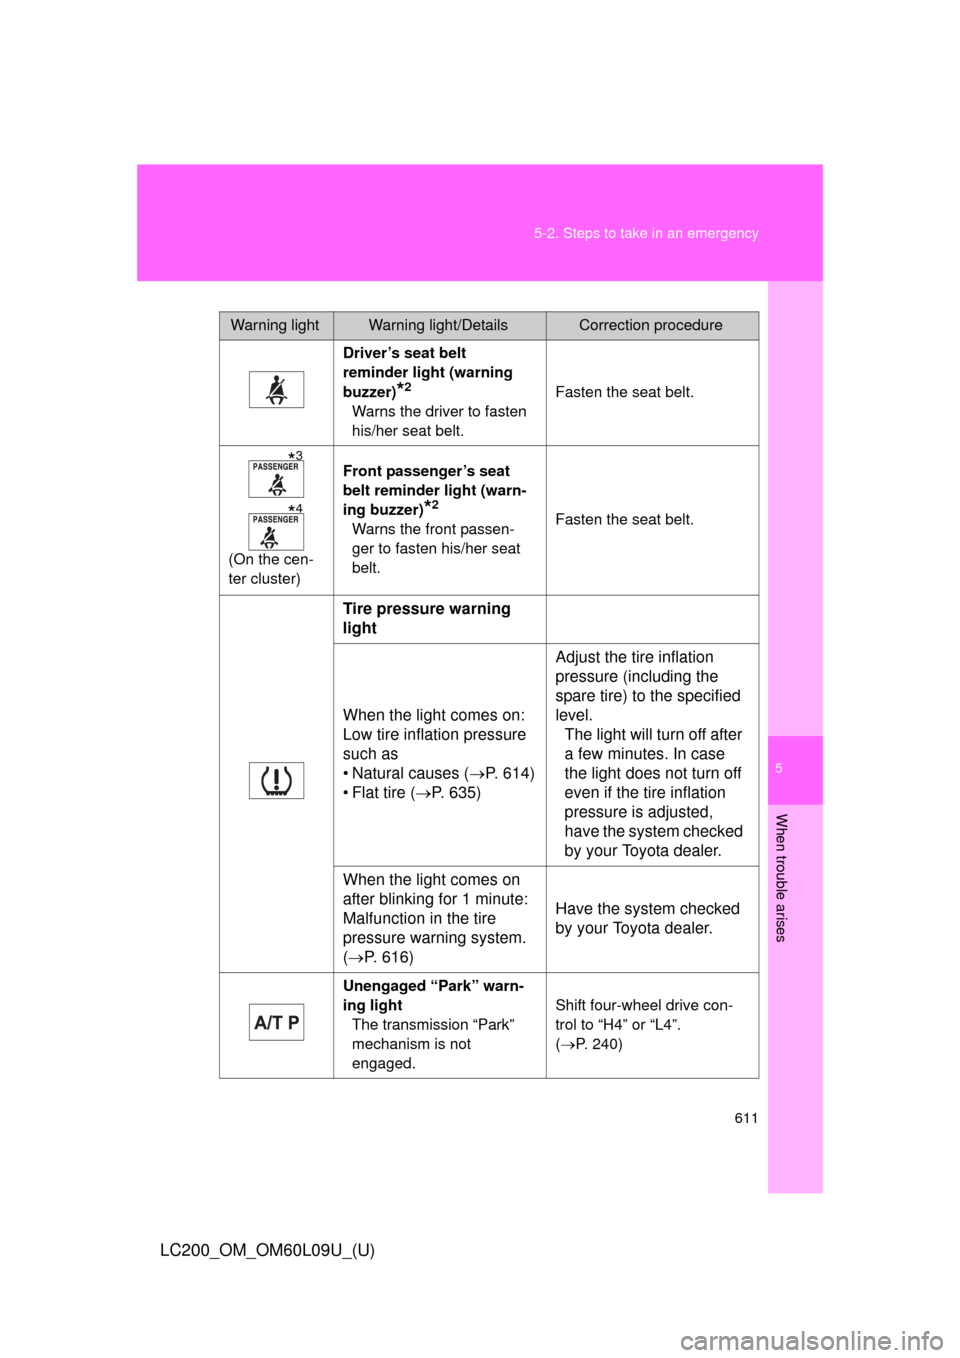
Warning lightWarning light/DetailsCorrection procedure
Driver’s seat belt
reminder light (warning
buzzer)
*2
Warns the driver to fasten
his/her seat belt. Fasten the seat belt.
(On the cen-
ter cluster) Front passenger’s seat
belt reminder light (warn-
ing buzzer)
*2
Warns the front passen-
ger to fasten his/her seat
belt.
Fasten the seat belt.
Tire pressure warning
light
When the light comes on:
Low tire inflation pressure
such as
• Natural causes (
P. 614)
• Flat tire ( P. 635) Adjust the tire inflation
pressure (including the
spare tire) to the specified
level.
The light will turn off after
a few minutes. In case
the light does not turn off
even if the tire inflation
pressure is adjusted,
have the system checked
by your Toyota dealer.
When the light comes on
after blinking for 1 minute:
Malfunction in the tire
pressure warning system.
( P. 616) Have the system checked
by your Toyota dealer.
Unengaged “Park” warn-
ing light
The transmission “Park”
mechanism is not
engaged. Shift four-wheel drive con-
trol to “H4” or “L4”.
(
P. 240)
*3
*4
Page 615 of 724

5
When trouble arises
615
5-2. Steps to take in an emergency
LC200_OM_OM60L09U_(U)
■When a tire is replaced with a spare tire
The spare tire is also equipped with the tire pressure warning valve and
transmitter. The tire pressure warning li
ght will turn on if the tire inflation
pressure of the spare tire is low. If a tire goes flat, even though the flat
tire is replaced with the spare tire, the tire pressure warning light does
not turn off. Replace the spare tire with the repaired tire and adjust the
proper tire inflation pressure. The ti re pressure warning light will turn off
after a few minutes.
■If the tire pressure warning system is inoperative
The tire pressure warning system will be disabled in the following condi-
tions:
(When the condition be comes normal, the system will work properly.)
●If tires not equipped with tire pressure warning valves and transmit-
ters are used.
●If the ID code on the tire pressure warning valves and transmitters is
not registered in the tire pressure warning computer.
●If the tire inflation pressure is 73 psi (500 kPa, 5.1 kgf/cm2 or bar) or
higher.
The tire pressure warning system may be disabled in the following condi-
tions:
(When the condition be comes normal, the system will work properly.)
●If electronic devices or facilities using similar radio wave frequencies
are nearby.
●If a radio set at similar frequencies is in use in the vehicle.
●If a window tint that affects the radio wave signals is installed.
●If there is a lot of snow or ice on the vehicle, in particular around the
wheels or wheel housings.
●If non-genuine Toyota wheels are used. (Even if you use Toyota
wheels, the tire pressu re warning system may not work properly with
some types of tires.)
●If tire chains are used.
●If the spare tire is in a location subject to poor radio wave signal
reception.
●If a large metallic object which can interfere with signal reception is
put in the luggage compartment.
Page 616 of 724

616 5-2. Steps to take in an emergency
LC200_OM_OM60L09U_(U)
■If the tire pressure warning light frequently comes on after blinking
for 1 minute
If the tire pressure warning light frequently comes on after blinking for 1
minute when the “ENGINE START STOP ” switch is turned to IGNITION
ON mode, have it checked by Toyota dealer.
CAUTION
■If the tire pressure warning light comes on
Be sure to observe the following precautions. Failure to do so could
cause loss of vehicle control and re sult in death or serious injury.
●Stop your vehicle in a safe place as soon as possible. Adjust the tire
inflation pressure immediately.
●If the tire pressure warning light comes on even after tire inflation pres-
sure adjustment, it is pr obable that you have a flat tire. Check the tires.
If the tire is flat, change to the spare tire and have the flat tire repaired
by the nearest Toyota dealer.
●Avoid abrupt maneuvering and braking. If the vehicle tires deteriorate,
you could lose control of the steering wheel or the brakes.
■If a blowout or sudden air leakage should occur
The tire pressure warning syste m may not activate immediately.
Page 617 of 724

5
When trouble arises
617
5-2. Steps to take in an emergency
LC200_OM_OM60L09U_(U)
CAUTION
■Maintenance of the tires
Each tire, including the spare (if provided), should be checked monthly
when cold and inflated to the inflation pressure recommended by the
vehicle manufacturer on the vehicle
placard or tire inflation pressure
label (tire and load information label). (If your vehicle has tires of a differ-
ent size than the size indicated on the vehicle placard or tire inflation
pressure label [tire and load information label], you should determine the
proper tire inflation pr essure for those tires.)
As an added safety feature, your vehicle has been equipped with a tire
pressure monitoring system (TPMS-ti re pressure warning system) that
illuminates a low tire pressure telltal e (tire pressure warning light) when
one or more of your tires is significantly under-inflated. Accordingly,
when the low tire pressure telltale (tire pre ssure warning light) illumi-
nates, you should stop and check your tires as soon as possible, and
inflate them to the proper pressure. Driving on a significantly under-
inflated tire causes the tire to overheat and can lead to tire failure.
Under-inflation also reduces fuel effi ciency and tire tread life, and may
affect the vehicle’s handling and stopping ability.
Please note that the TPMS (tire pressure warning system) is not a sub-
stitute for proper tire ma intenance, and it is the driver’s responsibility to
maintain correct tire pressure, even if under-inflation has not reached the
level to trigger illu mination of the TPMS low ti re pressure telltale (tire
pressure warning light).
Page 635 of 724
5
When trouble arises
635
5-2. Steps to take in an emergency
LC200_OM_OM60L09U_(U)
If you have a flat tire
Remove the flat tire and replace it with the spare provided.
■Before jacking up the vehicle
●Stop the vehicle on a hard, flat surface.
● Set the parking brake.
● Shift the shift lever to “P”.
● Stop the engine.
● Turn on the emergency flashers.
■ Location of the spare tire, jack and tools
Tool box
Spare tire Jack
Page 638 of 724
638 5-2. Steps to take in an emergency
LC200_OM_OM60L09U_(U)
Taking out the spare tireAssembling the jack handle.
Remove the jack handle and the jack extension bar from the tool
box and assemble by following these steps.
Loosen the screw using a
screwdriver.
Assemble the jack handle and
the jack handle extension bar
and tighten the screw.
Check that the screw is firmly
tightened.
STEP1