Page 160 of 232
154IN CASE OF AN EMERGENCY
CAUTION
After fixing the tire in place, make
sure that the tire is fixed securely by
pushing it. If the handle is not fas-
tened tightly enough, or if the chain
is twisted, the vibration caused by
driving can cause the tire to become
loose and fall off.
2. Block the wheel diagonally opposite
the flat tire to keep the vehicle from
rolling when it is jacked up.
When blocking the wheel, place a wheel
block from the front for the front wheels
or from the rear for the rear wheels.
Dyna100/150_EE
—Blocking the wheel
Page 161 of 232
IN CASE OF AN EMERGENCY155
3. Remove the bolts by turning them
counterclockwise with an open−end
wrench. Remove the wheel ornament.
CAUTION
Take due care in handling the orna-
ment to avoid unexpected serious in-
jury.
Your vehicle may have any of the above
wheel nuts.
1. Right−hand thread nut (no marks)
2. Left−hand thread nut (identified by
punch marks on each nut)
Dyna100/150_EE
—Removing wheel ornament —Loosening wheel nuts
Page 162 of 232

156IN CASE OF AN EMERGENCY
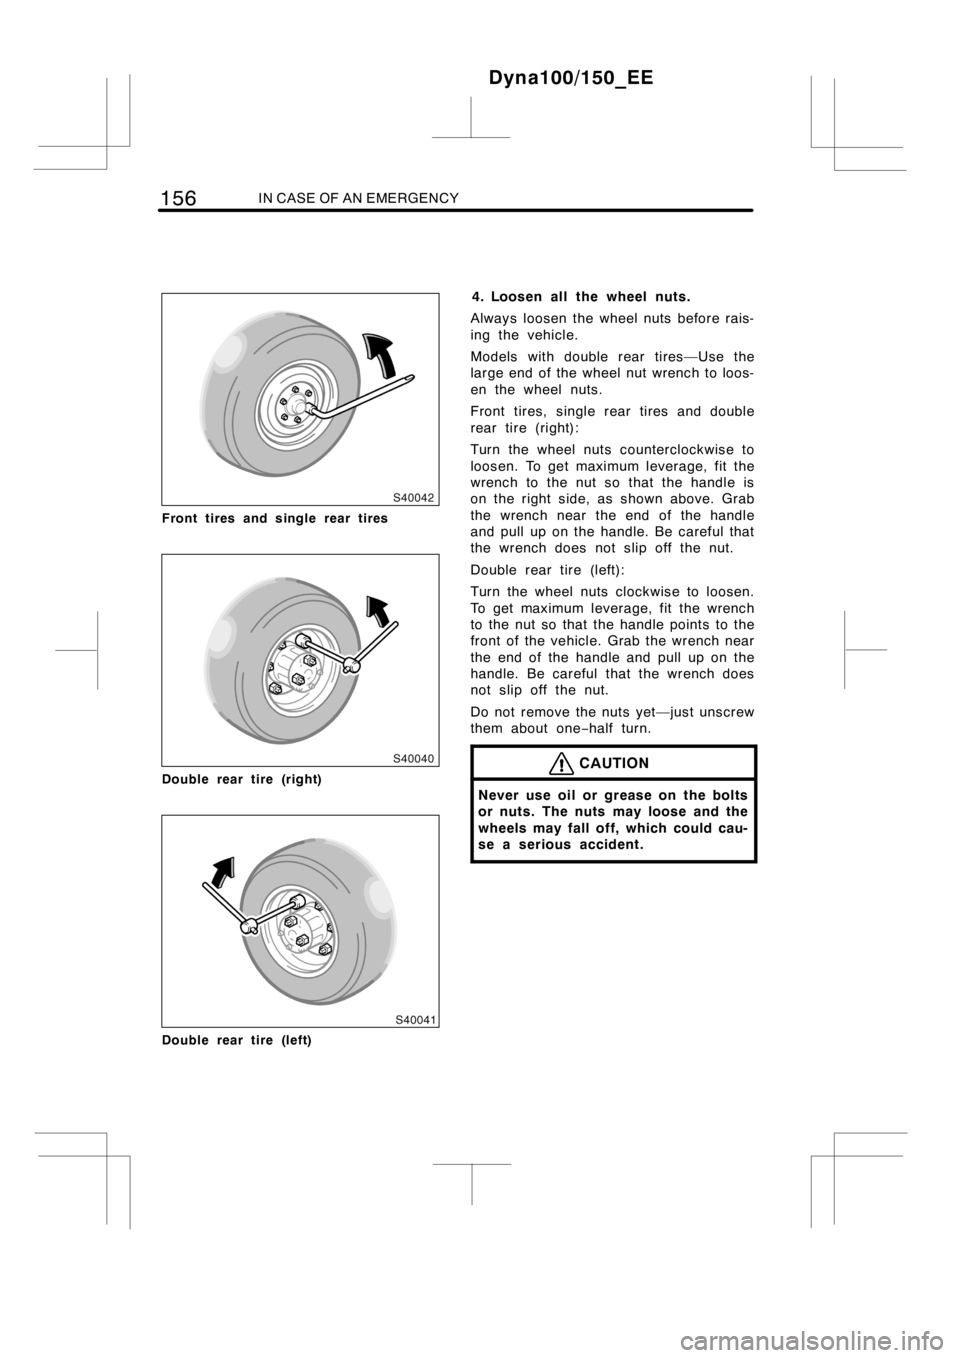
Front tires and single rear tires
Double rear tire (right)
Double rear tire (left)
4. Loosen all the wheel nuts.
Always loosen the wheel nuts before rais-
ing the vehicle.
Models with double rear tires—Use the
large end of the wheel nut wrench to loos-
en the wheel nuts.
Front tires, single rear tires and double
rear tire (right):
Turn the wheel nuts counterclockwise to
loosen. To get maximum leverage, fit the
wrench to the nut so that the handle is
on the right side, as shown above. Grab
the wrench near the end of the handle
and pull up on the handle. Be careful that
the wrench does not slip off the nut.
Double rear tire (left):
Turn the wheel nuts clockwise to loosen.
To get maximum leverage, fit the wrench
to the nut so that the handle points to the
front of the vehicle. Grab the wrench near
the end of the handle and pull up on the
handle. Be careful that the wrench does
not slip off the nut.
Do not remove the nuts yet—just unscrew
them about one−half turn.
CAUTION
Never use oil or grease on the bolts
or nuts. The nuts may loose and the
wheels may fall off, which could cau-
se a serious accident.
Dyna100/150_EE
Page 163 of 232
IN CASE OF AN EMERGENCY157
5. Position the jack at the correct jack
point as shown.
Make sure the jack is positioned on a
level and solid place.6. After making sure that no one is in
the vehicle, raise it high enough so
that the spare tire can be installed.
Remove the wheel nuts and the tire.
Remember you will need more ground
clearance when putting on the spare tire
than when removing the flat tire.
To raise the vehicle, insert the jack handle
end into the jack (it is a loose fit) and
turn it clockwise with the handle, making
sure that the handle remains firmly fitted
onto the jack handle extension. As the
jack touches the vehicle and begins to lift,
double−check that it is properly positioned.
CAUTION
Never get under the vehicle when the
vehicle is supported by the jack
alone.
Dyna100/150_EE
—Positioning the jack —Raising your vehicle
Page 166 of 232
160IN CASE OF AN EMERGENCY
Tapered
portion
CAUTION
Be sure to install the wheel nuts with
the tapered end facing inward. Instal-
ling the nuts with the tapered end
facing outward can cause wheel to
break and eventually cause a wheel to
come off while driving, which could
lead to an accident resulting in death
or serious injury.
9. Lower the vehicle completely and
tighten the wheel nuts.
To lower the vehicle, turn the jack handle
extension counterclockwise with the han-
dle, making sure the handle remains firmly
fitted onto the jack handle extension.
Tighten each nut a little at a time in the
order shown. Repeat the process until all
the nuts are tight.
Use only the wheel nut wrench to tighten
the nuts. Do not use other tools or any
additional leverage other than your hands,
such as a hammer, pipe or your foot.
Make sure the wrench is securely en-
gaged over the nut.
Dyna100/150_EE
—Lowering your vehicle
Page 167 of 232
IN CASE OF AN EMERGENCY161
CAUTION
DWhen lowering the vehicle, make
sure all portions of your body and
all other persons around will not be
injured as the vehicle is lowered to
the ground.
DHave the wheel nuts tightened with
torque wrench to the following
torques, as soon as possible after
changing wheels. Otherwise, the
nuts may loosen and the wheels
may fall off, which could cause a
serious accident.
DYNA 100
�
135 N·m (13.8 kgf·m, 100 ft·lbf)
DYNA 150�
365 N·m (37.2 kgf·m, 269 ft·lbf)
�: See “Model code” on page vi in the
beginning of this manual if you are not
sure of your vehicle model.
10. Reinstall the wheel ornament.
To reinstall the wheel ornament, tighten
the bolts by turning them clockwise with
the open−end wrench.
CAUTION
Take due care in handling the orna-
ment to avoid unexpected serious in-
jury.
Dyna100/150_EE
—Reinstalling wheel
ornament
Page 169 of 232

IN CASE OF AN EMERGENCY163
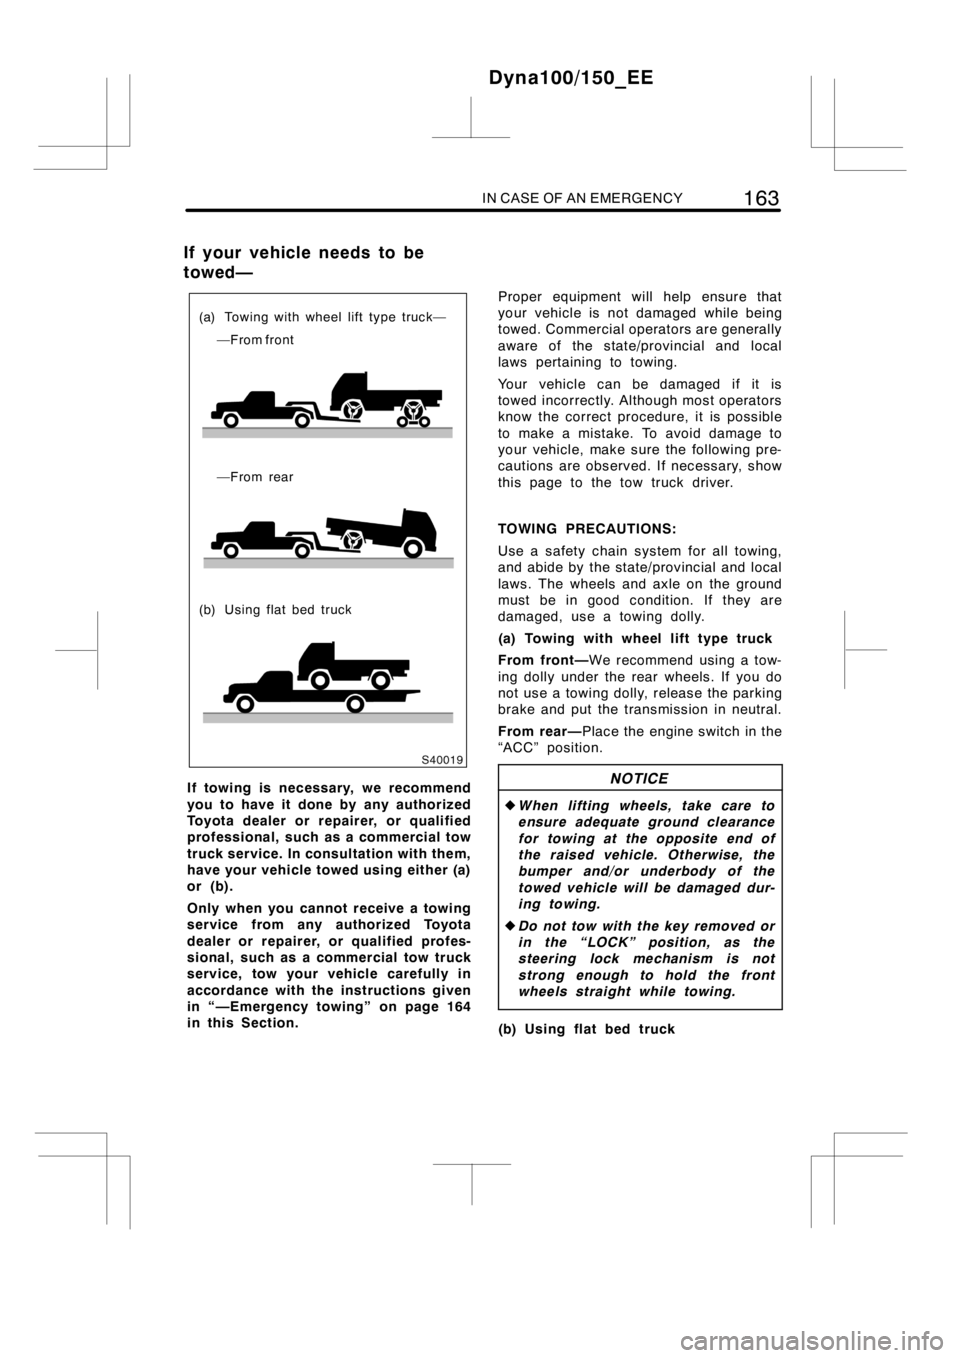
(a) Towing with wheel lift type truck—
—From front
—From rear
(b) Using flat bed truck
If towing is necessary, we recommend
you to have it done by any authorized
Toyota dealer or repairer, or qualified
professional, such as a commercial tow
truck service. In consultation with them,
have your vehicle towed using either (a)
or (b).
Only when you cannot receive a towing
service from any authorized Toyota
dealer or repairer, or qualified profes-
sional, such as a commercial tow truck
service, tow your vehicle carefully in
accordance with the instructions given
in “—Emergency towing” on page 164
in this Section.Proper equipment will help ensure that
your vehicle is not damaged while being
towed. Commercial operators are generally
aware of the state/provincial and local
laws pertaining to towing.
Your vehicle can be damaged if it is
towed incorrectly. Although most operators
know the correct procedure, it is possible
to make a mistake. To avoid damage to
your vehicle, make sure the following pre-
cautions are observed. If necessary, show
this page to the tow truck driver.
TOWING PRECAUTIONS:
Use a safety chain system for all towing,
and abide by the state/provincial and local
laws. The wheels and axle on the ground
must be in good condition. If they are
damaged, use a towing dolly.
(a) Towing with wheel lift type truck
From front—We recommend using a tow-
ing dolly under the rear wheels. If you do
not use a towing dolly, release the parking
brake and put the transmission in neutral.
From rear—Place the engine switch in the
“ACC” position.NOTICE
zWhen lifting wheels, take care to
ensure adequate ground clearance
for towing at the opposite end of
the raised vehicle. Otherwise, the
bumper and/or underbody of the
towed vehicle will be damaged dur-
ing towing.
zDo not tow with the key removed or
in the “LOCK” position, as the
steering lock mechanism is not
strong enough to hold the front
wheels straight while towing.
(b) Using flat bed truck
Dyna100/150_EE
If your vehicle needs to be
towed—
Page 172 of 232

166IN CASE OF AN EMERGENCY
DBefore emergency towing, check that
the hook or eyelet is not broken or
damaged and that the installation bolts
are not loose.
DFasten the towing cable or chain se-
curely to the hook or eyelet.
DDo not jerk the hook or eyelet. Apply
steady and even force.
DTo avoid damaging the hook or eyelet,
do not pull from the side or at a verti-
cal angle. Always pull straight ahead.You can purchase a new key at any
authorized Toyota dealer or repairer, or
another duly qualified and equipped
professional, if you can give them the
key number.
See the suggestion given in “Keys” on
page 12 in Section 1−2.
If your key is locked in the vehicle and
you cannot get a duplicate, many autho-
rized Toyota dealers, repairers or other
duly qualified and equipped professionals
can still open the door for you, using their
special tools. If you must break a window
to get in, we suggest breaking the side
window because it is the least expensive
to replace. Be extremely cautious to avoid
cuts from the glass.
Dyna100/150_EE
—Emergency towing hook or
eyelet precautionsIf you lose your keys