Page 185 of 201

60G309
Insert a piece of cloth between the spokes of the wheel cover and try to pull the cover outward (as shown in figure). Ta")
8-4
EMERGENCY SERVICE
76MH1-74E
76MH1-74E
Full Wheel Cover (if equipped)
60G309
Insert a piece of cloth between the spokes of the wheel cover and try to pull the cover outward (as shown in figure). Take out thedetached wheel cover from the wheel rim. For installation first match the slot at the wheel cover with the air filling nozzle of the wheel. Apply equal pressure at the circum- ference of the wheel cover to fix it in thewheel rim.
74LHT0860
When installing the cover, make sure that itis positioned so that it does not cover orfoul the air valve.
Jump Starting Instructions
When Jump Starting Your Vehicle,
Use the Following Procedure:1) Use only a 12-volt battery to jump start your vehicle. Position the good 12-volt battery close to your vehicle so that thejump leads will reach both batteries. When using a battery installed on another vehicle, DO NOT LET THEVEHICLES TOUCH. Set the parking brakes fully on both vehicles. 2) Turn off all vehicle accessories, exceptthose necessary for safety reasons (for example, headlights or hazard lights).
54MN259
EXAMPLE
EXAMPLE
WA R N I N G
• Never attempt to jump start your vehicle if the battery appears to be frozen. Batteries in this condition may explode or rupture if jumpstarting is attempted. • When making jump lead connec- tions, be certain that your handsand the jump leads remain clear from pulleys, belts, or fans. • Batteries produce flammablehydrogen gas. Keep flames and sparks away from the battery or an explosion may occur. Never smokewhen working in the vicinity of the battery. • If the booster battery you use forjump starting is installed in another vehicle, make sure the two vehicles are not touching each other.• If your battery discharges repeat- edly, for no apparent reason, have your vehicle inspected by anauthorized MARUTI SUZUKI dealer. • To avoid harm to yourself or dam- age to your vehicl e or battery, fol- low the jump starting instructions below precisely and in order. If you are in doubt, call for qualifiedroad service.
NOTICE
Your vehicle should not be started bypushing or towing. This startingmethod could result in permanent damage to the ca talytic converter. Use jump leads to start a vehicle witha weak or flat battery.
(2)
(1)
(3)2 3
4
1
EXAMPLE
174
Page 186 of 201
 Make jump lead connections as follows:
1. Connect one end of the first jump lead to the positive (+) terminal of the flat battery (1). 2. Connect the othe")
8-5
EMERGENCY SERVICE
76MH1-74E
76MH1-74E
3) Make jump lead connections as follows:
1. Connect one end of the first jump lead to the positive (+) terminal of the flat battery (1). 2. Connect the other end to the positive(+) terminal of the booster battery (2). 3. Connect one end of the second jumplead to the negative (–) terminal of the booster battery (2). 4. Make the final connection to anunpainted, heavy metal part (i.e. engine mount bracket (3)) of the engine of the vehicle with the flatbattery (1).
4) If the booster battery you are using is fitted to another vehicle, start the
engine of the vehicle with the booster battery. Run the engine at moderate speed.5) Start the engine of the vehicle with the flat battery. 6) Remove the jump leads in the exactreverse order in which you connected them.
Towing
If you need to have your vehicle towed, contact a professional service. Your dealercan provide you with detailed towing instructions.
2-Wheel Drive (2WD) Manual Tran- saxle or Auto Gear ShiftManual transaxle vehicles or Auto Gear Shift vehicles may be towed using either of the following methods.
1) From the front, with the front wheels lifted and the rear wheels on the ground. Before towing, make sure thatthe parking brake is released. 2) From the rear, with the rear wheels lifted and the front wheels on theground, provided the steering and drivetrain are in operational condition. Before towing, make sure that transaxleis in neutral, the steering wheel is
unlocked (the ignition key should be in the “ACC” position), and the steering wheel is secured with a clampingdevice designed for towing service.
WA R N I N G
Never connect the jump lead directlyto the negative (–) terminal of the dis- charged battery, or an explosion may occur.
CAUTION
Connect the jump le ad to the engine mount bracket securely. If the jump lead disconnects from the engine mount bracket because of vibrationat the start of the engine, the jump lead could be caught in the drive belts.
NOTICE
To help avoid damage to your vehicle during towing, proper equipment and towing procedures must be used.
NOTICE
After shifting the Auto Gear Shiftlever to the “N” position, always check the gear position indicator in the instrument cluster shows the “N”position to make sure that the transaxle is disengaged. If the transaxle cannot be put in neu-tral, turn the key from the “LOCK” to the “ON” position, and move the Auto Gear Shift lever from “N” to “D”,“M” or “R”, then back to “N” again. Then turn the key from the “ON” to the “LOCK” position.These procedures may help put the transaxle in neutral. If the transaxle still cannot be put in neutral, you can-not tow the vehicle without using a towing dolly. The steering column is not strongenough to with stand shocks trans- mitted from the fr ont wheels during towing. Always unlock the steeringwheel before towing.
175
Page 187 of 201
 Try turning the ignition switch to the “START” position with the headlights turned on to determine the battery con- d")
8-6
EMERGENCY SERVICE
76MH1-74E
76MH1-74E
If the Starter Does Not
Operate
1) Try turning the ignition switch to the “START” position with the headlights turned on to determine the battery con- dition. If the headlights go excessivelydim or go off, it usually means that either the battery is flat or the battery terminal contact is poor. Recharge thebattery or correct battery terminal con- tact as necessary. 2) If the headlights remain bright, checkthe fuses. If the reason for failure of the starter is not obvious, there may be a major electrical problem. Have the vehi-cle inspected by your authorized MAR- UTI SUZUKI dealer.
If the Engine is Flooded
If the engine is flooded with petrol, it may be hard to start. If this happens, press theaccelerator pedal all the way to the floor and hold it there while cranking the engine. For petrol engine model, do not operatethe starter motor for more than 12 sec- onds. For diesel engine model, do not operatethe starter motor for more than 30 sec- onds.
If the Engine Overheats
The engine could overheat temporarily under severe driving conditions. If the highengine coolant temperature warning light comes on as overheating during driving: 1) Turn off the air conditioner, if equipped.2) Take the vehicle to a safe place and park. 3) Let the engine run at the normal idlespeed for a few minutes until the high engine coolant temperature warning light goes off.
If the high engine coolant temperature warning light does not go off: 1) Turn off the engine and check that the water pump belt and pulleys are notdamaged or slipping. If any abnormality is found, correct it.
2) Check the coolant level in the reservoir. If it is found to be lower than the “LOW” line, look for leaks at the radiator, waterpump, and radiator and heater hoses. If you locate any leaks that may have caused the overheating, do not run theengine until these problems have been corrected. 3) If you do not find a leak, carefully addcoolant to the reservoir and then the radiator, if necessary. (Refer to “Engine Coolant” in the “INSPECTION ANDMAINTENANCE” section.)
NOTE: If your engine overheats and you are unsure what to do, contact your MARUTI SUZUKI dealer.
WA R N I N G
If you see or hear escaping steam,stop the vehicle in a safe place andimmediately turn off the engine to let it cool. Do not open the hood when steam is present. When the steamcan no longer be seen or heard, open the hood to see if the coolant is still boiling. If it is, you must wait until itstops boiling before you proceed.
176
Page 188 of 201

8-7
EMERGENCY SERVICE
76MH1-74E
76MH1-74E
65D614
Warning Triangle
MHO-07-001
In case of vehicle break-down or during emergency stopping, where, your vehiclecould become a potential traffic hazard, keep the warning triangle, provided with your vehicle, on the road free from anyobstacles behind your vehicle so as to warn the approaching traffic, at an approxi- mate distance of 50-100 m. The reflecting side of the triangle should face the on com- ing traffic. Please activate the hazardwarning lamps before alighting the vehicle to keep the warning triangle.
MHO-07-014
Remove the warning triangle carefullyfrom the cover as shown by arrow 1. Open both the reflector arms as shownby arrow and lock the arms with each other with the clip provided in the right arm. Open the bottom stand in counterclock-wise direction as shown by arrow 3. Position the warning triangle behind the vehicle on a plain surface. Reverse the removal procedure for keep- ing inside the cover.
MHO-07-014
WA R N I N G
• It is hazardous to remove the radia- tor cap (or degassing tank cap for adiesel engine) when the water tem- perature is high, because scalding fluid and steam may be blown outunder pressure. The cap should only be taken off when the coolant temperature has lowered.• To help prevent personal injury, keep hands, tools and clothing away from the engine cooling fanand air-conditioner fan (if equipped). These electric fans can automatically turn on without warn- ing.
EXAMPLE
177
Page 189 of 201
APPEARANCE CARE
76MH1-74E
76MH1-74E
178
APPEARANCE CARECorrosion Prevention ......................................................... 9-1
Vehicle Cleaning ................................................................. 9-2
Page 190 of 201

9-1
APPEARANCE CARE
76MH1-74E
76MH1-74E
APPEARANCE CARE
Corrosion Prevention
It is important to take good care of your vehicle to protect it from corrosion. Listedbelow are instructions for how to maintain your vehicle to prevent corrosion. Please read and follow these instructions carefully.
Important Information About Corrosion
Common causes of corrosion 1) Accumulation of road salt, dirt, mois- ture, or chemicals in hard-to-reachareas of the vehicle underbody or frame. 2) Chipping, scratches and any damage totreated or painted metal surfaces resulting from minor accidents or abra- sion by stones and gravel.
Environmental conditions which accel- erate corrosion1) Road salt, dust control chemicals, sea air or industrial pollution will all acceler- ate the corrosion of metal.2) High humidity will increase the rate of corrosion particularly when the tem- perature range is just above the freez-ing point. 3) Moisture in certain areas of a vehicle for an extended period of time may pro-mote corrosion even though other body sections may be completely dry.
4) High temperatures will cause an accel- erated rate of corrosion to parts of the vehicle which are not well ventilated topermit quick drying.
This information illustrates the necessity of keeping your vehicle (particularly the underbody) as clean and dry as possible. It is equally important to repair any damageto the paint or protective coatings as soon as possible.
How to Help Prevent Corrosion
Wash your vehicle frequentlyThe best way to preserve the finish on your vehicle and to help avoid corrosion is tokeep it clean with frequent washing. Wash your vehicle at least once during the winter and once immediately after the win-ter. Keep your vehicle, particularly the underside, as clean and dry as possible. If you frequently drive on salted roads, yourvehicle should be washed at least once a month during the winter. If you live near the ocean, your vehicle should be washed atleast once a month throughout the year.
For washing instructions, refer to the “Vehi- cle Cleaning” section.
Remove foreign ma terial depositsForeign material such as salts, chemicals, road oil or tar, tree sap, bird droppings andindustrial fall-out may damage the finish of your vehicle if it is left on painted surfaces. Remove these types of deposits as quicklyas possible. If these deposits are difficult to wash off, an additional cleaner may be required. Be sure that any cleaner you use
is not harmful to painted surfaces and is specifically intended for your purposes. Fol- low the manufacturer’s directions when using these special cleaners.
Repair finish damage Carefully examine your vehicle for damage to the painted surfaces. Should you findany chips or scratches in the paint, touch them up immediately to prevent corrosion from starting. If the chips or scratches havegone through to the bare metal, have a qualified body shop make the repair.
Keep passenger and luggage compart- ments cleanMoisture, dirt or mud can accumulate under the floor mats and may cause corrosion. Occasionally, check under these mats toensure that this area is clean and dry. More frequent checks are necessary if the vehicle is used off road or in wet weather.Certain cargos such as chemicals, fertiliz- ers, cleaners, salts, etc. are extremely cor- rosive by nature. These products should betransported in sealed containers. If a spill or leak does occur, clean and dry the area immediately.
Store your vehicle in a dry, well-venti- lated area Do not park your vehicle in a damp, poorlyventilated area. If you often wash your vehicle in the garage or if you frequently drive it in when wet, your garage may bedamp. The high humidity in the garage may cause or accelerate corrosion. A wet vehicle may corrode even in a heatedgarage if the ventilation is poor.
179
Page 191 of 201

9-2
APPEARANCE CARE
76MH1-74E
76MH1-74E
Vehicle Cleaning
76G044S
Cleaning the Interior
Vinyl upholstery Prepare a solution of soap or mild deter-gent mixed with warm water. Apply the solution to the vinyl with a sponge or soft cloth and let it soak for a few minutes toloosen dirt. Rub the surface with a clean, damp cloth to remove dirt and the soap solution. If somedirt still remains on the surface, repeat this procedure.
Fabric upholstery Remove loose dirt with a vacuum cleaner. Using a mild soap solution, rub stainedareas with a clean damp cloth. To remove soap, rub the areas again with a cloth dampened with water. Repeat this until thestain is removed, or use a commercial fab- ric cleaner for tougher stains. If you use a fabric cleaner, carefully follow the manu-facturer’s instructions and precautions.
Seat belts Clean seat belts with a mild soap and water. Do not use bleach or dye on the belts. They may weaken the fabric in thebelts.
Vinyl floor mats Ordinary dirt can be removed from vinyl with water or mild soap. Use a brush to help loosen dirt. After the dirt is loosened,rinse the mat thoroughly with water and dry it in the shade.
Carpets Remove dirt and soil as much as possible with a vacuum cleaner. Using a mild soapsolution, rub stained areas with a clean damp cloth. To remove soap, rub the areas again with a cloth dampened with water.Repeat this until the stain is removed, or use a commercial carpet cleaner for tougher stains. If you use a carpet cleaner,carefully follow the manufacturer’s instruc- tions and precautions.
Instrument panel and console Remove loose dirt with a vacuum cleaner. Gently wipe dirt off with a tightly squeezed damp clean cloth. Repeat this until the dirt is removed.
Cleaning the Exterior
WA R N I N G
Do not apply additional undercoating or rust preventive coating on oraround exhaust system components such as the catalytic converter, exhaust pipes, etc. A fire could bestarted if the undercoating substance becomes overheated.
WA R N I N G
When cleaning the interior or exterior of the vehicle, NEVER USE flammablesolvents such as lacquer thinners, petrol, benzene or cleaning materials such as bleaches or strong householddetergents. The materials could cause personal injury or damage to the vehi- cle.
NOTICE
Do not use chemical products that contain silicon to wipe electrical components such as the air condi-tioning system, audio, navigation system, or other switches. These will cause damage to the components.
NOTICE
It is important that your vehicle bekept clean and free from dirt. Failureto keep your vehicle clean may result in fading of the pa int or corrosion to various parts of the vehicle body.
180
Page 192 of 201

9-3
APPEARANCE CARE
76MH1-74E
76MH1-74E
Caring for Aluminum Wheels
NOTE: • Do not use an acidic or alkaline deter- gent to wash aluminum wheels. These types of detergent will cause permanentspots, discoloration and cracks on fin- ished surfaces. • Do not use a bristle brush and soap con-taining an abrasive material. These will damage finished surfaces.
Washing
60B212S
When washing the vehicle, park it wheredirect sunlight does not fall on it and follow the instructions below:1) Flush the underside of body and wheel housings with pressurized water to remove mud and debris. Use plenty ofwater.
2) Rinse the body to loosen the dirt. Remove dirt and mud from the body
exterior with running water. You may use a soft sponge or brush. Do not use hard materials which can scratch thepaint or plastic. Remember that the headlight covers or lenses are made of plastic in many cases.
3) Wash the entire exterior with a mild detergent or car wash soap using a sponge or soft cloth. The sponge or cloth should be frequently soaked in thesoap solution.
4) Once the dirt has been completely removed, rinse off the detergent with running water. 5) After rinsing, wipe off the vehicle bodywith a wet chamois or cloth and allow it to dry in the shade. 6) Check carefully for damage to paintedsurfaces. If there is any damage, “touch-up” the damage following the procedure below:
WA R N I N G
• Never attempt to wash and waxyour vehicle with the engine run-ning. • When cleaning the underside of the body and fender, where there maybe sharp-edged parts, you should wear gloves and a long-sleeved shirt to protect your hands andarms from being cut. • After washing your vehicle, care- fully test the brakes before drivingto make sure they have maintained their normal effectiveness.
NOTICE
When washing the vehicle: • Avoid directing steam or hot water of more than 80
 1
1 2
2 3
3 4
4 5
5 6
6 7
7 8
8 9
9 10
10 11
11 12
12 13
13 14
14 15
15 16
16 17
17 18
18 19
19 20
20 21
21 22
22 23
23 24
24 25
25 26
26 27
27 28
28 29
29 30
30 31
31 32
32 33
33 34
34 35
35 36
36 37
37 38
38 39
39 40
40 41
41 42
42 43
43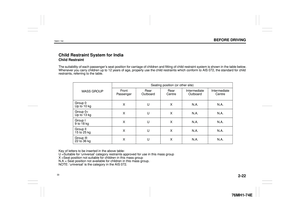 44
44 45
45 46
46 47
47 48
48 49
49 50
50 51
51 52
52 53
53 54
54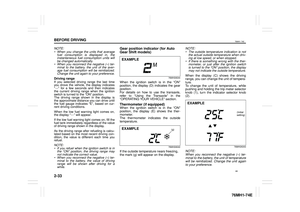 55
55 56
56 57
57 58
58 59
59 60
60 61
61 62
62 63
63 64
64 65
65 66
66 67
67 68
68 69
69 70
70 71
71 72
72 73
73 74
74 75
75 76
76 77
77 78
78 79
79 80
80 81
81 82
82 83
83 84
84 85
85 86
86 87
87 88
88 89
89 90
90 91
91 92
92 93
93 94
94 95
95 96
96 97
97 98
98 99
99 100
100 101
101 102
102 103
103 104
104 105
105 106
106 107
107 108
108 109
109 110
110 111
111 112
112 113
113 114
114 115
115 116
116 117
117 118
118 119
119 120
120 121
121 122
122 123
123 124
124 125
125 126
126 127
127 128
128 129
129 130
130 131
131 132
132 133
133 134
134 135
135 136
136 137
137 138
138 139
139 140
140 141
141 142
142 143
143 144
144 145
145 146
146 147
147 148
148 149
149 150
150 151
151 152
152 153
153 154
154 155
155 156
156 157
157 158
158 159
159 160
160 161
161 162
162 163
163 164
164 165
165 166
166 167
167 168
168 169
169 170
170 171
171 172
172 173
173 174
174 175
175 176
176 177
177 178
178 179
179 180
180 181
181 182
182 183
183 184
184 185
185 186
186 187
187 188
188 189
189 190
190 191
191 192
192 193
193 194
194 195
195 196
196 197
197 198
198 199
199 200
200