Page 121 of 201

5-25
OTHER CONTROLS AND EQUIPMENT
76MH1-74E
76MH1-74E
AAC* Bit rate: ABR 16k - 320 kbbs Sampling frequency: 32 k/44.1 k/48 kHz* Apple Lossless is not supported.
Maximum number of files/folders Maximum number of files: 2500 Maximum number of files in a folder: 255 Maximum depth of tree structure: 8 Maximum number of folders: 255 (Root folder is included.)
Listening to an iPod®
Display
(1) MEDIA button (2) TUNE FOLDER PUSH SOUND knob (3) Up button(4) Down button (5) RPT button (6) RDM button(7) DISP button (8) Preset buttons ([1] to [6])
(A) Track title (B) Track number (C) Play time
Selecting an iPod® mode Press the MEDIA button (1).Each time the button is pressed, the mode will change as follows:
Selecting a track Press the Up button (3) to listen to the next track. Press the Down button (4) twice to listento the previous track. When the Down button (4) is pressed once, the track currently being playedwill start from the beginning again.
Fast forwarding/Rewinding a track Hold down the Up button (3) to fast for- ward the track.
Hold down the Down button (4) to fast rewind the track.
Random playback Press the RDM button (6). Each time the button is pressed, the modewill change as follows:
SONG RANDOM The random indicator “RDM” will light.The tracks in the iPod® will be played in random order. ALBUM RANDOM The random indicator “D.RDM” will light. The albums in the iPod® will be played inrandom order.
Repeat playback Press the RPT button (5). Each time the button is pressed, the mode will change as follows:
SONG REPEAT The repeat indicator “RPT” will light. The track currently being played will beplayed repeatedly.
(6) (7)
(4)
(2)
(3)
(5)(1)
(8)
(C)
(A)
OFF SONG RANDOM ALBUM RANDOM
OFF SONG REPEAT
110
Page 122 of 201
. Each time the button is pressed, displaywill change as follows:
NOTE: If text data contains more than 1")
5-26
OTHER CONTROLS AND EQUIPMENT
76MH1-74E
76MH1-74E
Display change Press the DISP button (7). Each time the button is pressed, displaywill change as follows:
NOTE: If text data contains more than 12 charac- ters, the “>” mark will appear at the right end. Holding down the DISP button (7) for1 second or longer can display the next page.
Playing Mode selection 1) Press the button numbered [6] of the Preset buttons (8) for 1 second or lon-ger. 2) Turn the TUNE FOLDER PUSH SOUND knob (2).Each time the knob is turned, the mode will change as follows:
3) Press the TUNE FOLDER PUSH SOUND knob (2) to select the desired mode.
NOTE: • When the button numbered [6] of thePreset buttons (8) is pressed, the previ- ous mode will be displayed.
Notes on iPod®
Supported iPod®
® touch (5th generation)® touch (4rd generation) ® touch (3rd generation)® touch (2nd generation) ® touch (1st generation) ® classic® nano (7th generation) ® nano (6th generation) ® nano (5th generation)® nano (4th generation) ® nano (3rd generation) ® nano (2nd generation)® nano (1st generation) ® (5th generation) iPhone® 5 iPhone® 4S iPhone® 4 iPhone® 3GS iPhone® 3G iPhone®
* Some functions may not be available depending on the model of iPod®. *iPod® is a trademark of Apple Inc., regis- tered in the U.S. and other countries.* iPhone® is a trademark of Apple Inc., registered in the U.S. and other coun- tries.* Apple is not responsible for the operation of this device or its compliance with safety and regulatory standards.
Playlist name /Track title (Playlist mode only)
Artist name / Track title
Album name / Track title
Track title / Play time
PLAYLIST
ARTIST
ALBUM
SONGS
GENRE
111
Page 123 of 201

5-27
OTHER CONTROLS AND EQUIPMENT
76MH1-74E
76MH1-74E
iPod® connection Make sure to detach the iPod® after pressing the engine switch to change theignition switch is in “LOCK” position. The iPod® may not be shut down when it is being connected and may result in bat-tery depletion. Please do not connect iPod® accesso- ries such as an iPod® remote control orheadphones while connecting the iPod®
with the unit. The unit may not operatecorrectly.
AUX Function
(1) MEDIA button
AUX connection To listen to auxiliary audio sources (sold separately) through the unit, follow theinstruction below. 1) Connect the auxiliary audio source to the AUX/USB socket (separatelyattached) with an AUX cable.
2) Press the MEDIA button (1). Each time the button is pressed, the mode will change as follows:
NOTE: • Please consult your place of purchasefor details about whether a given auxil- iary audio source can be connected and the proper auxiliary cord to use.• The volume and tone controls of the auxiliary audio source can be adjusted on the unit.• In AUX mode, the volume setting is dif- ferent from another mode.
Bluetooth® Hands-Free (if
equipped)
(1) TUNE FOLDER PUSH SOUND knob (2) VOL PUSH POWER knob(3) Preset buttons
Steering switch
(1)
CAUTION
• Before connection, mute the unit, and also keep the volume of the auxiliary audio source within arange that will not cause distortion. • When the audio source is turned off, noise may be emitted. Be sureto turn off the unit or switch to another mode before turning off the audio source.
USB (iPod®) (if equipped)
Bluetooth® audio (if equipped)
AUX (if equipped)(2)(1)
(3)
(4)
(5)
(6)
112
Page 124 of 201
5-28
OTHER CONTROLS AND EQUIPMENT
76MH1-74E
76MH1-74E
(4) Bluetooth® setup button (5) Off Hook button (6) On Hook button (7) VOL switch
Phone registration
NOTE: • Up to 5 phones can be registered. • To set up a new phone, disconnect theaudio player from the unit. Connect the audio player again after phone setup is completed if necessary.• When failed to establish the pairing within 120 seconds, the connecting operation will be canceled. Please tryagain or refer to the manual of the phone in use for how to establish the pairing with the phone.
1) Press the Bluetooth® setup button (4). The Bluetooth® setup menu will be dis- played.2) Turn the TUNE FOLDER PUSH SOUND knob (1) to select “Setup Blue- tooth”, and press the knob (1) to deter-mine the selection. 3) Turn the TUNE FOLDER PUSH SOUND knob (1) to select “Pairing”, and press the knob (1) to determine the selection. 4) Select
Page 125 of 201
 Turn the TUNE FOLDER PUSH SOUND knob (1) to select “Call Vol- ume” or “Ringtone Volume”, and pressthe knob (1) to determine the selecti")
5-29
OTHER CONTROLS AND EQUIPMENT
76MH1-74E
76MH1-74E
4) Turn the TUNE FOLDER PUSH SOUND knob (1) to select “Call Vol- ume” or “Ringtone Volume”, and pressthe knob (1) to determine the selection. The current call or ringtone volume will be displayed.5) Turn the TUNE FOLDER PUSH SOUND knob (1) to select desired call or ringtone volume, and press the knob(1) to determine the selection.
NOTE: When selecting “Go Back”, the previous menu will be displayed.
Selecting the Ringtone Follow the instructions below to select a ringtone.1) Press the Bluetooth® setup button (4). The Bluetooth® setup menu will be dis- played.2) Turn the TUNE FOLDER PUSH SOUND knob (1) to select “Setup Tele- phone”, and press the knob (1) to deter-mine the selection. 3) Turn the TUNE FOLDER PUSH SOUND knob (1) to select “Sound Set-ting”, and press the knob (1) to deter- mine the selection. 4) Turn the TUNE FOLDER PUSHSOUND knob (1) to select “Ringtone”, and press the knob (1) to determine the selection.The current ringtone will be sounded. 5) Turn the TUNE FOLDER PUSH SOUND knob (1) to select desired ring-
tone, and press the knob (1) to deter- mine the selection.
NOTE: When selecting “Go Back”, the previous menu will be displayed.
Dialing using Missed/Incoming/ Outgoing CallsFollow the instructions below to dial to the last dialed number again.
NOTE: Up to 10 phone numbers of the latest calls can be stored. (10 each for dialed,received and missed call)
1) Press the Off Hook button (5). The Bluetooth® phonebook menu will be displayed. 2) Turn the TUNE FOLDER PUSHSOUND knob (1) to select “Missed Calls”, “Incoming Calls” or “Outgoing Calls”, and press the knob (1) to deter-mine the selection. To dial from the dialed history or the received history, select “Missed Calls”,“Incoming Calls” or “Outgoing Calls” respectively. 3) Turn the TUNE FOLDER PUSHSOUND knob (1) to select the desired number, and press the knob (1) to determine the selection.4) Turn the TUNE FOLDER PUSH SOUND knob (1) to select “Dial”, and press the knob (1) or the Off Hook but-ton (5) to dial to the selected number.
NOTE: • When selecting “Go Back”, the previous menu will be displayed.• Pressing “Confirm” after selecting “Add Speed Dial” can register the selected number in the speed dial.• Pressing “Confirm” after selecting “Delete” can delete the selected number from the call history.
Deletion of call historyFollow the instructions below to delete a missed/incoming/outgoing call history. 1) Press the Off Hook button (5). The Bluetooth® phonebook menu will be displayed. 2) Turn the TUNE FOLDER PUSH SOUND knob (1) to select
Page 126 of 201
 Turn the TUNE FOLDER PUSH SOUND knob (1) to select “Confirm”, and press the knob (1) to complete thedeletion.
NOTE: When selecting “Go B")
5-30
OTHER CONTROLS AND EQUIPMENT
76MH1-74E
76MH1-74E
7) Turn the TUNE FOLDER PUSH SOUND knob (1) to select “Confirm”, and press the knob (1) to complete thedeletion.
NOTE: When selecting “Go Back”, the previous menu will be displayed.
Registration in Phonebook Registration of numbers in the phonebook. Follow the instructions below to registerphone numbers in the Phonebook of the unit. 1) Press the Bluetooth® setup button (4). The Bluetooth® setup menu will be dis- played. 2) Turn the TUNE FOLDER PUSHSOUND knob (1) to select “Setup Tele- phone”, and press the knob (1) to deter- mine the selection.3) Turn the TUNE FOLDER PUSH SOUND knob (1) to select “Setup Phonebook”, and press the knob (1) todetermine the selection. 4) Turn the TUNE FOLDER PUSH SOUND knob (1) to select “Add Con-tacts”, and press the knob (1) to deter- mine the selection. 5) Turn the TUNE FOLDER PUSHSOUND knob (1) to select “Overwrite All” or “Add One Contact”, and press the knob (1) to deter mine the selection. The “Rest of Memory XXXX: Ok?” will be displayed. 6) Press or turn the TUNE FOLDERPUSH SOUND knob (1) to select “Con-
firm”, and press the knob (1) to deter- mine the selection. 7) Transfer contacts from the phone.When the registration is completed, the “Setup Phonebook” will be displayed.
NOTE: • When selecting “Go Back” the previous menu will be displayed.• Up to 1000 numbers can be registered in Phonebook.
Transfer of call hi story (Call History) Follow the instructions below to transfer call history of the registered phone.1) Press the Bluetooth® setup button (4). The Bluetooth® setup menu will be dis- played.2) Turn the TUNE FOLDER PUSH SOUND knob (1) to select “Setup Tele- phone”, and press the knob (1) to deter-mine the selection. 3) Turn the TUNE FOLDER PUSH SOUND knob (1) to select “Call His-tory”, and press the knob (1) to deter- mine the selection. 4) Turn the TUNE FOLDER PUSHSOUND knob (1) to select “Call His- tory?”, and press the knob (1) to deter- mine the selection.5) Turn the TUNE FOLDER PUSH SOUND knob (1) to select “Confirm”, and press the knob (1) to transfer thecall history from the phone.
NOTE: When selecting “Go Back”, the previous menu will be displayed.
Making a call by Phonebook Follow the instructions below to dial a num-ber registered in Phonebook. 1) Press the Off Hook button (5). The Bluetooth® phonebook menu willbe displayed. 2) Turn the TUNE FOLDER PUSH SOUND knob (1) to select “Phone-book”, and press the knob (1) to deter- mine the selection. 3) Turn the TUNE FOLDER PUSHSOUND knob (1) to select the initial of the name you would like to make a call, and press the knob (1) to determine theselection. The registered numbers will be dis- played in sequence. If names havebeen registered together with num- bers, the names will be displayed. 4) Turn the TUNE FOLDER PUSHSOUND knob (1) to select “Dial”, and press the knob (1) to determine the selection.5) Press the Off Hook button (5). The displayed number or the number registered with the displayed name willbe dialed.
115
Page 127 of 201
 Follow the instructions below to delete anumber registered in Phonebook. 1) Press the Bluetooth® setup")
5-31
OTHER CONTROLS AND EQUIPMENT
76MH1-74E
76MH1-74E
Deletion of registered data (Delete Entry) Follow the instructions below to delete anumber registered in Phonebook. 1) Press the Bluetooth® setup button (4). The Bluetooth® setup menu will be dis-played. 2) Turn the TUNE FOLDER PUSH SOUND knob (1) to select “Setup Tele-phone”, and press the knob (1) to deter- mine the selection. 3) Turn the TUNE FOLDER PUSHSOUND knob (1) to select “Setup Phonebook”, and press the knob (1) to determine the selection.4) Turn the TUNE FOLDER PUSH SOUND knob (1) to select “Delete Con- tacts”, and press the knob (1) to deter-mine the selection. 5) Turn the TUNE FOLDER PUSH SOUND knob (1) to select a number tobe deleted, and press the knob (1) to determine the selection. 6) Turn the TUNE FOLDER PUSHSOUND knob (1) to select “Delete?”, and press the knob (1) to determine the selection.1) Turn the TUNE FOLDER PUSH SOUND knob (1) to select “Confirm”, and press the knob (1) to complete thedeletion.
NOTE: When selecting “Go Back”, the previous menu will be displayed.
Registration in speed dial Follow the instructions below to assign a number to one of the Preset buttons to useas the speed dial. 1) Press the Bluetooth® setup button (4). The Bluetooth® setup menu will be dis-played. 2) Turn the TUNE FOLDER PUSH SOUND knob (1) to select “Setup Tele-phone”, and press the knob (1) to deter- mine the selection. 3) Turn the TUNE FOLDER PUSHSOUND knob (1) to select “Setup Phonebook”, and press the knob (1) to determine the selection.4) Turn the TUNE FOLDER PUSH SOUND knob (1) to select “Add Speed Dial”, and press the knob (1) to deter-mine the selection. 5) Turn the TUNE FOLDER PUSH SOUND knob (1) to select a number tobe assigned, and press the knob (1) to determine the selection. 6) Turn the TUNE FOLDER PUSHSOUND knob (1) to select “Choose Preset”, and press the knob (1) to determine the selection.7) Press one of the Preset buttons (3) to which the selected number is to be assigned. If a number is alreadyassigned to the selected button, a con- firmation message will be displayed. Turn the TUNE FOLDER PUSHSOUND knob (1) to select “Confirm”, and press the knob (1) to complete the assignment.
When the assignment is completed, the “Setup Phonebook” will be displayed.
NOTE: When selecting “Go Back”, the previous menu will be displayed.
One-touch call (Speed dial) Follow the instructions below to dial thenumber assigned to each of the Preset buttons (3). 1) Press the Off Hook button (5). The Bluetooth® phonebook menu will be displayed. 2) Turn the TUNE FOLDER PUSHSOUND knob (1) to select “Speed Dials”, and press the knob (1) to deter- mine the selection.3) Press one of the Preset buttons (3). When no number is assigned, “No Entry” is displayed.4) Press the Off Hook button (5). The selected number will be dialed.
116
Page 128 of 201
 To delete a number assigned for the speed dial, follow the instructions below.1) Press the Off Hook button")
5-32
OTHER CONTROLS AND EQUIPMENT
76MH1-74E
76MH1-74E
Deletion of speed dial (Del Speed Dial) To delete a number assigned for the speed dial, follow the instructions below.1) Press the Off Hook button (5). The Bluetooth® phonebook menu will be displayed.2) Turn the TUNE FOLDER PUSH SOUND knob (1) to select “Speed Dials”, and press the knob (1) to deter-mine the selection. 3) Press one of the Preset buttons (3) to which the number to be deleted isassigned. “No Entry” appears if the number is not registered.4) Turn the TUNE FOLDER PUSH SOUND knob (1) to select “Delete”, and press the knob (1) to determine theselection. 5) Turn the TUNE FOLDER PUSH SOUND knob (1) to select “Del Speed Dial”, and press the knob (1) to deter- mine the selection. 6) Turn the TUNE FOLDER PUSHSOUND knob (1) to select “Confirm”, and press the knob (1) to complete the deletion.
NOTE: When selecting “Go Back”, the previousmenu will be displayed.
Display of device data (Device Name) Follow the instructions below to display the BD (Bluetooth® Device) address anddevice name. 1) Press the Bluetooth® setup button (4). The Bluetooth® setup menu will be dis-played. 2) Turn the TUNE FOLDER PUSH SOUND knob (1) to select “Setup Blue-tooth”, and press the knob (1) to deter- mine the selection. 3) Turn the TUNE FOLDER PUSHSOUND knob (1) to select “Bluetooth Info”, and press the knob (1) to deter- mine the selection.4) Turn the TUNE FOLDER PUSH SOUND knob (1) to select “Device Name” or “Device Address”, and pressthe knob (1) to display the device name or the BD (Bluetooth® Device) address.
NOTE: When selecting “Go Back”, the previous menu will be displayed.
Reset to the factory defaults Follow the instructions below to reset all the settings to the factory defaults.1) Press the Bluetooth® setup button (4). The Bluetooth® setup menu will be dis- played.2) Turn the TUNE FOLDER PUSH SOUND knob (1) to select “Setup Blue- tooth”, and press the knob (1) to deter-mine the selection. 3) Turn the TUNE FOLDER PUSH SOUND knob (1) to se lect “Initialize”, and press the knob (1) to determine the selection. 4) Turn the TUNE FOLDER PUSHSOUND knob (1) to select “All Initial- ize”, and press the knob (1) to deter- mine the selection.5) Turn the TUNE FOLDER PUSH SOUND knob (1) to select “Confirm”, and press the knob (1) to start thereset.
NOTE: When selecting “Go Back”, the previous menu will be displayed.
117
 1
1 2
2 3
3 4
4 5
5 6
6 7
7 8
8 9
9 10
10 11
11 12
12 13
13 14
14 15
15 16
16 17
17 18
18 19
19 20
20 21
21 22
22 23
23 24
24 25
25 26
26 27
27 28
28 29
29 30
30 31
31 32
32 33
33 34
34 35
35 36
36 37
37 38
38 39
39 40
40 41
41 42
42 43
43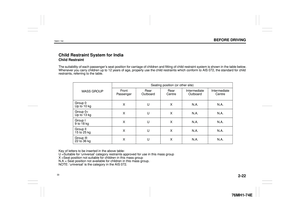 44
44 45
45 46
46 47
47 48
48 49
49 50
50 51
51 52
52 53
53 54
54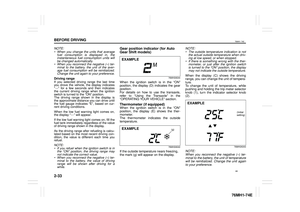 55
55 56
56 57
57 58
58 59
59 60
60 61
61 62
62 63
63 64
64 65
65 66
66 67
67 68
68 69
69 70
70 71
71 72
72 73
73 74
74 75
75 76
76 77
77 78
78 79
79 80
80 81
81 82
82 83
83 84
84 85
85 86
86 87
87 88
88 89
89 90
90 91
91 92
92 93
93 94
94 95
95 96
96 97
97 98
98 99
99 100
100 101
101 102
102 103
103 104
104 105
105 106
106 107
107 108
108 109
109 110
110 111
111 112
112 113
113 114
114 115
115 116
116 117
117 118
118 119
119 120
120 121
121 122
122 123
123 124
124 125
125 126
126 127
127 128
128 129
129 130
130 131
131 132
132 133
133 134
134 135
135 136
136 137
137 138
138 139
139 140
140 141
141 142
142 143
143 144
144 145
145 146
146 147
147 148
148 149
149 150
150 151
151 152
152 153
153 154
154 155
155 156
156 157
157 158
158 159
159 160
160 161
161 162
162 163
163 164
164 165
165 166
166 167
167 168
168 169
169 170
170 171
171 172
172 173
173 174
174 175
175 176
176 177
177 178
178 179
179 180
180 181
181 182
182 183
183 184
184 185
185 186
186 187
187 188
188 189
189 190
190 191
191 192
192 193
193 194
194 195
195 196
196 197
197 198
198 199
199 200
200 Bluetooth® setup button (5) Off Hook button (6) On Hook button (7) VOL switch
Phone registration
NOTE: • Up to 5 phones can be registered")