2014 SUBARU TRIBECA power steering
[x] Cancel search: power steeringPage 22 of 426
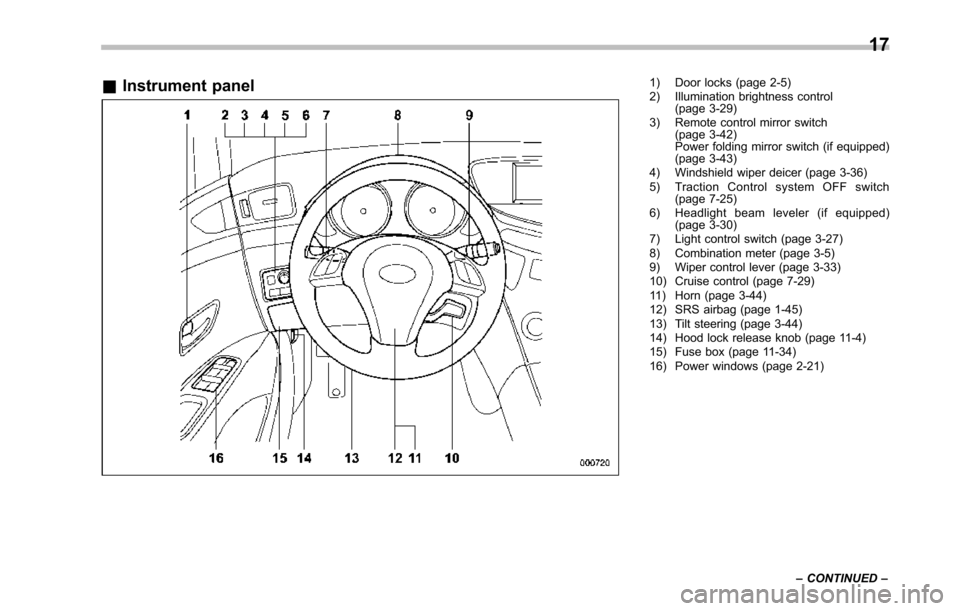
&Instrument panel1) Door locks (page 2-5)2) Illumination brightness control(page 3-29)3) Remote control mirror switch(page 3-42)Power folding mirror switch (if equipped)(page 3-43)4) Windshield wiper deicer (page 3-36)5) Traction Control system OFF switch(page 7-25)6) Headlight beam leveler (if equipped)(page 3-30)7) Light control switch (page 3-27)8) Combination meter (page 3-5)9) Wiper control lever (page 3-33)10) Cruise control (page 7-29)11) Horn (page 3-44)12) SRS airbag (page 1-45)13) Tilt steering (page 3-44)14) Hood lock release knob (page 11-4)15) Fusebox (page 11-34)16) Power windows (page 2-21)
17
–CONTINUED–
Page 136 of 426
Ignition switch
WARNING
.Never turn the ignition switch to“LOCK”while the vehicle isbeing driven or towed becausethat will lock the steering wheel,preventing steering control. Andwhen the engine is turned off, ittakes a much greater effort thanusual to steer.
.Before leaving the vehicle, al-ways removethe key from theignition switch for safety andnever allow an unattended childto remain in the vehicle. Failureto follow this procedure couldresult in injury to a child orothers. Children could operatethe power windows, the moon-roof or other controls or evenmake the vehicle move.
CAUTION
Do not attach a large key holder orkey case to either key. If it bangedagainst your knees or hands whileyou were driving, it could turn theignition switch from the“ON”posi-
tion to the“Acc”or“LOCK”posi-tion, thereby stopping the engine.Also, if the key is attached to akeyholder or to a large bunch ofother keys, centrifugal force may acton it as the vehicle moves, resultingin unwanted turning of the ignitionswitch.
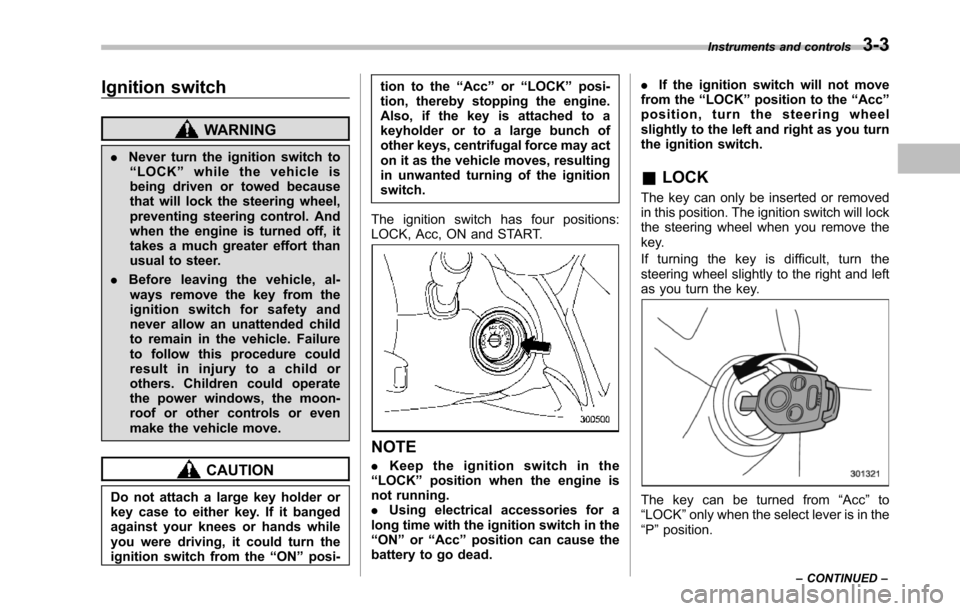
The ignition switch has four positions:LOCK, Acc, ON and START.
NOTE
.Keep the ignition switch in the“LOCK”position when the engine isnot running..Using electrical accessories for along time with the ignition switch in the“ON”or“Acc”position can cause thebattery to go dead.
.If the ignition switch will not movefrom the“LOCK”position to the“Acc”position, turn the steering wheelslightly to the left and right as you turnthe ignition switch.
&LOCK
The key can only be inserted or removedin this position. The ignition switch will lockthe steering wheel when you remove thekey.
If turning the key is difficult, turn thesteering wheel slightly to the right and leftas you turn the key.
The key can be turned from“Acc”to“LOCK”only when the select lever is in the“P”position.
Instruments and controls3-3
–CONTINUED–
Page 248 of 426
Fuel...................................................................... 7-2Fuel requirements............................................... 7-2Fuel filler lid and cap........................................... 7-3
State emission testing (U.S. only)...................... 7-5
Preparing to drive............................................... 7-7
Starting the engine.............................................. 7-7
Stopping the engine............................................ 7-8
Remote engine start system (dealer option)..... 7-8Starting your vehicle........................................... 7-9Remote start safety features................................ 7-9Entering the vehicle while it is running via remotestart.................................................................. 7-9Entering the vehicle following remote engine startshutdown.......................................................... 7-9Pre-heating or pre-cooling the interior of thevehicle............................................................. 7-10Service mode..................................................... 7-10Remote engine start transmitter programmingand programmable feature option..................... 7-10System maintenance.......................................... 7-11
Automatic transmission..................................... 7-12Select lever........................................................ 7-13Shift lock function.............................................. 7-14Selectionof manual mode.................................. 7-16Driving tips........................................................ 7-17SPORT mode..................................................... 7-18
Power steering................................................... 7-18
Braking............................................................... 7-19Braking tips....................................................... 7-19Brake system.................................................... 7-19Disc brake pad wear warning indicators............. 7-20
ABS (Anti-lock Brake System).......................... 7-20ABS system self-check...................................... 7-21ABS warning light.............................................. 7-21
Electronic Brake Force Distribution (EBD)system............................................................. 7-22Steps to take if EBD system malfunctions.......... 7-22
Vehicle Dynamics Control system.................... 7-23Vehicle Dynamics Control system monitor.......... 7-25Traction Control system OFF switch................... 7-25
Tire pressure monitoring system (TPMS)........ 7-27
Parking your vehicle......................................... 7-28Parking brake.................................................... 7-28Parking tips....................................................... 7-29
Cruise control.................................................... 7-29To set cruise control.......................................... 7-30To temporarily cancel the cruise control............. 7-31To turn off the cruise control.............................. 7-31To change the cruising speed ............................ 7-31Cruise control indicator light.............................. 7-32Cruise control set indicator light........................ 7-32
Starting and operating
7
Page 255 of 426
7-8Starting and operating
started. The fuel injection system auto-matically lowers the idle speed as theengine warms up.
While the engine is warming up, makesure that the select lever is at the“P”or“N”position and that the parking brake isapplied.
NOTE
.The engine may be difficult to startwhen the battery has been discon-nected and reconnected (for mainte-nance or other purposes). This diffi-culty is caused by the electronicallycontrolled throttle’sself-diagnosisfunction. To overcome it, keep theignition switch in the“ON”positionfor approximately 10 seconds beforestartingthe engine..To p r o t e c t t h e e n g i n e w h i l e t h eselect lever is in the“P”or“N”position, the engine is controlled sothat the engine speed may not becometoo high even if the accelerator pedal isdepressed hard.
Stopping the engine
WARNING
Do not stop the engine when thevehicle is moving. This will causeloss of power to the power steeringand the brakebooster, making steer-ing and braking more difficult. Itcould also result in accidental acti-vation of the“LOCK”position on theignition switch, causing the steeringwheel to lock.
The ignition switch should be turned offonly whenthe vehicle is stopped and theengine is idling.
Remote engine start system
(dealer option)
WARNING
.Do not start the engine using theremote start system in an en-closed environment (e.g. closedgarage). Prolonged operation ofa motor vehicle in an enclosedenvironment can cause a harmfulbuild-up of Carbon Monoxide.Carbon Monoxide is harmful toyour health. Exposure to highlevels of Carbon Monoxide cancause headaches, dizziness or inextreme cases unconsciousnessand/or death.
.Before performing any servicingof the vehicle, temporarily placethe remote engine start system inservice mode to prevent thesystem from unexpectedly start-ing the engine.
Page 265 of 426
7-18Starting and operating
&SPORT mode
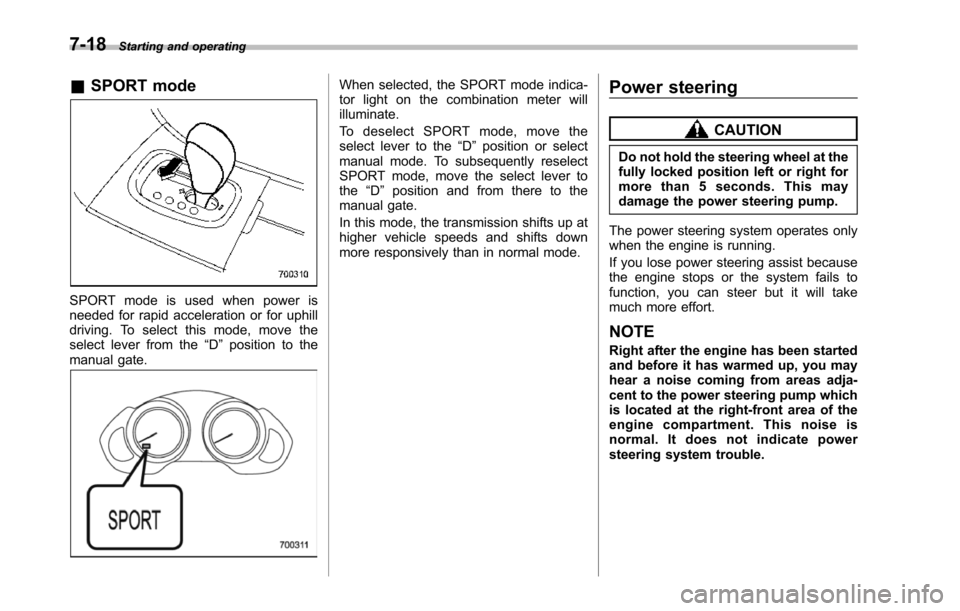
SPORT mode is used when power isneeded for rapid acceleration or for uphilldriving. To select this mode, move theselect lever from the“D”position to themanual gate.
When selected, the SPORT mode indica-tor light on the combination meter willilluminate.
To d e s e l e c t S P O R T m o d e , m o v e t h eselect lever to the“D”position or selectmanual mode. To subsequently reselectSPORT mode, move the select lever tothe“D”position and from there to themanual gate.
In this mode, the transmission shifts up athigher vehicle speeds and shifts downmore responsivelythan in normal mode.
Power steering
CAUTION
Do not hold the steering wheel at thefully locked position left or right formore than 5 seconds. This maydamage thepower steering pump.
The power steering system operates onlywhen the engine is running.
If you lose power steering assist becausethe engine stops or the system fails tofunction, you can steer but it will takemuch more effort.
NOTE
Right after the engine has been startedand before it has warmed up, you mayhear a noise coming from areas adja-centto the power steering pump whichis located at the right-front area of theengine compartment. This noise isnormal. It does not indicate powersteering system trouble.
Page 324 of 426
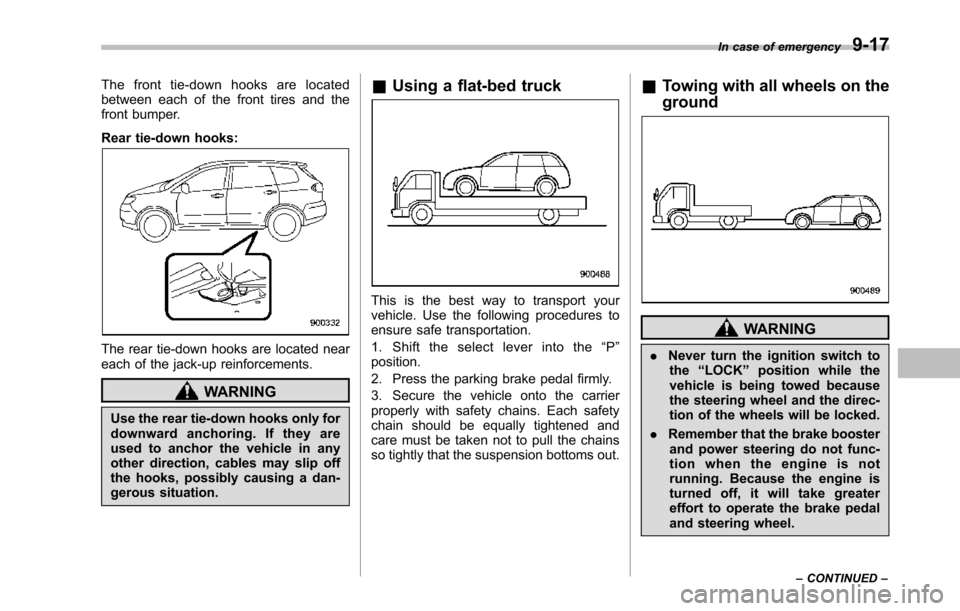
The front tie-down hooks are locatedbetween each of the front tires and thefront bumper.
Rear tie-down hooks:
The rear tie-down hooks are located neareach of the jack-up reinforcements.
WARNING
Use the rear tie-down hooks only fordownward anchoring. If they areused to anchor the vehicle in anyother direction, cables may slip offthe hooks,possibly causing a dan-gerous situation.
&Using a flat-bed truck
This is the best way to transport yourvehicle. Use the following procedures toensure safe transportation.
1. Shift the select lever into the“P”position.
2. Press the parking brake pedal firmly.
3. Secure the vehicle onto the carrierproperly with safety chains. Each safetychain should be equally tightened andcare must be taken not to pull the chainsso tightly that the suspension bottoms out.
&Towing with all wheels on the
ground
WARNING
.Never turn the ignition switch tothe“LOCK”position while thevehicle is being towed becausethe steeringwheel and the direc-tion of the wheels will be locked.
.Remember that the brake boosterand power steering do not func-tion when the engine is notrunning. Because the engine isturned off, it will take greatereffort to operate the brake pedaland steering wheel.
In case of emergency9-17
–CONTINUED–
Page 329 of 426

10-2Appearance care
Exterior care
&Washing
CAUTION
.When washing the vehicle, thebrakes may get wet. As a result,the brake stopping distance willbe longer. To dry the brakes,drive the vehicle at a safe speedwhile lightly pressing the brakepedal to heat up the brakes.
.Do not wash the engine compart-ment and areas adjacent to it. Ifwater enters the engine air in-take, electrical parts or the powersteering fluid reservoir, it willcause engine trouble or a mal-functionof the power steering.
.Do not use any organic solventswhen washing the surface of thebulb assembly cover. However, ifa detergent with organic solventsis used to wash the cover sur-face, completely rinse off thedetergent with water. Otherwise,the cover surface may be da-maged.
.Since your vehicle is equippedwith a rear wiper, automatic car-wash brushes could become
tangled around it, damaging thewiper arm and other compo-nents. Ask the automatic car-wash operator not to let thebrushes touch the wiper arm orto fix the wiper arm on the rearwindow glass with adhesive tapebefore operating the machine.
NOTE
When having your vehicle washed inan automatic car wash, make surebeforehand that the car wash is ofsuitable type.
The best way to preserve your vehicle’sbeauty is frequent washing. Wash thevehicleat least once a month to avoidcontamination by road grime.
Wash dirt off with a wet sponge and plentyof lukewarm or cold water. Do not washthe vehicle with hot water and in directsunlight.
Salt, chemicals, insects, tar, soot, treesap, and bird droppings should be washedoff by using a light detergent, as required.If you use a light detergent, make certainthat it is a neutral detergent. Do not usestrong soap or chemical detergents. Allcleaning agents should be promptlyflushed from the surface and not allowed
to dry there. Rinse the vehicle thoroughlywith plenty of lukewarm water. Wipe theremaining water off with a chamois or softcloth.
!Washing the underbody
Chemicals, salts and gravel used fordeicing road surfaces are extremely cor-rosive, accelerating the corrosion of un-derbody components, such as the exhaustsystem, fuel and brake lines, brakecables, floor pan and fenders, and sus-pension.
Thoroughly flush the underbody and in-side of the fenders with lukewarm or coldwater at frequent intervals to reduce theharmful effects of such agents.
Mud and sand adhering to the underbodycomponents may accelerate their corro-sion.
Afterdriving off-road or muddy or sandyroads, wash the mud and sand off theunderbody.
Carefully flushthe suspension and axleparts, as they are particularly prone tomud and sand buildup. Do not use asharp-edged tool to remove caked mud.
NOTE
Be careful not to damage brake hoses,sensor harnesses, and other partswhen washing suspension compo-
Page 334 of 426

Maintenance schedule....................................... 11-3
Maintenance precautions................................... 11-3Before checking or servicing in the enginecompartment.................................................... 11-4When you do checking or servicing in the enginecompartment while the engine is running.......... 11-4
Engine hood....................................................... 11-4
Engine compartment overview.......................... 11-6
Engine oil............................................................ 11-7Checking the oil level......................................... 11-7Changing the oil and oil filter.............................. 11-8Recommendedgrade and viscosity.................... 11-9Synthetic oil....................................................... 11-9
Cooling system................................................ 11-10Hose and connections...................................... 11-10Engine coolant................................................. 11-11
Air cleaner element.......................................... 11-12Replacing the air cleaner element..................... 11-12
Spark plugs...................................................... 11-13Recommended spark plugs.............................. 11-13
Drive belts........................................................ 11-13
Automatic transmission fluid.......................... 11-14Checking the fluid level.................................... 11-14Recommended fluid......................................... 11-15
Front differential gear oil................................. 11-15Checking the oil level....................................... 11-15Recommended grade and viscosity.................. 11-16
Rear differential gear oil.................................. 11-16Recommended grade and viscosity.................. 11-16
Power steering fluid........................................ 11-16Checking the fluid level.................................... 11-16Recommended fluid......................................... 11-17
Brake fluid........................................................ 11-17Checking the fluid level.................................... 11-17Recommended brake fluid............................... 11-18
Brakebooster.................................................. 11-18
Brake pedal...................................................... 11-19Checking the brake pedal free play.................. 11-19Checking the brake pedal reserve distance....... 11-19
Replacement of brake pad and lining............ 11-19Breaking-in of new brake pads and linings....... 11-20
Parking brake stroke....................................... 11-20
Tires and wheels.............................................. 11-21Types of tires................................................... 11-21Tire pressure monitoring system (TPMS).......... 11-21Tire inspection................................................. 11-22Tire pressuresand wear.................................. 11-23Wheel balance................................................. 11-25Wear indicators............................................... 11-25Tire rotation direction mark.............................. 11-25Tire rotation..................................................... 11-26Tire replacement.............................................. 11-26Wheel replacement.......................................... 11-27
Aluminum wheels............................................ 11-27
Windshield washer fluid.................................. 11-28
Replacement of wiper blades......................... 11-29Windshield wiper blade assembly..................... 11-30Windshield wiper blade rubber ......................... 11-30Rear window wiper blade assembly.................. 11-31
Maintenance and service
11