2014 SUBARU TRIBECA service
[x] Cancel search: servicePage 147 of 426
3-14Instruments and controls
vehicle speed and stop the vehicle at thenearest safe place.
Park the vehicle for several minutes. Afterthe light turns off, you can start driving.
If the light does not turn off, contact thenearest SUBARU dealer for service.
NOTE
.If the tire pressures are not correctand/or the tires are not all the samesize and brand, the rear differential willbe heavily loaded when the vehicle isdriven, resultingin an abnormally highoiltemperature..The rear differential oil will deterio-rate if its temperature increases en-ough for the rear differential oil tem-perature warning light to illuminate. It isadvisable to have the rear differentialoil replaced as soon as possible.
&Low tire pressure
warning light
When the ignition switch is turned to the“ON”position, the low tire pressure warn-ing light will illuminate for approximately 2seconds to check that the tire pressuremonitoring system (TPMS) is functioningproperly. If there is no problem and all tiresare properly inflated, the light will turn off.
Each tire, including the spare (if provided),
should be checked monthly when coldand inflated to the inflation pressurerecommended by the vehicle manufac-turer on the vehicle placard or tire inflationpressure label. (If your vehicle has tires ofa different size than the size indicated onthe vehicle placard or tire inflation pres-sure label, you should determine theproper tire inflation pressure for thosetires.)
As an added safety feature, your vehiclehas been equipped with a tire pressuremonitoring system (TPMS) that illuminatesa low tire pressure telltale when one ormore of your tires is significantly under-inflated. Accordingly, when the low tirepressure telltale illuminates, you shouldstop and check your tires as soon aspossible, and inflatethem to the properpressure.Driving on a significantly under-inflated tire causes the tire to overheat andcan lead to tire failure. Under-inflation alsoreduces fuel efficiency and tire tread life,and may affect the vehicle’s handling andstopping ability.
Please note that the TPMS is not asubstitute for proper tire maintenance,and it is the driver’sresponsibilitytomaintain correct tire pressure, even ifunder-inflation has not reached the levelto trigger illumination of the TPMS low tirepressure telltale.
Your vehicle has also been equipped witha TPMS malfunction indicator to indicatewhen the system is not operating properly.The TPMS malfunction indicator is com-bined with the low tire pressure telltale.When the system detects a malfunction,the telltale will flash for approximately oneminute and then remain continuouslyilluminated. This sequence will continueupon subsequent vehicle start-ups as longas the malfunction exists. When themalfunction indicator is illuminated, thesystem may not be able to detect or signallow tire pressure as intended. TPMSmalfunctions may occur for a variety ofreasons, including the installation of re-placement or alternate tires or wheels onthe vehicle that prevent the TPMS fromfunctioning properly. Always check theTPMS malfunction telltale after replacingone or more tires or wheels on yourvehicle to ensure that the replacement oralternate tires and wheels allow the TPMSto continue to function properly.
Should the warning light illuminate stea-dily after blinking for approximately oneminute, have the system inspected byyour nearest SUBARU dealer as soon aspossible.
Page 188 of 426
system.
&Air conditioner compressor
shut-off when engine is
heavily loaded
To improve acceleration and gas mileage,the air conditioner compressor is designedto temporarily shut off during air condi-tioner operation whenever the acceleratoris fully depressed such as during rapidacceleration or when driving on a steepupgrade.
&Refrigerant for your climate
control system
Your air conditioner uses ozone friendlyrefrigerant HFC134a. Therefore, the meth-od of adding, changing or checking therefrigerant is different from the method forCFC12 (freon). Consult your SUBARUdealer for service. Repairs needed as aresult of using the wrong refrigerant arenot covered under warranty.
Air filtration system
Replace the filter element according to thereplacement schedule shown in the fol-lowing. This schedule should be followedto maintain the filter’sdustcollectionability. Under extremely dusty conditions,the filter should be replaced more fre-quently. It is recommended that you haveyour filter checked or replaced by yourSUBARU dealer. For replacement, werecommend the use of a genuineSUBARU airfilter kit.
Replacement schedule:
Every 15 months or 15,000 miles (24,000km) whichever comes first
&Replacing the air filter
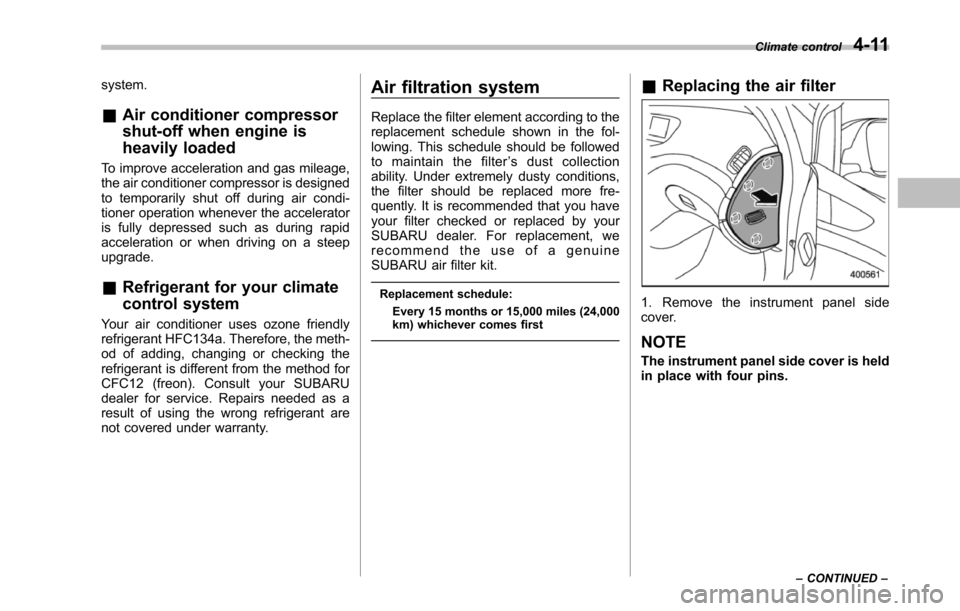
1. Remove the instrument panel sidecover.
NOTE
The instrument panel side cover is heldin place with four pins.
Climate control4-11
–CONTINUED–
Page 198 of 426
NOTE
While you are holding down either sideof the“TUNE TRACK”button, thetuning frequency will not stop chan-ging even if the frequency of a recei-vable station is reached.
!Seek tuning
If you press the“”or“”side of the“SEEK FLDR”button (7), the radio willautomatically search for a receivablestation and stop at the first one it finds.This function may not be available, how-ever, when radio signals are weak. In suchasituation,performmanualtuningtoselect the desired station.
!Automatic tuning (SCAN)
Press the“SCAN”button (8) to change theradio to the SCAN mode. In this mode, theradio scans through the radio band until astation is found. The radio will stop at thestation for 5 seconds while displaying thefrequency, after which scanning will con-tinue until the entire band has beenscanned from the low end to the highend. Press the“SCAN”button again tocancel the SCAN mode and to stop on anydisplayed frequency.
Press the“”or“”side of the“SEEKFLDR”button (7) again to cancel the scanmode and to stop on any displayed
frequency.
When the“SCAN”button is pressed forautomatic tuning, stations are scanned inthe direction of low frequencies to highfrequencies only.
Automatic tuning may not function prop-erly if the station reception is weakened bydistancefrom the station or proximity totall buildings and hills.
!Selecting preset stations
Presetting a station with a preset button(10) allows you to select that station in asingle operation. Up to six, AM, FM1 andFM2 stations each may be preset.
!How to preset stations
1. Press the“FM AM”button (2) to selectFM1, FM2, or AM reception.
2. Press the“SCAN”button (8) or tunethe radio manually until the desired stationfrequencyis displayed.
3. Press and hold one of the presetbuttons (10) to store the frequency. If thebutton is pressed briefly, the precedingselection will remain in memory.
NOTE
.If the connection between the radioand battery is broken for any reasonsuch as vehicle maintenance or radioremoval, all stations stored in the
preset buttons are cleared. If thisoccurs, it is necessary to reset thepreset buttons..If a cell phone is placed near theradio, it may cause the radio to emitnoise when it receives calls. This noisedoes not indicate a radio malfunction.
!Satellite radio mode (if equipped)
To receive satellite radio, it is necessary toinstall the SUBARU genuine satellitereceiver (optional part) and to enter intoa contract with a satellite radio networkservice such as“Sirius XMTMsatelliteradio”(for U.S.A. only)or“Sirius satelliteradio”(for Canada only). For details,please contact your SUBARU dealer.
!Sirius satellite radio (for Canadaonly)
Sirius satellite radio is a recent innovationthat allows the listener to experiencedigital sound quality and to have a greatervariety of channels.
Use of satellite radio (Sirius) requires atuner, antenna and a service contract. Fordetails, please contact your SUBARUdealer or visit Sirius Satellite Radio atwww.sirius.ca or call 1-888-539-7474 formore information. Sirius, the Sirius doglogo, channel names and logos are trade-marks of SIRIUS Satellite Radio Inc.
Audio5-7
–CONTINUED–
Page 199 of 426
5-8Audio
!Sirius XMTMSatellite Radio Acti-vation (for U.S.A. only)
Models with Sirius XMTMare eligible for a3-month complimentary subscription tothe Sirius XMTMSatellite Radio service.
Activation process:
You can activate the XM Satellite Radiofromthe website of the XM Satellite Radio.For details, visit the website.
!Satellite radio reception
Satellite radio signals are best received inareas with a clear view of the open sky. Inareas wherethere are tall buildings, trees,tunnels or other structures that mayobstruct the signal of the satellites, theremay be signal interruptions. Other circum-stances that may result in signal lossinclude driving near a wall, steep cliff orhill, or driving on the lower level of a multi-tiered road or inside a parking garage.
To help reduce this condition, satelliteradio providers have installed ground-based repeaters in heavily populatedareas. However, you may still experiencereception problems in some areas.
!Displaying satellite radio ID oftuner
When you activate satellite radio, youshould have your satellite radio tuner ID
ready because each tuner is identified byits unique satellite radio tuner ID.
The satellite radio ID will be needed whenyou activate satellite radio and receivesatellite radio customer support.
The satellite radio ID can be found on theaudio display by tuning the channel to“0”.
Turn the“TUNE TRACK”button (4) toselect the satellite radio channel.
!Band selection button
Push the“SAT”button (1) when the radiois off to turn on the radio.
Push the“SAT”button when the radio ison to select SAT1, SAT2 or SAT3 recep-tion.
!Channel selection
Press“”of the“TUNE TRACK”button(4) to select the next channel and press“”of the button to select the previouschannel.
Keep pressing“”of the button tochange to the next channel continuouslyand keep pressing“”of the button tochange to the previous channel continu-ously.
!Category selection
Press“”or“”of the“SEEK FLDR”button (7) to display the current category.Press“”again to select the next
category, and press“”again to selectthe previous category.
!Channel scan
Press the“SCAN”button (8) to change theradio to the SCAN mode. In this mode, theradio scans through the channels until astation is found. The radio will stop at thestation for 5 seconds while displaying thechannel number, after which scanning willcontinue until the entire channel has beenscanned from the low end to the high end.
Also during the category selection, chan-nel scan can be performed in that cate-gory.
Press the“SCAN”button again to cancelthe SCAN mode and to stop on anydisplayed channel.
!Selecting presetchannels
Presetting a channel with a preset button(10) allows you to select that channel in asingle operation. Up to six, SAT1, SAT2and SAT3 channels each may be preset.
!How to preset channels
1. Press the“SAT”button (1) to selectSAT1, SAT2 and SAT3 reception.
2. Press the“SCAN”button (8) or the“TUNE TRACK”button (4) to select thechannel.
3. Press and hold one of the preset
Page 209 of 426
5-18Audio
NOTE
While you are holding down either sideof the TUNE/TRACK button, the tuningfrequency will not stop changing evenif the frequency of a receivable stationis reached.
!Seek tuning (SEEK)
If you press the“”or“”side of the“SEEK FLDR”button (7), the radio willautomatically search for a receivablestation and stop at the first one it finds.This function may not be available, how-ever, when radio signals are weak. In suchasituation,performmanualtuningtoselect the desired station.
!Scan tuning (SCAN)
Press the“SCAN”button (8) to change theradio to the SCAN mode. In this mode, theradio scans through the radio band until astationis found. The radio will stop at thestation for 5 seconds while displaying thefrequency, after which scanning will con-tinue until the entire band has beenscannedfrom the low end to the highend. Press the“SCAN”buttonagain tocancel the SCAN mode and to stop on anydisplayed frequency.
Press the“”or“”side of the“SEEKFLDR”button (7) again to cancel the scanmode and to stop on any displayed
frequency.
When the“SCAN”button is pressed forautomatic tuning, stations are scanned inthe direction of low frequencies to highfrequencies only.
Automatic tuning may not function prop-erly if the station reception is weakened bydistance from the station or proximity totall buildings and hills.
!Selecting preset stations
Presetting a station with a preset buttonallows you to select that station in a singleoperation. Up to six AM, FM1 and FM2stations each may be preset.
!How to preset stations
1. Press the“FM AM”button (2) to selectFM1, FM2 or AM reception.
2. Press the“SCAN”button (8) or tunethe radio manually until the desired stationfrequency is displayed.
3. Press and hold one of the presetbuttons to store the frequency. If thebutton is pressed briefly, the precedingselection will remain in memory.
NOTE
.If the connection between the radioand battery is broken for any reasonsuch as vehicle maintenance or radioremoval, all stations stored in the
preset buttons are cleared. If thisoccurs, it is necessary to reset thepreset buttons..If a cell phone is placed near theradio, it may cause the radio to emitnoise when it receives calls. This noisedoes not indicate a radio malfunction.
!Satellite radio mode (if equipped)
To receive satellite radio, it is necessary toinstall the SUBARU genuine satellitereceiver (optional part) and to enter intoa contract with a satellite radio networkservice such as“Sirius XMTMsatelliteradio”(for U.S.A. only) or“Sirius satelliteradio”(for Canada only). For details,please contact your SUBARU dealer.
!Sirius satellite radio (for Canadaonly)
Refer to“Sirius satellite radio (for Canadaonly)”F5-7.
!Sirius XMTMSatellite Radio Acti-vation (for U.S.A. only)
Refer to“Sirius XMTMSatellite RadioActivation (for U.S.A. only)”F5-8.
!Satellite radio reception
Refer to“Satellite radio reception”F5-8.
Page 238 of 426
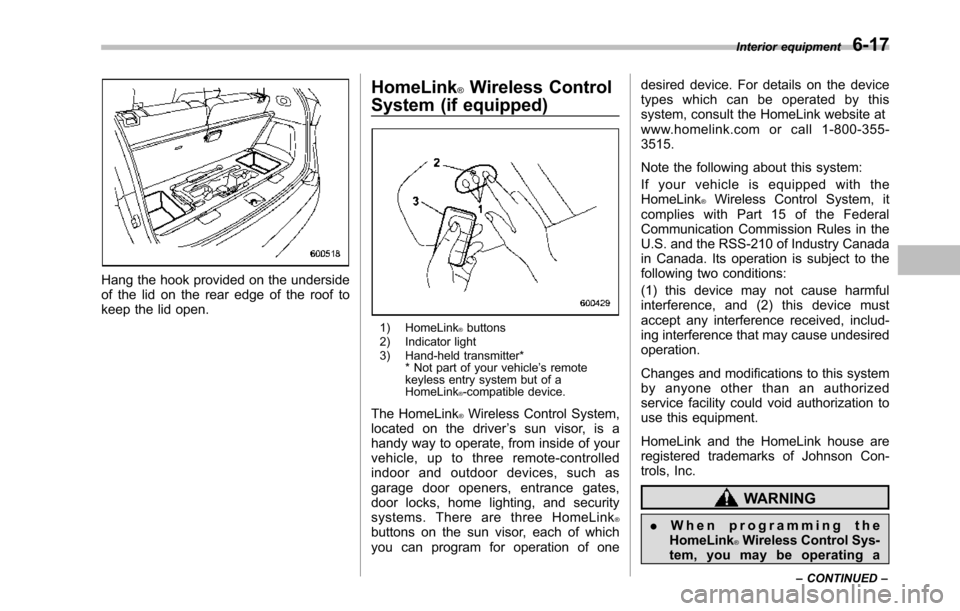
Hang the hook provided on the undersideof the lid on the rear edge of the roof tokeepthe lid open.
HomeLink®Wireless Control
System (if equipped)
1) HomeLink®buttons2) Indicator light3) Hand-held transmitter** Not part of your vehicle’s remotekeyless entry system but of aHomeLink®-compatible device.
The HomeLink®Wireless Control System,located on the driver’s sun visor, is ahandy way to operate, from inside of yourvehicle, up to three remote-controlledindoor and outdoor devices, such asgarage door openers, entrance gates,door locks, home lighting, and securitysystems. There are three HomeLink®buttons on the sun visor, each of whichyou can program for operation of one
desired device. For details on the devicetypes which can be operated by thissystem, consult the HomeLink website atwww.homelink.com or call 1-800-355-3515.
Note the following about this system:
If your vehicle is equipped with theHomeLink®Wireless Control System, itcomplies with Part 15 of the FederalCommunication Commission Rules in theU.S. and the RSS-210 of Industry Canadain Canada. Its operation is subject to thefollowing two conditions:
(1) this device may not cause harmfulinterference, and (2) this device mustaccept any interference received, includ-ing interference that may cause undesiredoperation.
Changes and modifications to this systemby anyone other than an authorizedservice facility could void authorization touse this equipment.
HomeLink and the HomeLink house areregistered trademarks of Johnson Con-trols, Inc.
WARNING
.When programming theHomeLink®Wireless Control Sys-tem, you may be operating a
Interior equipment6-17
–CONTINUED–
Page 248 of 426
Fuel...................................................................... 7-2Fuel requirements............................................... 7-2Fuel filler lid and cap........................................... 7-3
State emission testing (U.S. only)...................... 7-5
Preparing to drive............................................... 7-7
Starting the engine.............................................. 7-7
Stopping the engine............................................ 7-8
Remote engine start system (dealer option)..... 7-8Starting your vehicle........................................... 7-9Remote start safety features................................ 7-9Entering the vehicle while it is running via remotestart.................................................................. 7-9Entering the vehicle following remote engine startshutdown.......................................................... 7-9Pre-heating or pre-cooling the interior of thevehicle............................................................. 7-10Service mode..................................................... 7-10Remote engine start transmitter programmingand programmable feature option..................... 7-10System maintenance.......................................... 7-11
Automatic transmission..................................... 7-12Select lever........................................................ 7-13Shift lock function.............................................. 7-14Selectionof manual mode.................................. 7-16Driving tips........................................................ 7-17SPORT mode..................................................... 7-18
Power steering................................................... 7-18
Braking............................................................... 7-19Braking tips....................................................... 7-19Brake system.................................................... 7-19Disc brake pad wear warning indicators............. 7-20
ABS (Anti-lock Brake System).......................... 7-20ABS system self-check...................................... 7-21ABS warning light.............................................. 7-21
Electronic Brake Force Distribution (EBD)system............................................................. 7-22Steps to take if EBD system malfunctions.......... 7-22
Vehicle Dynamics Control system.................... 7-23Vehicle Dynamics Control system monitor.......... 7-25Traction Control system OFF switch................... 7-25
Tire pressure monitoring system (TPMS)........ 7-27
Parking your vehicle......................................... 7-28Parking brake.................................................... 7-28Parking tips....................................................... 7-29
Cruise control.................................................... 7-29To set cruise control.......................................... 7-30To temporarily cancel the cruise control............. 7-31To turn off the cruise control.............................. 7-31To change the cruising speed ............................ 7-31Cruise control indicator light.............................. 7-32Cruise control set indicator light........................ 7-32
Starting and operating
7
Page 249 of 426
7-2Starting and operating
Fuel
CAUTION
Use of a fuel which is low in qualityor use of an inappropriate fueladditive may cause engine damage.
&Fuel requirements
The engine is designed to operate usingunleaded gasolinewith an octane ratingof87 AKI (90 RON) or higher.
!Fuel octane rating
This octane rating is the average of theResearch Octane and Motor Octanenumbers andis commonly referred to asthe Anti Knock Index (AKI).
Using a gasoline with a lower octanerating can causepersistent and heavyknocking, which can damage the engine.Do not be concerned if your vehiclesometimes knocks lightly when you driveup a hill or when you accelerate. Contactyour SUBARU dealer if you use a fuel withthe specified octane rating and yourvehicle knocks heavily or persistently.
!Unleaded gasoline
The neck of the fuel filler pipe is designedto accept only an unleaded gasoline filler
nozzle. Under no circumstances shouldleaded gasoline be used because it willdamage the emission control system andmay impair driveability and fuel economy.
!California fuel
If your vehicle was certified to CaliforniaEmission Standards as indicated on theunderhood tune-up label, it is designed tooptimize engine and emission controlsystem performance with gasoline thatmeets the clean burning low-sulfur Cali-fornia gasoline specifications. If you live inany other state than California, yourvehicle will operate on gasoline meetingFederal specifications. Gasoline sold out-side California is permitted to have highersulfur levels, which may affect the perfor-mance of your vehicle’s catalytic converterand may produce a sulfur exhaust odor orsmell. SUBARU recommends that you trya different brand of unleaded gasolinehaving lower sulfur to determine if theproblem is fuel related before returningyour vehicle to an authorized dealer forservice. The CHECK ENGINE warninglight/Malfunction indicator light may alsoilluminate. If this occurs, return to yourauthorized SUBARU dealer for diagnosis.If it is determined that the condition iscausedby the type of fuel used, repairsmay not be covered by your warranty.
!MMT
Some gasoline contains an octane-en-hancing additive called MMT (Methylcy-clopentadienyl Manganese Tricarbonyl). Ifyou use such fuels, your emission controlsystem performance may deteriorate andthe CHECK ENGINE warning light/Mal-function indicator light may illuminate. Ifthis happens, return to your authorizedSUBARU dealer for service. If it isdetermined that the condition is causedby the type of fuel used, repairs may notbe covered by your warranty.
!Gasoline for cleaner air
CAUTION
Do not let fuel spill on the exteriorsurfaces of the vehicle. Fuels con-taining alcohol may cause paintdamage, which is not covered underthe SUBARU Limited Warranty.
Yo u r u s e o f g a s o l i n e w i t h d e t e r g e n tadditives will help prevent deposits fromforming in your engine and fuel system.This helps keepyour engine in tune andyour emission control system workingproperly, and is a way of doing your partfor cleaner air. If you continuously use ahigh quality fuel with the proper detergentand other additives, you should never