Page 23 of 106

Navigation 95
Read First
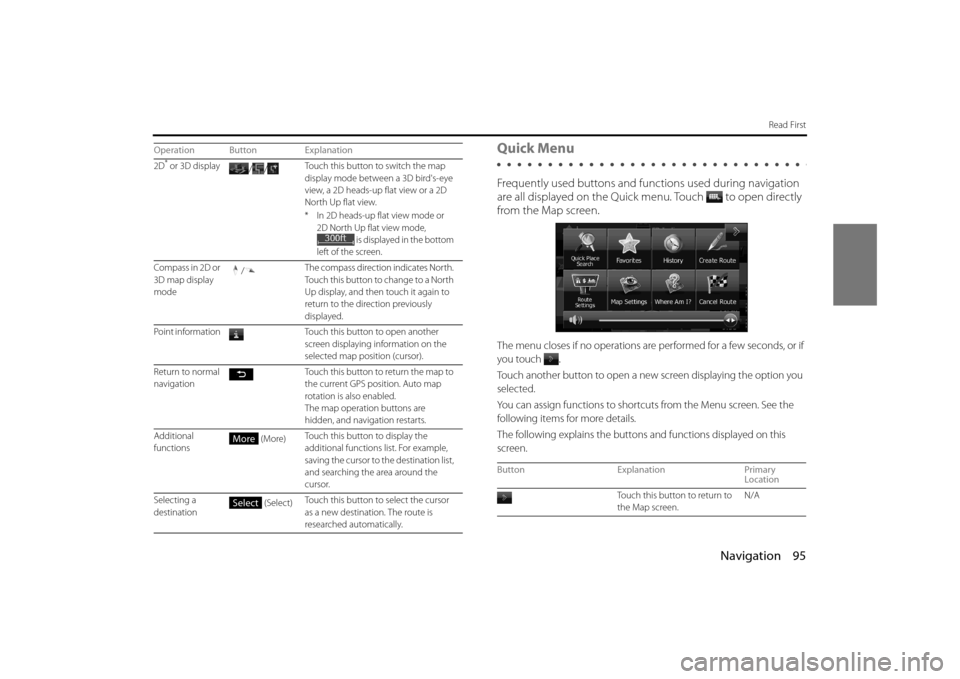
Quick Menu
Frequently used buttons and functions used during navigation
are all displayed on the Quick menu.
Touch to open directly
from the Map screen.
The menu closes if no operations are performed for a few seconds, or if
you touch
.
Touch another button to open a new screen displaying the option you
selected.
You can assign functions to shortcu ts from the Menu screen. See the
following items for more details.
The following explains the buttons and functions displayed on this
screen.
2D* or 3D display //Touch this button to switch the map
display mode between a 3D bird's-eye
view, a 2D heads-up flat view or a 2D
North Up flat view.
* In 2D heads-up flat view mode or
2D North Up flat view mode, is displayed in the bottom
left of the screen.
Compass in 2D or
3D map display
mode /
The compass direction indicates North.
Touch this button to change to a Nor th
Up display, and then touch it again to
return to the direction previously
displayed.
Point information Touch this button to open another
screen displaying information on the
selected map position (cursor).
Return to normal
navigation Touch this button to return the map to
the current GPS position. Auto map
rotation is also enabled.
The map operation buttons are
hidden, and navigation restarts.
Additional
functions (More)
Touch this button to display the
additional functions list. For example,
saving the cursor to the destination list,
and searching the area around the
cursor.
Selecting a
destination (Select)
Touch this button to select the cursor
as a new destination. The route is
researched automatically.
Operation Button Explanation
More
Select
Button
Explanation Primary
Location
Touch this button to return to
the Map screen. N/A
Page 34 of 106
106 Navigation
Navigation
7The map is displayed in full-screen mode with the
selected point at the center. If necessary, you can touch
another point on the map to change the destination. The
cursor ( ) is displayed at the new position. Touch
(Next) to set the destination, or touch to select
another destination.8After a summary of the route plan is displayed, the entire
route is displayed on the map. The route is researched
automatically. Touch (More) to change the route
plan, or touch (Go!) to start navigation. (When the
countdown is displayed in the “Go!” button, guidance
begins automatically after 10 seconds even if you do not
touch the button.)
Next
More
Go!
Page 36 of 106
108 Navigation
Navigation
6Touch (Select City) without entering the street
name. Set the city/town center displayed as the route's
destination.
7The map is displayed in full-screen mode with the
selected point at the center. If necessary, you can touch
another point on the map to change the destination. The
cursor ( ) is displayed at the new position. Touch
(Next) to set the destination, or touch to select
another destination.
8After a summary of the route plan is displayed, the entire
route is displayed on the map. The route is researched
automatically. Touch (More) to change the route
plan, or touch (Go!) to start navigation. (When the
countdown is displayed in the “Go!” button, guidance
begins automatically after 10 seconds even if you do not
touch the button.)Select City
Next
More
Go!
Page 39 of 106
Navigation 111
Navigation
8The map is displayed in full-screen mode with the
selected point at the center. If necessary, you can touch
another point on the map to change the destination. The
cursor ( ) is displayed at the new position. Touch
(Next) to set the destination, or touch to select
another destination.9After a summary of the route plan is displayed, the entire
route is displayed on the map. The route is researched
automatically. Touch (More) to change the route
plan, or touch (Go!) to start navigation. (When the
countdown is displayed in the “Go!” button, guidance
begins automatically after 10 seconds even if you do not
touch the button.)
Next
More
Go!
Page 42 of 106
114 Navigation
Navigation
5Find the item you want on the list, and then touch that
item. The map is displayed in full-screen mode with the
selected point at the center. The name and address of
the spot are displayed at the top of the screen.
6(Optional) Touch to display details about the selected
spot. Touch to return to the map.
7If necessary, you can touch another point on the map to
change the destination. The cursor ( ) is displayed at
the new position. Touch (Next) to set the
destination, or touch to select another destination.
8After a summary of the route plan is displayed, the entire
route is displayed on the map. The route is researched
automatically. Touch (More) to change the route
plan, or touch (Go!) to start navigation. (When the
countdown is displayed in the “Go!” button, guidance
begins automatically after 10 seconds even if you do not
touch the button.)
Next
More
Go!
Page 56 of 106
128 Navigation
Navigation
3Touch the position you want to select as the destination.
If necessary, you can scroll through the list, or touch (Filter) and enter a few letters from the item name
to search the list.
4The map is displayed in full-screen mode with the
selected point at the center. If necessary, you can touch
another point on the map to change the destination. The
cursor ( ) is displayed at the new position. Touch
(Next) to set the destination, or touch to select
another destination.
5After a summary of the route plan is displayed, the entire
route is displayed on the map. The route is researched
automatically. Touch (More) to change the route
plan, or touch (Go!) to start navigation. (When the
countdown is displayed in the “Go!” button, guidance
begins automatically after 10 seconds even if you do not
touch the button.)
Filter
Next
More
Go!
Page 57 of 106

Navigation 129
Navigation
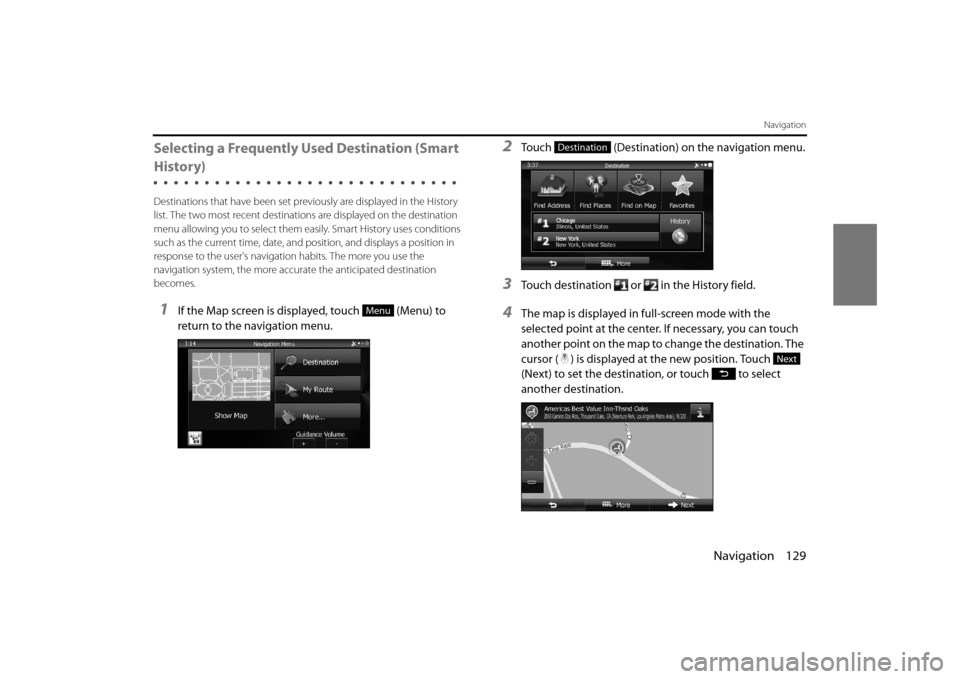
Selecting a Frequently Used Destination (Smart
History)
Destinations that have been set previously are displayed in the History
list. The two most recent destinatio ns are displayed on the destination
menu allowing you to select them easily. Smart History uses conditions
such as the current time, date, and po sition, and displays a position in
response to the user's navigati on habits. The more you use the
navigation system, the more accu rate the anticipated destination
becomes.
1If the Map screen is displayed, touch (Menu) to
return to the navigation menu.
2Touch (Destination) on the navigation menu.
3Touch destination or in the History field.
4The map is displayed in full-screen mode with the
selected point at the center. If necessary, you can touch
another point on the map to change the destination. The
cursor ( ) is displayed at the new position. Touch
(Next) to set the destination, or touch to select
another destination.Menu
Destination
Next
Page 59 of 106
Navigation 131
Navigation
3Select a destination from the list.
4The map is displayed in full-screen mode with the
selected point at the center. If necessary, you can touch
another point on the map to change the destination. The
cursor ( ) is displayed at the new position. Touch
(Next) to set the destination, or touch to select
another destination.
5After a summary of the route plan is displayed, the entire
route is displayed on the map. The route is researched
automatically. Touch (More) to change the route
plan, or touch (Go!) to start navigation. (When the
countdown is displayed in the “Go!” button, guidance
begins automatically after 10 seconds even if you do not
touch the button.)
Next
More
Go!