2014 SUBARU IMPREZA WRX ad blue
[x] Cancel search: ad bluePage 168 of 414

&Center and side ventilators
! Center ventilators
Move the tab to adjust the flow direction. !
Side ventilators
1) Open
2) Close
3) Thumb-wheel
Move the tab to adjust the flow direction.
To open or close the ventilator, turn the
thumb-wheel up or down. Manual climate control sys-
tem (if equipped) &
Control panel
1) Temperature control dial
2) Fan speed control dial
3) Airflow control dial
4) Control switch of the defogger and deicer
system (Refer to “Defogger and deicer ”
F 3-47.)
5) Air conditioner button
6) Air inlet selection button
! Temperature control dial
This dial regulates the temperature of
airflow from the air outlets over a range
fromtheblueside(cool)toredside(warm).
Climate control/Manual climate control system4-3
– CONTINUED –
Page 171 of 414

4-6Climate control/Manual climate control system
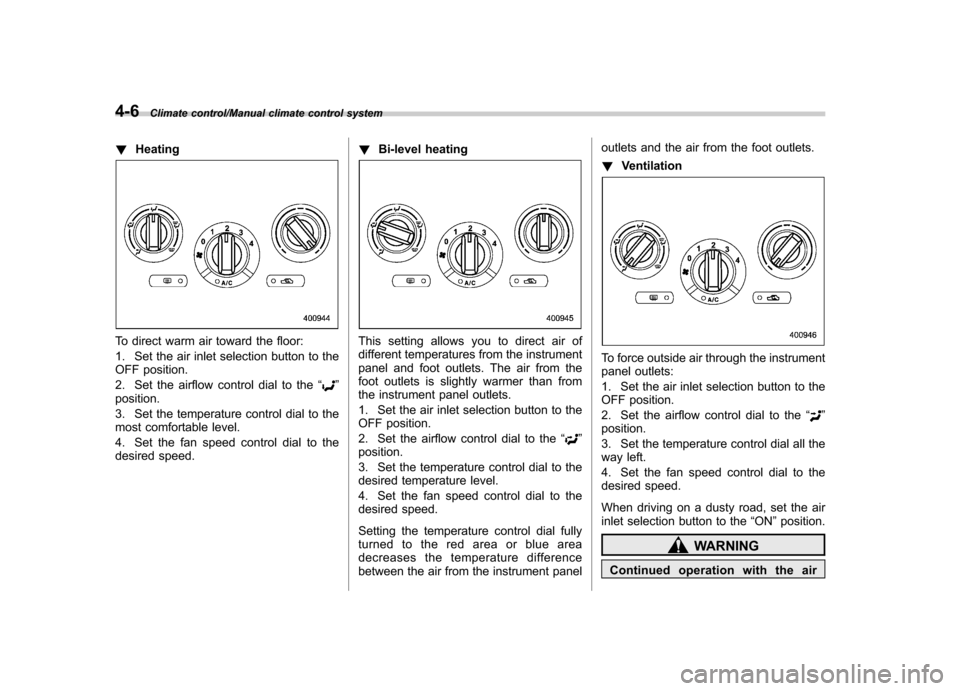
!Heating
To direct warm air toward the floor:
1. Set the air inlet selection button to the
OFF position.
2. Set the airflow control dial to the “
”
position.
3. Set the temperature control dial to the
most comfortable level.
4. Set the fan speed control dial to the
desired speed. !
Bi-level heating
This setting allows you to direct air of
different temperatures from the instrument
panel and foot outlets. The air from the
foot outlets is slightly warmer than from
the instrument panel outlets.
1. Set the air inlet selection button to the
OFF position.
2. Set the airflow control dial to the “
”
position.
3. Set the temperature control dial to the
desired temperature level.
4. Set the fan speed control dial to the
desired speed.
Setting the temperature control dial fully
turned to the red area or blue area
decreases the temperature difference
between the air from the instrument panel outlets and the air from the foot outlets. !
Ventilation
To force outside air through the instrument
panel outlets:
1. Set the air inlet selection button to the
OFF position.
2. Set the airflow control dial to the “
”
position.
3. Set the temperature control dial all the
way left.
4. Set the fan speed control dial to the
desired speed.
When driving on a dusty road, set the air
inlet selection button to the “ON ”position.
WARNING
Continued operation with the air
Page 172 of 414

inletselectionbuttonintheON
position may fog up the windows.
Switch to the OFF position as soon
as the outside dusty conditionclears.
& Air conditioner operation
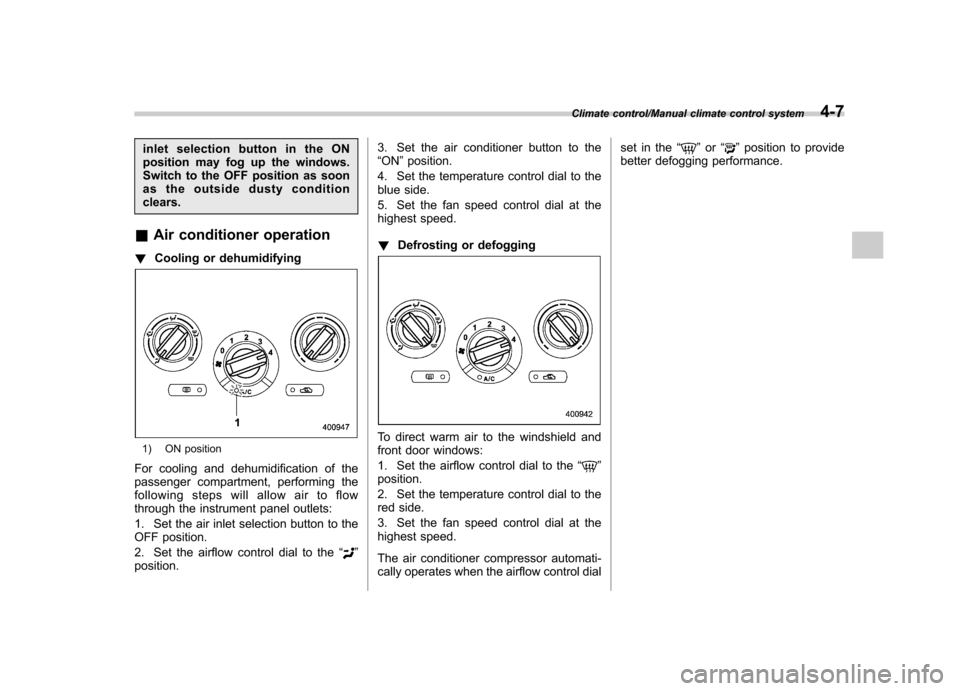
! Cooling or dehumidifying
1) ON position
For cooling and dehumidification of the
passenger compartment, performing the
following steps will allow air to flow
through the instrument panel outlets:
1. Set the air inlet selection button to the
OFF position.
2. Set the airflow control dial to the “
”
position. 3. Set the air conditioner button to the “
ON ”position.
4. Set the temperature control dial to the
blue side.
5. Set the fan speed control dial at the
highest speed. ! Defrosting or defogging
To direct warm air to the windshield and
front door windows:
1. Set the airflow control dial to the “
”
position.
2. Set the temperature control dial to the
red side.
3. Set the fan speed control dial at the
highest speed.
The air conditioner compressor automati-
cally operates when the airflow control dial set in the
“
”or “”position to provide
better defogging performance.
Climate control/Manual climate control system4-7
Page 183 of 414

AudioDisplay selection ................................................ 5-30
Folder selection (only when connecting USB storage device) ................................................ 5-30
When “CHECK DEVICE ”is displayed .................. 5-30
Audio control buttons ........................................ 5-31
MODE button ..................................................... 5-31
“
” and “”buttons ......................................... 5-31
Volume control buttons ...................................... 5-32
MUTE button (models without Hands-free system) ............................................................ 5-33 Bluetooth
®audio (type B audio)
....................... 5-33
Media format ..................................................... 5-33
Setting Bluetooth
®audio .................................... 5-33
Bluetooth®audio operation ................................ 5-34
Hands-free system (if equipped) ...................... 5-35
Tips for the Hands-free system .......................... 5-35
Certification for the Hands-free system ............... 5-36
Safety precautions ............................................. 5-37
Using the Hands-free system ............................. 5-38
Bluetooth
®setting ............................................. 5-46
Page 214 of 414

&MUTE button (models with-
out Hands-free system)
Press the “”button if you wish to
immediately cut the volume to zero.
The audio display will show “MUTE ”.
If you press the button again, the original
sound volume will return and “MUTE ”
turns off. Bluetooth
®audio (type B
audio) NOTE
For models with the genuine SUBARU
navigation system, refer to the Owner ’s
Manual supplement for the navigationsystem.
NOTE
The Bluetooth word mark and logo are
registered tradem arks of Bluetooth
SIG, Inc.
This function enables you to play back
audio sources recorded in Bluetooth
®
audio devices. You need to register theBluetooth®audio device in the system
before using it. &
Media format
Bluetooth
®audio devices cannot be
connected if they are not compatible with
the following Bluetooth
®profiles.
. A2DP (Advanced Audio Distribution
Profile) . AVRCP (Audio/Video Remote Control
Profile) & Setting Bluetooth
®audio
1. Select the “BT-A SETUP ”menu by
pressing the “MENU ”button. For details,
refer to “Other sound setting controls ”F 5-
7.
2. Perform the following procedure by
operating the “TUNE/TRACK/CH ”dial
while “BT-A ”is displayed.
NOTE
You cannot set a Bluetooth
®audio
while driving. ! Registering (pairing) device
1. Select the “PAIR AUDIO ”menu.
– If a device is already registered,
“ MEMORY FULL ”is displayed and the
mode changes to the Bluetooth
®
audio setting mode.
2. After the passkey is shown on the
display, input the passkey into the cell
Audio/Bluetooth®audio (type B audio)5-33
– CONTINUED –
Page 215 of 414

5-34Audio/Bluetooth®audio (type B audio)
phone.–If you input the correct passkey,
“ PAIRED ”is displayed and the regis-
tering procedure is finished. – If you input an incorrect passkey,
“ FAILED ”is displayed, the registering
procedure was not successful and the
mode changes to the Bluetooth
®
audio setting mode.
! Selecting device
1. Select the “SELECT AUDIO ”menu.
– If no devices are registered,
“ EMPTY ”is displayed and the mode
changes to the Bluetooth
®audio
setting mode.
2. Select the “CONFIRM ”menu.
– If the device is connected, “SE-
LECTED ”is displayed and the select-
ing procedure is finished. – If the device cannot be connected,
“ FAILED ”is displayed and the select-
ing procedure was not successful.
! Setting passkey
1. Select the “SET PASSKEY ”menu.
– After the currently set passkey is
displayed, a new passkey can be entered.
2. Input the new passkey by operatingthe “TUNE/TRACK/CH ”dial. 3. Select the
“CONFIRM ”menu.
– The new passkey is displayed, the
passkey is changed and the mode
changes to the Bluetooth
®audio
setting mode.
! Deleting device
1. Select the “DELETE AUDIO ”menu.
– If no devices are registered,
“ EMPTY ”is displayed and the mode
changes to the Bluetooth
®audio
setting mode.
2. Select the “CONFIRM ”menu.
–“ DELETED ”is displayed and the
mode changes to the Bluetooth
®
audio setting mode.
& Bluetooth
®audio operation
NOTE
Depending on the connected device, it
may not activate as per the following
items or not work smoothly. ! How to play back
Press the
button and select the “BT-
A ”mode.
! To select a track from its beginning
Select a track in the same way as for a
CD. Refer to “To select a track from the
beginning ”F 5-18. !
Repeating
Repeating is operated in the same way as
for a CD. Refer to “Repeating ”F 5-19.
Each time you briefly press the
button, the mode changes in the following sequence.
! Random playback
Random playback is operated in the same
way as for a CD. Refer to “Random
playback ”F 5-20. Each time you press
and hold the
button, the mode
changes in the following sequence.
! Display selection
Select an indication in the same way as
for a CD. Refer to “Display selection ”F 5-
21. Each time you briefly press the
button, the indication changes in the
following sequence.
Page 216 of 414

!Folder selection
Select a folder in the same way as for a
CD. Refer to “Folder selection ”F 5-21. Hands-free system (if equipped) NOTE .
For models with the genuine
SUBARU navigation system, refer to
the Owner ’s Manual supplement for the
navigation system.. When selling your vehicle, make
sure that you initialize the Hands-free
system to prevent personal data from
being improperly accessed.
The Hands-free system operates while the
ignition switch is in the “Acc ”or “ON ”
position.
& Tips for the Hands-free sys- tem
! Bluetooth
®
It is possible to connect a cell phone to the
in-vehicle equipment through the Blue-
tooth
®format (wireless) to make a phone
call from the in-vehicle equipment or take
an incoming phone call.
Since the Bluetooth
®format is wireless, a
connection between the in-vehicle equip-
ment and the cell phone can be made
without placing them in close proximity of
each other. The cell phone can be used
with it left in the breast pocket or bag. NOTE .
The Hands-free system may not
operate properly under the following conditions.
–The cell phone is turned off.
– The cell phone is not in the
phone call area. – The battery of the cell phone has
run down.– The cell phone is not connected
to the Hands-free system.– The cell phone is behind the seat
or in the glove box.– A metal material covers or
touches the cell phone.
. Depending on the type of cell phone
that is used, the screen on the cell
phone may remain illuminated while
the ignition switch is in the “ON ”
position. If this occurs, turn the illumi-
nation off by adjusting the cell phonesettings. . Depending on the setting of the cell
phone, the dial lock function may be
activated after making a call. Deacti-
vate the automatic dial lock function of
the cell phone before using the Hands-
free system. . Depending on the type of cell phone
that is used, operation and the sound
volume may be different from those of
cell phones currently used.
Audio/Hands –free system5-35
– CONTINUED –
Page 217 of 414

5-36Audio/Hands–free system
. When the ignition switch is turned to
the “LOCK ”position during a call, the
call may be disconnected or continued
on the cell phone depending on the
type of cell phone that is used. Note
that operation of the cell phone may be
necessary if the call is continued on the
cell phone. . Do not speak at the same time as the
other party during a call. If you and the
party speak at the same time, it may be
difficult for the other party to hear your
voice and vice versa. This is normal. . The receiver sound volume should
be set as low as possible. Otherwise,
the party you are calling may notice an
undesirable echo sound. . Speak clearly and loudly.
. Your voice may be difficult to be
heard by the party under the following conditions.
–Driving on a rough road.
– Driving at a high speed.
– Driving with a window open.
– When air from the ventilator
blows directly towards the micro-phone. – When the sound coming from the
ventilator is loud.– When the cell phone is too close
to the microphone. .
The sound quality may degrade due
to the influence of the cell phone that is
connected to the system or the circum-
stances of the Bluetooth network. . When another Bluetooth
®device is
simultaneously connected, noise may
be heard in the voice coming from the
hands-free phone. ! Corresponding profiles for the cell phone
. HFP (Hands Free Profile): Ver. 1.0
. OPP (Object Push Profile): Ver. 1.1
& Certification for the Hands-
free system
CAUTION
FCC WARNING
Changes or modifications not ex-
pressly approved by the party re-
sponsible for compliance could void
the user ’s authority to operate the
equipment.
NOTE
This device complies with Part 15 of
the FCC Rules and RSS-Gen of IC
Rules. Operation is subject to the
following two conditions: (1) this de- vice may not cause harmful interfer-
ence, and (2) this device must accept
any interference received, including
interference that may cause undesiredoperation. NOTE
This equipment has been tested and
found to comply with the limits for a
Class B digital device, pursuant to Part
15 of the FCC Rules. These limits are
designed to provide reasonable protec-
tion against harmful interference in a
residential installation. This equipment
may cause harmful interference to
radio communications, if it is not
installed and used in accordance with
the instructions. However, there is no
guarantee that interference will not
occur in a particular installation. If this
equipment does cause harmful inter-
ference to radio or television reception,
which can be determined by turning the
equipment off and on, the user is
encouraged to try to correct the inter-
ference by one or more of the followingmeasures. .
Reorient or relocate the receiving
antenna. . Increase the separation between the
equipment and receiver.. Connect the equipment into an out-