2014 SUBARU IMPREZA WRX Shift up indicator light
[x] Cancel search: Shift up indicator lightPage 25 of 414

22
&Warning and indicator lights
Mark Name Page
Seatbelt warning light 3-13
Front passenger ’s
seatbelt warning light 3-13
SRS airbag system
warning light3-14
/Front passenger
’s
frontal airbag ON indi- cator 3-14
/Front passenger
’s
frontal airbag OFF in- dicator 3-14
CHECK ENGINE
warning light/Malfunc-
tion indicator light3-15
Charge warning light 3-16
Oil pressure warning light
3-16
Rear differential oil
temperature warning
light (STI)3-16
ABS warning light 3-18 Mark Name Page
Brake system warning light
3-19
Door open warning light3-20
Hill start assist warn-
ing light/Hill start assist
OFF indicator light (STI)3-20
Vehicle Dynamics
Control warning light/
Vehicle Dynamics
Control operation indi-
cator light3-20
Vehicle Dynamics
Control OFF indicator
light/Traction Control
OFF indicator light (STI)3-21
Turn signal indicator lights
3-24
High beam indicator light3-24
Front fog light indicator
light (if equipped)
3-24
Security indicator light 3-23
Headlight indicator light
3-24Mark Name Page
Cruise control indica-
tor light
3-24
Cruise control set in-
dicator light3-24
Low fuel warning light 3-20
Low tire pressure
warning light
(U.S.-spec. models)3-16
Shift-up indicator light (STI)
3-23
Driver
’s control center
differential auto indi-
cator light (STI) 3-24
Auto [+] mode indica-
tor light (STI)
3-24
Auto [
�] mode indica-
tor light (STI) 3-25
Driver
’s control center
differential indicator
and warning lights (STI) 3-25
REV indicator light (STI)
3-25
Sport (S) mode indi-
cator light (STI)3-23
Page 116 of 414

Ignition switch..................................................... 3-3
LOCK .................................................................. 3-3
Acc..................................................................... 3-4
ON...................................................................... 3-4
START ................................................................ 3-4
Key reminder chime ............................................ 3-4
Ignition switch light ............................................. 3-4
Hazard warning flasher ....................................... 3-5
Meters and gauges. ............................................. 3-5
Combination meter illumination ........................... 3-5
Canceling the function for meter/gauge needle movement upon turning on the ignition switch ............................................................... 3-6
Meter/Gauge needle illumination setting (except STI) ................................................................... 3-6
Speedometer ....................................................... 3-7
Odometer/Trip meter ............................................ 3-7
Tachometer ......................................................... 3-9
Fuel gauge .......................................................... 3-9
Temperature gauge ............................................ 3-10
REV indicator light and buzzer (STI). ................ 3-10
Setting the alarm-level engine speed ................... 3-11
Deactivating the REV alarm system ..................... 3-12
Warning and indicator lights ............................. 3-12
Seatbelt warning light and chime ........................ 3-13
SRS airbag system warning light ........................ 3-14
Front passenger ’s frontal airbag ON and OFF
indicators ......................................................... 3-14
CHECK ENGINE warning light/Malfunction indicator light ................................................... 3-15
Charge warning light .......................................... 3-16 Oil pressure warning light
.................................. 3-16
Rear differential oil temperature warning light (STI) ................................................................ 3-16
Low tire pressure warning light (U.S.-spec. models) ........................................................... 3-16
ABS warning light .............................................. 3-18
Brake system warning light ................................ 3-19
Low fuel warning light ....................................... 3-20
Hill start assist warning light/Hill start assist OFF indicator light (STI) .......................................... 3-20
Door open warning light .................................... 3-20
Vehicle Dynamics Control warning light/Vehicle Dynamics Control operation indicator light .. ..... 3-20
Vehicle Dynamics Control OFF indicator light/ Traction Control OFF indicator light (STI)..... ..... 3-21
Security indicator light ....................................... 3-23
SI-DRIVE indicator light (STI) .............................. 3-23
Shift-up indicator light (STI) ............................... 3-23
Turn signal indicator lights ................................. 3-24
High beam indicator light ................................... 3-24
Cruise control indicator light .............................. 3-24
Cruise control set indicator light ........................ 3-24
Front fog light indicator light (if equipped) ..... ..... 3-24
Headlight indicator light ..................................... 3-24
Driver ’s control center differential auto indicator
light (STI) ........................................................ 3-24
Driver ’s control center differential indicator and
warning lights (STI) .......................................... 3-25
REV indicator light (STI) ..................................... 3-25
Clock .................................................................. 3-26
Information display ............................................ 3-26
Outside temperature indicator .. .......................... 3-27
Instruments and controls
3
Page 127 of 414

3-12Instruments and controls/Warning and indicator lights
to OFF, OFF to ON, or the vehicle starts
moving before the setting procedure isfinished..Setting the speed is impossible
when the vehicle is moving.. The set engine speed may differ
from the engine speed shown by the
tachometer. Use the engine speed
shown by the tachometer as a roughguide.. If the setting operation is performed
with the engine switch turned off, the
REV indicator light turns off and the
setting operation is aborted when you
have stopped the setting operation for
approximately 10 seconds. . If the setting operation is performed
with the engine switch turned off, the
REV indicator light turns off and the
setting operation is aborted when you
open and close the driver ’s door.
& Deactivating the REV alarm system
To deactivate the REV indicator light and
buzzer functions of the REV alarm system,
set the thousands place of the alarm-level
engine speed to “–”. Warning and indicator lights
Several of the warning and indicator lights
illuminate momentarily and then turn off
when the ignition switch is initially turned
to the
“ON ”position. This permits check-
ing the operation of the bulbs.
Apply the parking brake and turn the
ignition switch to the “ON ”position. For
the system check, the following lights
illuminate and turn off after several sec-
onds or after the engine has started:
: Seatbelt warning light (The seatbelt warning light turns off
only when the driver fastens theseatbelt.)
: Front passenger ’s seatbelt warning
light
(The seatbelt warning light turns off
only when the front seat passenger
fastens the seatbelt.)
: SRS airbag system warning light
ON /
: Front passenger ’s frontal airbag
ON indicator light
/: Front passenger ’s frontal airbag
OFF indicator light
: CHECK ENGINE warning light/Mal- function indicator light
: Charge warning light
: Oil pressure warning light
: Rear differential oil temperature warn-ing light (STI)
: Low tire pressure warning light (U.S.- spec. models)
/: ABS warning light
/: Brake system warning light
: Low fuel warning light
: Hill start assist warning light/Hill start assist OFF indicator light (STI)
: Door open warning light
: Vehicle Dynamics Control warning light/Vehicle Dynamics Control opera-
tion indicator light
: Vehicle Dynamics Control OFF indica-tor light/Traction Control OFF indicator
light (STI)
: Cruise control indicator light
: Cruise control set indicator light
: Shift-up indicator light (STI)
: REV indicator light (STI)
:Driver ’s control center differential
indicator and warning lights (STI)
Page 138 of 414

has warmed up) after the engine has started. !Traction Control OFF indicator light (green –STI)
The light illuminates when the Vehicle
Dynamics Control OFF switch is pressed
briefly to select the traction mode. For
details, refer to “Traction mode ”F 7-30.
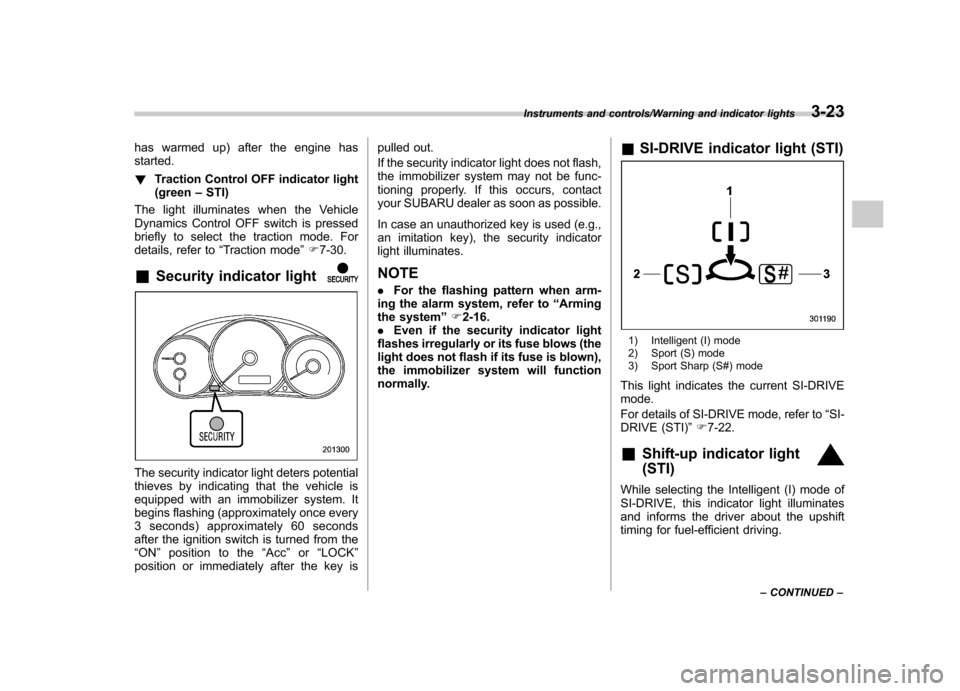
& Security indicator light
The security indicator light deters potential
thieves by indicating that the vehicle is
equipped with an immobilizer system. It
begins flashing (approximately once every
3 seconds) approximately 60 seconds
after the ignition switch is turned from the“ON ”position to the “Acc ”or “LOCK ”
position or immediately after the key is pulled out.
If the security indicator light does not flash,
the immobilizer system may not be func-
tioning properly. If this occurs, contact
your SUBARU dealer as soon as possible.
In case an unauthorized key is used (e.g.,
an imitation key), the security indicator
light illuminates.
NOTE . For the flashing pattern when arm-
ing the alarm system, refer to “Arming
the system ”F 2-16.
. Even if the security indicator light
flashes irregularly or its fuse blows (the
light does not flash if its fuse is blown),
the immobilizer system will function
normally. &
SI-DRIVE indicator light (STI)
1) Intelligent (I) mode
2) Sport (S) mode
3) Sport Sharp (S#) mode
This light indicates the current SI-DRIVE mode.
For details of SI-DRIVE mode, refer to “SI-
DRIVE (STI) ”F 7-22.
& Shift-up indicator light (STI)
While selecting the Intelligent (I) mode of
SI-DRIVE, this indicator light illuminates
and informs the driver about the upshift
timing for fuel-efficient driving.
Instruments and controls/Warning and indicator lights3-23
– CONTINUED –
Page 153 of 414

3-38Instruments and controls/Mirrors
Mirrors
Always check that the inside and outside
mirrors are properly adjusted before you
start driving. &Inside mirror
The inside mirror has a day and night
position. Pull the tab at the bottom of the
mirror toward you for the night position.
Push it away for the day position. The
night position reduces glare from head-lights. &
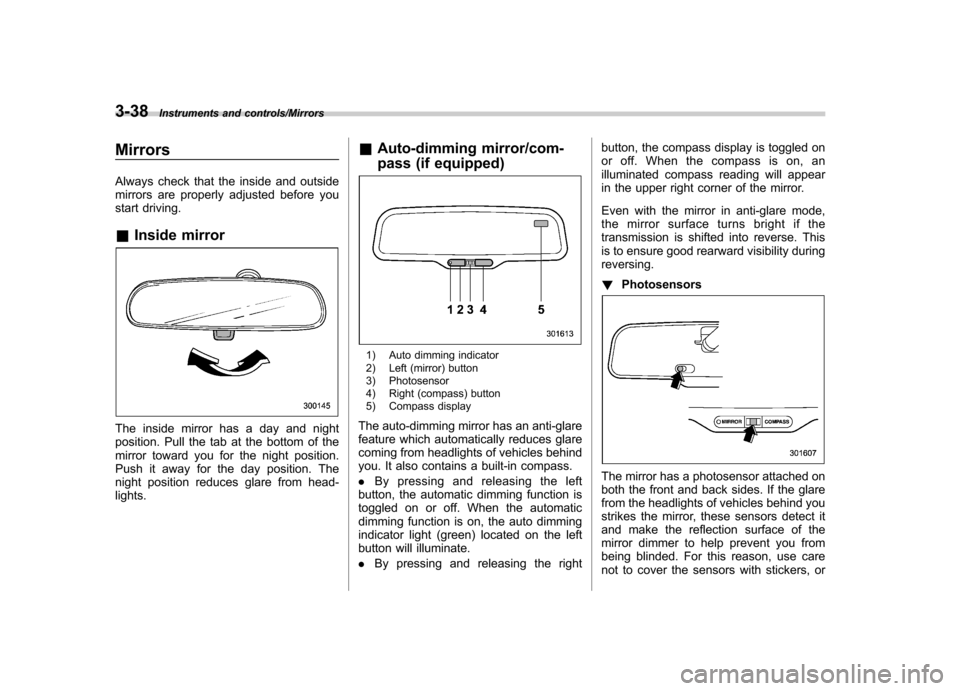
Auto-dimming mirror/com-
pass (if equipped)
1) Auto dimming indicator
2) Left (mirror) button
3) Photosensor
4) Right (compass) button
5) Compass display
The auto-dimming mirror has an anti-glare
feature which automatically reduces glare
coming from headlights of vehicles behind
you. It also contains a built-in compass. . By pressing and releasing the left
button, the automatic dimming function is
toggled on or off. When the automatic
dimming function is on, the auto dimming
indicator light (green) located on the left
button will illuminate. . By pressing and releasing the right button, the compass display is toggled on
or off. When the compass is on, an
illuminated compass reading will appear
in the upper right corner of the mirror.
Even with the mirror in anti-glare mode,
the mirror surface turns bright if the
transmission is shifted into reverse. This
is to ensure good rearward visibility duringreversing. !
Photosensors
The mirror has a photosensor attached on
both the front and back sides. If the glare
from the headlights of vehicles behind you
strikes the mirror, these sensors detect it
and make the reflection surface of the
mirror dimmer to help prevent you from
being blinded. For this reason, use care
not to cover the sensors with stickers, or
Page 155 of 414

3-40Instruments and controls/Mirrors
dimming function is on, the LED indicator
will illuminate.
Even with the mirror in the automatic
dimming mode, the mirror surface turns
bright if the transmission is shifted into
reverse. This is to ensure good rearward
visibility during reversing. .By pressing the compass display but-
ton, the compass display is toggled on or
off. When the compass is on, an illumi-
nated compass reading will appear in the
upper right corner of the mirror.
When cleaning the mirror, use a paper
towel or similar material dampened with
glass cleaner. Do not spray glass cleaner
directly on the mirror as that may cause
theliquidcleanertoenterthemirror
housing and damage the mirror. !
Photosensors
The mirror has a photosensor attached on
both the front and back sides. During
nighttime driving, these sensors detect
distracting glare from vehicle headlights
behind you and automatically dim the
mirror to eliminate glare and preserve
your vision. For this reason, use care not
to cover the sensors with stickers, or other
similar items. Periodically wipe the sen-
sors clean using a piece of dry soft cotton
cloth or an applicator. !
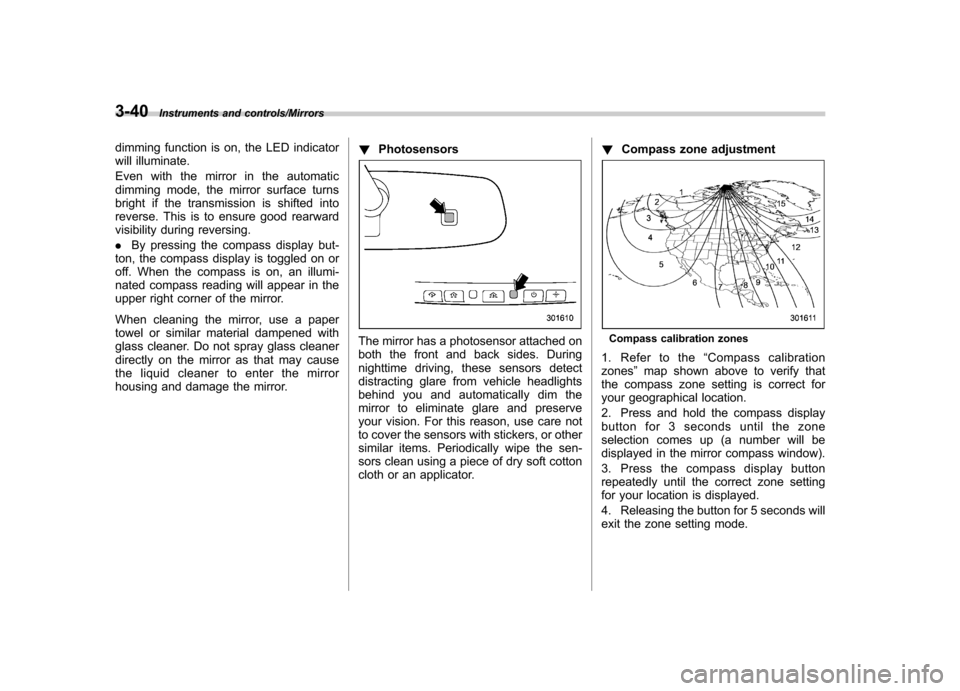
Compass zone adjustmentCompass calibration zones
1. Refer to the “Compass calibration
zones ”map shown above to verify that
the compass zone setting is correct for
your geographical location.
2. Press and hold the compass display
button for 3 seconds until the zone
selection comes up (a number will be
displayed in the mirror compass window).
3. Press the compass display button
repeatedly until the correct zone setting
for your location is displayed.
4. Releasing the button for 5 seconds will
exit the zone setting mode.
Page 244 of 414

Fuel...................................................................... 7-3
Fuel requirements ............................................... 7-3
Fuel filler lid and cap ........................................... 7-4
State emission testing (U.S. only) ...................... 7-7
Preparing to drive ............................................... 7-8
Starting the engine .............................................. 7-9
Stopping the engine ........................................... 7-10
Remote engine start system (dealer option) .............................................................. 7-10
Starting your vehicle .......................................... 7-10
Remote start safety features ............................... 7-11
Entering the vehicle while it is running via remote start ................................................................. 7-11
Entering the vehicle following remote engine start shutdown ......................................................... 7-11
Pre-heating or pre-cooling the interior of the vehicle ............................................................. 7-11
Service mode ..................................................... 7-11
Remote engine start transmitter programming and programmable feature option ..................... 7-12
System maintenance .......................................... 7-12
Manual transmission –6 speeds (STI) ............. 7-14
Selecting reverse gear ........................................ 7-15
Shifting speeds .................................................. 7-15
Driving tips ........................................................ 7-16
Manual transmission –5 speeds (except
STI) ................................................................... 7-16
Shifting speeds .................................................. 7-17
Driving tips ........................................................ 7-17 Driver
’s Control Center Differential (DCCD)
(STI) ................................................................. 7-18
To change mode of driver ’s control center
differential ....................................................... 7-18
Auto mode ........................................................ 7-19
Manual mode ..................................................... 7-20
Temporary release ............................................. 7-21
SI-DRIVE (STI) .................................................... 7-22
Intelligent (I) mode ............................................. 7-22
Sport (S) mode .................................................. 7-22
Sport Sharp (S#) mode. ...................................... 7-23
SI-DRIVE selector .............................................. 7-23
Limited slip differential (LSD) (STI) .................. 7-24
Power steering ................................................... 7-24
Braking ............................................................... 7-24
Braking tips ....................................................... 7-24
Brake system .................................................... 7-25
Disc brake pad wear warning indicators ............. 7-25
ABS (Anti-lock Brake System) .......................... 7-26
ABS system self-check ...................................... 7-26
ABS warning light .............................................. 7-26
Electronic Brake Force Distribution (EBD) system ............................................................. 7-27
Steps to take if EBD system malfunctions ..... ..... 7-27
Vehicle Dynamics Control system .................... 7-28
Vehicle Dynamics Control system monitor..... ..... 7-29
Vehicle Dynamics Control OFF switch (STI) ... ..... 7-30
Vehicle Dynamics Control OFF switch (except STI) ................................................................. 7-31 Starting and operating
7
Page 252 of 414

Starting the engine
CAUTION
Do not operate the starter motor
continuously for more than 10 sec-
onds. If the engine fails to start after
operating the starter for 5 to 10
seconds, wait for 10 seconds or
more before trying again.
NOTE
It may be difficult to start the engine
when the battery has been discon-
nected and reconnected (for mainte-
nance or other purposes). This diffi-
culty is caused by the electronically
controlled throttle ’s self-diagnosis
function. To overcome it, keep the
ignition switch in the “ON ”position
for approximately 10 seconds before
starting the engine.
1. Apply the parking brake.
2. Turn off unnecessary lights and ac- cessories.
3. Depress the clutch pedal to the floor
and shift the shift lever into neutral. Hold
the clutch pedal to the floor while starting
the engine.
The starter motor will only operate when the clutch pedal is depressed fully to the
floor.
4. Turn the ignition switch to the
“ON ”
position and check the operation of the
warning and indicator lights. Refer to“ Warning and indicator lights ”F 3-12.
5. Turn the ignition switch to the “START ”
position without depressing the accelera-
tor pedal. Release the key immediately
after the engine has started.
If the engine does not start, try the following.
(1) Turn the ignition switch to the“OFF ”position and wait for at least
10 seconds. After checking that the
parking brake is firmly set, turn the
ignition switch to the “START ”position
while depressing the accelerator pedal
slightly (approximately a quarter of the
full stroke). Release the accelerator
pedal as soon as the engine starts.
(2) If this fails to start the engine, turn
the ignition switch back to the “OFF ”
position and wait for at least 10
seconds. Then fully depress the accel-
erator pedal and turn the ignition
switch to the “START ”position. If the
engine starts, quickly release the
accelerator pedal.
(3) If this fails to start the engine, turn
the ignition switch again to the “OFF ”
position. After waiting for 10 seconds or longer, turn the ignition switch to the“
START ”position without depressing
the accelerator pedal.
(4) If the engine still refuses to start,
contact your nearest SUBARU dealer
for assistance.
6. Confirm that all warning and indicator
lights have turned off after the engine has
started. The fuel injection system auto-
matically lowers the idle speed as the
engine warms up.
Starting and operating/Starting the engine7-9