Page 57 of 88

MirrorLink ™
Introduction
This chapter contains information on the following subjects:
Connection conditions
54
Start function
54
Operation
55
Settings
55
Function problems
55
First and foremost, pay attention to the safety instructions » page 7 , Impor-
tant notes .
MirrorLink ™
provides a function for the operation of some installed applica-
tions in the communication facility (e.g. telephone, hereinafter referred to only
as facility) by using the device.
Using this function is only for specially designed and certified applications. For
reasons of safety, the operation of some applications while driving is limited or
not possible (function keys of the applications are inactive).
WARNING■ No objects such as mobile telephone mounts, etc. must be attached to
the covers of the airbag modules or be located within their immediate vicin-
ity.■
Never leave communication facility in the deployment area of an airbag,
on a seat, on the dash panel or in another area, from which it can be
thrown during a sudden braking manoeuvre, an accident or a collision -
there is a risk of injury. There are storage compartments with lids and if
necessary there is the multimedia storage compartments to hold this » Ve-
hicle owner's manual , chapter Transport and practical equipment .
CAUTION
■
MirrorLink ™
Applications that use a mobile data connection, are dependent
on the quality of the signal supplied by your telephone service provider. ŠKODA
accepts no responsibility for the transmitted data volume.■
An intensive use of the function MirrorLink ™
and the work associated with
applications (e.g., GPS, mobile data, fully-backlit display and the like.) can lead
to battery discharge of the connected facility.
Connection conditions
Read and observe
and on page 54 first.
The connection between the facility and the device using the function
MirrorLink ™
is operational under the following conditions.
The ignition is switched on.
The facility supports the function MirrorLink ™
and contains applications
that support this feature.
The display of the equipment is unlocked.
The facility is connected to the USB input » Fig. 20 on page 34 .
Note
Before connecting the MirrorLink - Functions, unlock the device screen. While
using the function the display may automatically darken or the screen com-
pletely turns off.
Start function
Read and observe
and on page 54 first.
›
Press the button
→
™
→ Selection .
A list of the facilities connected to the USB input is displayed.
›
Select one of the MirrorLink ™
function supporting facilities.
If the facility is separated from the USB cable and the ignition is not off, it au- tomatically reconnects when a new connection to the device is made.
Note
■ If the facility is connected by means of the function MirrorLink ™
, it cannot be
used as a USB audio source Media menu.■
The list of available facilities and applications, which support the MirrorLink ™
function, can be seed in the ŠKODA Internet pages www.infotainment.skoda-
auto.com .
54Familiarization with the unit
Page 58 of 88

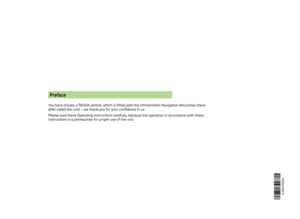
OperationFig. 30
List of Applications / example of a running application
Read and observe
and on page 54 first.
After successfully connecting the facility to the device a list of available appli-
cations is displayed » Fig. 30-
.
If there is only one available application it will be started automatically after
connecting the facility.
Function keys in the list of applications Separation of the connection with the attached facility
Open a list of currently running applications with the ability to terminate
them
Display of the connected facility
MirrorLink ™
- settings » page 55
›
Press the respective function key, to launch the application the application.
The number of applications is not restricted. If there are more applications
than can be shown in the device screen then symbols appear in position
1
in-
dicating more pages for the list of applications. The next page of the applica-
tion list is shown by touching the display screen with a finger and moving it to
the side.
Function keys for operation of the application - area
2
» Fig. 30
Return to the menu with the list of applications
Display the alphanumeric keypad of the device
Display function keys on the right side
Display of the function keys in the bottom of the screen
Masking the function keys
In area 3
various function keys are shown, depending on the connected de-
vice.
Example of displayed keys Open a menu with applications for the attached device
Return to the main screen
Return to previous screen
With muted function keys the following symbol appears in the device screen
. Pressing the right control
2
» Fig. 1
on page 7 causes the function keys to
appear.
Settings
Read and observe
and on page 54 first.
›
Press the button
→
™
→ .
The settings menu for the function MirrorLink ™
opens.
■ Select device - Open a list of available facilities
■ Screen orientation - Setting the screen representation of the facility 1)
■ Landscape - Width representation
■ Portrait - Height representation
■ Flipped - Image reversed by 180 ° 1)
■ Activate keyboard entry field - Switching on/off the alphanumeric keypad of
the device 1)
Function problems
Read and observe
and on page 54 first.
Restrictions or problems of the MirrorLink ™
function are indicated on the de-
vice screen by one of the following warning messages.
1)
The function is only displayed, if supported by the connected device.
55Communication
Page 59 of 88

Examples of warning messagesMessageMeaningNo USB connection found. Please es-
tablish a connection using "Connect".Connect to the USB input of a facility
which supports the MirrorLink ™
func-
tion and make the connection.The app is unavailable while the ve-
hicle is in motion.The application is only available when
the vehicle is stationary.Error: AppThe application is not supported by
the MirrorLink ™
function.MirrorLink™ Audio is not available.No playable audio files are available
on the connected facility....: MirrorLink ™ connection is not
available.Check the connection to the USB in-
put.Connection failed. MirrorLink™ is not
supported by the device.The function MirrorLink ™
is not sup-
ported by the device.No compatible apps found on the de-
vice. The device may not support Mir-
rorLink™.The function MirrorLink ™
may not be
supported by the facility, or there may
be no MirrorLink ™
application availa-
ble in the facility.Disconnected.The time limit for the connection with
the facility has expired. Disconnect
and reconnect to the USB input.The app is unavailable while the ve-
hicle is in motion. The app is not cer-
tified or the certification restricts use
while the vehicle is in motion.The application is available only when
the vehicle is stationary, not available
when moving.Error: the app is not compatible.The application cannot be started in
the corresponding facility.The app is unavailable while the ve-
hicle is in motion. The app is not
available in this country.The region for which the application
is certified, does not match the oper-
ating region. This application is availa-
ble only when the vehicle is station-
ary.
The mobile device is restricted.
Check if the current date / time corre-
sponds to reality. If the date is incor-
rectly set the applications are availa-
ble only when the vehicle is station-
ary.56Familiarization with the unit
Page 60 of 88

Navigation
Description of the navigation system
Preface to navigation
Introduction
This chapter contains information on the following subjects:
Navigation data
57
Main menu
58
Map display
58
Map Orientation
59
Map scale
59
Options for map display
60
Split screen
60
First and foremost, pay attention to the safety instructions » page 7 , Impor-
tant notes .
The unit uses the GPS (Global Positioning System) satellite system for route
guidance. The satellite signal allows you to determine your current vehicle po-
sition.
Outside the range of the GPS satellite signal (e.g. in dense vegetation, in tun-
nels, parking garages, etc.), the unit navigates only with restrictions using on-
vehicle sensors.
The route guidance is as follows.
› With graphical driving recommendations in the device screen and MAXI DOT
display.
› With navigation announcements.
WARNING■
Information about traffic lights, stop and right of way signs, parking and
stopping restrictions as well as lane constrictions and speed restrictions is
not taken into account for route guidance by the unit.■
The navigation announcements provided may vary from the actual situa-
tions, e.g. due out-of-date navigation data.
■
The volume should be adjusted to ensure that acoustic signals from out-
side, e.g. sirens from vehicles which have the right of way, such as police,
ambulance and fire brigade vehicles, can be heard at all time.
CAUTIONIn some countries, some unit features can no longer be selected when the ve-
hicle is running faster than a certain speed. This is not a malfunction, but com-
plies with the national legal regulations.
Navigation data
Read and observe
and on page 57 first.
Navigation data source
You received the SD memory card with navigation data together with the unit.
For correct functioning of the device, the card must be inserted into slots
12
or
13
» Fig. 1 on page 7 during the entire route guidance.
Insert the memory card » page 33, SD memory card .
Data update
The navigation data is subject to constant changes (such as new streets,
changes of street names and house numbers) and are no longer valid after
some time. Therefore the route guidance may be inaccurate of incorrect. We
recommend that you update the navigation data on a regular basis.
For more information on updating the data, please visit the ŠKODA website
www.infotainment.skoda-auto.com or contact a ŠKODA Partner.
The version of the navigation data for maps can be found in the navigation
settings
→
→ Version information .
Card has been damaged or lost
If the SD memory card with the navigation data has been damaged or lost, a
new card can be obtained from ŠKODA original accessories. The navigation da-
ta can be loaded only on the original card.
57Description of the navigation system
Page 61 of 88

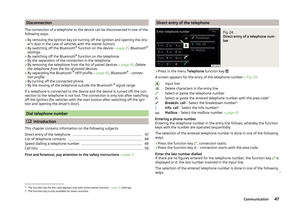
Main menuFig. 31
Main menu Navigation
Read and observe and on page 57 first.
›
Press the button.
The navigation menu opens.
If a different menu to the main menu opens, then press the button
again.
Description of the main menu Navigation » Fig. 31
Function keys of the main menu
Function keys of the map control » page 58, Map display
Status bar with information about the vehicle's position and the time and distance to destination
Extra window » page 60, Split screen
Description of function keys of the menu Navigation » Fig. 31
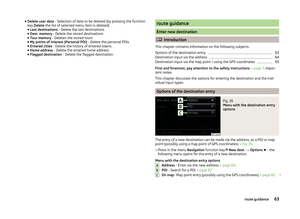
Entering a new destination New dest.(no route guidance) » page 63or
display the menu Route(route guidance) » page 72
Open the menu Destinations
Open the menu My tours
Open the menu POIs. - Input / search for a POI » page 67
Open the menu View - Options for map display » page 60
Playback operation of the menu Radio » page 23 or Media » page 29
Open the menu Setup » page 61
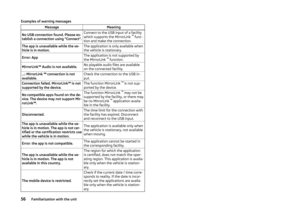
ABCD Map displayFig. 32
Map
Read and observe and on page 57 first.
The map display can be operated by using function keys, by finger touching
the device screen or with the right controller
2
» Fig. 1 on page 7 .
The type of map display can be selected » page 60.
Depending on the route guidance context and the display setting the follow-
ing information can be displayed on the map.
Vehicle position
Destination position
Route
Position of the home address » page 67
POI symbols » page 69
Function keys for the map orientation » page 59and map centering
Function keys for operating the map scale » page 59
Function keys for map centering -
F
These keys are used for map centering on the vehicle position and on the des-
tination position.
Touching causes the map to be aligned with the vehicle position (the func-
tion key appears when the map is not aligned to the vehicle position)
Touching causes the map to be aligned with the destination position or
the tour representation (the function key appears when the map is not
aligned to the destination position or the tour presentation)
Function keys for scaling -
G
The map scale changes automatically or can be changed manually » page 59.
ABCDEFG58Navigation
Page 62 of 88

appears.
Map Orientation
Read and observe
and on page 57 first.
The 2D map can be oriented to")
If no scale change occurs then above the scale function key the symbol with
mediated elevation 1)
appears.
Map Orientation
Read and observe
and on page 57 first.
The 2D map can be oriented to the north or in relation to the direction of trav-
el.
The 3D map is always aligned with respect to the direction of travel.
A change of map orientation is only possible when the map is centred on the
vehicle position (the function key or
is not displayed).
›
Press the function key
- one of the following types of 2D map orientations
is displayed.
Map orientation towards the north
› The map is oriented towards north and the Arrow
A
» Fig. 32
on
page 58 shows the direction of travel.
If the scale of the 2D Map or 3D Map is greater than 10 km (5 miles), then the
map is automatically displayed as 2D and aligned in the direction of north.
Map orientation with respect to the direction
› The map rotates and the direction of travel arrow
A
» Fig. 32
on
page 58 points to the top of the screen.
Map scale
Read and observe
and on page 57 first.
It is possible to change the map scale manually or to turn on the automatic
change of scale.
Symbols of the scale function keys
The map type can be changed by pressing a function key depending on the
context in
G
» Fig. 32 on page 58 .
manual scale is active automatic scale is active
Turn on / off the automatic scale
fast map
manual scale
The manual scale is turned on when the function key G
and the symbol
» Fig. 32 on page 58 is displayed.
Map scale can be change in the following ways.
› Turning the right control
2
» Fig. 1
on page 7 .
› Touching the device screen with two fingers and pulling them apart or clos-
ing them together.
The map is moved by touching the device screen with one finger and moving it
in the desired direction. If the automatic scale is on then it changes to manual
scale. The symbol in the function key changes to .
Turn on the automatic scale
The automatic scale can be turned on by pressing the function key
→
.
The function key is highlighted in green and the function of the automatic
scale is turned on. The symbol in the function key changes to .
The automatic scale will only be active as long as the map is centred on the
vehicle position (the function key or
is not displayed).
If the automatic scale is active, the map scale will change automatically de-
pending on the route travelled (motorway - smaller map scale / town larger
map scale).
Turning off the automatic scale
The automatic scale can be turned off by pressing the function key
→
or by manually changing the map scale. The symbol in the function key
changes to .
Fast map
› Press the function key
or
→
.
The map scale is reduced for a few seconds and then restored.
1)
Display of elevation requires the reception of signals from at least five satellites. Route guidance must
not be running in demo mode.
59Description of the navigation system
Page 63 of 88

Options for map displayFig. 33
Map options
Read and observe and on page 57 first.
Switch between different navigation map display modes depending on the
context.
It is possible however to show a split screen or selected POI in the map dis-
play.
›
Press in the menu Navigation function key
View - the following list of
function keys is displayed.
2D - current vehicle position in the 2D map display
3D - current vehicle position in the 3D map display
Displays a map with the route (after calculating the route, the device dis-
plays the route from the vehicle location to the destination. The scale is
adjusted to the length of the route.)
Display of the map to the destination (only displayed after the route has
been calculated)
Auto - Automatic map display in day or night mode (depending on the cur-
rently active vehicle lighting)
Day - Map display in day mode
Night - Map display in night mode
Split screen - On / off of the split screen display » page 60
POIs - On / off of the selected POI categories display » page 62, Map
ABCDESplit screenFig. 34
Split screen / menus in the split screen
Read and observe
and on page 57 first.
Additional information is displayed in the split screen depending on the con- text of the selected menu.
Switching on
›
Press in the menu Navigation function key
View → Extra window .8
The last opened split screen is displayed
A
» Fig. 34 .
Switching off
›
In the split screen
A
» Fig. 34 press the function key
.
or
›
Press in the menu Navigation function key
View → Extra window .
By pressing the function key with the name of the current split screen menu
and the symbol the following menu is displayed.
Audio - Playback operation of the menu Radio » page 23 or Me-
dia » page 29
Compass - Displays the current vehicle location in relation to the compass
directions
Manoeuvre - Graphic display of driving recommendations (the function is
available only during navigation) » page 71
Road signs - Display of traffic signs stored in the navigation data (the
function is available only during navigation) » page 61, Traffic signs
Satellite data - Displays the geographical coordinates of the current vehi-
cle location » page 61, Satellite data
BCDEF60Navigation
Page 64 of 88

Traffic signs
The device offers the possibility to display the road signs in the information
display and the device screen of the data stored in the navigation information
of the map data.
Switching on the traffic sign display function » page 62.
Satellite data
The unit offers the possibility to show in the split screen display the following
Satellite data » Fig. 34 information about the current geographical position of
the vehicle.
longitude 1)
latitude 1)
elevation 2)
Number of received/available satellites
Settings
Introduction
This chapter contains information on the following subjects:
Main menu settings
61
Route options
61
Map
62
Fuel options
62
Navigation announcements
62
Advanced settings
62
Manage memory
62
First and foremost, pay attention to the safety instructions » page 7 , Impor-
tant notes .
The setting of the Navigation influences, for example the route calculation,
the type of route guidance or the map display.
Main menu settings›
Press in the menu Navigation function key
.
■ Route options - Set the parameters for route calculation » page 61
■ Map - Settings for the map display » page 62
■ Fuel options - Select preferred fuel station; switch on/off reminder of low
fuel level warning with the possibility to find the nearest fuel sta-
tion » page 62
■ Nav. announcements - Set the volume and the type of the navigation an-
nouncements » page 62
■ Advanced setup - Display additional information » page 62
■ Manage memory - Sort contacts, enter your home address, and delete desti-
nations » page 62
■ Import destinations - Import custom destinations previously pre-
pared » page 67
■ Version information - Displays the current version of the navigation data
with the possibility to update or load personal POIs » page 68
■ Top speeds - Display of maximum country-specific speed limits
Route options
›
Press in the menu Navigation function key
→ Route options .
■ Suggest 3 alternative routes - Switch on/off manual selection of the route
type (economical, fast, short) » page 70
■ Route: - Automatic selection of the preferred route type (manual route selec-
tion is switched off)
■ Economical - Calculate the most economical route with shortest travelling
time and distance travelled – the route is highlighted green
■ Fast - Calculate the fastest route to the destination, even if a detour is nec-
essary - the route is highlighted red
■ Short - Calculate the shortest route to the destination, even if a longer
travelling time is required - the route is highlighted orange
■ Dynamic route - Switch on/off continuous route calculation using TMC traffic
reports » page 72
■
Avoid motorways - switches on/off the use of motorways
1)
To view the information on the longitude and latitude of the current vehicle position display requires the
reception of GPS signals from at least three satellites.
2)
Display of elevation requires the reception of GPS signals from at least five satellites. Route guidance
must not be running in demo mode.
61Description of the navigation system