Page 33 of 88

OperationAction
Plays the current track from the start
Press after about 3 seconds after
the start of the title playbackFinger movement to the right of the screen area A
» Fig. 15 on
page 29 (After 3 seconds from the
start of the track playback)Fast-reverse within the titlePress and hold
Play the next title
Press Finger movement to the left of the
screen area A
» Fig. 15 on page 29Fast-forward within the titlePress and hold Switch on and off the repeat title play-
back from the current album or folderPress Switch on/off the repeat title playbackPress Switch on and off the random track
playback from the current album or folderPress
The movement within the track is possible by finger touching the timeline 1)
B
» Fig. 15
on page 29 .
By finger touching in the area
C
» Fig. 15 on page 29 displays a menu of al-
bums. Movement within the menu can be performed by moving a finger across
the screen to the right or left or by turning the controller
2
» Fig. 1 on page 7 .2)
Note
Some function keys for playback may not be available.Folder / track list - BrowserFig. 16
Folder / Title list
The content of an audio source is displayed in alphabetical order in the folder /
track list.
The device allows you to browse the folder / track list without changing the
playing track.
The display of the folder / track lists or some function keys are only available
on some audio sources.
See a list
›
Press the function key in the menu Media
.
The folder / track list is displayed (not for connected Apple devices).
Folders and title lists - information and function keys » Fig. 16
Name of the selected audio source / the selected folder
Playback Options » table on page 29
Display of multimedia database (available only for the display of the entire
source content) » page 31
Folder
Playlist
Title playback
Stop the title playback
Appears on the title symbol , then this cannot be played. By pressing the
function key, the cause is displayed (e.g., DRM protection, unsupported format,
etc.).
ABC1)
The display playback time axis is not supported by some audio sources.
2)
Does not apply for Apple devices.
30Familiarization with the unit
Page 34 of 88

In the area Athe display shows the selected audio source, and possibly the
audio source folder. Movement within the folder is done by pressing the func-
tion key for the folder.
By pressing one of the function keys for playback B
the playback starts and at
the same time the menu Media » Fig. 16 is displayed.
Note
■
In the folders and title lists a directory max. of 1000 entries is displayed de-
pending on the date of creation. The entries are arranged alphabetically.■
The scanning speed of the folder / track list depends on the connection
speed and volume of data.
Multimedia database
Fig. 17
Multimedia database
In the multimedia database the title properties are sorted according to catego-
ries.
The display of the multimedia database is only available for some audio sour-
ces.
A connected Apple device displays only the multimedia database.
Viewing multimedia database
›
Press the function key in the menu Media
.
If the display of the folder / track list is not supported by the device, then the
multimedia database is displayed.
Categories of Multimedia Database - information and function keys » Fig. 17
Name of the selected audio source / the selected category
Display of folder / track lists (the function is only available for the display
of the entire source content) » page 30
Track lists - Sorted by the track title
ABArtists - Sorted by artist's name
Albums - Sorted by album name
Tracks - Sorted by the track title
Podcasts - Sorted by the Podcast names
Genres - Sorted by the genre type
Composers - Sorted by the composer names
Audiobooks - Sorted by the audiobook names
The display icons for the categories of multimedia database is not supported by some audio sources. Only the name of the category is displayed.
For playback the category and then the title is selected.
The movement within the categories is done by pressing one of the function
keys in the range A
.
Settings
›
Press the function key in the menu Media
.
■ Sound - Sound settings » page 19, Sound settings
■ Mix / repeat including subfolders - Switching the title display including sub-
directory
■ Bluetooth - Settings for the Bluetooth ®
function » page 21
■ Remove safely - safe removal of the audio source
■ SD card 1 - Removal of the SD storage card 1
■ SD card 2 - Removal of the SD storage card 2
■ USB - Removal of the USB audio source
■ Traffic programme (TP) - Switches traffic programme on/off
■ External AUX device - Enables / disables the AUX input
Audio sources
Introduction
This chapter contains information on the following subjects:
Select audio source
32
Bluetooth ®
Player
33
SD memory card
33
USB input
34
AUX - input
34
Supported audio source and file formats
35
31Media
Page 35 of 88

First and foremost, pay attention to the safety instructions » page 7 , Impor-
tant notes .
The device allows you to play audio files in various formats and to connect dif-
ferent source types » page 35.
For an audio source with a memory split into several areas, only the memory
areas of the supported formats can be read » tab. Supported audio sources on
page 35 .WARNING■
Never place audio sources close to the airbags. They could be thrown into
the passenger compartment when the airbags are deployed, injuring the
occupants.■
Never place audio sources on the dash panel, in your hand or on your
knees. They could be thrown into the passenger compartment during sud-
den driving manoeuvres, thereby injuring the occupants.
■
Always route the connection cable of the audio source such that is does
not restrict you when driving.
CAUTION
Do not store any important data on the connected external sources. ŠKODA
assumes no responsibility for lost or damaged files or connected audio sour-
ces.
Note
See the owner's manual of the specific manufacturer for operating the exter-
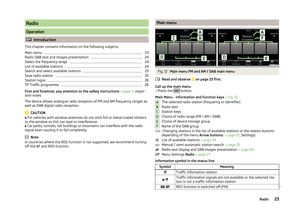
nal audio source.Select audio sourceFig. 18
Select audio source
Read and observe
and on page 32 first.
Selection of the audio source can be performed in the following ways.
› Repeatedly press the key
the display will change between available au-
dio sources.
› In the menu
Media press the function key
1
» Fig. 18 -
and select the de-
sired audio source.
› In the folder / track list
» page 30and in the multimedia data-
base » page 31 press the function key
and select the desired audio
source » Fig. 18 -
.
Menu for the audio source SD Card 1 - inserted SD memory card 1 » page 33
SD Card 2 - inserted SD memory card 2 » page 33
USB - connected to the USB input audio source » page 34
BT audio - coupled Bluetooth ®
player » page 33
AUX - Connected to the AUX input audio source » page 34
By pressing a function key with the audio source name the playback of titles
available starts. 1)
The unit only switches between connected audio sources with playable con-
tent.
The unit will play the contents of the connected audio source according to the
alphabetically sequenced directory and file name.
1)
Does not apply for AUX.
32Familiarization with the unit
Page 36 of 88

If the main and the additional telephones » page 40are connected to the de-
vice the audio source appears after selection BT Audio a menu for selecting
the Bluetooth ®
Player.
Bluetooth ®
Player
Read and observe
and on page 32 first.
The unit allows audio files of a connected Bluetooth ®
player to play using the
A2DP and AVRCP audio profile.
›
For connecting follow the same instructions as for pairing the device with a
telephone » page 42.
If an Apple device is connected as a Bluetooth ®
player, and this is connected
to the USB input, then the Bluetooth ®
connection is dropped.
The following warning message appears in the device screen Bluetooth-Audio
(A2DP) … Connection cancelled.
Note
■
We recommend setting the maximum output level of the Bluetooth ®
Play-
er » page 19 , Sound settings .■
Some operator options via the device may not be supported and are depend-
ent on the Bluetooth ®
player being used.
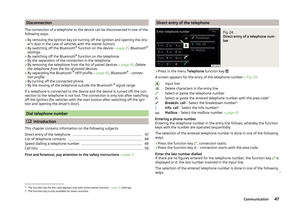
SD memory card
Fig. 19
SD memory card slots
Read and observe and on page 32 first.
The SD memory card slots
12
and
13
» Fig. 1 on page 7 are located on the front
of the device.
Inserting an SD memory card›Push the SD memory card into the available slot with the cut edge upwards
(SD card 1) or downwards (SD card 2) until it “locks into place”.
The play function will start automatically. The playlists are not played auto-
matically and must be manually started from the folders and title lists.
Removing an SD memory card›
Press the button →
Remove safely → SD card 1 or SD card 2 .
›
Press the inserted SD memory card. The SD memory card “jumps” into the
eject position.
After popping out the SD memory card, playback will start from the last played
audio source. If this source is not available, the device switches to the Radio
menu.
Unreadable SD memory card
If there are no readable files on the SD memory card nothing will play.
Due to differing quality requirements from different card manufacturers, it is
not always possible to guarantee the playback from SD memory cards.
It may not be possible to play some or all files on the SD memory card, or pos-
sibly their playback may be limited.
CAUTION
Use only SD memory cards with a standard size. When using smaller SD cards
with the adapter the SD memory card can fall out of the adapter while driving
due to vehicle vibrations.33Media
Page 37 of 88

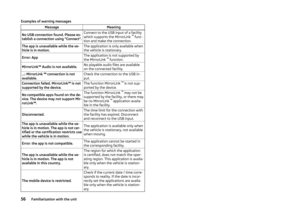
USB inputFig. 20
USB and AUX inputs
Read and observe and on page 32 first.
The USB input is above the storage compartment in the front center console
and is identified with the symbol
» Fig. 20 .
The USB input audio source can be connected directly or via a connecting ca-
ble.
Some audio sources connected to the USB input can be operated from this de-
vice 1)
.
Connect the USB audio source
›
Plug the USB audio source into the corresponding well.
The play function will start automatically. The playlists are not played auto-
matically and must be manually started from the folders and title lists.
If an Apple device is connected as a Bluetooth ®
player, and this is connected
to the USB input, then the Bluetooth ®
connection is dropped.
The following warning message appears in the device screen Bluetooth-Audio
(A2DP) … Connection cancelled.
Separate USB audio source
›
Press the function key
→ Remove safely → USB .
›
Disconnect the USB audio source.
After disconnecting the USB audio source, playback will start from the last
played audio source. If this source is not available, the device switches to the
Radio menu.
Charge USB audio source
With the ignition on after connecting the USB audio source, the charging proc-
ess is automatically started (applies for audio sources where charging via the
USB connector is possible).
The charging efficiency can be different compared to the charging from the
usual mains power supply. Connected audio sources can be supplied / loaded
with a current of max. 1.5 A.
Some connected audio sources may not be recognised and cannot be charged.
The charging of the connected audio source is automatically stopped after
switching off the ignition.
CAUTION
■ USB extension cords, or reducers may impair the function of the connected
audio source.■
A video playback is not supported.
Note
■ When operating together with the connection of the audio source, the re-
spective Operating Instructions are to be observed.■
We recommend that you use extension cords from ŠKODA Original Accesso-
ries.
AUX - input
Read and observe
and on page 32 first.
The AUX input is above the storage compartment in the front center console
and is identified with the
» Fig. 20 on page 34 .
An audio source connected to the AUX input cannot be operated from this
unit.
After connecting the AUX audio source, the source must be selected.
Connecting AUX audio sources
›
Insert the plug of the audio source in the corresponding well.
›
Select the AUX audio source » page 32, Select audio source .
›
Start playback on the connected audio source.
1)
Some operating options from an audio source may not be supported.
34Familiarization with the unit
Page 38 of 88

Disconnect AUX audio source›Disconnect the connector of the audio source.
After disconnecting the AUX audio source is no automatic change to another
audio source takes place.
CAUTION
■ The AUX input must only be used for audio devices!■If an external audio source is connected to the AUX input, which is equipped
with an adapter for external power supply, the sound will be impaired. This de-
pends on the quality of the adapter which is used.
Note
■ The standard 3.5 mm stereo jack plug is used for the AUX input. If the exter-
nal devices do not have this jack plug, you must use an adapter.■
The AUX input can be activated / deactivated » page 31, Settings .
■
The volume can be adjusted by setting the input sensitivity of the connected
AUX audio source » page 19, Sound settings .
■
We recommend that you use extension cords from ŠKODA Original Accesso-
ries.
Supported audio source and file formats
Read and observe
and on page 32 first.
Supported audio sources
SourceTypeSpecificationFile systemSD memory cardStandard sizeSD, SDHC, SDXC
FAT16; VFAT;
FAT32; exFAT NTFSUSB devices
USB stick;
HDD (without any special software); MTP player (with
the Android oper- ating system and Windows)
USB 1.x; 2.x and
3.x or higher with support of USB 2.xBluetooth ®
-
Player-Bluetooth proto- colsA2DPand
AVRCP (1.0 - 1.4)-Other sourcesPortable player (e.g. iPod ®
, iPad ®
, iPhone ®
)Supported file formatsCodec type
(File formats)File suffixMax bit rateMaximumsampling rateMulti-
channelPlaylistsMPEG-1; 2 and 2.5
(Layer-3)mp3320 kbit / s48 kHz
no
m3u; pls;wpl;
m3u8; asx
Windows Media Audio
8; 9 and 10wma384 kbit / s96 kHzMPEG-2 and 4aac; mp4;m4a
48 kHz
WAVwav
Defined by
the format
(approx.
1.5 Mbit /
s)
FLAC;
OGG Vorbisflac; ogg
Defined by the format (approx.
5.5 Mbit / s)
yes
The images on the record covers can have an image resolution of max. 800 x
800 pixels and be in jpg, jpeg, png, bmp and gif formats. These are only dis-
played on the device screen when they are available in the playable audio
source.
CAUTION
■ At the time of publication, the device has been tested with most audio sour-
ces available in the various markets. However, it is possible that some audio
sources or files will be unreadable or unplayable.■
The GPT standards (GUID partition table) method structured signal sources
are not supported by the device.
■
Files that are protected by Digital Rights Management (DRM) technology
cannot be played back by the device.
35Media
Page 39 of 88

Note■We recommend that you use class 4 SD memory cards and higher. This guar-
antees the fastest possible access to the audio files.■
For a good playback, we recommend using files with a smaller degree of
compression (such as a bit rate of at least 160 kb / s or higher compressed MP3 files).
■
A list of compatible audio sources can be found on the ŠKODA Internet pa-
ges.
Pictures
Image viewer
Introduction
This chapter contains information on the following subjects:
Operation
36
Select source
37
Supported Formats
37
Settings
37
First and foremost, pay attention to the safety instructions » page 7 , Impor-
tant notes .
Note
Viewing image files in the device screen is not supported by connected Apple
devices.
Operation
Fig. 21
Image viewer
Call Images menu
›
Press the button
→
.
If there are image files on the selected source of the supported for-
mats » page 37 , the menu Images is displayed.
If the source contains no displayable image files, the following message ap-
pears in the device Screen Please select a source with image files.
36Familiarization with the unit
Page 40 of 88

Switching off the slideshow 1)")
Function keys of the menu ImagesSelect the source image files
Select the image file or folder from the list
Display the previous image file
Switching on the slideshow 1)
Switching off the slideshow 1)
Display the next image file
Settings of the image files
Rotate the image file through 90° anticlockwise
Rotate the image file 90° clockwise
Display the original image size (retaining the aspect ratio)
Route guidance to GPS coordinates stored in an image file (only displayed as long as the image file contains data) » page 75
Operating modesOperationActionGo to the next image fileFinger motion across the screen to the leftPress Go to previous image fileFinger motion across the screen to the rightPress
Increase the image size
Touch screen using two fingers and pull
apartTurn the right knob 2» Fig. 1 on page 7 to
the right
Reduce the image size
Touch screen using two fingers and closing togetherTurn the right knob 2» Fig. 1 on page 7 to
the leftMoving the image file with an enlarged displayDrag your finger over the screen in the re- quired direction
Rotate by 90 °
Touch screen using two fingers and move
clockwise or counter clockwise (only availa- ble with standard representation)Press or AOperationActionMaximum zoomDouble finger tap on the screenReturn to the original repre-
sentationDouble tap on the screen againPressing the right menu control 2 » Fig. 1 on
page 7
When browsing through folder and the first or last image file is reached the
following message appears on the screen Start/end of directory reached.
Browsing is continued from one end or the other.
Select source
›
In the menu Images press the function key
A
» Fig. 21 on page 36 .
The following menu of available sources is displayed. ■
USB - USB memory (type MSC)
■
SD card 1 - SD memory card 1
■
SD card 2 - SD memory card 2
Supported Formats
Codec type
(File formats)File suffixMax. resolution (Megapixels)BMPbmp4JP (E) Gjpg; jpeg4; 64GIFgif4PNGpng4
Note
The max. supported image file size is 20 MB.
Settings
›
In the Images menu, press the function key
.
■ Image view: - Image view settings
■ Full - Display the maximum image size while retaining the aspect ratio
■ Automatic - Full screen display
1)
Presentation of selected photographs shown in succession at defined intervals
» page 37.
37Pictures