2014 SKODA YETI warning
[x] Cancel search: warningPage 35 of 88
First and foremost, pay attention to the safety instructions » page 7 , Impor-
tant notes .
The device allows you to play audio files in various formats and to connect dif-
ferent source types » page 35.
For an audio source with a memory split into several areas, only the memory
areas of the supported formats can be read » tab. Supported audio sources on
page 35 .WARNING■
Never place audio sources close to the airbags. They could be thrown into
the passenger compartment when the airbags are deployed, injuring the
occupants.■
Never place audio sources on the dash panel, in your hand or on your
knees. They could be thrown into the passenger compartment during sud-
den driving manoeuvres, thereby injuring the occupants.
■
Always route the connection cable of the audio source such that is does
not restrict you when driving.
CAUTION
Do not store any important data on the connected external sources. ŠKODA
assumes no responsibility for lost or damaged files or connected audio sour-
ces.
Note
See the owner's manual of the specific manufacturer for operating the exter-
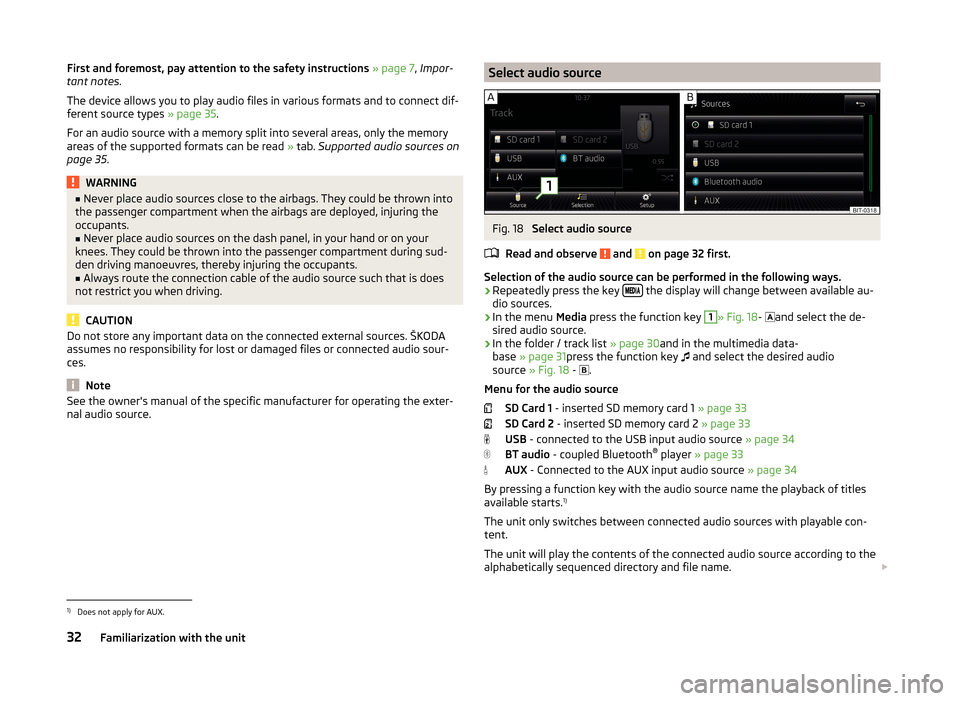
nal audio source.Select audio sourceFig. 18
Select audio source
Read and observe
and on page 32 first.
Selection of the audio source can be performed in the following ways.
› Repeatedly press the key
the display will change between available au-
dio sources.
› In the menu
Media press the function key
1
» Fig. 18 -
and select the de-
sired audio source.
› In the folder / track list
» page 30and in the multimedia data-
base » page 31 press the function key
and select the desired audio
source » Fig. 18 -
.
Menu for the audio source SD Card 1 - inserted SD memory card 1 » page 33
SD Card 2 - inserted SD memory card 2 » page 33
USB - connected to the USB input audio source » page 34
BT audio - coupled Bluetooth ®
player » page 33
AUX - Connected to the AUX input audio source » page 34
By pressing a function key with the audio source name the playback of titles
available starts. 1)
The unit only switches between connected audio sources with playable con-
tent.
The unit will play the contents of the connected audio source according to the
alphabetically sequenced directory and file name.
1)
Does not apply for AUX.
32Familiarization with the unit
Page 36 of 88
If the main and the additional telephones » page 40are connected to the de-
vice the audio source appears after selection BT Audio a menu for selecting
the Bluetooth ®
Player.
Bluetooth ®
Player
Read and observe
and on page 32 first.
The unit allows audio files of a connected Bluetooth ®
player to play using the
A2DP and AVRCP audio profile.
›
For connecting follow the same instructions as for pairing the device with a
telephone » page 42.
If an Apple device is connected as a Bluetooth ®
player, and this is connected
to the USB input, then the Bluetooth ®
connection is dropped.
The following warning message appears in the device screen Bluetooth-Audio
(A2DP) … Connection cancelled.
Note
■
We recommend setting the maximum output level of the Bluetooth ®
Play-
er » page 19 , Sound settings .■
Some operator options via the device may not be supported and are depend-
ent on the Bluetooth ®
player being used.
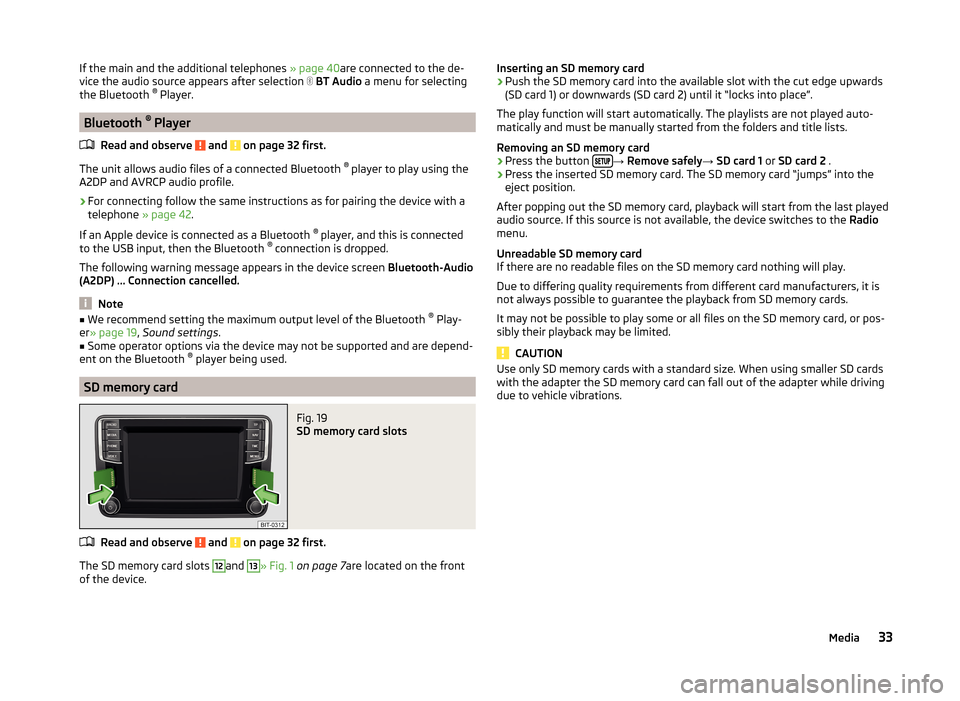
SD memory card
Fig. 19
SD memory card slots
Read and observe and on page 32 first.
The SD memory card slots
12
and
13
» Fig. 1 on page 7 are located on the front
of the device.
Inserting an SD memory card›Push the SD memory card into the available slot with the cut edge upwards
(SD card 1) or downwards (SD card 2) until it “locks into place”.
The play function will start automatically. The playlists are not played auto-
matically and must be manually started from the folders and title lists.
Removing an SD memory card›
Press the button →
Remove safely → SD card 1 or SD card 2 .
›
Press the inserted SD memory card. The SD memory card “jumps” into the
eject position.
After popping out the SD memory card, playback will start from the last played
audio source. If this source is not available, the device switches to the Radio
menu.
Unreadable SD memory card
If there are no readable files on the SD memory card nothing will play.
Due to differing quality requirements from different card manufacturers, it is
not always possible to guarantee the playback from SD memory cards.
It may not be possible to play some or all files on the SD memory card, or pos-
sibly their playback may be limited.
CAUTION
Use only SD memory cards with a standard size. When using smaller SD cards
with the adapter the SD memory card can fall out of the adapter while driving
due to vehicle vibrations.33Media
Page 37 of 88
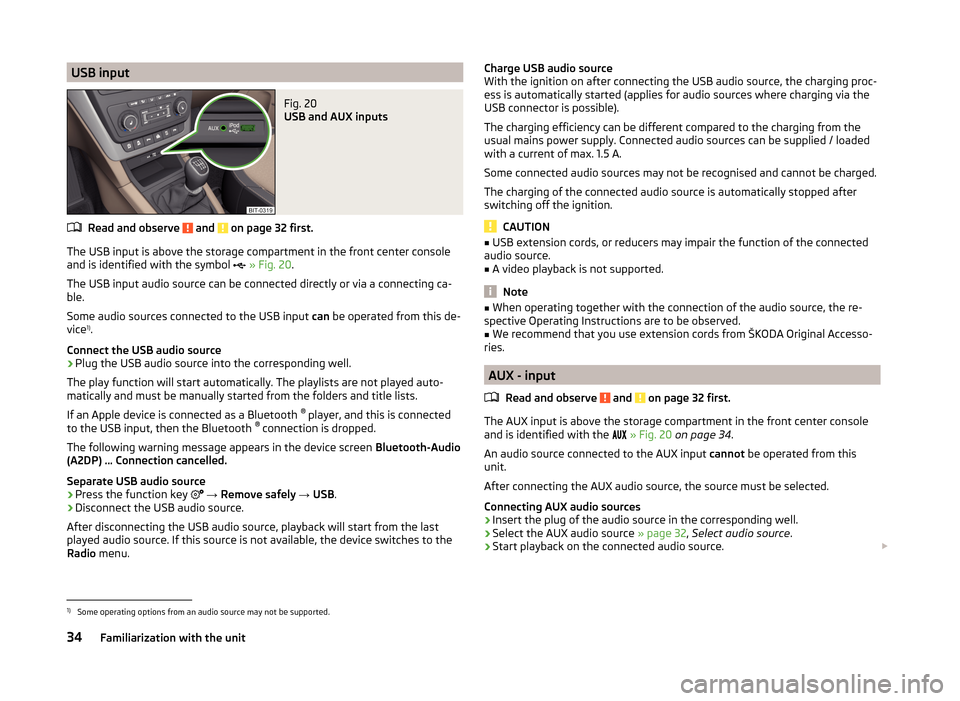
USB inputFig. 20
USB and AUX inputs
Read and observe and on page 32 first.
The USB input is above the storage compartment in the front center console
and is identified with the symbol
» Fig. 20 .
The USB input audio source can be connected directly or via a connecting ca-
ble.
Some audio sources connected to the USB input can be operated from this de-
vice 1)
.
Connect the USB audio source
›
Plug the USB audio source into the corresponding well.
The play function will start automatically. The playlists are not played auto-
matically and must be manually started from the folders and title lists.
If an Apple device is connected as a Bluetooth ®
player, and this is connected
to the USB input, then the Bluetooth ®
connection is dropped.
The following warning message appears in the device screen Bluetooth-Audio
(A2DP) … Connection cancelled.
Separate USB audio source
›
Press the function key
→ Remove safely → USB .
›
Disconnect the USB audio source.
After disconnecting the USB audio source, playback will start from the last
played audio source. If this source is not available, the device switches to the
Radio menu.
Charge USB audio source
With the ignition on after connecting the USB audio source, the charging proc-
ess is automatically started (applies for audio sources where charging via the
USB connector is possible).
The charging efficiency can be different compared to the charging from the
usual mains power supply. Connected audio sources can be supplied / loaded
with a current of max. 1.5 A.
Some connected audio sources may not be recognised and cannot be charged.
The charging of the connected audio source is automatically stopped after
switching off the ignition.
CAUTION
■ USB extension cords, or reducers may impair the function of the connected
audio source.■
A video playback is not supported.
Note
■ When operating together with the connection of the audio source, the re-
spective Operating Instructions are to be observed.■
We recommend that you use extension cords from ŠKODA Original Accesso-
ries.
AUX - input
Read and observe
and on page 32 first.
The AUX input is above the storage compartment in the front center console
and is identified with the
» Fig. 20 on page 34 .
An audio source connected to the AUX input cannot be operated from this
unit.
After connecting the AUX audio source, the source must be selected.
Connecting AUX audio sources
›
Insert the plug of the audio source in the corresponding well.
›
Select the AUX audio source » page 32, Select audio source .
›
Start playback on the connected audio source.
1)
Some operating options from an audio source may not be supported.
34Familiarization with the unit
Page 41 of 88

■Display time: - Set the display time for the slideshow
■ 5 s
■ 10 s
■ 15 s
■ 30 s
■ Repeat slide show - Switching on/off the picture presentation - repeatCommunication
Telephone
Introduction
This chapter contains information on the following subjects:
Telephone
39
Main / additional phone
40
Bluetooth ®
- connection profile
40
Settings
41
Problems with telephone functions
41
First and foremost, pay attention to the safety instructions » page 7 , Impor-
tant notes .
Up to 2 telephones can be connected via Bluetooth ®
profile HFP and at the
same time one of them can also be connected with the audio profile A2DP or
AVRCP. Therefore the functions of both telephones can be operated via the
device.
The device allows you to work with text messages (SMS) of the connected tel-
ephone (a telephone support and a connection via the MAP profile are re-
quired).
ŠKODA permits the operation of telephones and two-way radio systems with a
professionally installed external aerial and a maximum transmission power of
up to 10 watts.
Please ask at a specialist workshop about installing and operating telephones
and two-way radio systems that have a transmission power of more than 10 W.
WARNING■ The national regulations for using a mobile phone in a vehicle must be
observed.■
No objects such as mobile telephone mounts, etc. must be attached to
the covers of the airbag modules or be located within their immediate vicin-
ity.
38Familiarization with the unit
Page 42 of 88

WARNING (Continued)■Never leave a telephone in the deployment area of an airbag, on a seat,
on the dash panel or in another area, from which it can be thrown during a
sudden braking manoeuvre, an accident or a collision - there is a risk of in-
jury. There are storage compartments with lids and if necessary there is the
multimedia storage compartments to hold this » Vehicle owner's manual ,
chapter Transport and practical equipment .■
Before transport of the vehicle by air, the Bluetooth ®
function must be
switched off by a specialist company.
CAUTION
■ In areas with no signal and possibly in tunnels, garages and subways a tele-
phone conversation can be interrupted and no telephone connection can be
established - not even in an emergency!■
We recommend that mobile phones and two-way radio systems be installed
in the a vehicle by a specialist workshop.
■
Most modern electronic equipment is shielded from RF signals. In exceptional
cases, electronic equipment may not be shielded against the RF signals and
telephone service may be disrupted.
Note
■ The range of the telephone connection to the device using the Bluetooth ®
profile is limited to the vehicle interior. The range is dependent on local fac-
tors, e.g. obstacles between the devices and mutual interferences with other
devices. If your telephone is in a jacket pocket, for example, this can lead to
difficulties when establishing a connection with the device or transferring da-
ta.■
The functionality of the telephone is dependent on the telephone service op-
erator and the telephone being used. Further information is available from the
telephone service operator or can be taken from the telephone manual.
■
In some countries the connection via the Bluetooth ®
function, may be limi-
ted. Further information can be obtained from local authorities.
TelephoneFig. 22
Telephone: Main menu
Read and observe and on page 38 first.
›
Press the button.
If at least one telephone is connected to the device, the Telephone menu is
displayed » Fig. 22.
Main Menu - Information and function keys Name of the mobile network operator of the associated main telephone
Function key for opening a list of up to 20 previously paired telephone
with the name of the connected main telephone
Function key for switching the connected telephones with the name of
the connected additional telephone
Speed dial the preferred telephone numbers » page 49
Choice of storage group for the preferred telephone numbers
Direct entry of a telephone number » page 47
Display the telephone contact list » page 48
Display a collection of text messages (SMS) 1)
» page 52 (When new mes-
sages appear the number of new SMS is specified)
Display of call list (if there are new missed calls, the icon will appear here
with the information about the number of missed calls)
» page 50
Menu settings for the Telephone » page 41
ABCDE1)
This function is only supported by some telephones.
39Communication
Page 45 of 88

If there are problems with the availability of the mobile network or with the
Bluetooth ®
function, one of the following messages may appear on the device
display screen.MessageMeaningNetw. search…The telephone scans for available
wireless networks.
No network
The telephone has no connection to a
wireless network, if necessary, it does
not support sending information to
the network state.
Rejected by network.
The telephone service provider has
rejected the connection (e.g. not
enough mobile telephone credit, SIM
card blocked, roaming not available).To use the Bluetooth function,
please switch the ignition on.Switch on the ignition » page 43,
conditions for coupling .Please switch on Bluetooth.Switch on the Bluetooth ®
function on
the device.Please connect a mobile telephone.Connect the telephone with the de-
vice » page 42 , Pair .Telephone not available.There is a problem with the Tele-
phone , contact a specialist workshop.Telephone is currently not available.
Unknown No.
The telephone did not provide any in-
formation regarding the telephone
service provider. Connect the mobile
telephone again, if necessary, remove
the key for a few minutes a)
.a)
On vehicles with a starter button, switch off the ignition and open the driver's door.
Pair
Introduction
This chapter contains information on the following subjects:
conditions for coupling
43
Coupling - no telephone connected
43
Coupling - connected telephone
43
Coupling - two telephones connected
44
Coupling - more options of the telephone search
44
Connect telephone to the device
44
Pairing confirmation
45
Delete the telephone from the list of paired devices
45
First and foremost, pay attention to the safety instructions » page 7 , Impor-
tant notes .
During the coupling and connecting process the device can demand the confir-
mation by the Bluetooth ®
profile (e.g., release contact import, release the MAP
profile or the Bluetooth connection ®
player and similar.) The telephone display
should be monitored to acknowledge any possible request.
If the telephone to be paired has several SIM cards, then the primary SIM card
of the telephone is paired with your device.
The coupling procedure is different depending on the number of telephones
associated with the device.
WARNINGThe device may require confirmation of certain features in the telephone
when pairing. Therefore do not carry out the pairing process while driving -
there is danger of accidents! 42Familiarization with the unit
Page 57 of 88
MirrorLink ™
Introduction
This chapter contains information on the following subjects:
Connection conditions
54
Start function
54
Operation
55
Settings
55
Function problems
55
First and foremost, pay attention to the safety instructions » page 7 , Impor-
tant notes .
MirrorLink ™
provides a function for the operation of some installed applica-
tions in the communication facility (e.g. telephone, hereinafter referred to only
as facility) by using the device.
Using this function is only for specially designed and certified applications. For
reasons of safety, the operation of some applications while driving is limited or
not possible (function keys of the applications are inactive).
WARNING■ No objects such as mobile telephone mounts, etc. must be attached to
the covers of the airbag modules or be located within their immediate vicin-
ity.■
Never leave communication facility in the deployment area of an airbag,
on a seat, on the dash panel or in another area, from which it can be
thrown during a sudden braking manoeuvre, an accident or a collision -
there is a risk of injury. There are storage compartments with lids and if
necessary there is the multimedia storage compartments to hold this » Ve-
hicle owner's manual , chapter Transport and practical equipment .
CAUTION
■
MirrorLink ™
Applications that use a mobile data connection, are dependent
on the quality of the signal supplied by your telephone service provider. ŠKODA
accepts no responsibility for the transmitted data volume.■
An intensive use of the function MirrorLink ™
and the work associated with
applications (e.g., GPS, mobile data, fully-backlit display and the like.) can lead
to battery discharge of the connected facility.
Connection conditions
Read and observe
and on page 54 first.
The connection between the facility and the device using the function
MirrorLink ™
is operational under the following conditions.
The ignition is switched on.
The facility supports the function MirrorLink ™
and contains applications
that support this feature.
The display of the equipment is unlocked.
The facility is connected to the USB input » Fig. 20 on page 34 .
Note
Before connecting the MirrorLink - Functions, unlock the device screen. While
using the function the display may automatically darken or the screen com-
pletely turns off.
Start function
Read and observe
and on page 54 first.
›
Press the button
→
™
→ Selection .
A list of the facilities connected to the USB input is displayed.
›
Select one of the MirrorLink ™
function supporting facilities.
If the facility is separated from the USB cable and the ignition is not off, it au- tomatically reconnects when a new connection to the device is made.
Note
■ If the facility is connected by means of the function MirrorLink ™
, it cannot be
used as a USB audio source Media menu.■
The list of available facilities and applications, which support the MirrorLink ™
function, can be seed in the ŠKODA Internet pages www.infotainment.skoda-
auto.com .
54Familiarization with the unit
Page 58 of 88
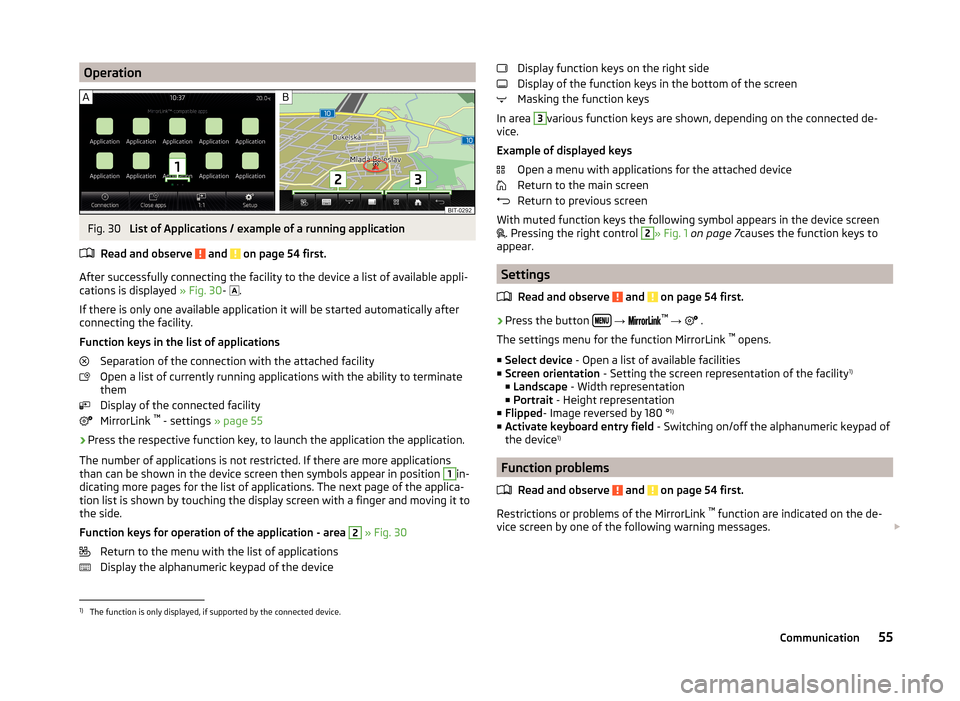
OperationFig. 30
List of Applications / example of a running application
Read and observe
and on page 54 first.
After successfully connecting the facility to the device a list of available appli-
cations is displayed » Fig. 30-
.
If there is only one available application it will be started automatically after
connecting the facility.
Function keys in the list of applications Separation of the connection with the attached facility
Open a list of currently running applications with the ability to terminate
them
Display of the connected facility
MirrorLink ™
- settings » page 55
›
Press the respective function key, to launch the application the application.
The number of applications is not restricted. If there are more applications
than can be shown in the device screen then symbols appear in position
1
in-
dicating more pages for the list of applications. The next page of the applica-
tion list is shown by touching the display screen with a finger and moving it to
the side.
Function keys for operation of the application - area
2
» Fig. 30
Return to the menu with the list of applications
Display the alphanumeric keypad of the device
Display function keys on the right side
Display of the function keys in the bottom of the screen
Masking the function keys
In area 3
various function keys are shown, depending on the connected de-
vice.
Example of displayed keys Open a menu with applications for the attached device
Return to the main screen
Return to previous screen
With muted function keys the following symbol appears in the device screen
. Pressing the right control
2
» Fig. 1
on page 7 causes the function keys to
appear.
Settings
Read and observe
and on page 54 first.
›
Press the button
→
™
→ .
The settings menu for the function MirrorLink ™
opens.
■ Select device - Open a list of available facilities
■ Screen orientation - Setting the screen representation of the facility 1)
■ Landscape - Width representation
■ Portrait - Height representation
■ Flipped - Image reversed by 180 ° 1)
■ Activate keyboard entry field - Switching on/off the alphanumeric keypad of
the device 1)
Function problems
Read and observe
and on page 54 first.
Restrictions or problems of the MirrorLink ™
function are indicated on the de-
vice screen by one of the following warning messages.
1)
The function is only displayed, if supported by the connected device.
55Communication