2014 SKODA YETI window
[x] Cancel search: windowPage 13 of 88

Unit operation
Operation on the device screen
Introduction
This chapter contains information on the following subjects:
Operation
10
Alphanumeric with keyboard
11
This chapter covers the touch screen and its operation.
Operation
Fig. 3
Screen area / screen display
Description of the display Status bar
Information and the operation of the current menu Function keys of the current menu
Identification of the current menu
Return to the higher-level menu
Slider - Position and movement in the menu (movement is by moving the
slider down / up with the finger or by turning control
2
» Fig. 1 on page 7 to
the left or right)
Menu item currently selected
Menu point with “checkbox”
Menu point is not available
Open a submenu of the menu point with the “pop-up window”
ABCDEFGHIJStatus line
In some menus a status bar located at the top of the screen shows the time
and outdoor temperature along with other information.
Function keys
Screen areas which confirm a function or a menu are called “ function keys”.
Grey background - The key is inactive and thus not selectable
White background - The key is active and thus selectable
Green background - The currently selected function or menu point
Selecting menu/menu item/function › Drag your finger over the screen in the required direction.
› By turning the right control2
» Fig. 1
on page 7 .
Confirming menu/menu item/function
› Touch the function key with your finger.
› By pressing the right menu control
2
» Fig. 1 on page 7 .
Returning to higher-level menu
› by pressing the function key
.
› By pressing the relevant button next to the screen.
› By touching the screen outside of the “pop-up window” with your finger.
Open submenu of a function
› by pressing the function key
a “pop-up window” with a sub menu opens.
Switching function on/off with “checkbox”
›
or
- Function is switched on
›
or
- Function is switched off
Set value › by touching the function keys with the symbols
.
› Touching or moving your finger over the scale.
Note
For some menus or menu items, the current setting is displayed, e.g.
Dis-
tance: ... km or distance: ... mi .10Familiarization with the unit
Page 18 of 88
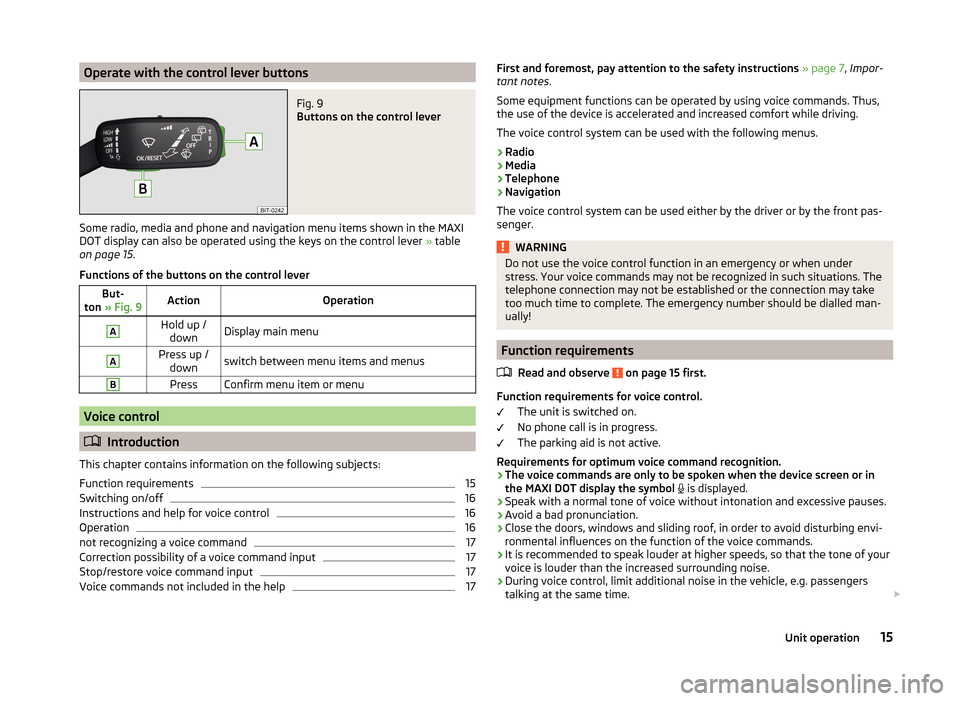
Operate with the control lever buttonsFig. 9
Buttons on the control lever
Some radio, media and phone and navigation menu items shown in the MAXI
DOT display can also be operated using the keys on the control lever » table
on page 15 .
Functions of the buttons on the control lever
But-
ton » Fig. 9ActionOperationAHold up /
downDisplay main menuAPress up / downswitch between menu items and menusBPressConfirm menu item or menu
Voice control
Introduction
This chapter contains information on the following subjects:
Function requirements
15
Switching on/off
16
Instructions and help for voice control
16
Operation
16
not recognizing a voice command
17
Correction possibility of a voice command input
17
Stop/restore voice command input
17
Voice commands not included in the help
17First and foremost, pay attention to the safety instructions » page 7 , Impor-
tant notes .
Some equipment functions can be operated by using voice commands. Thus,
the use of the device is accelerated and increased comfort while driving.
The voice control system can be used with the following menus.
› Radio
› Media
› Telephone
› Navigation
The voice control system can be used either by the driver or by the front pas-
senger.WARNINGDo not use the voice control function in an emergency or when under
stress. Your voice commands may not be recognized in such situations. The
telephone connection may not be established or the connection may take
too much time to complete. The emergency number should be dialled man-
ually!
Function requirements
Read and observe
on page 15 first.
Function requirements for voice control. The unit is switched on.
No phone call is in progress.
The parking aid is not active.
Requirements for optimum voice command recognition.
› The voice commands are only to be spoken when the device screen or in
the MAXI DOT display the symbol
is displayed.
› Speak with a normal tone of voice without intonation and excessive pauses.
› Avoid a bad pronunciation.
› Close the doors, windows and sliding roof, in order to avoid disturbing envi-
ronmental influences on the function of the voice commands.
› It is recommended to speak louder at higher speeds, so that the tone of your
voice is louder than the increased surrounding noise.
› During voice control, limit additional noise in the vehicle, e.g. passengers
talking at the same time.
15Unit operation
Page 26 of 88
Radio
Operation
Introduction
This chapter contains information on the following subjects:
Main menu
23
Radio DAB text and images presentation
24
Select the frequency range
24
List of available stations
24
Search and select available stations
25
Save radio station
25
Station logos
26
TP Traffic programme
26
First and foremost, pay attention to the safety instructions » page 7 , Impor-
tant notes .
The device allows analogue radio reception of FM and AM frequency ranges as
well as DAB digital radio reception.
CAUTION
■ For vehicles with window antennas do not stick foil or metal coated stickers
to the window as this can lead to interference.■
Car parks, tunnels, tall buildings or mountains can interfere with the radio
signal even causing it to fail completely.
Note
In countries where the RDS function is not supported, we recommend turning
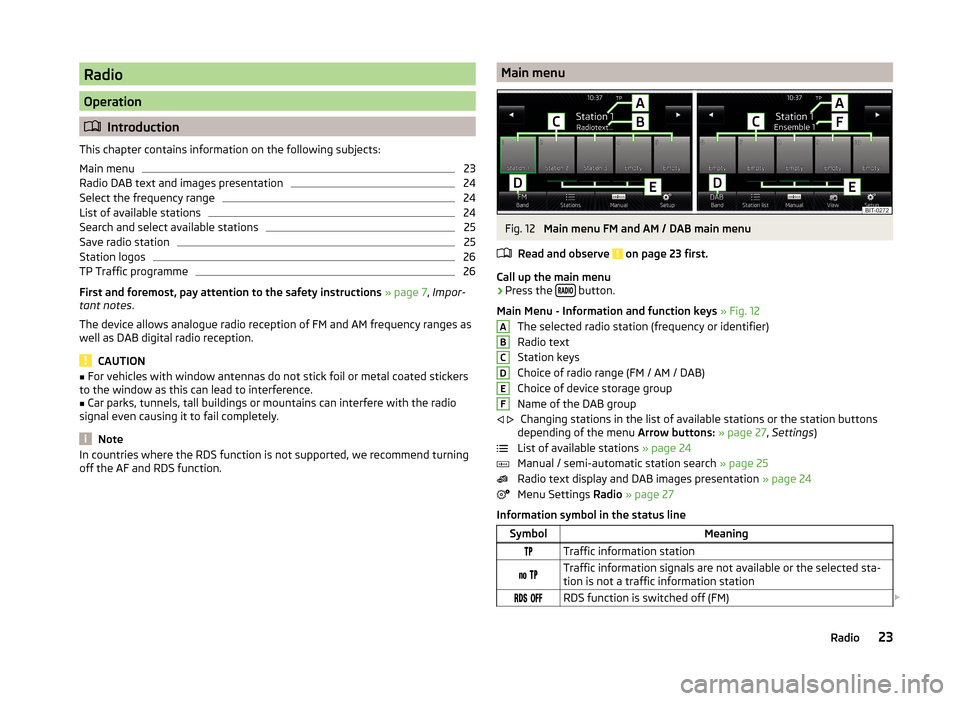
off the AF and RDS function.Main menuFig. 12
Main menu FM and AM / DAB main menu
Read and observe
on page 23 first.
Call up the main menu
›
Press the button.
Main Menu - Information and function keys » Fig. 12
The selected radio station (frequency or identifier)
Radio text
Station keys
Choice of radio range (FM / AM / DAB)
Choice of device storage group
Name of the DAB group Changing stations in the list of available stations or the station buttons
depending of the menu Arrow buttons: » page 27 , Settings )
List of available stations » page 24
Manual / semi-automatic station search » page 25
Radio text display and DAB images presentation » page 24
Menu Settings Radio » page 27
Information symbol in the status line
SymbolMeaningTraffic information station Traffic information signals are not available or the selected sta-
tion is not a traffic information station RDS function is switched off (FM) ABCDEF
23Radio
Page 38 of 88
Disconnect AUX audio source›Disconnect the connector of the audio source.
After disconnecting the AUX audio source is no automatic change to another
audio source takes place.
CAUTION
■ The AUX input must only be used for audio devices!■If an external audio source is connected to the AUX input, which is equipped
with an adapter for external power supply, the sound will be impaired. This de-
pends on the quality of the adapter which is used.
Note
■ The standard 3.5 mm stereo jack plug is used for the AUX input. If the exter-
nal devices do not have this jack plug, you must use an adapter.■
The AUX input can be activated / deactivated » page 31, Settings .
■
The volume can be adjusted by setting the input sensitivity of the connected
AUX audio source » page 19, Sound settings .
■
We recommend that you use extension cords from ŠKODA Original Accesso-
ries.
Supported audio source and file formats
Read and observe
and on page 32 first.
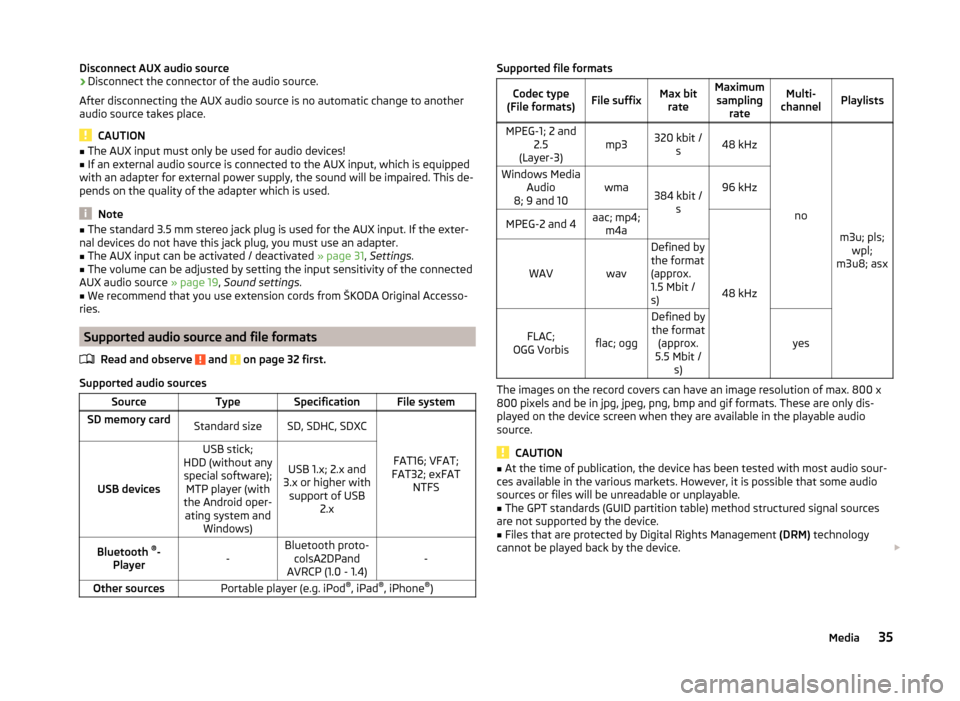
Supported audio sources
SourceTypeSpecificationFile systemSD memory cardStandard sizeSD, SDHC, SDXC
FAT16; VFAT;
FAT32; exFAT NTFSUSB devices
USB stick;
HDD (without any special software); MTP player (with
the Android oper- ating system and Windows)
USB 1.x; 2.x and
3.x or higher with support of USB 2.xBluetooth ®
-
Player-Bluetooth proto- colsA2DPand
AVRCP (1.0 - 1.4)-Other sourcesPortable player (e.g. iPod ®
, iPad ®
, iPhone ®
)Supported file formatsCodec type
(File formats)File suffixMax bit rateMaximumsampling rateMulti-
channelPlaylistsMPEG-1; 2 and 2.5
(Layer-3)mp3320 kbit / s48 kHz
no
m3u; pls;wpl;
m3u8; asx
Windows Media Audio
8; 9 and 10wma384 kbit / s96 kHzMPEG-2 and 4aac; mp4;m4a
48 kHz
WAVwav
Defined by
the format
(approx.
1.5 Mbit /
s)
FLAC;
OGG Vorbisflac; ogg
Defined by the format (approx.
5.5 Mbit / s)
yes
The images on the record covers can have an image resolution of max. 800 x
800 pixels and be in jpg, jpeg, png, bmp and gif formats. These are only dis-
played on the device screen when they are available in the playable audio
source.
CAUTION
■ At the time of publication, the device has been tested with most audio sour-
ces available in the various markets. However, it is possible that some audio
sources or files will be unreadable or unplayable.■
The GPT standards (GUID partition table) method structured signal sources
are not supported by the device.
■
Files that are protected by Digital Rights Management (DRM) technology
cannot be played back by the device.
35Media
Page 61 of 88
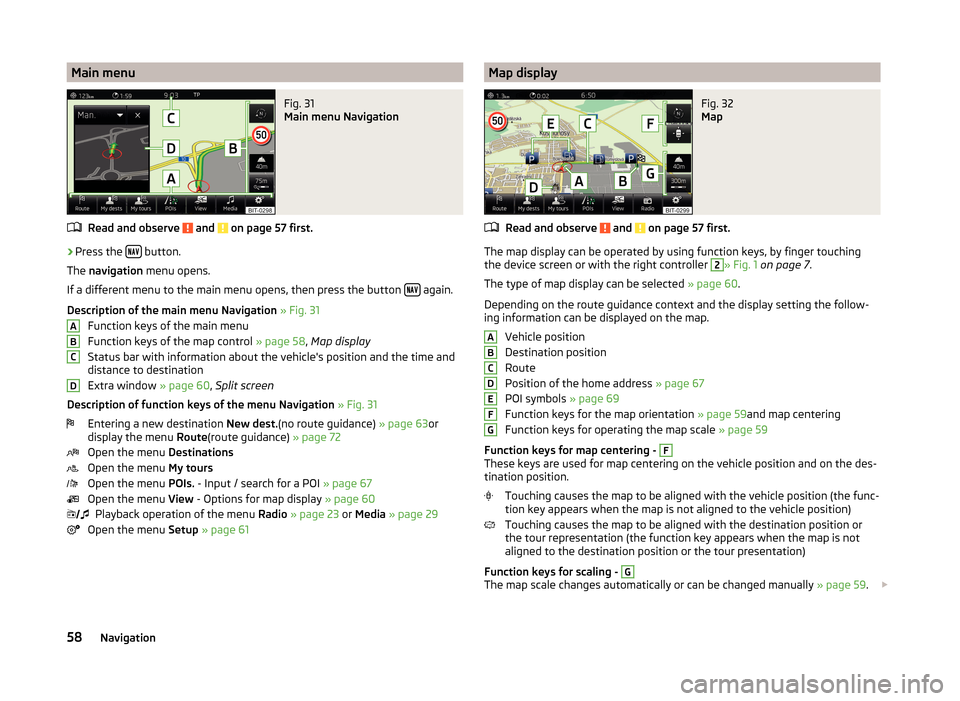
Main menuFig. 31
Main menu Navigation
Read and observe and on page 57 first.
›
Press the button.
The navigation menu opens.
If a different menu to the main menu opens, then press the button
again.
Description of the main menu Navigation » Fig. 31
Function keys of the main menu
Function keys of the map control » page 58, Map display
Status bar with information about the vehicle's position and the time and distance to destination
Extra window » page 60, Split screen
Description of function keys of the menu Navigation » Fig. 31
Entering a new destination New dest.(no route guidance) » page 63or
display the menu Route(route guidance) » page 72
Open the menu Destinations
Open the menu My tours
Open the menu POIs. - Input / search for a POI » page 67
Open the menu View - Options for map display » page 60
Playback operation of the menu Radio » page 23 or Media » page 29
Open the menu Setup » page 61
ABCD Map displayFig. 32
Map
Read and observe and on page 57 first.
The map display can be operated by using function keys, by finger touching
the device screen or with the right controller
2
» Fig. 1 on page 7 .
The type of map display can be selected » page 60.
Depending on the route guidance context and the display setting the follow-
ing information can be displayed on the map.
Vehicle position
Destination position
Route
Position of the home address » page 67
POI symbols » page 69
Function keys for the map orientation » page 59and map centering
Function keys for operating the map scale » page 59
Function keys for map centering -
F
These keys are used for map centering on the vehicle position and on the des-
tination position.
Touching causes the map to be aligned with the vehicle position (the func-
tion key appears when the map is not aligned to the vehicle position)
Touching causes the map to be aligned with the destination position or
the tour representation (the function key appears when the map is not
aligned to the destination position or the tour presentation)
Function keys for scaling -
G
The map scale changes automatically or can be changed manually » page 59.
ABCDEFG58Navigation
Page 63 of 88
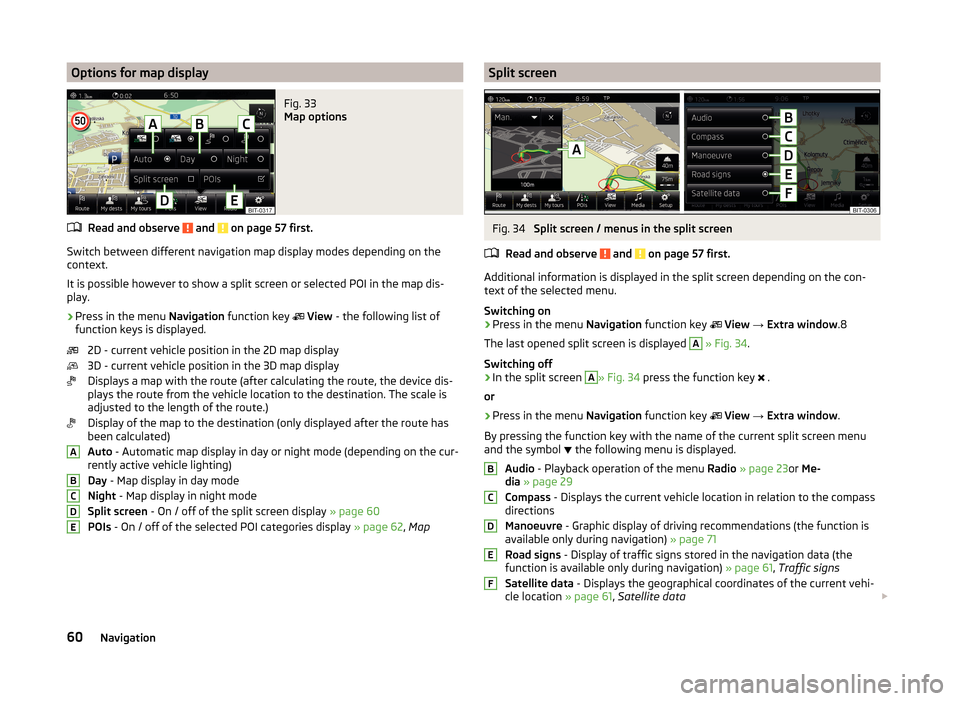
Options for map displayFig. 33
Map options
Read and observe and on page 57 first.
Switch between different navigation map display modes depending on the
context.
It is possible however to show a split screen or selected POI in the map dis-
play.
›
Press in the menu Navigation function key
View - the following list of
function keys is displayed.
2D - current vehicle position in the 2D map display
3D - current vehicle position in the 3D map display
Displays a map with the route (after calculating the route, the device dis-
plays the route from the vehicle location to the destination. The scale is
adjusted to the length of the route.)
Display of the map to the destination (only displayed after the route has
been calculated)
Auto - Automatic map display in day or night mode (depending on the cur-
rently active vehicle lighting)
Day - Map display in day mode
Night - Map display in night mode
Split screen - On / off of the split screen display » page 60
POIs - On / off of the selected POI categories display » page 62, Map
ABCDESplit screenFig. 34
Split screen / menus in the split screen
Read and observe
and on page 57 first.
Additional information is displayed in the split screen depending on the con- text of the selected menu.
Switching on
›
Press in the menu Navigation function key
View → Extra window .8
The last opened split screen is displayed
A
» Fig. 34 .
Switching off
›
In the split screen
A
» Fig. 34 press the function key
.
or
›
Press in the menu Navigation function key
View → Extra window .
By pressing the function key with the name of the current split screen menu
and the symbol the following menu is displayed.
Audio - Playback operation of the menu Radio » page 23 or Me-
dia » page 29
Compass - Displays the current vehicle location in relation to the compass
directions
Manoeuvre - Graphic display of driving recommendations (the function is
available only during navigation) » page 71
Road signs - Display of traffic signs stored in the navigation data (the
function is available only during navigation) » page 61, Traffic signs
Satellite data - Displays the geographical coordinates of the current vehi-
cle location » page 61, Satellite data
BCDEF60Navigation
Page 65 of 88
■ Avoid ferries and motorail trains - Switch use of ferries and motorail
trains on/off
■ Avoid toll roads - Switch on/off use of toll roads
■ Avoid tunnels - Switch use of tunnels on/off
■ Avoid routes requiring toll stickers - Switch use of routes requiring toll
stickers on/off
■ Available toll stickers - Choose the use of toll roads for respective countries
(the choice is only available when the function Avoid routes requiring toll
stickers is on)
Map
›
Press in the menu Navigation function key
→ Map .
■ Lane guidance - Switch on/off the display with the recommended lane for
complicated intersections » page 71
■ Show favourites - Switch on/off the display of favourites
■ Show road signs - Switch on/off the display of traffic signs
■ Show POIs - Switch on / off the display of POIs (additional menu items ap-
pear only when this function is turned off)
■ Select categories for POIs - Select POIs that can be displayed on the map
from a list of available POIs (max. 10 POI categories) » page 69
■ Show brands for POIs - Switch on/off the display company logos at the POIs
Fuel options
›
Press in the menu Navigation function key
→ Fuel options .
■ Select preferred fuel station - Setting for the preferred fuel station brand
(the selected markers appear in the search on the first three positions of the
list, even if a different, non-preferred brand fuel station is closer)
■ Fuel warning - Switch on / off the display of the warning (when the pointer
of the fuel gauge reaches the reserve area)
When the pointer of the fuel gauge reaches the reserve area, a screen appears
when the function Fuel warning is switched on with the warning message
Warning: fuel tank almost empty. Would you like to find a fuel station near-
by? with the following menu items.
› Cancel
- Close the window with the warning
› Search
- Search for the nearest fuel station; when you select the fuel station,
the new route will be calculated from your current position
Navigation announcements›
Press in the menu Navigation function key
→ Navigation announce-
ments .
■ Volume - Volume control of the navigation announcements
■ No voice guidance during call - Enable / disable the navigation prompts dur-
ing a telephone conversation
Advanced settings
›
Press in the menu Navigation function key
→ Advanced setup .
■ Time display: - Select the time to be displayed in the status line
■ Time of arrival - displays the expected time to destination
■ Travelling time - Display the expected travelling time to the destination
■ Status line: Status line - Display information about your selected destination
in the status line ■ Destination - Display information about the distance and duration of the
guidance to the destination
■ Next stopover - Display information about the distance and duration of the
guidance to the stopover
■ Note: national border crossed - Switch on/off the display of the information
window with speed limits when crossing the national border
■ Demo mode - Switch on/off guidance in demo mode
■ Define demo mode starting point - Enter the start point of the route guid-
ance for the demo mode ■ Cancel - Cancel the entry
■ Position - Select the current vehicle position as the starting point
■ Address - Select an address as the starting point
Manage memory
›
Press in the menu Navigation function key
→ Manage memory .
■ Sort by: - Sort contacts imported from a connected telephone
■ Name - according to contact surname
■ Name - according to contact first name
■ Define home address - Enter / show / edit the home address » page 67,
Home address
■ Delete my POIs - Delete saved personal points of interest
■ Update my POIs (SD card) - Update / import personal POIs
62Navigation
Page 76 of 88
Dynamic route switch on / off›
Press in the menu Navigation function key
→ Route options → Dynamic
route .
The TMC traffic reports affect the route guidance when the function Dynamic
route » page 61 is switched on.
Dynamic route guidance can also be switched on / off during active route guid-
ance.
Dynamic route switched on
Information on traffic problems which affect the route are displayed in the
map by means of a coloured symbol (e.g., ,
,
, etc.). Traffic problems,
which do not affect the route, are displayed in the map by means of a grey
symbol. The direction in which a traffic problem is found, is displayed by means
of an arrow in the symbol.
Dynamic route switched off
You are not alerted to received traffic disruptions along your route and are gui-
ded through this traffic disruption by the radio navigation system. The traffic
reports are updated automatically in the unit and displayed by pressing
.
If there is a traffic obstruction on your route the route can be locked manually
by entering a traffic jam » page 72, Route .
Note
Making a diversion from a traffic jam based on TMC traffic reports may not al-
ways offer a time advantage, e.g. if the diversion route is also congested.
Traffic report details
Pressing
causes the following information to be displayed:
■ Function key All - show all traffic information.
■ Function key Route - only display the traffic information on the current route.
■ A map showing the traffic obstruction.
■ Window with the following information.
■ Location of event, the accuracy depends on the timeliness of the naviga-
tion data.
■ Description of up to three events related to the respective information.
■ Description of the direction with respect to the event.
■ Probable duration of the event.
■ Additional information, such as probable delay time.
■
An information line, on how current the information is and on the provider
of the message.
■ Symbol that specifies the type of information.
■ - zoom in window with described traffic obstruction.
■ - zoom out window with described traffic obstruction.
■ - show previous traffic information.
■ - show the following traffic information.
■ - display list of all received traffic messages.
My tour
Introduction
This chapter contains information on the following subjects:
New Tour / Tour editing
73
Tour memory
74
First and foremost, pay attention to the safety instructions » page 7 , Impor-
tant notes .
This chapter discusses the procedure for route entry and route processing or
storage.
New Tour / Tour editing
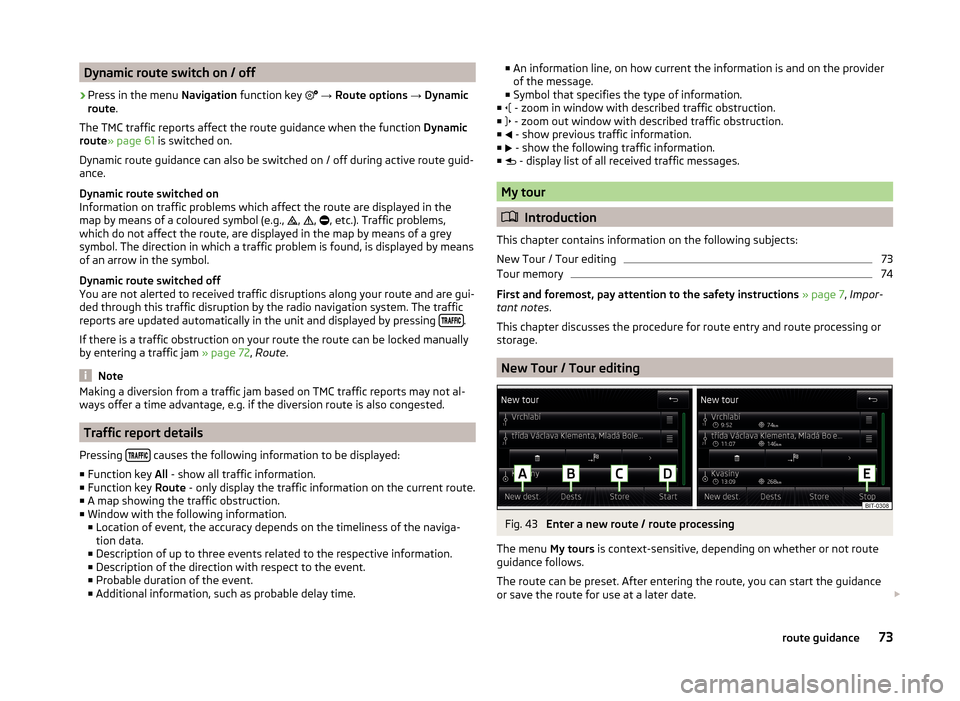
Fig. 43
Enter a new route / route processing
The menu My tours is context-sensitive, depending on whether or not route
guidance follows.
The route can be preset. After entering the route, you can start the guidance
or save the route for use at a later date.
73route guidance