Page 17 of 30
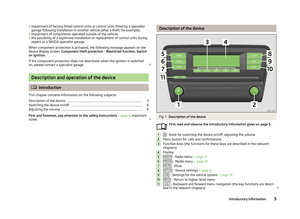
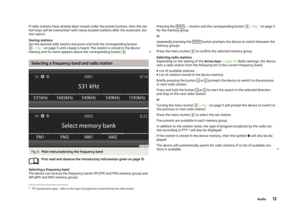
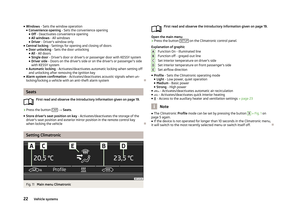
 Blues Car Radio Manual Selecting sourcesFig. 7
Main menu/USB operation
First read and observe the introductory information and safety warn-
ings
on page 14.
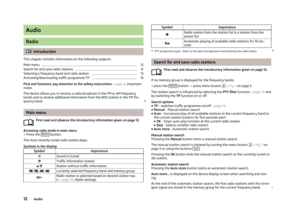
Accessing main menu in media mode
›
Press the button MEDIA.")
Selecting sourcesFig. 7
Main menu/USB operation
First read and observe the introductory information and safety warn-
ings
on page 14.
Accessing main menu in media mode
›
Press the button MEDIA.
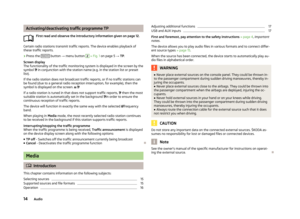
Selecting the audio source ■ USB - Changes to an external audio source connected to the USB in-
put 1)
» page 17
■ AUX - Changes to an external audio source connected to the AUX in-
put » page 17
Symbols in the displaySymbolImportanceTrack repeatFolder/source repeatRandom play, Currently selected audio sourceAuto-play function for 10 seconds
Supported sources and file formats
First read and observe the introductory information and safety warn-
ings
on page 14.
Supported sources
USB devicesUSB stick, USB MP3 player, HDD (without special software)Other external
sourcesPortable playback devices with AUX connection, MTP (MSC)
players
At the time of publication, the device has been tested with most products and
media available on the various markets. However, it is possible that some devices,
media or files will be unreadable or unplayable.
Supported files
Audio filesCodec type (file
formats)MPEG-1/2 (layer 3)Windows Media Audio 7, 8, 9 and 10File suffixmp3wmaPlaylistsm3u, pls, wpl, m3u8; asx
The name of the artist, the album and the title of the played file can be displayed
if the information is available as a so-called ID3 tag. If no ID3 tag is available, only the folder name is displayed.
To ensure good playback, we recommend using compressed MP3 files at a bit rate
of at least 160 kb/s. For audio files with variable bitrates, the indicated remaining
playback time does not correspond to the actual remaining playback time.
1)
Operating a connected external audio source is only possible with certain restrictions, depending on
the type of the connected device.
15Audio
Page 18 of 30
 Blues Car Radio Manual The WMA files can only be played if they are not additionally copyrighted by DRM.
These kinds of WMA files are not supported by the device.
The more files, folders or playlists on one source, the long")
The WMA files can only be played if they are not additionally copyrighted by DRM.
These kinds of WMA files are not supported by the device.
The more files, folders or playlists on one source, the longer it will take to read
the source. It is a good idea to create subfolders with files (e.g. by artist or album
names) in order to save time.
Source propertiesSpecifications for USB
sourcesUSB 1.x and 2.x or higher with USB 2.x support
(the maximum data transfer speed will then corre- spond to the USB 2.x speed)
Speed class of max. 480 Mb/sFile system for the USB
sourceFAT16, VFAT, FAT32
File properties
Bitratemax. 320 kb/sSampling ratemax. 48 kHz
Operation
First read and observe the introductory information and safety warn-
ings
on page 14.
The and buttons always affect the audio source currently being listened to,
regardless of the menu being used.
It is also possible to change tracks using the buttons
3
» Fig. 1 on page 5 from
within the menu of the audio source currently being played.
A list of buttons
3
is displayed in the menu of the audio source currently being
played after the menu button
2
is turned.
■ Play - Plays the current track
■ Up - Returns to a higher level
Press menu button
2
to start playback of the current track or to open the cur-
rent folder.
Button ActionFunction
Press briefly
Go to the start of the track being played if the track
has been playing for more than 3 secondsGo to the start of the previous track if the track has been playing for less than 3 secondsPress and holdFast rewind of the track
Button
ActionFunctionPress brieflyGo to the start of the next trackPress and holdFast forward of the track
Button
/
ActionFunction
Press briefly
Playback/pause: the play function is stopped in the
current position and the symbol changes to - when
pressed again, playback will continue from this posi-
tion.
Button
ActionFunction
Press briefly
Go to the start of the track being played if the track
has been playing for more than 3 secondsGo to the start of the previous track if the track has been playing for less than 3 secondsPress and holdFast rewind of the track
Button
ActionFunctionPress brieflyGo to the start of the next trackPress and holdFast forward of the track
Button
ActionFunctionPress brieflyScrolling down in folders 16Audio
Page 19 of 30
 Blues Car Radio Manual Button ActionFunctionPress brieflyScrolling up in folders
Adjusting additional functions
First read and observe the introductory information and safety warn-
ings
on page 14.
› Press the")
Button ActionFunctionPress brieflyScrolling up in folders
Adjusting additional functions
First read and observe the introductory information and safety warn-
ings
on page 14.
› Press the
MEDIA button
→ menu button
2
» Fig. 1 on page 5.
■ TP - switches traffic programme on/off
■ - Displays the artist, album and track name from ID3 tag 1)
■ Repeat - Sets repeat play
■ Off - Switches repeat function off
■ Track - Repeats the current track
■ Folder - Repeats all tracks in folder
■ Mix - Random playback
■ Off - Switches random playback function off
■ All - Sets random playback of all tracks in the current audio source
■ Folder - Repeats all tracks in folder
■ Scan - Consecutive playback of the tracks for 10 seconds
■ OK - Stops auto-play function at the current track
■ Skip - Selects another track
■ Cancel - Changes to the track played originally
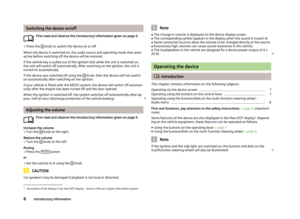
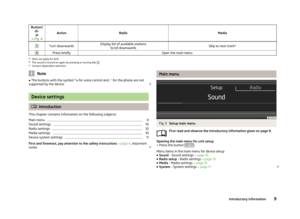
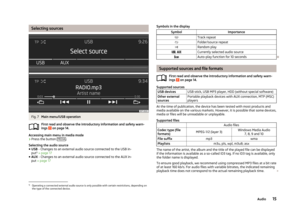
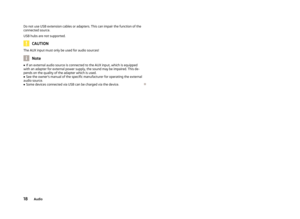
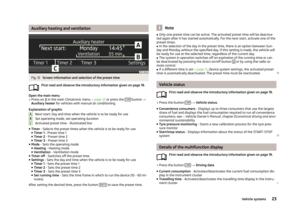
USB and AUX inputsFig. 8
USB and AUX inputs
First read and observe the introductory information and safety warn-
ings on page 14.
Die MDI (USB and AUX) inputs are located above the storage compartment at the
front of the centre console » Fig. 8.
The device can be used to play audio files from sources connected via these in-
puts, either directly or via a connection cable available from ŠKODA Genuine Ac-
cessories.
Adjusting the playback volume of the source
The playback volume of the source can be adjusted by turning the
knob.
Depending on the connected source, the output volume can be adjusted at this
source » page 10 , Sound settings .
AUX input
External audio sources connected to the AUX input cannot be operated from your
device.
The standard 3.5-mm jack plug is used for the AUX input. If the external audio
source does not have this jack plug, you must use an adapter .
USB input
External audio sources connected to the USB input cannot be operated from your
device.
Before removing the USBdevice, proceed as follows:
›
Press the button SETUP
→ System → Remove USB device safely .
1)
If there are no artist, album and track names available in the file being played, the folder or file name
is displayed.
17Audio
Page 20 of 30
Do not use USB extension cables or adapters. This can impair the function of the
connected source.
USB hubs are not supported.
CAUTION
The AUX input must only be used for audio sources!
Note
■ If an external audio source is connected to the AUX input, which is equipped
with an adapter for external power supply, the sound may be impaired. This de-
pends on the quality of the adapter which is used.■
See the owner's manual of the specific manufacturer for operating the external
audio source.
■
Some devices connected via USB can be charged via the device.
18Audio
Page 21 of 30
 Blues Car Radio Manual Vehicle systems
Vehicle settings
Introduction
This chapter contains information on the following subjects:
Selecting driving mode
19
Driving assistants
20
Deactivating traction control (ASR)
21
Spe")
Vehicle systems
Vehicle settings
Introduction
This chapter contains information on the following subjects:
Selecting driving mode
19
Driving assistants
20
Deactivating traction control (ASR)
21
Speed limit for winter tyres
21
Light
21
Visibility
21
Opening and closing
21
Seats
22
Setting Climatronic
22
Auxiliary heating and ventilation
23
Vehicle status
23
Details of the multifunction display
23
Service
24
Resetting to factory settings
24
First and foremost, pay attention to the safety instructions » page 4 , Important
notes .
Settings relating to the vehicle systems can only be made when the ignition is
switched on.
Note
■ The individual systems are described in the » Vehicle Owner's Manual .■For safety reasons, if any system functions are disabled, then some functions,
such as parts of the ESC system, are automatically enabled again after switching
the ignition off and on.
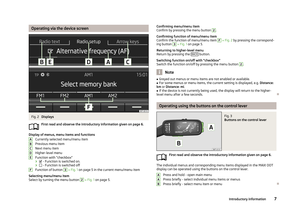
Selecting driving modeFig. 9
Button for selecting the driving
mode
First read and observe the introductory information given on page 19.
The menu for selecting the driving mode allows you to set the vehicle to one of
the three preset driving modes (Normal, Sport and Eco), or to the Individual driv-
ing mode, which allows customised settings to be applied.
If a driving mode other than Normal is selected, then the
» Fig. 9 symbol lights
up in the button.
Open the main menu
›
Press the button
» Fig. 9 .
■ Normal - Activates Normal mode
■ Info - Displays the mode settings
■ Sport - Activates Sport mode
■ Info - Displays the mode settings
■ Eco - Activates the fuel-saving mode
■ Info - Displays the mode settings
■ Individual - Activates the Individual mode
■ Settings - Individual settings
■ Steering action - Sets the power steering characteristics
■ Normal - Normal
■ Sport - Sports
■ Engine - Sets the engine (drive) characteristics
■ Normal - Normal
■ Sport - Sports
■ Eco - Economical
19Vehicle systems
Page 22 of 30
 Blues Car Radio Manual ■ACC driving programme - Sets the vehicle acceleration when adaptive cruise
control is activated ■ Normal - Normal
■ Sport - Sports
■ Eco - Economical
■ Advanced FrontLighting System (AF")
■ACC driving programme - Sets the vehicle acceleration when adaptive cruise
control is activated ■ Normal - Normal
■ Sport - Sports
■ Eco - Economical
■ Advanced FrontLighting System (AFS) - Sets the characteristics of the
adaptive headlights
■ Normal - Normal
■ Sport - Sports
■ Eco - Economical
■ Air conditioning - Sets the Climatronic characteristics
■ Normal - Normal
■ Eco - Economical
■ Reset - Sets the mode to Normal
Note
If the device is not operated for longer than 10 seconds in the "Select driving
mode" main menu, it will switch to the most recently selected menu or switch it-
self off.
Driving assistants
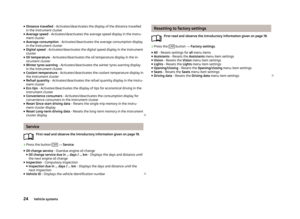
Fig. 10
Parking assistance: Illustrations
First read and observe the introductory information given on page 19.
Parking aid: Explanation of graphic
Obstacle detected in the scanned area (the vehicle can still continue to travel
in the direction of the obstacle)
Obstacle detected in the collision area (do not continue to drive in the direc- tion of the obstacle)
More information on the parking aid can be found in the » Vehicle Owner's Man-
ual , chapter Assistance systems .
›
Press the button CAR
→ Assistants .
■ Front Assist - Sets the assistant for distance monitoring to the vehicles ahead
■ Active - Activates/deactivates the assistant
■ Advance warning - Activates/deactivates advance warning function
■ Display distance warning - Activates/deactivates distance warnings
■ ACC (adaptive cruise control) - Sets the adaptive cruise control
■ Distance - Sets the distance monitoring to the vehicles ahead
■ Very close - Very small distance
■ Close - Small distance
■ Medium - Medium distance
■ Far - Large distance
■ Very far - Very large distance
■ Last distance selected - Last selected distance on/off
■ Driving programme - Sets the vehicle acceleration when adaptive cruise con-
trol is active 1)
■ Normal - Normal
■ Sport - Sports
■ Eco - Economical
■ Park Assist - Sets the parking aid
■ Front volume - Adjusts the volume of the front sensors
■ Front tone setting - Adjusts the tone of the front sensors
■ Rear volume - Adjusts the volume of the rear sensors
■ Rear tone setting - Adjusts the tone of the rear sensors
■ Audio lowering - Lowers the volume
■ Off - No lowering of the volume
■ Light - Slight lowering of the volume
AB1)
This can be set in the menu on vehicles with driving mode selection option
» page 19, Selecting driv-
ing mode .
20Vehicle systems
Page 23 of 30
 Blues Car Radio Manual ■Medium - Medium lowering of the volume
■ Strong - Strong lowering of the volume
■ ProActive passenger protection - Activates/deactivates proactive passenger
protection
■ Fatigue detection")
■Medium - Medium lowering of the volume
■ Strong - Strong lowering of the volume
■ ProActive passenger protection - Activates/deactivates proactive passenger
protection
■ Fatigue detection - Activates/deactivates the fatigue detection function
Deactivating traction control (ASR)
First read and observe the introductory information given on page 19.
›
Press the CAR button
→ ASR off - Switches deactivation of traction control
(ASR) on/off.
Speed limit for winter tyres
First read and observe the introductory information given on page 19.
›
Press the button CAR
→ Winter tyres limit .
■ Winter tyres warning - Activates/deactivates the winter tyres warning function
■ Warning at: ... km/h - Sets the speed for the warning
Note
This function is, for example, used for winter tyres where the maximum permissi-
ble speed is lower than the maximum speed of the vehicle.
Light
First read and observe the introductory information given on page 19.
›
Press the button CAR
→ Lights .
■ Light Assist - Sets the light assist
■ Switch-on time - Sets the sensitivity of the light sensor to the change in in-
tensity of the ambient light
■ Early - High sensitivity
■ Medium - Medium sensitivity
■ Late - Low sensitivity
■
Light Assist - Activates/deactivates the head light assist function
■ Automatic headlight control (rain) - Activates/deactivates automatic head-
light control in rain
■ Daytime running lights - Activates/deactivates daytime running lights
■ Lane change flash - Activates/deactivates lane change flashing
■ Travel mode - Sets the travel mode
■ Left-hand traffic - For left-hand traffic
■ Right-hand traffic - For right-hand traffic
■ Interior lighting - Sets the interior lighting
■ Instrument lighting - Sets the brightness of the instrument/switch lighting
■ Footwell light - Sets the brightness of the footwell light
■ Coming home - Activates/deactivates the function and sets the illumination pe-
riod after leaving the vehicle (5-30 seconds)
■ Leaving home - Activates/deactivates the function and sets the illumination pe-
riod after unlocking the vehicle (5-30 seconds)
Visibility
First read and observe the introductory information given on page 19.
›
Press the button CAR
→ Vision .
■ Mirrors - Adjusts the mirrors
■ Synchronous mirror adjustment - Activates/deactivates synchronous mirror
adjustment
■ Lowering in reverse - Activates/deactivates the lowering of the front passen-
ger mirror when reversing
■ Fold in while parking - Activates/deactivates folding of the mirrors via remote
control or using the sensor in the handle (KESSY)
■ Wipers - Adjusts the windscreen wipers
■ Automatic wiping in rain - Activates/deactivates automatic windscreen wip-
ing in rain
■ Automatic rear wiper - Activates/deactivates automatic rear window wiping
Opening and closing
First read and observe the introductory information given on page 19.
›
Press the button CAR
→ Opening/closing .
21Vehicle systems
Page 24 of 30
 Blues Car Radio Manual ■Windows - Sets the window operation
■ Convenience opening - Sets the convenience opening
■ Off - Deactivates convenience opening
■ All windows - All windows
■ Driver - Drivers window")
■Windows - Sets the window operation
■ Convenience opening - Sets the convenience opening
■ Off - Deactivates convenience opening
■ All windows - All windows
■ Driver - Driver's window only
■ Central locking - Settings for opening and closing of doors
■ Door unlocking - Sets the door unlocking
■ All - All doors
■ Single door - Driver's door or driver's or passenger door with KESSY system
■ Driver side - Doors on the driver's side or on the driver's or passenger's side
with KESSY system
■ Automatic locking - Activates/deactivates automatic locking when setting off
and unlocking after removing the ignition key
■ Alarm system confirmation - Activates/deactivates acoustic signals when un-
locking/locking a vehicle with an anti-theft alarm system
Seats
First read and observe the introductory information given on page 19.
›
Press the button CAR
→ Seats .
■ Store driver's seat position on key - Activates/deactivates the storage of the
driver's seat position and exterior mirror position in the remote control key
when locking the vehicle
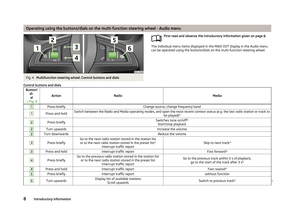
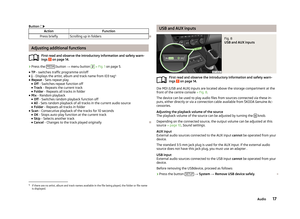
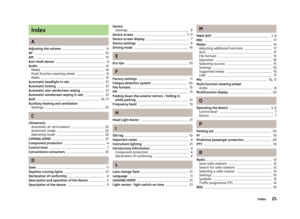
Setting Climatronic
Fig. 11
Main menu Climatronic
First read and observe the introductory information given on page 19.
Open the main menu
›
Press the button SETUP on the Climatronic control panel.
Explanation of graphic Function On - illuminated line
Function off - greyed-out line
Set interior temperature on driver's side
Set interior temperature on front passenger's side Set airflow direction
■ Profile - Sets the Climatronic operating mode
■ Light - Low power, quiet operation
■ Medium - Basic power
■ Strong - High power
■ - Activates/deactivates automatic air recirculation
■ - Activates/deactivates quick interior heating
■ - Access to the auxiliary heater and ventilation settings » page 23
Note
■
The Climatronic Profile mode can be set by pressing the button 3 » Fig. 1 on
page 5 again.■
If the device is not operated for longer than 10 seconds in the Climatronic menu,
it will switch to the most recently selected menu or switch itself off.
ABCDE22Vehicle systems


 Blues Car Radio Manual Do not use USB extension cables or adapters. This can impair the function of the
connected source.
USB hubs are not supported.
CAUTION
The AUX input must only be used for audio sources!
Note
■ If an")