Page 9 of 30
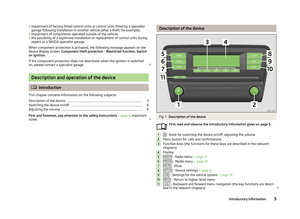
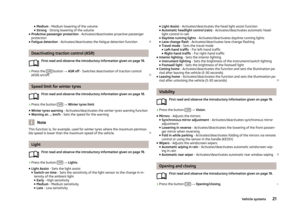
 Blues Car Radio Manual Operating via the device screenFig. 2
Displays
First read and observe the introductory information given on page 6.
Display of menus, menu items and functions Currently selected menu/menu item
Previo")
Operating via the device screenFig. 2
Displays
First read and observe the introductory information given on page 6.
Display of menus, menu items and functions Currently selected menu/menu item
Previous menu item
Next menu item
Higher-level menu
Function with “checkbox” ›
- Function is switched on.
›
- Function is switched off
Function of button
3
» Fig. 1 on page 5 in the current menu/menu item
Selecting menu/menu item
Select by turning the menu button
2
» Fig. 1 on page 5.
ABCDEFConfirming menu/menu item
Confirm by pressing the menu button 2.
Confirming function of menu/menu item
Confirm the function of menu/menu item F
» Fig. 2 by pressing the correspond-
ing button
3
» Fig. 1 on page 5.
Returning to higher-level menu
Return by pressing the BACK
button.
Switching function on/off with “checkbox” Switch the function on/off by pressing the menu button
2
.
Note
■ Greyed out menus or menu items are not enabled or available.■For some menus or menu items, the current setting is displayed, e.g. Distance:
km or Distance: mi .■
If the device is not currently being used, the display will return to the higher-
level menu after a few seconds.
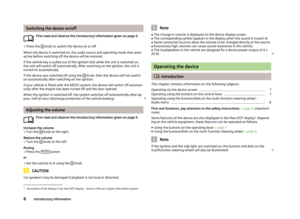
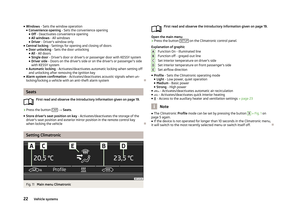
Operating using the buttons on the control lever
Fig. 3
Buttons on the control lever
First read and observe the introductory information given on page 6.
The individual menus and corresponding menu items displayed in the MAXI DOT display can be operated using the buttons on the control lever.
Press and hold - open main menu
Press briefly - select individual menu items or menus
Press briefly - select menu item or menu
AAB7Introductory information
Page 10 of 30
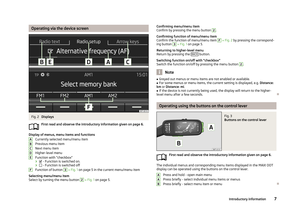
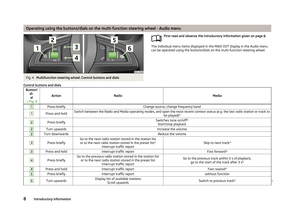
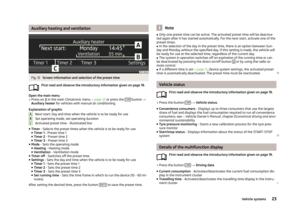
 Blues Car Radio Manual Operating using the buttons/dials on the multi-function steering wheel - Audio menuFig. 4
Multifunction steering wheel: Control buttons and dials
First read and observe the introductory information g")
Operating using the buttons/dials on the multi-function steering wheel - Audio menuFig. 4
Multifunction steering wheel: Control buttons and dials
First read and observe the introductory information given on page 6.
The individual menu items displayed in the MAXI DOT display in the Audio menu
can be operated using the buttons/dials on the multi-function steering wheel.
Control buttons and dialsButton/
di-al
» Fig. 4
ActionRadioMedia
1Press brieflyChange source, change frequency band1Press and holdSwitch between the Radio and Media operating modes, and open the most recent context status (e.g. the last radio station or track to be played)a)2Press brieflySwitches tone on/off b)
Start/stop playback2Turn upwardsIncrease the volume2Turn downwardsReduce the volume3
Press brieflyGo to the next radio station stored in the station list or to the next radio station stored in the preset list c)
Interrupt traffic reportSkip to next track a)
3Press and holdInterrupt traffic reportFast forwarda)4
Press brieflyGo to the previous radio station stored in the station list
or to the next radio station stored in the preset list Interrupt traffic reportGo to the previous track within 3 s of playback,go to the start of the track after 3 s a)4Press and holdInterrupt traffic reportFast rewinda)5Press brieflyInterrupt traffic reportwithout function5Turn upwardsDisplay list of available stations
Scroll upwardsSwitch to previous track a)
8Introductory information
Page 11 of 30
 Blues Car Radio Manual Button/di-al
» Fig. 4
ActionRadioMedia
5Turn downwardsDisplay list of available stations Scroll downwardsSkip to next track a)6Press brieflyOpen the main menua)
Does not apply for AUX.
b)
The sound i")
Button/di-al
» Fig. 4
ActionRadioMedia
5Turn downwardsDisplay list of available stations Scroll downwardsSkip to next track a)6Press brieflyOpen the main menua)
Does not apply for AUX.
b)
The sound is turned on again by pressing or turning dial
2
.
c)
Context-dependent selection.
Note■
The buttons with the symbol for voice control and for the phone are not
supported by the device.
Device settings
Introduction
This chapter contains information on the following subjects:
Main menu
9
Sound settings
10
Radio settings
10
Media settings
10
Device system settings
11
First and foremost, pay attention to the safety instructions » page 4 , Important
notes .
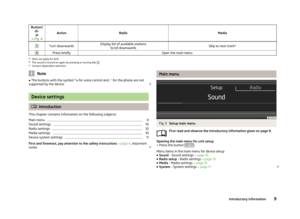
Main menuFig. 5
Setup main menu
First read and observe the introductory information given on page 9.
Opening the main menu for unit setup
›
Press the button SETUP.
Menu items in the main menu for device setup
■ Sound - Sound settings » page 10
■ Radio setup - Radio settings » page 10
■ Media - Media settings » page 10
■ System - System settings » page 11
9Introductory information
Page 12 of 30
 Blues Car Radio Manual Sound settingsFirst read and observe the introductory information given on page 9.›
Press the SETUP
→ Sound button.
■ Bass - Bass settings
■ Mid - Mid-range settings
■ Treble - Treble")
Sound settingsFirst read and observe the introductory information given on page 9.›
Press the SETUP
→ Sound button.
■ Bass - Bass settings
■ Mid - Mid-range settings
■ Treble - Treble settings
■ Balance - Sets the balance between the left and right-hand sides
■ Fader - Sets the balance between the front and the rear
■ Volume - Volume settings
■ Maximum switch-on volume - Volume after switching on
■ Traffic announcement - sets the volume for the traffic program alerts (TP)
■ Speed-dependent vol. adjustment - increases the volume as speed increases
■ AUX volume - Adjusts the playback volume of an external source
■ Quiet - Low volume
■ Medium - Medium volume
■ Loud - High volume
Radio settings
First read and observe the introductory information given on page 9.
›
Press the button SETUP
→ Radio setup .
■ Radio text - Switches radio text display on/off
■ Alternative frequency (AF) - Activates/deactivates search for alternative fre-
quencies for the station currently being listened to
■ Arrow keys - Sets the station selection function in RADIO mode
■ Station list - Switches all stations currently in range for the selected fre-
quency band
■ Preset list - Switches only the stored stations in the selected frequency band
■ RDS regional - Activates/deactivates the automatic tracking of related regional
stations ■ Fixed - The selected regional station is kept permanently (another regional
station must be set manually if signal is lost)
■ Automatic - Automatic tracking of regional stations (the radio will automati-
cally switch to another available regional station if reception is lost in the re-
gion in question)
■ PTY filter - Selects radio stations by the type of programme being broadcast
■ Off - Switches off
■ News - News
■ Music - Music
■ Sport - Sports
■ Culture - Culture
■ Special - Other
■ Station list sort - Sorts the saved radio stations
■ Default - by the programme identification (PI code)
■ A-Z - In alphabetical order and also based on the frequency number (if the sta-
tion name changes during the programme, it can be displayed just at the end
of the list)
■ Name of station - Displays the station name
■ Variable - Allows changes to the station name
■ Fixed - The station name is fixed (suitable for the A-Z listing)
■ Delete presets - Deletes the stored stations in the device memory
Note
■
The Radio Data System (RDS) is used to transfer additional information. The
RDS enables program identification, program type identification (PTY), the recep-
tion of traffic reports (TP) or automatic station tracking, for example. If there is
sufficient reception, RDS-compatible radio stations will be displayed by station
name rather than station frequency.■
The Alternative frequency (AF) function ensures that the best receivable fre-
quency for the selected station is set automatically.
■
In countries where the RDS function is not adequately supported, the device
may not be fully functional. We therefore recommend switching off the RDS re-
gional setting as well as the Alternative frequency (AF) setting, if applicable. Oth-
erwise, these settings can affect the functionality of the radio.
Media settings
First read and observe the introductory information given on page 9.
›
Press the button SETUP
→ Media .
10Introductory information
Page 13 of 30
 Blues Car Radio Manual ■Activate AUX - Activates/deactivates AUX input
■ Mix/Repeat including subfolders - Activates/deactivates playback of the tracks
in the Mix and Repeat modes, including subfolders
■ Display")
■Activate AUX - Activates/deactivates AUX input
■ Mix/Repeat including subfolders - Activates/deactivates playback of the tracks
in the Mix and Repeat modes, including subfolders
■ Display ID3 tags - Activates/deactivates display of the artist, album and track
name in the device display screen 1)
Device system settings
First read and observe the introductory information given on page 9.
›
Press the button SETUP
→ System .
■ Language - Sets the device language 2)
■ Time/date - Time and date settings
■ Time - Time settings
■ Date - Date settings
■ Summer (DST) - Switches summer time adjustment on/off
■ Time format - Sets the time format
■ 24h
■ 12h
■ Date format - sets the date format
■ DD.MM.YYYY - Day - Month - Year
■ YYYY-MM-DD - Year - Month - Day
■ MM.DD.YYYY - Month - Day - Year
■ Units - Sets the units
■ Distance - Distance units
■ km - Kilometres
■ mi - Miles
■ Temperature - Temperature units
■ °C - Degrees Celsius
■ °F - Degrees Fahrenheit
■ Volume - Volume units
■ l - Litres
■ gall. (UK) - Gallons (UK)
■ gall. (US) - Gallons (US)
■
Speed - Speed units
■ km/h - Kilometres per hour
■ mph - Miles per hour
■ Consumption - Consumption units
■ l/100km - Litres per 100 kilometres
■ km/l - Kilometres per litre
■ mpg (US) - Miles per gallon (US)
■ mpg (UK) - Miles per gallon (UK)
■ Gas consumption - Gas consumption units
■ kg/100km - Kilograms per 100 km
■ km/kg - Kilometres per kilogram
■ Display - screen setting
■ Brightness - Adjusts the brightness of the screen
■ Brightest - brightest level
■ Brighter - brighter level
■ Medium - medium level
■ Darker - darker level
■ Darkest - darkest level
■ Clock in standby mode - Time display on the screen when the ignition is
switched on and the device switched off
■ Remove USB device safely - Safe removal of USB device 3)
■ Factory settings - Restore to factory settings
■ All - All settings
■ Sound - Sound settings
■ Radio setup - Radio settings
■ Vehicle - Vehicle system settings
■ Media - Media settings
■ System - System settings
■ Driving profile - Choice of driving mode
■ Display off - Activates/deactivates the screen in power-saving mode, where the
screen is black (the screen can be switched on again by pressing any button)
■ System information - Displays system information
■ Versions data - Displays version information
■ Device part number: ... - Device part number
■ Hardware: ... - Version of the hardware used
■ Software version: ... - Version of the software used
■ Copyright - Information on licences and copyrights used1)
Regardless of the setting, the ID3 tag is always displayed in the Audio menu in the MAXI DOT display.
2)
The correct display of country-specific characters (e.g. ID3 tag information) can not always be guaran-
teed.
3)
If a sound is currently played from the USB data carrier, this function is not active.
11Introductory information
Page 14 of 30
 Blues Car Radio Manual Audio
Radio
Introduction
This chapter contains information on the following subjects:
Main menu
12
Search for and save radio stations
12
Selecting a frequency band and radio station
13
Activating/d")
Audio
Radio
Introduction
This chapter contains information on the following subjects:
Main menu
12
Search for and save radio stations
12
Selecting a frequency band and radio station
13
Activating/deactivating traffic programme TP
14
First and foremost, pay attention to the safety instructions » page 4 , Important
notes .
The device allows you to receive a radio broadcast in the FM or AM frequency
bands and to receive additional information from the RDS station in the FM fre-
quency band.
Main menu
First read and observe the introductory information given on page 12.
Accessing radio mode in main menu
›
Press the RADIO button.
The most recently tuned radio station plays.
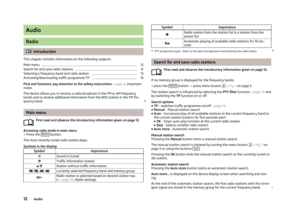
Symbols in the display
SymbolImportanceSound is mutedTraffic information station Station without traffic information , , , Currently selected frequency band and memory group a)Radio station is selected based on desired station top-
ic » page 10 , Radio settingsSymbolImportanceRadio station from the station list is a station from the
preset list Automatic playing of available radio stations for 10 sec-
ondsa)
PTY (programme type) - refers to the type of programme transmitted by the radio station.
Search for and save radio stations
First read and observe the introductory information given on page 12.
If no memory group is displayed for the frequency bands,
›
press the RADIO button
→ press menu button
2
» Fig. 1 on page 5.
The station search is influenced by selecting the PTY filter function » page 10 and
by switching the TP function on or off.
Search options
■ TP - switches traffic programme on/off » page 14
■ Manual - Manual station search
■ Scan - Successive play of all available stations in the current frequency band or
the current station buttons for five seconds each ■ OK - Stops auto-play function at the current radio station
■ Skip - Selects another radio station
■ Auto store - Automatic station search
Manual station search
Pressing the Manual button starts a manual station search.
The manual station search is initiated by turning the menu button
2
» Fig. 1 on
page 5 or using the buttons .
Pressing the OK button ends the manual station search at the currently tuned ra-
dio station.
Automatic station search
Pressing the Auto store button starts an automatic station search.
Auto store... is displayed on the device display screen when searching and stor-
ing.
At the end of the automatic station search, the five radio stations with the stron-
gest signal are stored in the memory group for the current frequency band.
12Audio
Page 15 of 30
 Blues Car Radio Manual If radio stations have already been stored under the preset buttons, then the sta-
tion keys will be overwritten with newly located stations after the automatic sta-
tion search.
Storing stations
Set")
If radio stations have already been stored under the preset buttons, then the sta-
tion keys will be overwritten with newly located stations after the automatic sta-
tion search.
Storing stations
Set the desired radio station and press and hold the corresponding button3
» Fig. 1 on page 5 until a beep is heard. The station is stored in the device
memory and its name appears above the corresponding button
3
.
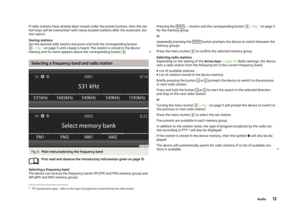
Selecting a frequency band and radio station
Fig. 6
Main menu/selecting the frequency band
First read and observe the introductory information given on page 12.
Selecting a frequency band
The device can receive the frequency bands FM (FM1 and FM2 memory group) and
AM (AM1 and AM2 memory group).
Pressing the RADIO
→ button and the corresponding button 3 » Fig. 1 on page 5
for the memory group
or
repeatedly pressing the RADIO
button prompts the device to switch between the
memory groups.
Press the menu button
2
to confirm the selected memory group.
Selecting radio stations
Depending on the setting of the Arrow keys » page 10 , Radio settings , the device
sets a radio station from the following list in the current frequency band:
■ List of available stations
■ List of stations stored in the device memory
Briefly pressing the button
or prompts the device to switch to the previous
or next radio station.
Press and hold the button
or to start the search in the selected direction
and stop at the next radio station.
or
Turning the menu button
2
» Fig. 1 on page 5 will prompt the device to switch to
the previous or next radio station.
Press the menu button
2
to select the set station.
Five presets are available in each memory group. In addition to the station name, the type of program broadcast by the radio sta-
tion according to PTY 1)
will also be displayed.
If the station is stored in the device memory, then the symbol
will also be dis-
played.
The device will automatically search for radio stations if no list of available sta- tions is available.
1)
PTY (programme type) - refers to the type of programme transmitted by the radio station.
13Audio
Page 16 of 30
 Blues Car Radio Manual Activating/deactivating traffic programme TPFirst read and observe the introductory information given on page 12.
Certain radio stations transmit traffic reports. The device enables playback of
these")
Activating/deactivating traffic programme TPFirst read and observe the introductory information given on page 12.
Certain radio stations transmit traffic reports. The device enables playback of
these traffic reports.
›
Press the RADIO button
→ menu button
2
» Fig. 1 on page 5 → TP.
Screen display
The functionality of the traffic monitoring system is displayed in the screen by the
symbol in conjunction with the station name (e.g. in the station list or preset
list).
If the radio station does not broadcast traffic reports, or if no traffic stations can
be found (due to a general radio reception interruption, for example), then the
symbol is displayed on the screen.
If a radio station is tuned in that does not support traffic reports,
then the most
suitable station is automatically set in the background
in order to ensure the
continuous reception of traffic reports.
The device will function in exactly the same way with the selected
frequency
band.
When playing in Media mode, the most recently selected radio station continues
to be received in the background if this station supports traffic reports.
Interrupting/stopping the traffic programme
When the traffic programme is being received, Traffic announcement is displayed
on the device display screen along with the following options:
■ TP off - Switches off the traffic announcement currently being broadcast
■ Cancel - Deactivates the traffic programme function
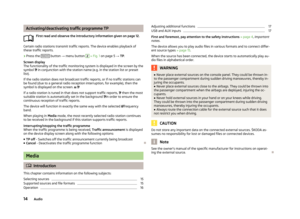
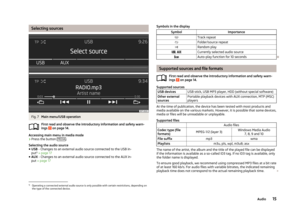
Media
Introduction
This chapter contains information on the following subjects:
Selecting sources
15
Supported sources and file formats
15
Operation
16Adjusting additional functions17USB and AUX inputs17
First and foremost, pay attention to the safety instructions » page 4 , Important
notes .
The device allows you to play audio files in various formats and to connect differ-
ent source types » page 15.
When the source has been connected, the device starts to automatically play au- dio files in alphabetical order.
WARNING■ Never place external sources on the console panel. They could be thrown in-
to the passenger compartment during sudden driving manoeuvres, thereby in-
juring the occupants.■
Never place external sources close to the airbags. They could be thrown into
the passenger compartment when the airbags are deployed, injuring the oc-
cupants.
■
Never hold external sources in your hand or on your knees while driving.
They could be thrown into the passenger compartment during sudden driving
manoeuvres, thereby injuring the occupants.
■
Always route the connection cable for the external source such that it does
not restrict you when driving.
CAUTION
Do not store any important data on the connected external sources. ŠKODA as-
sumes no responsibility for lost or damaged files or connected devices.
Note
See the owner's manual of the specific manufacturer for instructions on operat-
ing the external source.
14Audio