Page 9 of 216

Downloaded from www.Manualslib.com manuals search engine Structure and more information about the Operating
Instructions
Structure of the manual
The operating manual is hierarchically divided into the following areas.
■ Paragraph (e.g. safety) - the title of the paragraph is always indicated on the
lower left side
■ Main chapters (e.g. airbag system) - the title of the main chapter is always
indicated on the lower right side
■ Chapter (e.g. airbag overview)
■ Introduction to the topic
- Module Overview within the chapter intro-
ductory information about the chapter content, if necessary, valid for
the entire chapter notes
■ Module (e.g. front airbags)
Information Search
When searching for information in the operating instructions, we recommend
using the Index at the end of the manual.
Direction indications
All direction indications such as “left”, “right”, “front”, “rear” relate to the for- ward direction of travel of the vehicle.
Units of measurement
The volume, weight, speed and length data are given in metric units, unless
otherwise indicated.
Display
In this owner's manual, the display on the MAXI DOT display is used as the dis-
play illustration, provided nothing to the contrary is stated.6Structure and more information about the Operating Instructions
Page 10 of 216

Downloaded from www.Manualslib.com manuals search engine AbbreviationsAbbreviationDefinitionrpmEngine revolutions per minuteABSAnti-lock brake systemAGMVehicle battery typeTCSTraction controlCO2Carbon dioxideCOCDeclaration of conformityDSGAutomatic double clutch gearboxEDLElectronic differential lockECEEconomic Commission for EuropeEPCEPC fault lightESCElectronic Stability ControlRDRim depthEUEuropean UnionHBAHydraulic brake assistHHCUphill start assistKESSYKeyless unlocking, starting and lockingkWKilowatt, measuring unit for outputMCBMulti-collision brakeMGManual gearboxMPIGasoline engine with a multi-point fuel injectionN1Panel van intended exclusively or mainly for the transporta-
tion of goodsNmNewton meter, measuring unit for the engine torqueTDI CRDiesel engine with turbocharger and common rail injection
systemTSIPetrol engine with turbocharging and direct injectionVINVehicle identification numberWWatt, unit of powerWi-Fiwireless data networkXDSFunctional extension of the electronic differential lock7Abbreviations
Page 11 of 216

Downloaded from www.Manualslib.com manuals search engine Safety
Passive Safety
General information
Introduction
This chapter contains information on the following subjects:
Before every journey
8
Driving safety
8
In this section of the instructions you will find important information, tips and
notes on the subject of passive safety.
We have combined everything here which you should be familiar with, for ex-
ample, regarding seat belts, airbags, safety of children and anything similar.
You will find further information on safety, which concerns you and those trav-
elling with you, in the following chapters of this Owner's Manual.
The complete on-board literature should therefore always be in the vehicle.
This particularly applies, if you rent out or sell the vehicle.
Before every journey
For your own safety and the safety of the people travelling with you, please
pay attention to the following points before setting off.
› Ensure that the lighting and the turn signal system are functioning properly.
› Make sure that the function of the wiper and the condition of the wiper
blades are free of any defects.
› Ensure that all of the windows offer good visibility to the outside.
› Adjust the rear-view mirror so that vision to the rear is guaranteed.
› Ensure that the mirrors are not covered.
› Check the tyre inflation pressure.
› Check the engine oil, brake fluid and coolant levels.
› Secure all items of luggage.
› Do not exceed the permissible axle loads and permissible gross weight of the
vehicle – risk of accident.
› Close all doors and the engine compartment and luggage compartment lid.
› Ensure that no objects can obstruct the pedals.
›Protect children in suitable child seats with correctly fastened seat belts
» page 20 , Transporting children safely .
› Adopt the correct seated position
» page 8, Correct and safe seated posi-
tion . Tell your passengers to assume the correct seated position.
Driving safety
The driver is fully responsible for himself and passengers, especially children. If
your driving safety is affected, you place yourself and oncoming traffic at risk.
The following guidelines must therefore be observed. › Do not become distracted from concentrating on the traffic situation, (e.g. by
your passengers or mobile phone calls).
› Never drive when your driving ability is impaired, (e.g. due to medication, al-
cohol or drugs).
› Keep to the traffic regulations and the permissible speed limit.
› Always adjust the driving speed to the road, traffic and weather conditions.
› Take regular breaks on long journeys (at least every two hours).
The following list contains instructions for the Passenger which, if not ob-
served, may cause serious injuries or death.
› Do not lean against the dash panel.
› Do not put your feet on the dash panel.
The following list contains instructions for all Passengers which, if not ob-
served, may cause serious injuries or death.
› Do not sit only on the front edge of the seat.
› Do not sit facing to the side.
› Do not lean out of the window.
› Do not put your limbs out of the window.
› Do not put your feet on the seat upholstery.
Correct and safe seated position
Introduction
This chapter contains information on the following subjects:
Correct seat position of the driver
9
Adjusting the steering wheel position
9
Correct seated position of the front passenger
10
Correct seated position of the rear seat passengers
10
8Safety
Page 12 of 216

Downloaded from www.Manualslib.com manuals search engine WARNING■The front seats and all head restraints must be adjusted to match body
size at all times and the seat belt must always be fastened properly to pro-
vide the most effective levels of protection to passengers.■
Each occupant must correctly fasten the seat belt belonging to the seat.
Children must be fastened » page 20, Transporting children safely with a
suitable restraint system.
■
By sitting incorrectly, the occupant is risking life-threatening injuries.
■
The seat backrests must not be tilted too far back when driving, as this
will impair the function of the seat belts and of the airbag system – risk of
injury!
Correct seat position of the driver
Fig. 1
Correct seated position for the driver/correct steering wheel posi-
tion
Read and observe
on page 9 first.
For your own safety and to reduce the risk of injury in the event of an accident,we recommend the following settings.
Adjust the driver’s seat in the forward/back direction so that the pedalscan be fully depressed with slightly bent legs.
Adjust the seat backrest so that the highest point of the steering wheel
can be reached with your arms at a slight angle.
Adjust the steering wheel so that the distance
A
between the steering
wheel and your chest is at least 25 cm » Fig. 1.
Adjust the head restraint so that the top edge of the head restraint is at
the same level as the upper part of your head B » Fig. 1 (not for seats
with integrated head restraint).
Correctly fasten the seat belt » page 11, Wearing seat belts .WARNING■
Always assume the correct seated position before setting off and do not
change this position while driving. Also advise your passengers to adopt
the correct seated position and not to change this position while the car is
moving.■
Maintain a distance of at least 25 cm to the steering wheel. Not keeping
to this minimum distance will mean that the airbag system will not be able
to properly protect you – risk of death!
■
When driving, hold the steering wheel with both hands firmly on the out-
er edge in the “9 o'clock” and “3 o'clock” position » Fig. 1. Never hold the
steering wheel in the “12 o'clock” position or in any other way (e.g. in the middle, inner edge of the steering wheel or similar). When the driver airbag
is triggered you could seriously injure you arms, hands or head.
■
Ensure that there are no objects in the driver's footwell, as these may get
caught in the pedal apparatus when driving or braking. You would then no
longer be able to operate the clutch, brake or acceleration pedals.
Adjusting the steering wheel position
Fig. 2
Adjusting the steering wheel position
Read and observe
on page 9 first.
The height and forward/back position of the steering wheel can be adjusted.
›
Swing the safety lever under the steering wheel in the direction of arrow
1
» Fig. 2 .
9Passive Safety
Page 13 of 216

Downloaded from www.Manualslib.com manuals search engine ›Adjust the steering wheel to the desired position. The steering wheel can be
adjusted in direction of arrow 2.›
Pull the holder until it stops in arrow direction
3
.
WARNING■ Never adjust the steering wheel when the vehicle is moving, but only
when the vehicle is stationary!■
The safety lever must be locked so that the steering wheel cannot acci-
dentally change position – risk of accident!
Correct seated position of the front passenger
Read and observe
on page 9 first.
For passenger safety and to reduce the risk of injury in an accident, the follow-ing instructions must be observed.
Position the front passenger seat back as far as possible. The front pas-
senger must maintain a distance of at least 25 cm to the dash panel so
that the airbag offers the greatest possible safety if it is deployed.
Adjust the head restraint so that the top edge of the head restraint is at
the same level as the upper part of your head
B
» Fig. 1 on page 9 (not for
seats with integrated head restraint).
Correctly fasten the seat belt » page 11, Wearing seat belts .
In exceptional cases the front passenger airbag can be deactivated
» page 18 , Deactivating airbags .
WARNING■
Maintain a distance of at least 25 cm to the dash panel. Not keeping to
this minimum distance will mean that the airbag system will not be able to
properly protect you – risk of death!■
Always keep your feet in the footwell when the car is being driven – nev-
er place your feet on the instrument panel, out of the window or on the
surface of the seats! You will be exposed to increased risk of injury if it be-
comes necessary to apply the brake or in the event of an accident. If an air-
bag is deployed, you may suffer fatal injuries when adopting an incorrect
seated position!
Correct seated position of the rear seat passengers
Read and observe
on page 9 first.
To reduce the risk of injury in the event of a sudden braking manoeuvre or anaccident, the occupants on the rear seats must observe the following.
Adjust the head restraint such that the top edge of the head restraint is at
the same level as the upper part of the head
B
» Fig. 1 on page 9 .
Correctly fasten the seat belt » page 11, Wearing seat belts .
Use a suitable child restraint system if transporting children in the vehicle
» page 20 , Transporting children safely .
10Safety
Page 14 of 216

Downloaded from www.Manualslib.com manuals search engine Seat belts
Wearing seat belts
Introduction
This chapter contains information on the following subjects:
The physical principle of a frontal collision
12
Correct routing of seat belt
12
Fastening and unfastening seat belts
13
Seat belts that are fastened correctly offer good protection in the event of an
accident. They reduce the risk of an injury and increase the chance of survival
in the event of a major accident.
Properly fastened seat belts hold occupants to correctly set seats in the right
seat position.
Particular safety aspects must be observed when transporting children in the
vehicle » page 20 .
The national legal requirements must be observed when using seat belts.
WARNING■ Fasten your seat belt before each journey - even when driving in town!
This also applies to other passengers - there is a danger of injury!■
Maximum seat belt protection is only achieved if you are correctly seated
» page 8 , Correct and safe seated position .
■
The seat backrests of the front seats must not be tilted too far to the
rear, otherwise the seatbelts can lose their effectiveness.
WARNINGInformation on the correct routing of the belt■Always ensure that the webbing of the seat belts is properly routed. Seat
belts which are not correctly adjusted can themselves cause injuries even,
in minor accidents.■
Adjust the height of the belt in such a way that the shoulder part of the
belt is roughly positioned across the middle of your shoulder - on no ac-
count across your neck.
WARNING (Continued)■ A seat belt which is hanging too loose can result in injuries, as your body
is moved forward by the kinetic energy produced in an accident and is then
abruptly held firm by the belt.■
The belt must not run across solid or fragile objects (e.g. spectacles, ball-
point pens, keys, etc.). Such objects can cause injury.
WARNINGInformation on dealing with the safety belts■The belt webbing must not be jammed in-between at any point or twis-
ted or chafe against any sharp edges.■
Make sure you do not catch the seat belt in the door when closing it.
WARNINGInformation on the proper use of the safety belts■No two persons (also not children) should ever use a single seat belt to-
gether.■
The lock tongue should only be inserted into the lock which is the correct
one for your seat. Wrong use of the safety belt will reduce its capacity to
protect and the risk of injury increases.
■
The slot of the belt tongue must not be blocked otherwise the belt
tongue will not lock in place properly.
■
Many layers of clothing and loose clothing (e. g. a winter coat over a jack-
et) do not allow you to be correctly seated and impairs proper operation of
the seat belts.
■
Do not use clamps or other objects to adjust seat belts (e.g. for shorten-
ing the belts for smaller persons).
■
The seat belts for the rear seats can only fulfil their function reliably
when the seat backrests are correctly locked into position » page 72.
WARNINGInformation on the care and maintenance of the safety belts■The belt webbing must always be kept clean. Soiled belts may impair
proper operation of the inertia reel » page 146.■
The seat belts must not be removed or changed in any way. Do not at-
tempt to repair the seat belts yourself.
11Seat belts
Page 15 of 216
■Check the condition of all the seat belts on a regular basis. If any damage
to the seat belts, seat belt connections, ine")
Downloaded from www.Manualslib.com manuals search engine WARNING (Continued)■Check the condition of all the seat belts on a regular basis. If any damage
to the seat belts, seat belt connections, inertia reel or the lock is detected,
the seat belt concerned must be replaced by a specialist garage.■
Damaged seat belts which have been subjected to stress in an accident
and were therefore stretched, must be replaced - this is best done by a
specialist garage. The anchorage points of the belts must also be inspec-
ted. The anchorage points for the belts should also be checked.
The physical principle of a frontal collision
Fig. 3
Driver without a fastened seat belt/rear seat passenger without a
fastened seat belt
Read and observe
on page 11 first.
As soon as the vehicle is moving, so-called kinetic energy (the energy of mo-
tion) is produced, both in terms of the car as well as in terms of the occupants.
The magnitude of this kinetic energy depends essentially on the speed at
which the vehicle is travelling and on the weight of the vehicle, including the
occupants.
Doubling the speed of the vehicle from 25 km/h up to 50 km/hour increases
the kinetic energy four times.
For example, a person's weight of 80 kg “increases” at 50 km/h to 4.8 tons
(4,800 kg).
In the event of a frontal collision, occupants of the car not wearing a seat belt
are thrown forward and strike parts of the interior of the car, such as the
steering wheel, dash panel, windscreen in ways which cannot be controlled
» Fig. 3 -
. In certain circumstances, you could even be thrown out of the ve-
hicle, which could cause life-threatening or even fatal injuries.
A rear seat passenger who has not fastened their seat belt is a danger not on-
ly to himself or herself but also to those seated in the front » Fig. 3 -
.
Correct routing of seat belt
Fig. 4
Routing of belt webbing over the shoulders and the lap belt/Rout-
ing of belt webbing for an expectant mother
Fig. 5
Front seat: Seat belt height ad-
juster
Read and observe on page 11 first.
It is important that the belt is properly routed to ensure seat belts offer the
maximum protection.
12Safety
Page 16 of 216

Downloaded from www.Manualslib.com manuals search engine The shoulder part of the seat belt must never run across the neck but must
roughly run over the middle of the shoulder and fit snugly against the chest.
The lap part of the belt must run across the pelvis, must not be positioned
across the stomach and must always fit snugly » Fig. 4 -
.
Seat belt height adjusters for front seats
The seat belt height adjuster makes it possible to adjust the routing of the
front seat belts in the area of the shoulder to the body size.›
Press the height adjuster and move to the desired position » Fig. 5.
›
Then pull firmly on the belt to ensure that the seat belt height adjuster has
correctly locked in place.
Seat belts with pregnant women
Expectant women must also always wear a seat belt. This is the only way of ensuring optimal protection for the unborn child.
With pregnant women, the lap part of the belt must be positioned as low as
possible on the pelvis to avoid exerting any pressure on the lower abdomen
» Fig. 4 -
.
Fastening and unfastening seat belts
Fig. 6
Fastening/unfastening the seat belt
Read and observe
on page 11 first.
Before using the seat belts the following conditions must be met. Correctly set head restraint (not for seats with integrated head restraint).
Correctly adjusted seat (applies for the front seats).
Correctly adjusted steering wheel (applies to the Driver's seat ).
Fastening›Use the lock tongue to slowly pull the webbing over your chest and pelvis.›
Insert the lock tongue into the belt buckle belonging to the seat » Fig. 6 -
until you hear it click into place.
›
Pull on the belt to check that it has engaged correctly in the lock.
Release
Release the seat belt only when the vehicle is stationary.
›
Press the red button in the belt buckle » Fig. 6 -
and the lock tongue will
pop out.
›
Manually guide the belt back so that it is easier to fully roll up the webbing
and to ensure the seat belt does not twist.
CAUTION
When releasing the seatbelt, ensure that the tongue of the lock does not dam-
age the door trim or other parts of the interior.
Inertia reel and belt pre-tensioners
Introduction
This chapter contains information on the following subjects:
Inertia reel
13
Belt tensioners
14
Inertia reel
Each seat belt is equipped with an inertia reel. The seat belt can move freely
when it is pulled slowly.
The seat belt is locked by the inertia reel when it is pulled suddenly. The belts
also lock under full braking, under acceleration, when driving downhill and
when cornering.
WARNINGIf the seat belt does not lock when it is pulled sharply, have it inspected im-
mediately by a specialist garage.13Seat belts
 1
1 2
2 3
3 4
4 5
5 6
6 7
7 8
8 9
9 10
10 11
11 12
12 13
13 14
14 15
15 16
16 17
17 18
18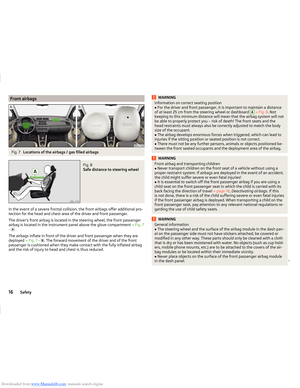 19
19 20
20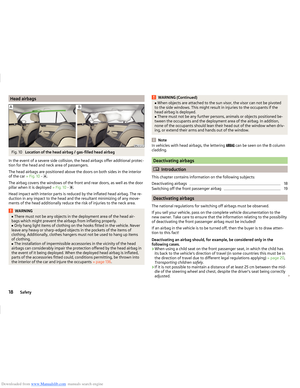 21
21 22
22 23
23 24
24 25
25 26
26 27
27 28
28 29
29 30
30 31
31 32
32 33
33 34
34 35
35 36
36 37
37 38
38 39
39 40
40 41
41 42
42 43
43 44
44 45
45 46
46 47
47 48
48 49
49 50
50 51
51 52
52 53
53 54
54 55
55 56
56 57
57 58
58 59
59 60
60 61
61 62
62 63
63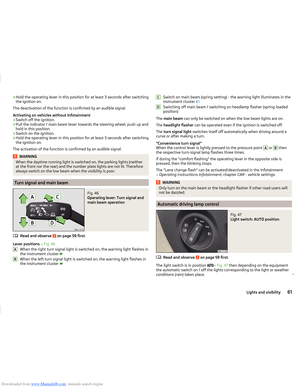 64
64 65
65 66
66 67
67 68
68 69
69 70
70 71
71 72
72 73
73 74
74 75
75 76
76 77
77 78
78 79
79 80
80 81
81 82
82 83
83 84
84 85
85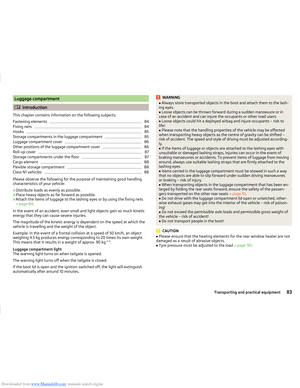 86
86 87
87 88
88 89
89 90
90 91
91 92
92 93
93 94
94 95
95 96
96 97
97 98
98 99
99 100
100 101
101 102
102 103
103 104
104 105
105 106
106 107
107 108
108 109
109 110
110 111
111 112
112 113
113 114
114 115
115 116
116 117
117 118
118 119
119 120
120 121
121 122
122 123
123 124
124 125
125 126
126 127
127 128
128 129
129 130
130 131
131 132
132 133
133 134
134 135
135 136
136 137
137 138
138 139
139 140
140 141
141 142
142 143
143 144
144 145
145 146
146 147
147 148
148 149
149 150
150 151
151 152
152 153
153 154
154 155
155 156
156 157
157 158
158 159
159 160
160 161
161 162
162 163
163 164
164 165
165 166
166 167
167 168
168 169
169 170
170 171
171 172
172 173
173 174
174 175
175 176
176 177
177 178
178 179
179 180
180 181
181 182
182 183
183 184
184 185
185 186
186 187
187 188
188 189
189 190
190 191
191 192
192 193
193 194
194 195
195 196
196 197
197 198
198 199
199 200
200 201
201 202
202 203
203 204
204 205
205 206
206 207
207 208
208 209
209 210
210 211
211 212
212 213
213 214
214 215
215