2014 SKODA FABIA reset
[x] Cancel search: resetPage 17 of 60
Safe removal of the audio source›
Press the button
→ Remove safely .
■ SD card - Safe removal of the SD storage card
■ USB - Safe removal of the USB source
Restore factory settings
›
Press the button
→ Factory settings .
■ Reset all settings and data - menu to restore all settings
■ Restore factory settings - Reset all factory settings
■ Reset individual settings/data - menu for the recovery of individual settings
■ Sound - Reset default settings for sound
■ Radio - Reset default settings for radio
■ Vehicle - Reset default settings for the vehicle systems
■ Telephone - Reset default settings for phone
■ Media - Reset default settings for media
■ System - Reset the system default settings
■ MirrorLink ™
- Reset settings on the MirrorLink ™
- function
Bluetooth ®
settings
›
Press the button
→ Bluetooth .
■ Bluetooth - Switch on/off Bluetooth ®
function
■ Visibility: - Switch on/off the visibility of the Bluetooth ®
device for other de-
vices
■ Visible - Visibility is always on
■ Hidden - Visibility is off
■ Name: - Open the input screen with keyboard - Change the device name
■ Paired devices - Display the list of paired Bluetooth ®
devices; connect or de-
lete a paired device; delete the list of paired devices ■ Delete all - Delete all paired Bluetooth ®
devices
■ - Delete the paired Bluetooth ®
device
■ Find devices - Searches for available external devices with enabled Blue-
tooth ®
functions and activated visibility
■ Bluetooth audio (A2DP/AVRCP) - Switch on/off the connection option for
Bluetooth ®
profiles A2DP or AVRCP 1)
System Information›
Press the button
→ System information .
■ Device part number: ... - Part number of the unit
■ Hardware: ... - Version of the hardware used
■ Software: ... - Version of the software used
■ Media Codec: ... - Media codec version
■ Update software - the function key for the software update
The information about available software updates can be found on the ŠKODA
Internet pages www.infotainment.skoda-auto.com .
1)
A2DP or AVRCP are Bluetooth®
profiles that support multimedia functions.
15Device Settings
Page 19 of 60
SymbolMeaning AF Alternative frequency is switched off (FM)Signal is not available (DAB)
If a continuous change of a displayed station name (dynamic text) occurs, then
it is possible to fix the current text by pressing on the screen for a while in the
station range
A
» Fig. 9 . The station name is displayed again completely by
pressing again longer in the area of the station name.
Radio DAB text and images presentation
Fig. 10
Station information
Read and observe on page 16 first.
Radio reception DAB allows multiple stations to be transmitted in a single fre- quency in the form of an ensemble or group. It also allows for the transmission
of additional data and information (e.g. messages, sport, weather, warnings,
etc.).
The display options for this information can be adjusted on the screen in the
following menu.
›
Press the function key in the Radio menu DAB
.
■ Preset list - Displaying the DAB main menu » Fig. 9 on page 16
■ Station info. - Display information on the DAB stations, by accompanying
(Radio text)
A
and pictures presentation
B
■ Radio text - Displays one radio text
■ Slideshow - Only a representation of images presentation (the presentation
goes into full screen display; does not apply if the station is broadcasting just
a logo)
Note■ If the screen is touched in the area of the radio text A, only this text is dis-
played in the full screen display.■
If the screen is touched in the area of thepictures presentation
B
, only this
presentation is displayed in full-screen mode (does not apply if the station is
broadcasting just a logo).
Select the frequency range
Read and observe
on page 16 first.
›
Press the button repeatedly.
or
›
Press the function button
D
» Fig. 9 on page 16 , and select the desired
range.
List of available stations
Fig. 11
Example, the list of available stations: FM / DAB
Read and observe
on page 16 first.
The station with sufficient signal strength are shown in the list of available
stations.
Display list of available stations
›
In the Radio menu, press the function key
.
17Radio
Page 20 of 60

List of available stations - information symbols and function keysSymbolMeaningRadio station, which is stored under a preset buttonCurrent radio stationTraffic information station (e.g.)Type of program being broadcast (FM) (e.g.)Type the regional broadcast (FM)Signal reception is not available (DAB)Signal reception is not safe (DAB)Radio stations with picture representation (so called slideshow)
(DAB)
Update station list
In the FM band the station list is continually updated automatically.
In FM and DAB bands update is performed manually by pressing the function
key .
Sort the stations in the station list (FM) › Alphabet
- alphabetical order according to station name
› Group
- Sort according to the program identification of programs being
broadcast (PI code of the radio station)
Search and select available stations
Read and observe
on page 16 first.
Select station from the list of available stations
The device will automatically search for available radio stations in the back-
ground, which can be selected immediately after turning on the power.
A radio station from the list of available stations can be selected in one of two
ways.
›
In the Radio menu, press the function key
or
press the top of the screen.
There will be a change to the previous or next channel.
or
›
In the Radio menu, press the function key
. The list of available stations is
opened » page 17 .
›
Select the desired station.
Manually selecting a radio station›In the Radio menu, press the function key .
It current frequency range appears in the scale.
Set the desired station in one of the following ways.›
Press the function key
or
press at the top of the screen (change to the
next available station).
›
Press the function key
or
or the bottom of the screen and set the desired
value of the frequency range.
›
turn the right control
2
» Fig. 1 on page 5 (movement on the scale of the
frequency range).
›
Move the slider on the scale of the frequency range by touching with the fin-
ger.
Close the menu for manual searching by pressing the right control
2
» Fig. 1
on page 5 .
Station scan
›
Press the function key or
hold.
A search commences in the selected direction and stops at the next station with sufficient signal strength.
Search available stations (Scan)
›
Push the right control
2
» Fig. 1 on page 5 .
or
›
In the Radio menu, press the function key
→ Scan .
The search is started.
This function plays all the receivable stations in succession for a few seconds
each.
By pressing any function button on the device screen the system will stop
searching.
The current station is played.
Save radio station
Read and observe
on page 16 first.
For each broadcasting range (FM / AM / DAB) there are 15 preset buttons to
store the radio stations. These preset buttons are divided into three memory
groups.
18Radio
Page 21 of 60
A radio station can be stored in the device memory in one of the following
ways.
Save station from the menu Radio›
In the menu Radio press and hold the desired station button
C
» Fig. 9 on
page 16 until you hear an acoustic signal.
If a station was already stored in the desired position it is replaced with the
currently selected station.
Save station from the station list
›
In the list of available stations » page 17 press the function key of the desired
station longer.
A list of the station keys
C
is shown as well as a list of the functions keys for
the storage groups
E
» Fig. 9 on page 16 .
›
Select a storage group.
›
Press the station button.
The station is stored under the selected station button.
Station logos
Read and observe
on page 16 first.
With the present buttons
C
» Fig. 9 on page 16 logos (images) can be linked or
removed to/from the radio stations.
Store station logos automatically (FM / DAB)
›
Before you store the radio station to a station button function key press in
the Radio menu the function key
→ Advanced settings .
›
Activate the menu item Auto-save station logos » page 20 , Advanced Set-
tings (FM) and » page 20 , Advanced setup (DAB) .
When you save the station to a station button, the station is assigned a logo
from the device memory if the logo is available in the memory.
Assign channel logo manually
A logo can be assigned or removed manually from the previously stored sta-
tions.
›
Press the function key
→ Station logos .
A menu with preset buttons for radio stations is displayed.
›
Press the preset button for the station, which a logo is to be assigned to.
A menu of media (CD, SD card, USB) is displayed.
› In the relevant media select the image you want to have.
By selection of the image it is assigned to the relevant station button.
Remove channel logo manually›
Press the function key
→ Station logos .
A menu with preset buttons for radio stations is displayed.
›
Press the preset button for the station, which a logo is to be removed from.
The logo is removed from the station button.
Note
■ The following image formats are supported: jpg, gif, png, bmp.■We recommend a resolution of up to 500 x 500 pixels.■
The information about radio station updates can be found on the ŠKODA In-
ternet pages www.infotainment.skoda-auto.com .
TP Traffic programme
Read and observe
on page 16 first.
The function allows the reception of traffic information.
Switching the traffic information station on and off manually
›
Press the button.
or
›
In the Radio menu, press the function key
.
›
Enable or disable the menu item
Traffic program (TP).
Current traffic reports
During a traffic announcement, the following menu is displayed.
›
Cancel - interruption of the current traffic report. The TP function remains
activated.
›
Deactivate - Interrupt the current traffic report and turn off TP function.
Note
■
Should this radio station not transmit traffic reports or the signal is not avail-
able, then the device automatically searches in the background for another TP
station.■
During playback in menu Media or a radio station in the AM range, traffic
news is received from the previously selected FM radio station.
19Radio
Page 22 of 60
Settings
Introduction
This chapter contains information on the following subjects:
Settings
20
Advanced Settings (FM)
20
Advanced setup (DAB)
20
First and foremost, pay attention to the safety instructions » page 4 , Impor-
tant notes .
The basic setting of the Radio menu functions is the same for all broadcast
ranges.
The Advanced setup menu is different for FM and DAB. The AM broadcast area
does not have this menu.
Settings
›
In the Radio menu, press the function key
.
■ Sound - Sound settings » page 12, Sound settings
■ Scan - Auto-play all stations in the current frequency band, each station for
around five seconds.
■ Arrow buttons: - Set the station select function in the Radio menu
■ Preset list - Change between stations stored under the preset buttons
■ Station list - Change between all receivable radio stations of the selected
frequency band
■ Traffic program (TP) - Switches traffic programme on/off
■ Delete presets - Deletes the preset buttons
■ - Delete a particular radio station
■
Delete all - Delete all stored stations
■ Station logos - manual assignment /removal of station logos » page 19, Sta-
tion logos
■ Radio text - Switching the text display radio (FM and DAB) on and off
■ Advanced setup - another setting that is different depending on the selec-
ted broadcasting range(FM and DAB)
Advanced Settings (FM)
›
Select the FM band in the Radio menu, and press the function key
→ Ad-
vanced settings .
■
Alternative frequency (AF) - Switching on/off the search for alternative fre-
quencies of the station currently being heard, when you turn off AF off is dis-
played on the device screen
■ Radio Data System (RDS) - Switches on/off the RDS function
■ RDS Regional: - Switch on/off the automatic tracking of related regional sta-
tions ■ Fixed - Maintains the selected regional station continuously. When the sig-
nal is lost, another regional station must be set manually.
■ Automatic - Auto-selects the station with the best reception at the mo-
ment. If you lose reception the region, the unit will automatically set anoth-
er available region.
■ Auto-save station logos - Automatic storage of the station logos » page 19,
Station logos
Advanced setup (DAB)
›
Select the DAB band in the Radio menu, and press the function key
→
Advanced settings .
■ Auto-save station logos - Automatic association of the logo with station de-
tected » page 19
■ DAB traffic announcements - Switch on/off DAB announcements
■ Other DAB messages - Switch on/off other announcements (e.g., warnings,
regional weather, sports reports, financial news)
■ DAB - DAB station tracking - Switch on/off automatic DAB station tracking in
other station groups
■ Automatic DAB - FM switching - Switch on/off auto-switching from DAB to
the FM frequency band if the DAB signal is lost
■ L-Band - Switch on/off the automatic DAB station search in L-band
DAB station tracking
If a DAB station is a member of several sender groups, when the signal is poor,
the same station is searched in a different sender group.
Auto-change DAB -FM
With bad DAB reception the device tries to find an FM transmitter.
› The station name is followed by (
) while the station is being received on
the FM band. The ( ) marker disappears when the relevant DAB station can
be received again.
› If a DAB station is also not available in the FM band due to poor reception,
the device will be switched to mute.
20Radio
Page 41 of 60
After the desired telephone and the Bluetooth ®
Has been searched out and
selected profile, must be chosen depending on the number of connected tele-
phones, if the telephone has to be connected as a main or additional phone.
Disconnection
The connection of a telephone to the device can be disconnected in one of the
following ways.
› By removing the ignition key (or turning off the ignition and opening the driv-
er's door in the case of vehicles with the starter button).
› By switching off the Bluetooth ®
function on the device » page 15, Bluetooth ®
settings .
› By switching off the Bluetooth ®
function on the telephone.
› By the separation of the connection in the telephone.
› By removing the telephone from the list of paired devices
» page 37, Delete
the telephone from the list of paired devices .
› By separating the Bluetooth ®
HFP profile » page 32, Bluetooth ®
- connection
profile .
› By turning off the connected phone.
› By the moving of the telephone outside the Bluetooth ®
signal range.
If a telephone is connected to the device and the device is turned off, the con-
nection to the telephone is not lost. The connection is only lost after switching
off the ignition (for vehicles with the start button after switching off the igni-
tion and opening the driver's door).
Dial telephone number
Introduction
This chapter contains information on the following subjects:
Direct entry of the telephone
39
List of telephone contacts
40
Speed dialling a telephone number
41
Call lists
42
First and foremost, pay attention to the safety instructions » page 4 .
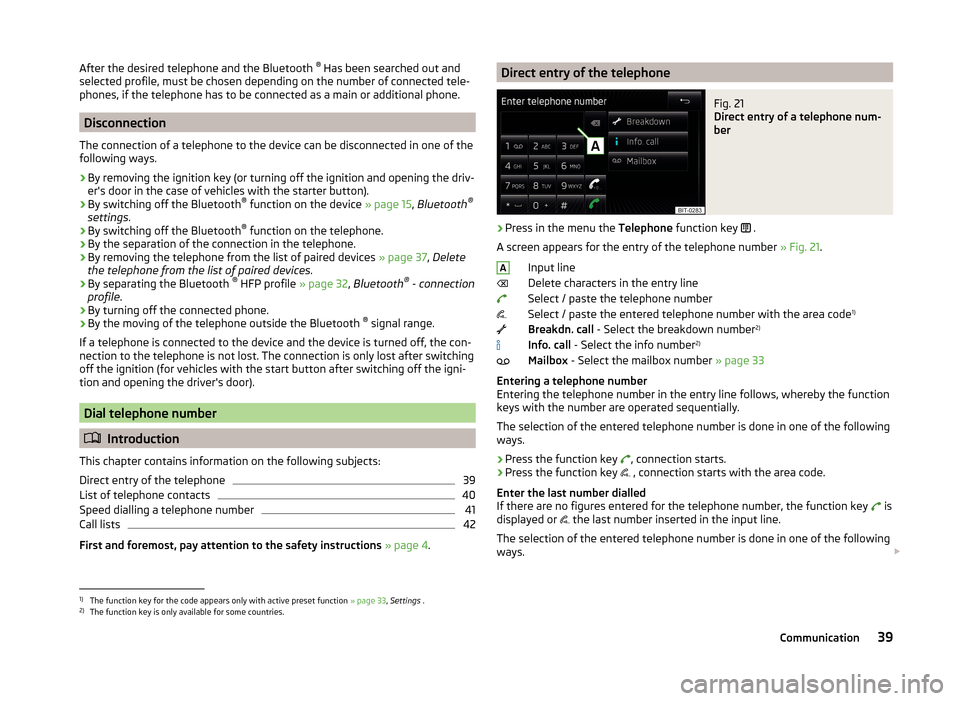
Direct entry of the telephoneFig. 21
Direct entry of a telephone num-
ber
›
Press in the menu the Telephone function key
.
A screen appears for the entry of the telephone number » Fig. 21.
Input line
Delete characters in the entry line
Select / paste the telephone number
Select / paste the entered telephone number with the area code 1)
Breakdn. call - Select the breakdown number 2)
Info. call - Select the info number 2)
Mailbox - Select the mailbox number » page 33
Entering a telephone number
Entering the telephone number in the entry line follows, whereby the function
keys with the number are operated sequentially.
The selection of the entered telephone number is done in one of the following
ways.
› Press the function key
, connection starts.
› Press the function key
, connection starts with the area code.
Enter the last number dialled
If there are no figures entered for the telephone number, the function key is
displayed or the last number inserted in the input line.
The selection of the entered telephone number is done in one of the following
ways.
A1)
The function key for the code appears only with active preset function
» page 33, Settings .
2)
The function key is only available for some countries.
39Communication
Page 42 of 60
›Press the function key
, connection starts.
› Press the function key
, connection starts with the area code.
Search for a contact in the list
The input screen » Fig. 21 also functions as an alphanumeric keypad that you
can use to search for contacts in the phonebook.
For example, if you enter 32, the unit will display contacts with the letter se-
quence DA, FA, EB, etc.
On the right side next to the numerical keyboard a list of contacts found from
the directory appears according to the lettered specified. By pressing the cor-
responding function key for the respective contact, dialling is started or the
contact details are displayed if the telephone contact has several telephone
numbers.
Enter prefix
Entering the prefix into the input line can be done in one of two ways.
› Enter the characters or numbers of the prefix (e.g.
or enter 00 or similar).
› Enter the telephone number and press the function key
(the connection
with the prefix starts).
The prefix may, for example be used for international calls, telephone calls via
a virtual telephone service provider or distinguishing between business and
private calls and similar.
If the contact number contains a prefix, pressing the function key causes a
further prefix to be added before the number and the connection starts. The
telephone number contains at this time two prefixes and a telephone call is
not initiated.
Dialling breakdown and info numbers
› Press the function key
Breakdn. call , breakdown number is dialled.
A breakdown service will then be called when your vehicle breaks down.
› Press the function key
Info. call
the Info number is dialled.
An information service can be called when information regarding the products and services of the ŠKODA brand are required.
The breakdown and info numbers are free of charge. Charges are only made for a telephone call in accordance with the fare conditions of your telephone
service provider.
If no Breakdown or Info. call can be made, then a ŠKODA service partner
should be consulted.The breakdown and info numbers are set country-specific at the factory. If you
want to change the preset numbers, then consult a ŠKODA service partner.
List of telephone contacts
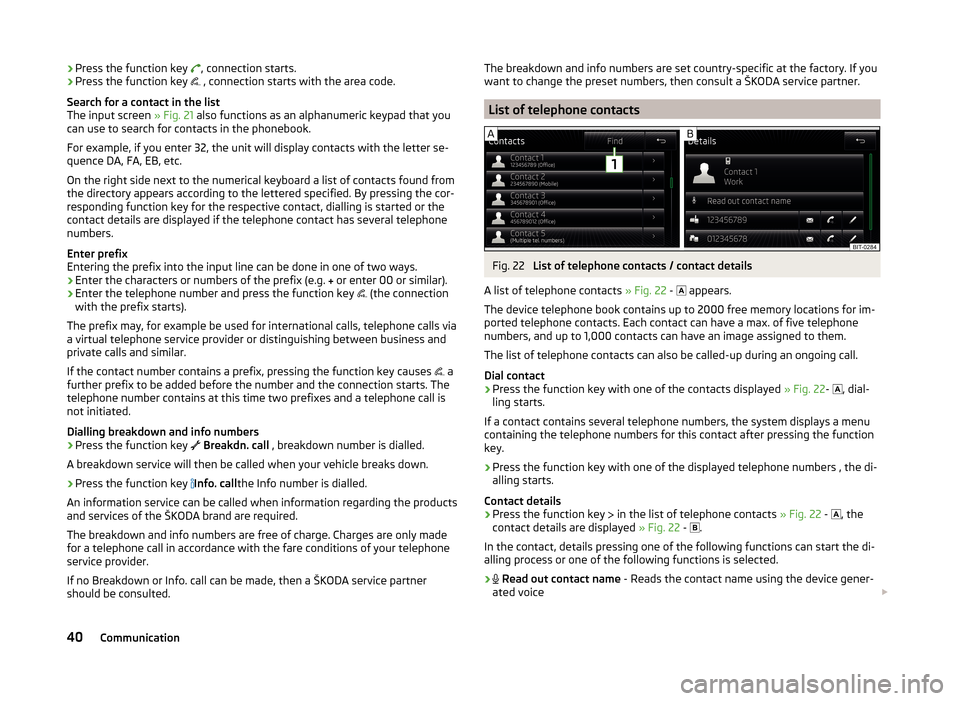
Fig. 22
List of telephone contacts / contact details
A list of telephone contacts » Fig. 22 -
appears.
The device telephone book contains up to 2000 free memory locations for im-
ported telephone contacts. Each contact can have a max. of five telephone
numbers, and up to 1,000 contacts can have an image assigned to them.
The list of telephone contacts can also be called-up during an ongoing call.
Dial contact
›
Press the function key with one of the contacts displayed » Fig. 22-
, dial-
ling starts.
If a contact contains several telephone numbers, the system displays a menu
containing the telephone numbers for this contact after pressing the function
key.
›
Press the function key with one of the displayed telephone numbers , the di-
alling starts.
Contact details
›
Press the function key in the list of telephone contacts
» Fig. 22 -
, the
contact details are displayed » Fig. 22 -
.
In the contact, details pressing one of the following functions can start the di- alling process or one of the following functions is selected.
›
Read out contact name - Reads the contact name using the device gener-
ated voice
40Communication
Page 53 of 60

■Front volume - Adjust the volume of the beeps for obstacle detection in
front
■ Front tone setting - Setting the pitch of the beeps for obstacle detection in
front
■ Rear volume - Set the volume level of the beeps for the rear obstacle de-
tection
■ Rear tone setting - Setting the pitch of the beeps for the rear obstacle de-
tection
■ Lowering entertainment - Lowers the audio volume (e.g. radio volume)
with activated parking aid
Light
›
Press the button
→
→ Light .
■ Light assistance - Setting of outdoor lighting
■ Switch-on time: - Set the sensibility of the light sensor against the change
in intensity of the ambient light
■ Early - High sensibility
■ Medium - Medium sensibility
■ Late - Low sensibility
■ Automatic headlight control (rain) - Activate/deactivate automatic head-
light control in rain
■ Daytime running lights - Activate/deactivate daytime running lights
■ Comfort turn signal - Activate/deactivate lane change flashing
■ Background lighting - Sets the interior lighting
■ Instrument/switch lighting - Sets the brightness of the instrument/switch
lighting
■ “Coming home/Leaving home”- function - setting the COMING HOME /
LEAVING HOME-function ■ "Coming Home" function - Sets the period that the lights remain on after
you leave the vehicle (0 - 30 seconds; 0 = function deactivated)
■ "Leaving Home" function - Sets the period that the lights remain on after
you unlock the vehicle (0 - 30 seconds; 0 = function deactivated)
Windscreen wipers
›
Press the button
→
→ Mirrors and wipers .
■ Wipers - Adjusts the windscreen wipers
■ Automatic wiping in rain - Activate/deactivate automatic windscreen wip-
ing in rain
■ Automatic rear wiper - Activate/deactivate automatic rear window wiping
Opening and closing›
Press the button
→
→ Opening and closing .
■ Central locking - Settings for opening and closing of doors
■ Door unlocking: - Set the door unlocking feature
■ All doors - All doors
■ Single door - Driver's door or driver's or passenger door with KESSY sys-
tem
■ Vehicle side - Doors on the driver's side or on the driver's or passenger's
side with KESSY system
■ Automatic locking - Activate/deactivate automatic locking when starting
off
■ Acoustic confirmation - Activate/deactivate acoustic signals when locking/
unlocking the vehicle with an anti-theft alarm system
Instrument cluster (multifunction display)
›
Press the button
→
→ Instrument cluster .
In this menu it is possible to hide/show the appearance of the menu items in
the instrument cluster multifunction display and reset the trip data.
■ Current consumption - Display of current fuel consumption on/off
■ Average consumption - Display of average fuel consumption on/off
■ Travelling time - Display of travelling time on/off
■ Distance - Display of distance travelled on/off
■ Average speed - Display of average speed on/off
■ Digital speed display - Display of current speed on/off
■ Speed warning - Winter tyres warning on/off
■ Oil temperature - Oil temperature on/off
■ Reset "Since start" driving data - Reset the single-trip memory in the device
screen and in the display of the instrument cluster
■ Reset "Long-term" driving data - Reset the long-term memory in the device
screen and in the display of the instrument cluster
Time, date and unit setting
›
Press
→ Time and date .
Description of the time and date settings » page 14 .
›
Press the button
→ Units .
Description of unit settings » page 14.
51Vehicle systems