2014 Seat Toledo technical specifications
[x] Cancel search: technical specificationsPage 147 of 200

Wheels and tyres
indicators is given on the tyre sidewalls by
the letters “TWI”, triangular symbols or other
symbols.
The useful life of the tyres depends primarily
on the following factors:
Tyre pressure values
Under-inflation or over-inflation will consider-
ably reduce the useful life of the tyres and
impair the vehicle's handling. Therefore,
check the tyre pressure, including the spare
wheel, at least once a month and before any
long journey.
Inflation pressures for summer tyres are lis-
ted on a sticker inside the fuel tank flap. The
pressures for winter tyres are 0.2 bar (2.9
psi/20 kPa) above the summer values.
Always check the pressure when the tyre is
cold. Do not reduce over-pressure in warm
tyres. The tyre pressures must be altered to
suit notable changes in the load being car-
ried.
Driving style
Fast cornering, heavy acceleration and hard
braking all increase tyre wear.
Wheel balancing
The wheels on new vehicles are balanced.
Various factors encountered when driving
can cause them to become unbalanced, which results in vibration of the steering
wheel.
The wheel must be rebalanced if a new tyre is
fitted or if a tyre is repaired.
Incorrect wheel alignment
Incorrect front or rear wheel alignment cau-
ses excessive tyre wear, frequently on one
side, and also impairs vehicle safety. If tyre
wear is very irregular, contact an Official
Service.
Tyre damage
To avoid damage to tyres and wheels, only
drive over kerbs or similar obstacles slowly
and at a right angle if possible.
Check tyres and wheels regularly for damage
(punctures, cracks, blisters, deformities,
etc.). Remove any foreign objects embedded
in outside of the treads.
Unusual vibration or the car pulling to one
side may indicate that one of the tyres is
damaged.
Reduce speed immediately and
s t
op if you suspect that damage may have
occurred! Check the tyres for damage (blis-
ter
s, cracks, etc.). If no external damage is
visible, drive slowly and carefully to the near-
est Official Service and have the vehicle in-
spected. Interchanging tyres
Fig. 118
Interchanging tyres. Changing wheels around
If the wear is visibly greater on the front tyres,
they should be exchanged for the rear tyres
as shown in the diagram
››› Fig. 118 . All the
ty r
es will then last for about the same time.
To ensure that the wear is equal on all tyres
and maintain their optimum useful life, they
should be changed around every 10 000 km.
Storing tyres
When you remove the tyres, mark them in or-
der to maintain the same direction of rotation
when they are installed again.
When removed, the wheels and/or tyres
should be stored in a cool, dry and preferably
dark location. Store tyres in a vertical posi-
tion, if they are not fitted on wheel rims.
145
Technical specifications
Advice
Operation
Safety
Page 149 of 200

Wheels and tyres
The tyre pressure of the spare wheel must be
checked (preferably whenever the tyre pres-
sure is checked – see sticker on fuel tank flap
››› page 144 ) to ensure the spare wheel re-
m ain
s ready for use.
If the spare wheel is not the same size or de-
sign as the tyres that are mounted on the car
(for example if the car has winter tyres or
tyres with direction tread), only use the spare
tyre for a short period of time in the event of
breakdown and drive with the corresponding
care ››› .
It must be replaced as soon as possible for a
wheel with a normal size and finish.
Temporary spare wheel
If the vehicle is equipped with a temporary
spare wheel, there will be a warning sign on
the rim of the wheel.
Follow the instructions below when driving
with this wheel fitted.
● After fitting the wheel, the warning sign
must not be covered.
● Do not drive faster than 80 km/h (50 mph)
with the spare wheel and take great care
while driving. Avoid heavy acceleration, hard
braking and fast cornering.
● The tyre pressure is the same as that of the
standard tyres. ●
Only use this spare wheel to reach the
nearest Official Service, as it is not designed
for permanent use. WARNING
● Under no circumstances must damaged
spare wheels be used.
● If the spare wheel is different in size or de-
sign to the tyres currently fitted, never drive
faster than 80 km/h (50 mph). Avoid heavy
acceleration, hard braking and fast cornering. CAUTION
Follow the instructions given on the tempora-
ry spare wheel label. Note
The tyre pressure of the spare wheel must al-
ways correspond to the highest pressure pre-
scribed for the model of vehicle in question. Tyre control systems
Tyre pressure* Fig. 120
Tyre pressure adjustment switch. The tyre pressure monitoring system uses
ABS sensors to compare the revolutions and
the circumference of each wheel. Should the
circumference of any wheel change, the
warning lamp on the general dash panel
››› page 38 will light up and an audible warn-
in g w
ill be heard.
Tyre circumference may change if:
● Tyre pressure is too low
● Tyre structure is damaged
● Vehicle load not evenly distributed
● wheels on one axle are subjected to greater
load, (e.g. driving with trailer, uphill, down-
hill);
● Snow chains are fitted »
147
Technical specifications
Advice
Operation
Safety
Page 151 of 200

Emergencies
Snow chains Snow chains must only be used on the front
wheels.
In winter road conditions, snow chains not
only help to improve grip but also improve
the braking capacity.
For technical reasons snow chains may only
be used on tyres with the following wheel
rim/tyre combinations.Rim sizeRim offsetTyre size
5J x 14
a)35 mm175/70
6J x 15b)38 mm185/60
6J x 15b)38 mm195/55
a)
Only use snow chains with fine-pitch links and lock no greater
than 9 mm.
b) Only use snow chains with fine-pitch links and lock no greater
than 13 mm.
Remove the wheel trims before fitting snow
chains. CAUTION
Chains must be removed when roads are free
of snow. Otherwise they will impair handling,
damage the tyres and wear out very quickly. Emergencies
Emergency equipment First-aid kit and warning triangle* Fig. 121
Location of the warning triangle. The warning triangle, measuring max.
436 x 45 x 32 mm, can be secured to the lin-
ing on the rear of the luggage compartment
with rubber straps
››› Fig. 121. WARNING
The first-aid kit and fire extinguisher must be
properly secured so that they are not catapul-
ted through the vehicle during driving and
braking manoeuvres or in the event of an ac-
cident. Risk of injury. Note
● Observe the expiry date of the contents of
the first aid kit.
● We recommend you use the first-aid kit and
the warning triangle from the SEAT Original
Accessories programme available in author-
ised SEAT dealers. Fire extinguisher*
Read the instructions given on the fire extin-
guisher carefully.
The fire extinguisher must be checked once a
year by an authorised person (take the appli-
cable legal regulations into account).
WARNING
The fire extinguisher must be properly se-
cured so that it is not catapulted through the
vehicle, causing injuries, during driving and
braking manoeuvres or in the event of an ac-
cident. Note
● The fire extinguisher must comply with lo-
cal legal requirements.
● Observe the expiry date of the fire extin-
guisher. The fire extinguisher may not work
properly if used after the expiry date. 149
Technical specifications
Advice
Operation
Safety
Page 153 of 200

Emergencies
●
If the anti-theft wheel bolt is overly tight-
ened, this could damage the bolt and the
adapter. Note
● The set of anti-theft wheel bolts or the
adapter are available from authorised SEAT
dealers.
● Please observe the relevant local legal reg-
ulations when changing the wheel. Preparation work
Some preparation is required before chang-
ing a wheel:
– If you have a flat tyre, stop the vehicle as
far away as possible from moving traffic.
The surface must be horizontal.
– All vehicle occupants should leave the ve-
hicle . Vehicle occupants should wait in a
s af
e place, e.g. behind the roadside crash
barrier) while the wheel is being changed.
– Switch off the ignition and engage neutral
or move the selector lever on the automatic
g
earbox to position P.
– Apply the handbrake firmly.
– If t
owing a trailer, unhitch it. –
Take the vehicle tool kit ››
› page 150 and
the spare wheel ››› page 150 out of the lug-
gage compartment.
Wheel trim Removing
– Place the hook from the vehicle tool kit on
the reinforced edge of the wheel trim.
– Insert the box spanner through the hook,
supporting it on the tyre and remove the
wheel trim.
Fitting – First press the wheel trim onto the wheel at
the cut out designed for the valve. Then
press the wheel trim on both sides in the
direction of the valve so that it fits correctly
in place around all the perimeter. CAUTION
● Press down by hand, do not hit the wheel
trim! Knocking it sharply, particularly at
points where the wheel trim has not yet been
inserted, could result in damage to the wheel
trim guiding and centring elements.
● Before fitting the trim on a steel wheel at-
tached with an anti-theft wheel bolt, make
sure the bolt is in the hole in the valve area
››› page 154, Anti-theft wheel bolts*. ●
Where trim is fitted at a later date, ensure
enough air inflow is guaranteed in order to
cool the brake system. Wheel bolt caps
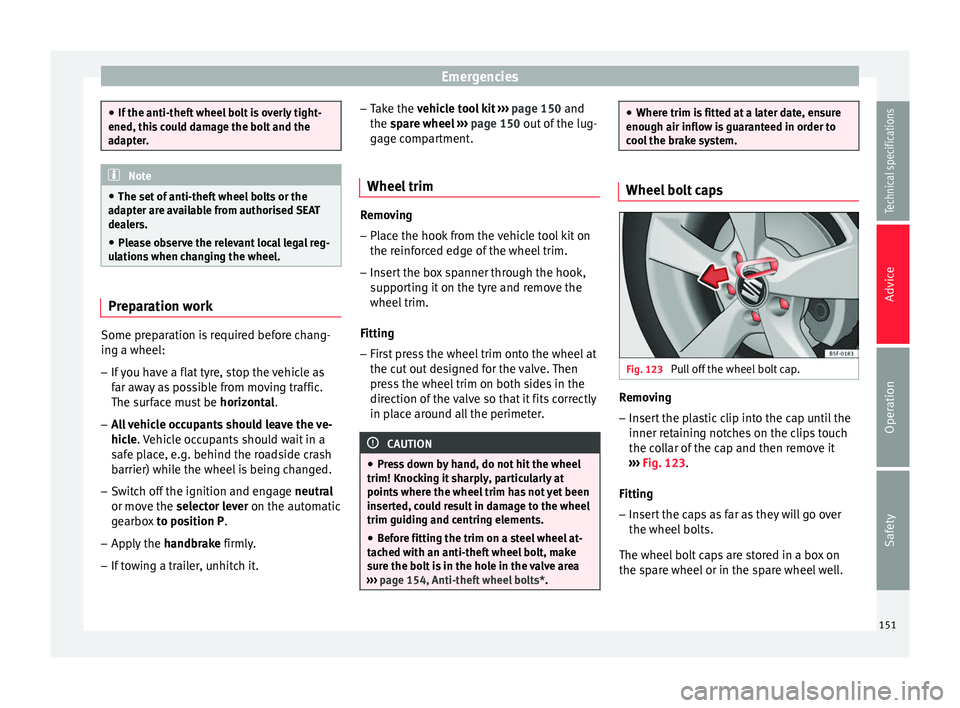
Fig. 123
Pull off the wheel bolt cap. Removing
– Insert the plastic clip into the cap until the
inner retaining notches on the clips touch
the collar of the cap and then remove it
››› Fig. 123 .
Fittin g
– In
sert the caps as far as they will go over
the wheel bolts.
The wheel bolt caps are stored in a box on
the spare wheel or in the spare wheel well.
151
Technical specifications
Advice
Operation
Safety
Page 155 of 200

Emergencies
Loosening wheel bolts – Fit the box spanner as far as it will go over
the wheel bolt 1)
.
– Grip the end of the box spanner and turn
the wheel bolt about one turn anti-clock-
w i
se ››› Fig. 124.
Tightening wheel bolts – Fit the box spanner as far as it will go over
the wheel bolt 1)
.
– Grip the box spanner as close to the end as
possible and tighten the bolt firmly by turn-
ing clockwise. WARNING
The wheel bolts should only be loosened
slightly (about one turn) before raising the
vehicle with the jack. Risk of accident! Note
If the wheel bolt is very tight, it may be pos-
sible to loosen it by pushing down the end of
the box spanner carefully with your foot. Hold
on to the vehicle for support and take care
not to slip. Lifting the vehicle
Fig. 125
Changing a wheel: jack position
points. Fig. 126
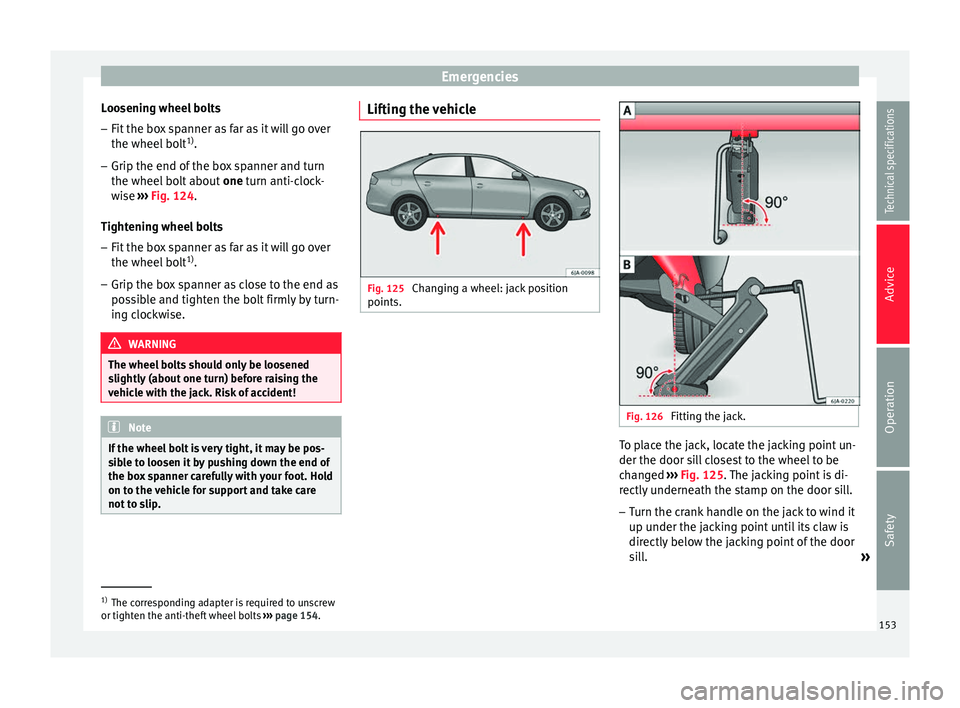
Fitting the jack. To place the jack, locate the jacking point un-
der the door sill closest to the wheel to be
changed
››› Fig. 125 . The jacking point is di-
r ectly
underneath the stamp on the door sill.
– Turn the crank handle on the jack to wind it
up under the jacking point until its claw is
directly below the jacking point of the door
sill.
»1)
The corresponding adapter is required to unscrew
or tighten the anti-theft wheel bolts ››› page 154.
153
Technical specifications
Advice
Operation
Safety
Page 157 of 200

Emergencies
●
Do not drive faster than 80 km/h (50 mph).
● Avoid heavy acceleration, hard braking and
fast cornering.
● Check the tyre pressure after 10 minutes of
driving!
● The sealant is harmful to health and must
be immediately rinsed from affected skin. For the sake of the environment
Used or out-of-date sealant must be disposed
of in line with environmental protection regu-
lations. Note
● Observe the usage instructions provided by
the snow chain manufacturer.
● A new can of sealant can be acquired from
the selection of SEAT Original Accessories.
● Change the tyre repaired using the Tyre
Mobility System as soon as possible or ask
an official service about the possibility of re-
pairing it for you. Components of the Tyre Mobility
System*
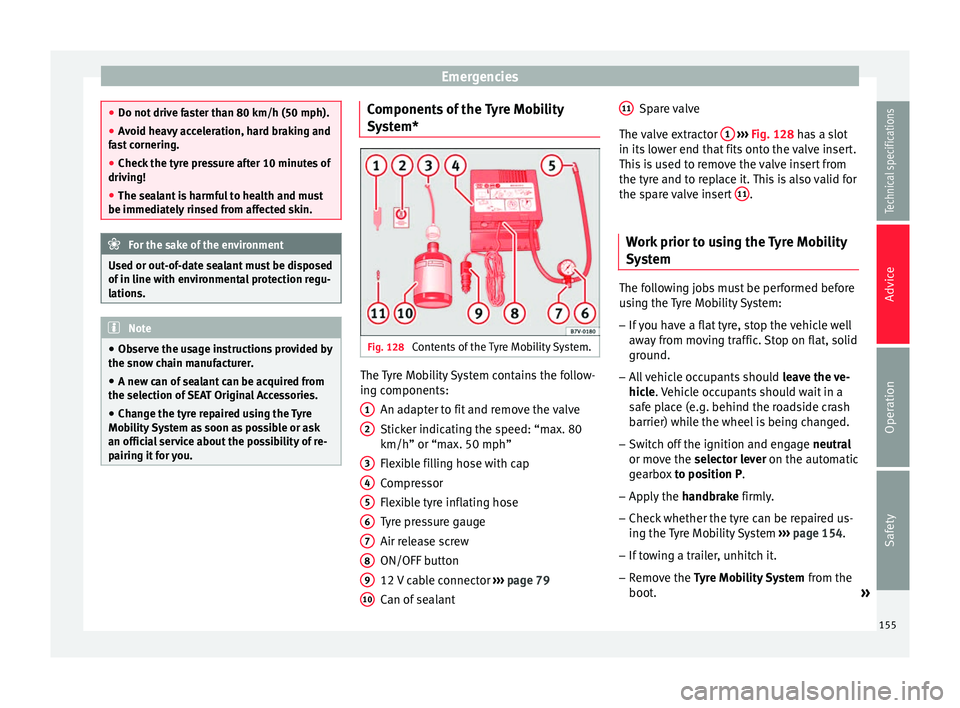
Fig. 128
Contents of the Tyre Mobility System. The Tyre Mobility System contains the follow-
ing components:
An adapter to fit and remove the valve
Sticker indicating the speed: “max. 80
km/h” or “max. 50 mph”
Flexible filling hose with cap
Compressor
Flexible tyre inflating hose
Tyre pressure gauge
Air release screw
ON/OFF button
12 V cable connector ››› page 79
Can of sealant
1 2
3
4
5
6
7
8
9
10 Spare valve
The valve extractor 1
››› Fig. 128 has a slot
in its lo
wer end that fits onto the valve insert.
This is used to remove the valve insert from
the tyre and to replace it. This is also valid for
the spare valve insert 11 .
Work prior to using the Tyre Mobility
System The following jobs must be performed before
using the Tyre Mobility System:
– If you have a flat tyre, stop the vehicle well
away from moving traffic. Stop on flat, solid
ground.
– All vehicle occupants should leave the ve-
hicle . Vehicle occupants should wait in a
s af
e place (e.g. behind the roadside crash
barrier) while the wheel is being changed.
– Switch off the ignition and engage neutral
or move the selector lever on the automatic
g
earbox to position P.
– Apply the handbrake firmly.
– Check
whether the tyre can be repaired us-
ing the Tyre Mobility System ›››
page 154.
– If towing a trailer, unhitch it.
– Remove the Tyre Mobility System from the
boot
. »
11
155
Technical specifications
Advice
Operation
Safety
Page 159 of 200

Emergencies
Check after 10 minutes of driving Check the tyre pressure after 10 minutes of
driving!
If the tyre pressure is less than 1.3 bar
(18.8 psi/130 kPa):
– Do not drive on! The tyr e cannot be suffi-
ciently filled using the tyre repair kit.
– See professional assistance.
If the tyre pressure is greater than 1.3 bar
(18.8 psi/130 kPa): – Correct the tyre pressure again to the cor-
rect value (see inside of the fuel tank flap).
– Carefully drive to the nearest specialised
workshop at a maximum speed of 80 km/h
(50 mph).
Jump-starting Introduction If the engine fails to start because of a dis-
charged battery, the battery can be connec-
ted to the battery of another vehicle to start
the engine. Suitable jump leads are required.
Both batteries need to have nominal voltage
of 12 V. The
capacity (Ah) of the back-up bat- t
er
y should not be notably less than the
drained battery.
Jump leads
The jump leads must be heavy enough to car-
ry the starter current and must be fitted with
insulated battery clamps. Refer to the instruc-
tions given by the manufacturer.
Positive cable – usually red
Neg
ative cable
– usually black WARNING
● A flat battery can also freeze at tempera-
tures slightly below to 0 °C (32 °F). Do not at-
tempt to start the vehicle with a frozen bat-
tery. Risk of explosion!
● Please note the safety warnings referring to
working in the engine compartment
››› page 132.
● The non-in s
ulated parts of the battery
clamps must not be allowed to touch. Addi-
tionally, the jump lead attached to the posi-
tive battery terminal must not touch metal
parts of the vehicle. Risk of short circuit!
● Do not connect the negative lead to the
negative terminal of the discharged battery.
In the event of sparks when starting the en-
gine, the explosive gas given off by the bat-
tery could catch fire.
● Position the jump leads in such a way that
they cannot come into contact with any mov-
ing parts in the engine compartment. ●
Do not bend over the battery. Risk of acid
burns!
● The screw plugs on the battery cells must
be screwed in firmly.
● Keep sources of fire (flames, lit cigarettes,
etc.) away from the battery. - Risk of explo-
sion!
● Never use the jump leads on batteries in
which the electrolyte level is too low. Risk of
explosion and acid burns. Note
● The vehicles must not touch each other, as
electricity could flow as soon as the positive
terminals are connected.
● The discharged battery must be properly
connected to the vehicle electrical system.
● The jump leads should be checked in a spe-
cialist vehicle battery shop. 157
Technical specifications
Advice
Operation
Safety
Page 161 of 200

Emergencies
on battery). Failure to comply could result in
an explosion.
●
Never use jump leads when one of the bat-
teries is frozen. Danger of explosion! Even af-
ter the battery has thawed, battery acid could
leak and cause chemical burns. If a battery
freezes, it should be replaced.
● Keep sparks, flames and lighted cigarettes
away from batteries, danger of explosion.
Failure to comply could result in an explo-
sion.
● Observe the instructions provided by the
manufacturer of the jump leads.
● Do not connect the negative cable from the
other vehicle directly to the negative terminal
of the flat battery. The gas emitted from the
battery could be ignited by sparks. Danger of
explosion.
● Do not attach the negative cable from the
other vehicle to parts of the fuel system or to
the brake line.
● The non-insulated parts of the battery
clamps must not be allowed to touch. The
jump lead attached to the positive battery
terminal must not touch metal parts of the ve-
hicle, this can cause a short circuit.
● Position the leads in such a way that they
cannot come into contact with any moving
parts in the engine compartment.
● Do not lean on the batteries. This could re-
sult in chemical burns. Note
The vehicles must not touch each other, oth-
erwise electricity could flow as soon as the
positive terminals are connected. Towing the vehicle
Introduction Vehicles with manual gearbox can be towed
using a towbar or towrope. They can also be
towed with either the front or rear wheels lif-
ted off the road.
Vehicles with automatic gearbox can be tow-
ed using a towbar or towrope. They can also
be towed with the front wheels lifted off the
road. If the vehicle is towed with the rear
wheels lifted off the road the automatic gear-
box will be damaged!
It is safer to tow a vehicle with a
towbar. A
towrope should only be used if you do not
h av
e a towbar.
Follow the instructions below when towing a
vehicle:
Notes for the driver of the towing vehicle
– Engage the clutch very gently when starting
to move or on vehicles with automatic gear-
box press the accelerator carefully. –
On vehicles with a manual gearbox, the
towrope must be taut before driving off.
Maximum towing speed is 50 km/h (31
mph).
Note
s for the driver of the towed vehicle
– The ignition should be switched on so that
the steering wheel lock is not engaged and
the turn signals, horn and windscreen wip-
ers and washers can be used.
– Put the gear lever in neutral or move the se-
lector lever to position N (automatic gear-
bo
x).
The brake servo and power steering only
work when the engine is running. Considera-
bly more effort is required on the brake pedal
and steering wheel when the engine is
switched off.
Ensure the towrope remains taut at all times
when towing. CAUTION
● Do not tow-start the engine. Risk of engine
damage! In vehicles with a catalytic convert-
er, fuel that has not been burned could reach
the catalytic converter and catch fire in it.
This could damage and destroy the catalytic
converter. You may use the battery from an-
other vehicle to help you start your engine
››› page 158.
» 159
Technical specifications
Advice
Operation
Safety