Page 49 of 114

48Navigation
Function button: Effect Point of interest : First select the search area and then enter the search
term.
Home: Enter the home address, or go to one of the saved addresses.
Input windows with on-screen keyboard
Fig. 46 Keyboard for free
text input.
Fig. 47 Input window for
selecting a destination
town.
Input windows with an on-screen keyboard are used to select a destination
address or, for example, to enter an entry name.
The position of the on-screen keyboard can be defined in the system set-
tings ⇒ page 101.
Input windows for “free text input”
An input window for free text input allows any letters, digits and special
characters to be entered in any combination ⇒ Fig. 46.
Pressing the OK
function button applies the sequence of characters current-
ly displayed in the window.
Input windows for selecting a destination address
It is only possible to enter a sequence of letters, numbers and special char-
acters that matches a destination found in the available navigation data
⇒ Fig. 47. That means you cannot freely enter any destination, but must
“choose” from the available destinations ⇒ page 50.
Page 50 of 114

49
Navigation
Operating instructions
● Available characters on the keyboard block are entered in the input win-
dow when pressed.
● OR: You can select characters by turning and pressing the setting knob
⇒ Fig. 1 10
.
Other control elements
Function buttonAction and meaningPress to switch between upper and lower case.
Press to open the input window for numbers and special
characters.
Or: A-ZPress to go back to the input window for letters.
and Press to move the cursor to the left or right on the input
line.
Press to enter a space.
Characters with
Hold down to display a pop-up window with special
characters based on this letter. Press the desired charac-
ter to enter it.
Press to briefly highlight all function buttons on which
special characters are available.
Press a function button to open a pop-up window for se-
lection of a special character.
Press to display Cyrillic characters on the input key-
board.
DeletePress to delete characters in the input line from right to
left.
Page 51 of 114

50Navigation
Enter destination
Introduction
Additional Information:
● Safety notes ⇒ page 4
● Unit overview ⇒ page 6
● Introduction to navigation ⇒ page 44
Note
The correct spelling and use of accents, diaeresis, etc. is important when
entering a destination. If the destination is not written correctly, the naviga-
tion system may not recognise it.
Selecting a destination address (address entry)
Fig. 48 Input window for
selecting a destination
town.
Fig. 49 Selecting a
street from a list.
When selecting an address, you first select the country, then the town or
postcode. The destination address is then narrowed down further by select-
ing the street and house number or a junction. The address selections are
made in a series of input windows.
● In the Navigation main menu, press the function button
Address to
enter a destination.
● By using successive input windows, it is possible to define the destina-
tion address ⇒ page 44.
Once the number of destinations matching the character sequence in the
display has been narrowed down to less than 99, the number of matching
destinations available will be displayed to the right of the input line
(in Fig. 48: 15).
● Press the List/OK
function button to open the list of remaining possible
destinations ⇒ Fig. 49. When fewer than six destinations are available, the
list opens automatically.
● Selecting a destination from the list
⇒ page 11.
Page 52 of 114
, press the unit button
⇒ Fig. 1 to
open a window with additional information about the selected entry in the
list.
In names made up of more th")
51
Navigation
Depending upon the unit (RNS 315), press the unit button
⇒ Fig. 1 to
open a window with additional information about the selected entry in the
list.
In names made up of more than one word, you must include the blank
space, e.g. “High Wycombe”.
A “town” refers to a locality or a postcode district and can also be selected
by entering its postcode.
When narrowing down the destination address, please note that every entry
restricts the available range of subsequent selections. For instance, if the
street you are looking for is not in the postcode area you have selected in a
previous window, you will not be able to find the street at the street selec-
tion stage.
● Press the
unit button to close the current menu and cancel the desti-
nation data entered so far step by step.
Ending destination entry
Once the destination data entered are sufficient for route guidance, it is
possible to end destination entry.
● After selecting a city, press the City centre
function button to end the des-
tination entry and start route guidance to the city centre.
● The Finish
function button appears in the list view for selection of a des-
tination if the destination data entered so far are sufficient to carry out route
guidance ⇒ Fig. 49. Press the Finish
function button to apply the destina-
tion marked in the list ( PORTSMOUTH AVENUE) and end destination entry.
When you have finished entering the destination, the address is displayed
in the “destination window” ⇒ page 51. Destination window
Fig. 50 Destination ad-
dress displayed in the
destination window.
The destination window provides an overview of all destination data entered
⇒ Fig. 50.
● Pressing an item in the destination window opens an input window in
which you can alter the item or narrow down the destination further (e.g. Street
function button).
● Press the Store function button to open an input window in which you
can assign an entry name ⇒ Fig. 46.
● OR: Press the Start
function button to start route guidance
⇒ page 61.
Page 53 of 114

52Navigation
Selecting stored destinations
Fig. 51 List of the auto-
matically stored last des-
tinations
Fig. 52 List of destina-
tions stored manually in
the destination memory.
You can start route guidance to the stored Home address
or to an automati-
cally or manually stored destination. Starting route guidance to the stored home address
● Press the Home addr.
function button to start route guidance to a previ-
ously stored home address.
Save and edit home address ⇒ page 56.
Start route guidance to stored destination
Destinations for which route guidance has been started are automatically
stored in the Last destinations list ⇒ Fig. 51.
Manually stored destinations are stored in the Destination memory
⇒ page 56.
● Open the Navigation main menu.
● Press the function button
Last destins.
or Destin. memory.
● Select a destination in the list by turning the setting knob ⇒ Fig. 1 10
and press to start route guidance
⇒ page 11.
● Alternatively: browse the list by dragging the scroll marker on the
screen and start route guidance by pressing on the destination ⇒ page 11.
To display a destination in the destination window, mark the destination in
the list view and press the Details
function button.
The destination displayed in the destination window can still be altered be-
fore route guidance is started ⇒ page 51, Destination window.
Page 54 of 114

53
Navigation
Selecting a petrol station or car park
Fig. 53 List of the near-
est car parks.
Fig. 54 Detailed view of
car park.
● Open the Navigation main menu.
● Press the function button
Petrol station
or P Car park to display a list
of petrol stations or car parks near to your current location ⇒ Fig. 53. ●
During the search, the Cancel
function button is displayed on screen.
Press to stop the search.
● Select a destination in the list by turning the setting knob ⇒ Fig. 1 10
and press to start route guidance
⇒ page 11.
● Alternatively: Browse the list by dragging the scroll marker on the
screen and select a destination to start route guidance ⇒ page 11.
● Press the Details
function button ⇒
Fig. 54. Press the Start function but-
ton in the detailed view to start route guidance.
● In the list view or detailed view, press the Store
function button to store
the marked or displayed address in the Destination memory ⇒ page 57.
Note
The distances and directions for points of interest refer to the route as the
crow flies ⇒ Fig. 53.
Page 55 of 114
.
Defining the search area")
54Navigation
Selecting a point of interest as a destination
Fig. 55 Setting a loca-
tion as the search area
centre.
Fig. 56 List of points of
interest found (keyword:
SEE).
Defining the search area
The search area covers a radius of roughly 75 km from the chosen “search
area centre”. ●
Open the Navigation main menu.
● Select the
Point of interest
function button.
● Press the City function button in the pop-up window, select a town as
the search area centre ⇒ page 50 and press the Find function button
⇒ Fig. 55.
● OR: Press the Here
function button in the pop-up window to set the cur-
rent vehicle position as the centre of the search area.
The POI search input window opens. POI search: Entering a keyword
A keyword is a word or a combination of digits and letters that occurs in the
name or the detailed information of the desired point of interest.
A keyword may be the known part of a name, e.g. “Lakeside”.
Starting from the search area centre, the unit searches for points of interest
which contain the keyword in their name or address. Possible results for the
keyword “Lakeside” would be, for example, “Lakeside Hotel” or points of in-
terest on “Lakeside” Avenue.
The POI search input window allows free text input ⇒ page 48. Correct spell-
ing is therefore important.
Starting the search
● When you have entered the keyword, press the Find
function button.
● The search radius is displayed and gradually enlarged. When several
matching points of interest are found, the display switches straight to the
list view.
The search ends automatically when it has covered a radius of roughly 100
kilometres from the defined search area centre.
A message appears to inform the user if no matching point of interest was
found.
To stop the search for a Point of Interest, press the Cancel
function button.
Page 56 of 114
55
Navigation
Selecting a point of interest from the list
● Select a destination in the list by turning the setting knob ⇒ Fig. 1 10
and press to start route guidance
⇒ page 11.
● Alternatively: Browse the list by dragging the scroll marker on the
screen and select a destination to start route guidance ⇒ page 11.
● Press the Details
function button. Press the Start function button in the
detailed view to start route guidance.
● In the list view or detailed view, press the Store
function button to store
the marked or displayed address in the Destination memory ⇒ page 57.
Note
The distances and directions for points of interest refer to the route as the
crow flies ⇒ Fig. 56.
 1
1 2
2 3
3 4
4 5
5 6
6 7
7 8
8 9
9 10
10 11
11 12
12 13
13 14
14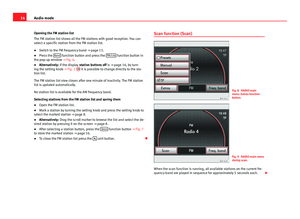 15
15 16
16 17
17 18
18 19
19 20
20 21
21 22
22 23
23 24
24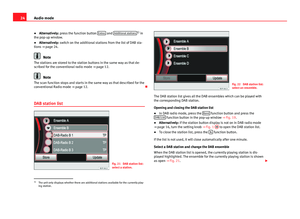 25
25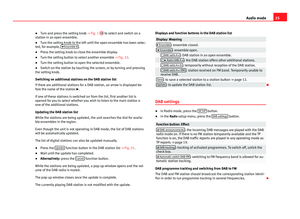 26
26 27
27 28
28 29
29 30
30 31
31 32
32 33
33 34
34 35
35 36
36 37
37 38
38 39
39 40
40 41
41 42
42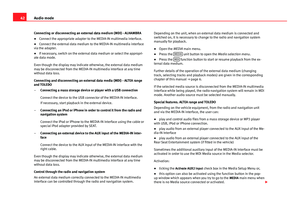 43
43 44
44 45
45 46
46 47
47 48
48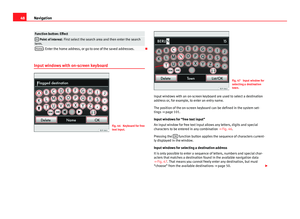 49
49 50
50 51
51 52
52 53
53 54
54 55
55 56
56 57
57 58
58 59
59 60
60 61
61 62
62 63
63 64
64 65
65 66
66 67
67 68
68 69
69 70
70 71
71 72
72 73
73 74
74 75
75 76
76 77
77 78
78 79
79 80
80 81
81 82
82 83
83 84
84 85
85 86
86 87
87 88
88 89
89 90
90 91
91 92
92 93
93 94
94 95
95 96
96 97
97 98
98 99
99 100
100 101
101 102
102 103
103 104
104 105
105 106
106 107
107 108
108 109
109 110
110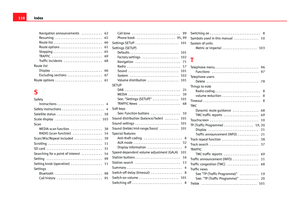 111
111 112
112 113
113