Page 114 of 252
Available Radio Soft-Key Voice Commands
Ty p e s o fVoiceCom-
mands
Available Steering
Wheel
Buttons to Press: (1)
Radio Mode (2)
Media Mode (3)
Climate
Controls (4)
Naviga- tion (5)
Phone Mode (6)
APPS
Uconnect®
Voice
Command (VR)
ButtonAM/FM
& Satel-
lite Band Control Media
Devices Control Tempera-
ture
Control Destina-
tion
Selection and View - Yelp
®
GENERAL
Uconnect®
Phone
Pick Up Button----
Call
Initiation, Call Man- agement, Pre-
defined
Voice Text Reply
-
ELECTRONICS
112
Page 115 of 252
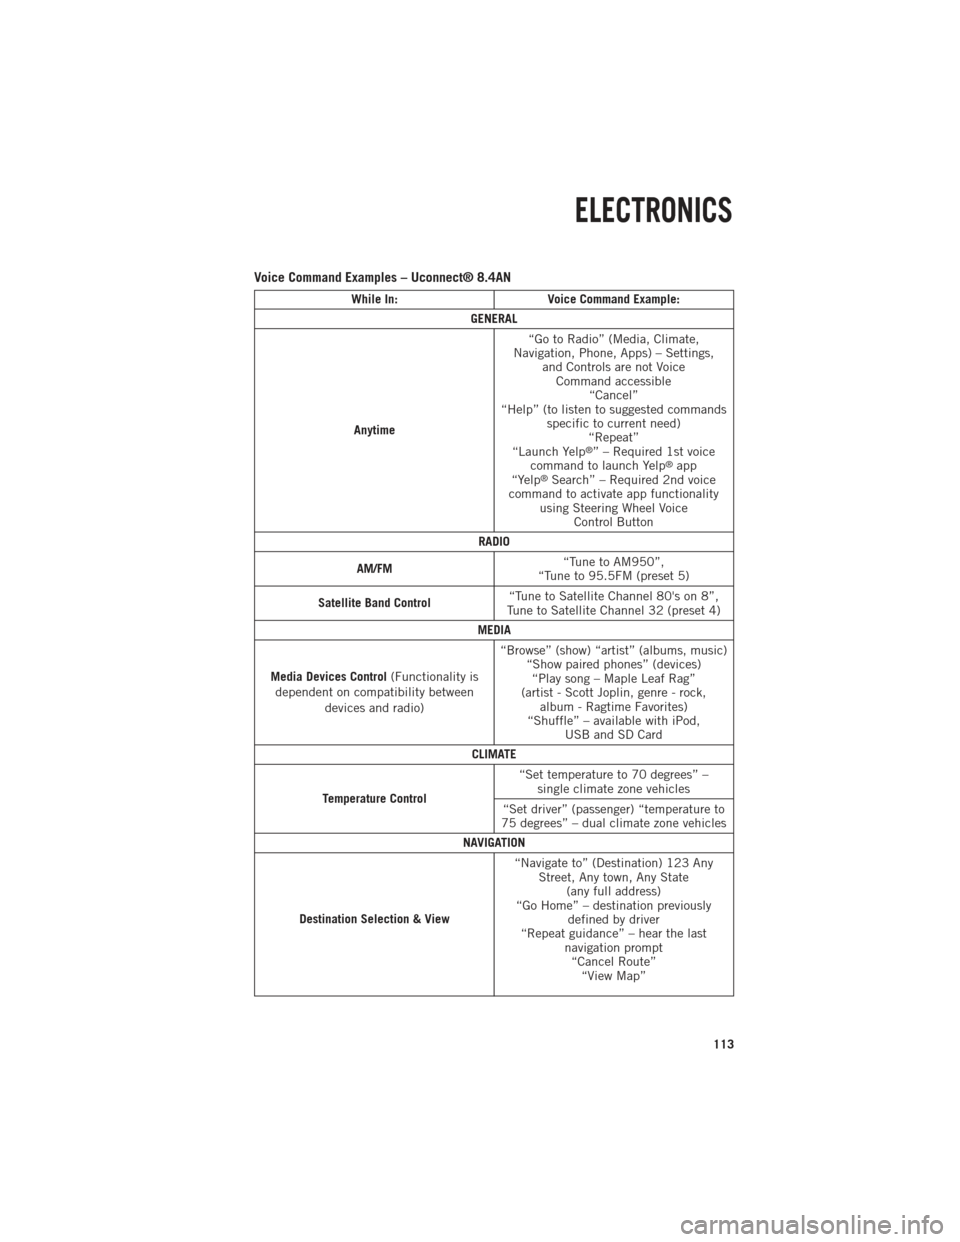
Voice Command Examples – Uconnect® 8.4AN
While In:Voice Command Example:
GENERAL
Anytime “Go to Radio” (Media, Climate,
Navigation, Phone, Apps) – Settings, and Controls are not VoiceCommand accessible “Cancel”
“Help” (to listen to suggested commands specific to current need)“Repeat”
“Launch Yelp
®” – Required 1st voice
command to launch Yelp®app
“Yelp®Search” – Required 2nd voice
command to activate app functionality using Steering Wheel Voice Control Button
RADIO
AM/FM “Tune to AM950”,
“Tune to 95.5FM (preset 5)
Satellite Band Control “Tune to Satellite Channel 80's on 8”,
Tune to Satellite Channel 32 (preset 4)
MEDIA
Media Devices Control (Functionality is
dependent on compatibility between devices and radio) “Browse” (show) “artist” (albums, music)
“Show paired phones” (devices)“Play song – Maple Leaf Rag”
(artist - Scott Joplin, genre - rock, album - Ragtime Favorites)
“Shuffle” – available with iPod, USB and SD Card
CLIMATE
Temperature Control “Set temperature to 70 degrees” –
single climate zone vehicles
“Set driver” (passenger) “temperature to
75 degrees” – dual climate zone vehicles
NAVIGATION
Destination Selection & View “Navigate to” (Destination) 123 Any
Street, Any town, Any State (any full address)
“Go Home” – destination previously defined by driver
“Repeat guidance” – hear the last navigation prompt“Cancel Route” “View Map”
ELECTRONICS
113
Page 116 of 252
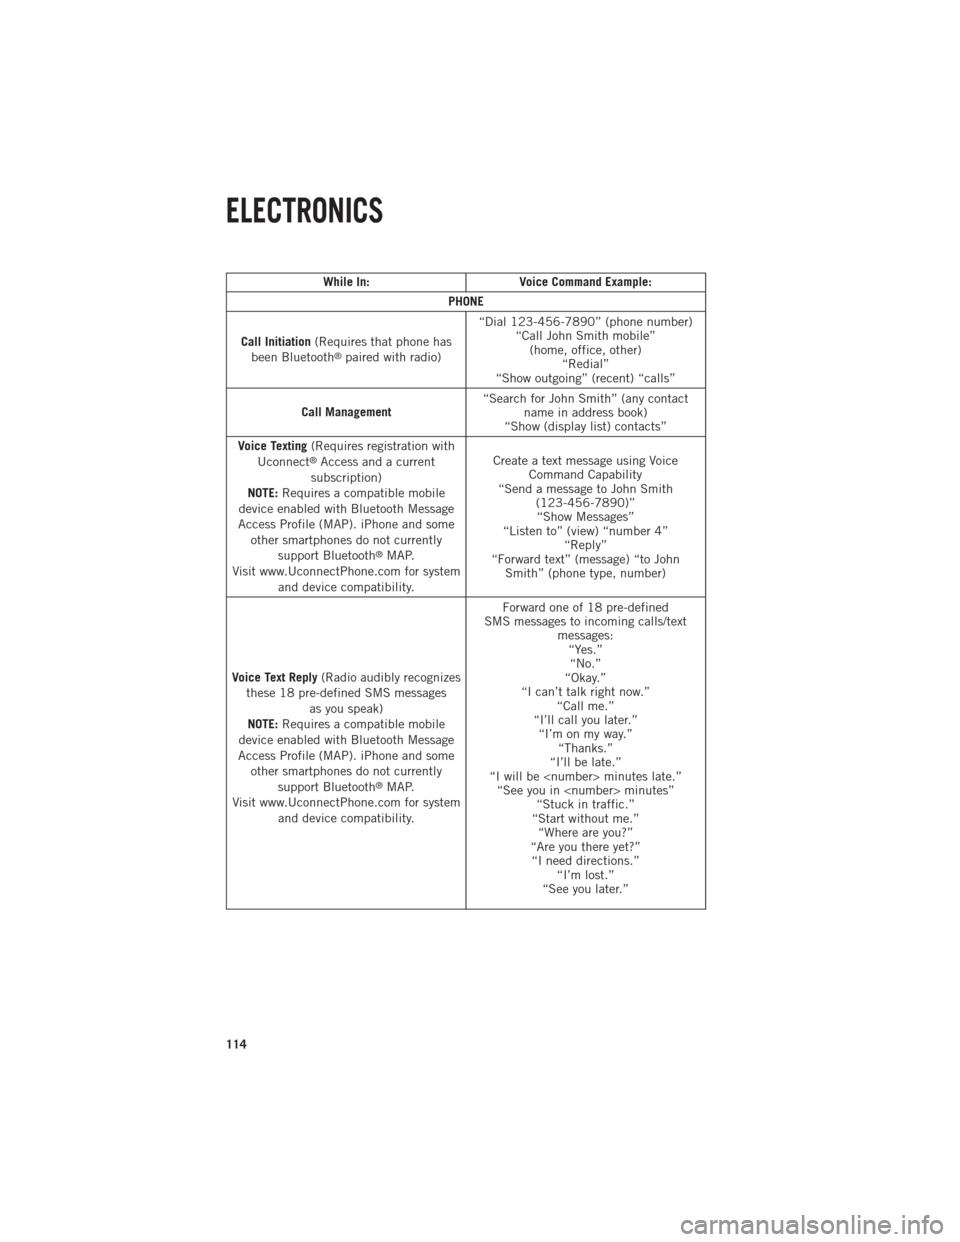
While In:Voice Command Example:
PHONE
Call Initiation (Requires that phone has
been Bluetooth
®paired with radio) “Dial 123-456-7890” (phone number)
“Call John Smith mobile”(home, office, other) “Redial”
“Show outgoing” (recent) “calls”
Call Management “Search for John Smith” (any contact
name in address book)
“Show (display list) contacts”
Voice Texting (Requires registration with
Uconnect
®Access and a current
subscription)
NOTE: Requires a compatible mobile
device enabled with Bluetooth Message
Access Profile (MAP). iPhone and some other smartphones do not currently support Bluetooth
®MAP.
Visit www.UconnectPhone.com for system and device compatibility. Create a text message using Voice
Command Capability
“Send a message to John Smith (123-456-7890)”“Show Messages”
“Listen to” (view) “number 4” “Reply”
“Forward text” (message) “to John Smith” (phone type, number)
Voice Text Reply (Radio audibly recognizes
these 18 pre-defined SMS messages as you speak)
NOTE: Requires a compatible mobile
device enabled with Bluetooth Message
Access Profile (MAP). iPhone and some other smartphones do not currently support Bluetooth
®MAP.
Visit www.UconnectPhone.com for system and device compatibility. Forward one of 18 pre-defined
SMS messages to incoming calls/text messages:“Yes.”“No.”
“Okay.”
“I can’t talk right now.” “Call me.”
“I’ll call you later.” “I’m on my way.” “Thanks.”
“I’ll be late.”
“I will be minutes late.” “See you in minutes” “Stuck in traffic.”
“Start without me.” “Where are you?”
“Are you there yet?” “I need directions.” “I’m lost.”
“See you later.”
ELECTRONICS
114
Page 117 of 252
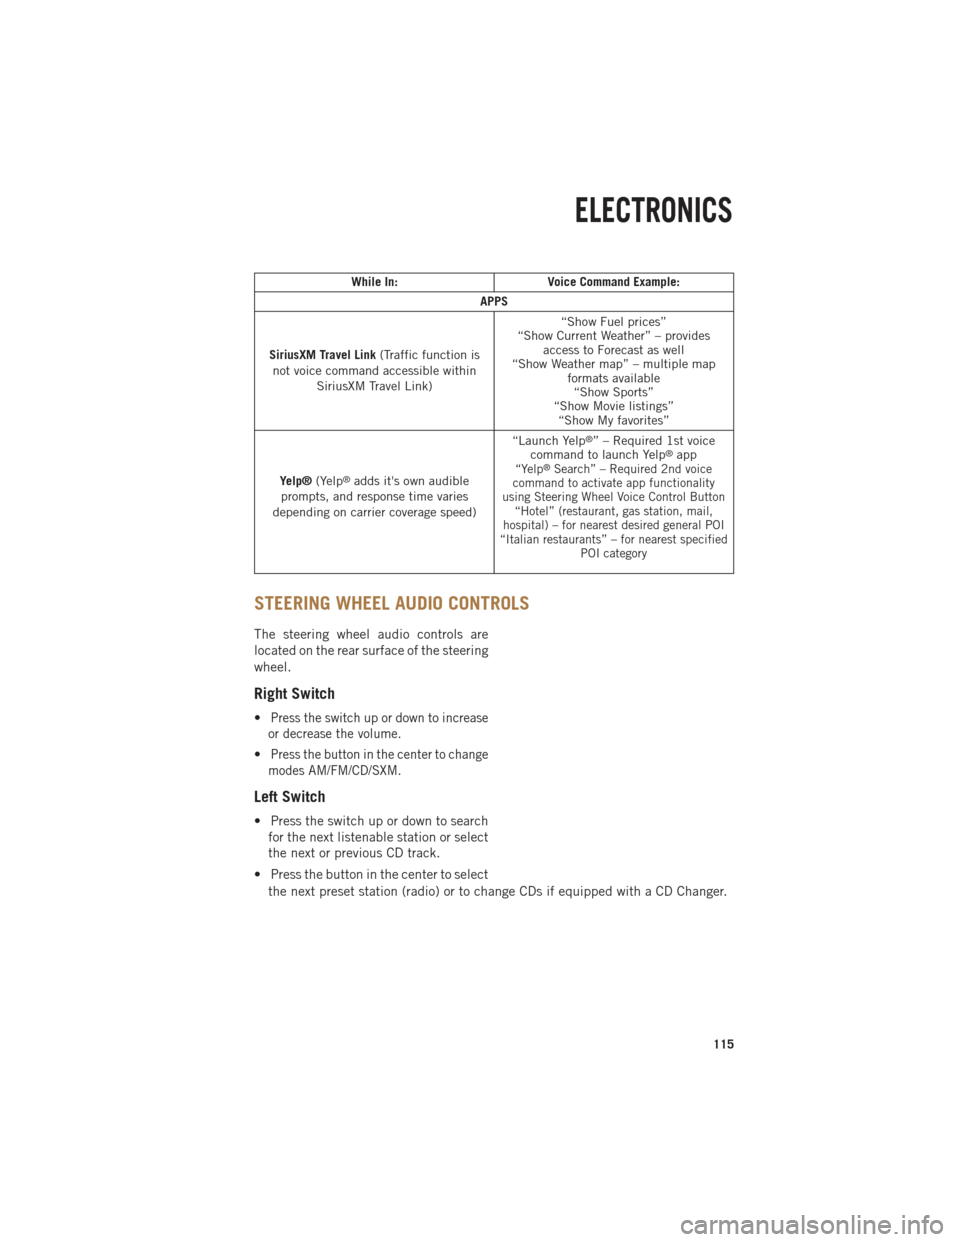
While In:Voice Command Example:
APPS
SiriusXM Travel Link (Traffic function is
not voice command accessible within SiriusXM Travel Link) “Show Fuel prices”
“Show Current Weather” – provides access to Forecast as well
“Show Weather map” – multiple map formats available“Show Sports”
“Show Movie listings” “Show My favorites”
Yelp® (Yelp
®adds it's own audible
prompts, and response time varies
depending on carrier coverage speed) “Launch Yelp
®” – Required 1st voice
command to launch Yelp®app“Yelp®Search” – Required 2nd voice
command to activate app functionality
using Steering Wheel Voice Control Button “Hotel” (restaurant, gas station, mail,
hospital) – for nearest desired general POI
“Italian restaurants” – for nearest specified POI category
STEERING WHEEL AUDIO CONTROLS
The steering wheel audio controls are
located on the rear surface of the steering
wheel.
Right Switch
•Press the switch up or down to increase
or decrease the volume.
•Press the button in the center to change
modes AM/FM/CD/SXM.
Left Switch
• Press the switch up or down to search for the next listenable station or select
the next or previous CD track.
• Press the button in the center to select the next preset station (radio) or to change CDs if equipped with a CD Changer.
ELECTRONICS
115
Page 118 of 252
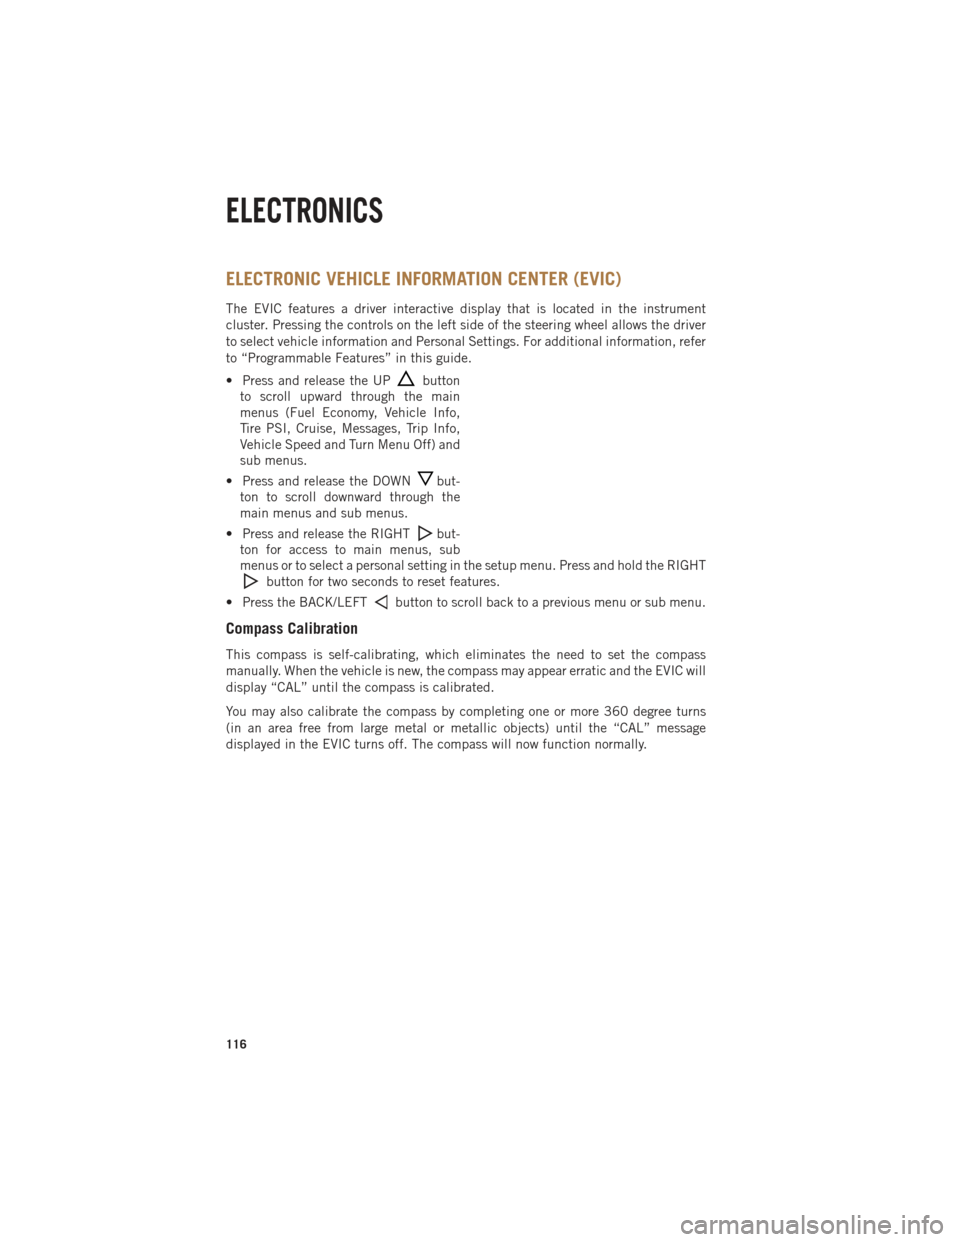
ELECTRONIC VEHICLE INFORMATION CENTER (EVIC)
The EVIC features a driver interactive display that is located in the instrument
cluster. Pressing the controls on the left side of the steering wheel allows the driver
to select vehicle information and Personal Settings. For additional information, refer
to “Programmable Features” in this guide.
• Press and release the UP
button
to scroll upward through the main
menus (Fuel Economy, Vehicle Info,
Tire PSI, Cruise, Messages, Trip Info,
Vehicle Speed and Turn Menu Off) and
sub menus.
• Press and release the DOWN
but-
ton to scroll downward through the
main menus and sub menus.
• Press and release the RIGHT
but-
ton for access to main menus, sub
menus or to select a personal setting in the setup menu. Press and hold the RIGHT
button for two seconds to reset features.
• Press the BACK/LEFT
button to scroll back to a previous menu or sub menu.
Compass Calibration
This compass is self-calibrating, which eliminates the need to set the compass
manually. When the vehicle is new, the compass may appear erratic and the EVIC will
display “CAL” until the compass is calibrated.
You may also calibrate the compass by completing one or more 360 degree turns
(in an area free from large metal or metallic objects) until the “CAL” message
displayed in the EVIC turns off. The compass will now function normally.
ELECTRONICS
116
Page 119 of 252
PROGRAMMABLE FEATURES
Programmable Features
The EVIC can be used to view or change the following settings. Press the UPor
DOWN
button until System Setup displays, then press the RIGHTbutton.
Scroll through the settings using the UP or DOWN buttons. Press the RIGHT
button to change the setting. Press the BACK/LEFTbutton to scroll back to a
previous menu or sub menu.
• Radio Info • Trip Info
• Fuel Economy Info • Tire Pressure
• Cruise Control Info • Vehicle Info
• Digital Vehicle Speed • Stored Warning Messages
• Stop/Start • Turn Menu OFF
• Screen Setup • Trailer Tow
Uconnect® Customer Programmable Features
The Uconnect®system allows you to access Customer Programmable feature settings
such as Display, Clock, Safety/Assistance, Lights, Doors & Locks, Auto-On Comfort &
Remote Start, Engine Off Operation, Compass Settings, Audio, Trailer Brake, Phone/
Bluetooth
®, Suspension and SiriusXM Setup and System Information through soft-keys.
•Press the SETTINGS button (Uconnect®5.0), or press the “Apps” button (Uconnect®
8.4) located near the bottom of the touchscreen, then press the “Settings” button on the
touchscreen to access the Settings screen. When making a selection, scroll up or down
until the preferred setting is highlighted, then press and release the preferred setting
until a check-mark appears next to the setting, showing that setting has been selected.
The following feature settings are available:
• Display • Clock
• Safety/Assistance • Doors & Locks
• Auto-On Comfort & Remote Start • Engine Off Options
• Phone/Bluetooth
®• Audio
• Lights • SiriusXM Setup
• Compass (Uconnect
®5.0) • Trailer Brake
• Suspension • System Information
• Units • Voice
NOTE:
Depending on the vehicles options, feature settings may vary.
ELECTRONICS
117
Page 120 of 252
EVIC Reconfigurable Screen Setup
The following settings allow you to change what information is displayed in the
instrument cluster as well as the location that information is displayed.
Digital Speedometer
• Press and release the UP or DOWN arrow button until the Digital display icon ishighlighted in the EVIC. Press and release the RIGHT arrow button to change the
display between km/h and mph.
Vehicle Info (Customer Information Features)
• Press and release the UP or DOWN button until the Vehicle Info icon is highlightedin the EVIC Display. Press and release the RIGHT or LEFT to scroll through the
following Vehicle Info submenus:• Tire Pressure Monitor System
• Air Suspension — If Equipped
• Coolant Temperature (Diesel Only)
• Transmission Temperature (ATX Only)
• Oil Temperature
• Oil Pressure
• Oil Life
• Fuel Filter Life (Diesel Only)
• Battery Voltage
• Exhaust Brake (Diesel Only)
• Turbo Boost (Diesel Only)
• Gauge Summary
• Coolant Temperature (Diesel Only)
• Transmission Temperature (ATX Only)
• Oil Temperature
• Oil Pressure
• Engine Hours
Trip A
• Press and release the UP or DOWN arrow button until the Trip A icon is highlighted in the EVIC. Press and hold the RIGHT arrow button to reset the Trip A information.
Trip B
• Press and release the UP or DOWN arrow button until the Trip B icon is highlightedin the EVIC. Press and hold the RIGHT arrow button to reset the Trip B information.
ELECTRONICS
118
Page 121 of 252

Fuel Economy
• Press and release the UP or DOWN arrow button until the Fuel Economy icon ishighlighted. The screen will display the following:• Average Fuel Economy/Miles Per Gallon
• Range To Empty (RTE)
• Current Miles Per Gallon (MPG)
• Dual Tanks- If Equipped Heavy Duty only
Stop/Start
• Press and release the UP or DOWN arrow button until the Stop/Start icon is highlighted in the EVIC. Press and release the RIGHT arrow button to display the
Stop/Start status.
Trailer Tow
• Press and release the UP or DOWN arrow button until the Trailer Tow icon ishighlighted. The screen will display the following information:• Trailer Trip Distance
Audio
• Press and release the UP or DOWN arrow button until the Audio display icon is highlighted in the EVIC. This screen will display the current media source.
Screen Setup
• Press and release the UP or DOWN arrow button until the Screen Setup displayicon is highlighted in the EVIC. Press and release the RIGHT arrow button to enter
the Screen Setup sub-menu. The Screen Setup feature allows you to change what
information is displayed in the instrument cluster as well as the location that
information is displayed.
ELECTRONICS
119