Page 37 of 240

35
2
READY TO SET OFF
Instruments and controls
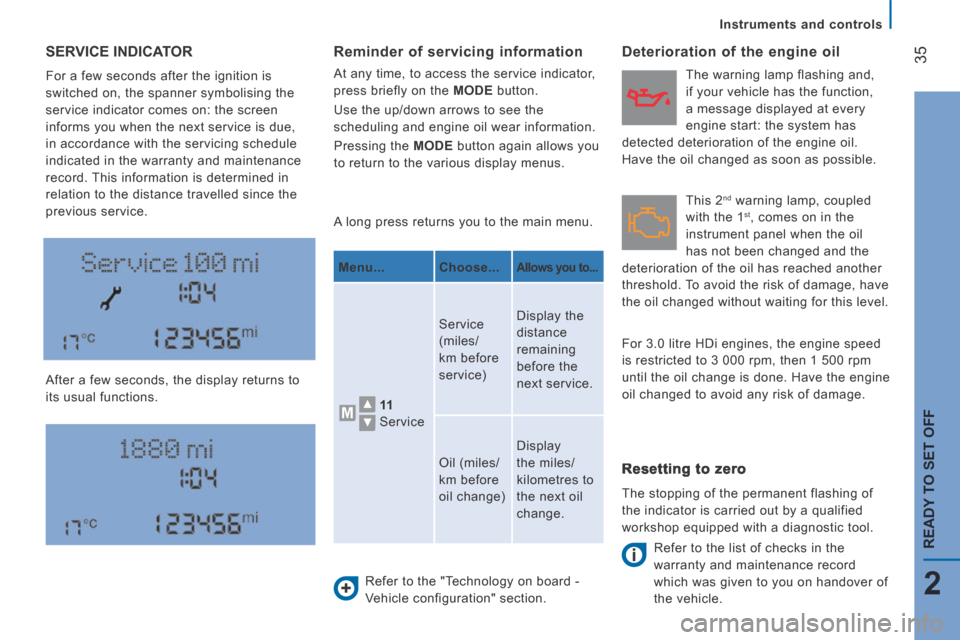
SERVICE INDICATOR
For a few seconds after the ignition is
switched on, the spanner symbolising the
service indicator comes on: the screen
informs you when the next service is due,
in accordance with the servicing schedule
indicated in the warranty and maintenance
record. This information is determined in
relation to the distance travelled since the
previous service.
After a few seconds, the display returns to
its usual functions. A long press returns you to the main menu.
Refer to the "Technology on board -
Vehicle configuration" section.
Deterioration of the engine oil
Refer to the list of checks in the
warranty and maintenance record
which was given to you on handover of
the vehicle.
Reminder of servicing information
At any time, to access the service indicator,
press briefly on the MODE button.
Use the up/down arrows to see the
scheduling and engine oil wear information.
Pressing the MODE button again allows you
to return to the various display menus.
Menu... Choose...
Allows you to...
11
Service Service
(miles/
km before
service)
Display the
distance
remaining
before the
next service.
Oil (miles/
km before
oil change) Display
the miles/
kilometres to
the next oil
change.
Resetting to zero
The stopping of the permanent flashing of
the indicator is carried out by a qualified
workshop equipped with a diagnostic tool. This 2
nd warning lamp, coupled
with the 1 st , comes on in the
instrument panel when the oil
has not been changed and the
deterioration of the oil has reached another
threshold. To avoid the risk of damage, have
the oil changed without waiting for this level. The warning lamp flashing and,
if your vehicle has the function,
a message displayed at every
engine start: the system has
detected deterioration of the engine oil.
Have the oil changed as soon as possible.
For 3.0 litre HDi engines, the engine speed
is restricted to 3 000 rpm, then 1 500 rpm
until the oil change is done. Have the engine
oil changed to avoid any risk of damage.
Page 91 of 240
89
4
TECHNOLOGY
on
BOARD
Vehicle data
The TRIP button, located at the end of the
wiper control stalk, gives access to the
following information:
- Range
This indicates the distance that can still be travelled with the fuel remaining in
the tank on the basis of the average
consumption over the last few miles
(kilometres) travelled. - Average speed A
This is the average speed calculated since the last trip computer zero reset
(with the ignition on).
- Trip duration A
This indicates the total time since the last trip recorder zero reset.
- Distance A
This indicates the distance travelled since the last trip computer zero reset.
- Average fuel consumption A
This is the average quantity of fuel consumed since the last trip computer
zero reset.
- Current fuel consumption A
This is the average quantity of fuel consumed during the last few seconds.
TRIP COMPUTER
If TRIP B is activated on the MODE menu:
- Distance B
- Average fuel consumption B
- Average speed B
- Trip duration B
Page 173 of 240
10.7
Level 1Level 2Level 3Comment
Radio Briefl y press the symbols for an automatic search. Press and hold the symbols for a quick search.
Radio
Preset
Make a long press on the button to present the current radio station. The current station is highlighted. Press the "All" button to display all of the preset radio stations in the waveband selected.
Radio
Navigate
List of stations Selection a station with a press.
Update the list according to reception.
Press these buttons to scroll through the radio stations received.
Go directly to the desired letter in the list.
Radio
AM/FM
Choose the waveband Choose the audio source.
Radio
Adjustment
Direct adjustment The screen virtual keypad can used to enter a single number corresponding to a station.
The symbols allow precise adjustment of the frequency.
Radio
Info
Information Display information on the current radio station.
Page 176 of 240
04
10.10
RADIO
Display the "DAB" band.
Display name and "Radiotext" for the current station.
Select preset radio stations.
Alternative frequency.
If the "DAB" radio station being listened to is not available, the "AF" alternative frequency option is crossed out.
Preset station.
Short press: select preset radio station.
Long press: preset a radio station.
Next "Multiplex".
Next radio station.
Adjust audio settings.
Select the audio source. Display the name and number of the multiplex service being used.
Previous "Multiplex".
Previous radio station.
Select a radio station from "All", "Genres", "Multiplex".
Page 197 of 240
10.31
Level 1Level 2Level 3Comment
More
Ambient temp. Displays the ambient temperature.
More
Clock Displays the clock.
More
Compass Displays the direction of travel.
More
Trip
Current trip Range
Displays the trip computer. Make a long press on button "Trip A" or "Trip B" to reset the trip in question.
Current fuel consumption
Trip A
Average fuel consumption
Average speed
Distance travelled
Journey time
Trip B
Average fuel consumption
Average speed
Distance travelled
Journey time
Page 218 of 240
01
10.52
FIRST STEPS
On/off, volume setting.
Display the menu and settings for options.
Repeat play.
Select preset stations:
FM-A, FM-B, FM-C, AM-A, AM-B, AM-C.
Automatic frequency search down/up.
Select the previous/next USB track.
Press and hold: fast forward or back.
Radio buttons 1 to 6:
Select a pre-set radio station.
Long press: pre-set a station.
Mute / restore sound.
Select USB or AUX source.
List of connected telephones.
Random (shuffl e) play
Abandon the current operation.
Go up one level (menu or folder).
Rotate: scroll through a list or adjustment of radio station.
Press: confi rm the option displayed in the screen.
Select FM and AM wavebands. Information on the current radio station or media.
Page 220 of 240

03
10.54
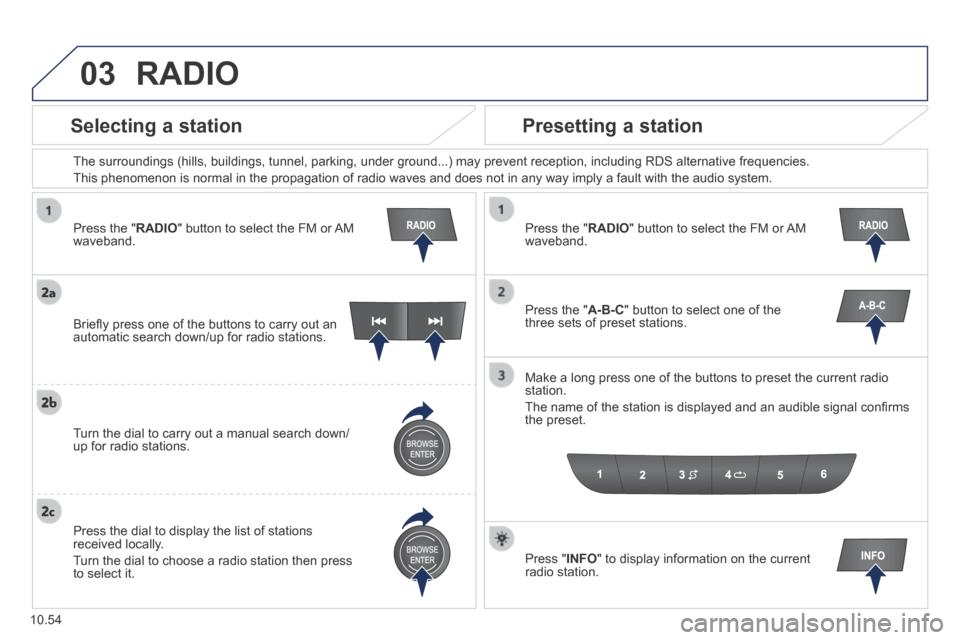
Press the " RADIO " button to select the FM or AM waveband.
The surroundings (hills, buildings, tunnel, parking, under ground...) \
may prevent reception, including RDS alternative frequencies.
This phenomenon is normal in the propagation of radio waves and does not\
in any way imply a fault with the audio system.
Press the " RADIO " button to select the FM or AM waveband.
Press the " A-B-C " button to select one of the three sets of preset stations.
Make a long press one of the buttons to preset the current radio station.
The name of the station is displayed and an audible signal confi rms the preset.
Press " INFO " to display information on the current radio station.
Briefl y press one of the buttons to carry out an automatic search down/up for radio stations.
Turn the dial to carry out a manual search down/up for radio stations.
Press the dial to display the list of stations received locally.
Turn the dial to choose a radio station then press to select it.
RADIO
Selecting a station Presetting a station
Page 226 of 240
06
10.60
SETTINGS
Press the " MENU " button. Press the " MENU " button.
The audio settings are different and independent for each audio source.
System settings Audio
Select " System settings " then press to display the list of settings for activating or deactivating options:
- " Reset default value "
- " 20 min. delay for switching off " 20 min. delay for switching off " 20 min. delay for switching off
- " Limit initial volume "
- " Automatic "
Select " Audio " then press to display the list of settings for activating or deactivating options:
- " Treble "
- " Mid-range "
- " Bass "
- "Activate/Deactivate"
- " Volume linked to vehicle speed "
- " Loudness "