Page 5 of 338

.
.
508RXH_en_Chap00a_sommaire_ed01-2014
Child seats 158
Deactivating the passenger's front airbag
1
61
ISOFIX child seats
1
66
Child lock
1
71
Child safety
Direction indicators 172
em
ergency or assistance call
1
73
H o r n
173
Warning triangle
1
74
Tyre under-inflation detection
1
75
e
SC system
1
77
Seat belts
1
80
Airbags
1
83
Safety
temporary puncture repair kit 1 87
Changing a wheel
1
93
Snow chains
1
98
Changing a bulb
1
99
Changing a fuse
2
05
12 V battery
2
09
Removing - refitting the battery
2
12
en
ergy economy mode
2
16
Changing a wiper blade
2
17
Recovery on a flat-bed
2
18
to
wing a trailer
2
20
Fitting roof bars
2
22
Very cold climate screen
2
23
Accessories
224
Practical information
Opening the bonnet 2 27
Running out of fuel (Diesel)
2
28
Diesel engine
2
29
Checking levels
23
0
Checks
233
Checks
electric motor 2 36
Diesel engine
2
37
Diesel weights
23
8
Dimensions
239
Identification markings
2
40
technical data
emergency or assistance 2 41
JBL equipment
2
43
7-inch touch screen
2
45
Audio equipment and telematics
Alphabetical indexVisual search
Contents
Page 147 of 338

145
508RXH_en_Chap05_visibilite_ed01-2014
Lighting left on audible signal
An audible signal when a front door
is opened warns the driver that the
vehicle's exterior lighting is on, with the
ignition off and in manual lighting mode.
In this case, switching off the lighting
stops the audible signal.
With the ignition off, if the dipped
headlamps remain on, the vehicle goes
into "
eC
O" mode to avoid discharging
the battery.
In some weather conditions (e.g. low
temperature or humidity), the presence
of misting on the internal sur face of the
glass of the headlamps and rear lamps
is normal; it disappears after the lamps
have been on for a few minutes. Daytime lighting, compulsory in certain
countries, which comes on automatically when
the engine is started making the vehicle more
visible to other road users.
Daytime running lamps
this function is assured:
-
i n countries where it is imposed by
regulations, by illumination of the dipped
beam headlamps with the sidelamps and
number plate lamps.
-
f
or other countries where it is provided, by
the use of dedicated lamps.
th
e lighting goes off when you switch
off the ignition, but you can always
switch it on again using the lighting
control stalk.
*
f
unction that can be set in the vehicle
configuration menu.
LED lamps
they come on when the engine is started.
Depending on the destination country, they are
used for:
-
d
aytime running lamps* in day mode and
sidelamps in night mode (they are brighter
when daytime running lamps),
or
-
s
idelamps in day and night mode.
Where L
eD l
amps are fitted, the filament bulbs
for the daytime running lamps / sidelamps in
the front lamp units are not used.
5
Visibility
Page 152 of 338

150
508RXH_en_Chap05_visibilite_ed01-2014
Manual adjustment
of halogen
headlampsAutomatic adjustment of "full LeD
"
technology headlamps
to avoid causing a nuisance to other road
users, the beams of the halogen headlamps
should be adjusted according to the load in the
vehicle.
If a fault occurs, this
warning lamp is displayed
in the instrument panel,
accompanied by an audible signal and a
message in the instrument panel screen.
th
e system then places your headlamps in the
lowest position. In order to avoid causing a nuisance to other
road users, this system corrects the height of
the "full L
e
D
" headlamps beam automatically,
in relation to the load in the vehicle. If a fault occurs, do not touch the "full
L
eD
" bulbs. Contact a P
e
uge
Ot
dealer or a qualified workshop.
th
e initial setting is position "0" .
1
D
river
2
D
river + front passenger.
3
D
river + front passenger + rear
passengers.
4
5
people.
5
5 p
eople + a load in the boot.
6
D
river + a load in the boot.
Travelling abroad
the design of the dipped beam
headlamps allows, without modification,
driving in a country that drives on the
other side of the road to the country in
which your vehicle was sold.
Visibility
Page 201 of 338

199
508RXH_en_Chap08_info-pratiques_ed01-2014
Changing a bulb
Front lamps
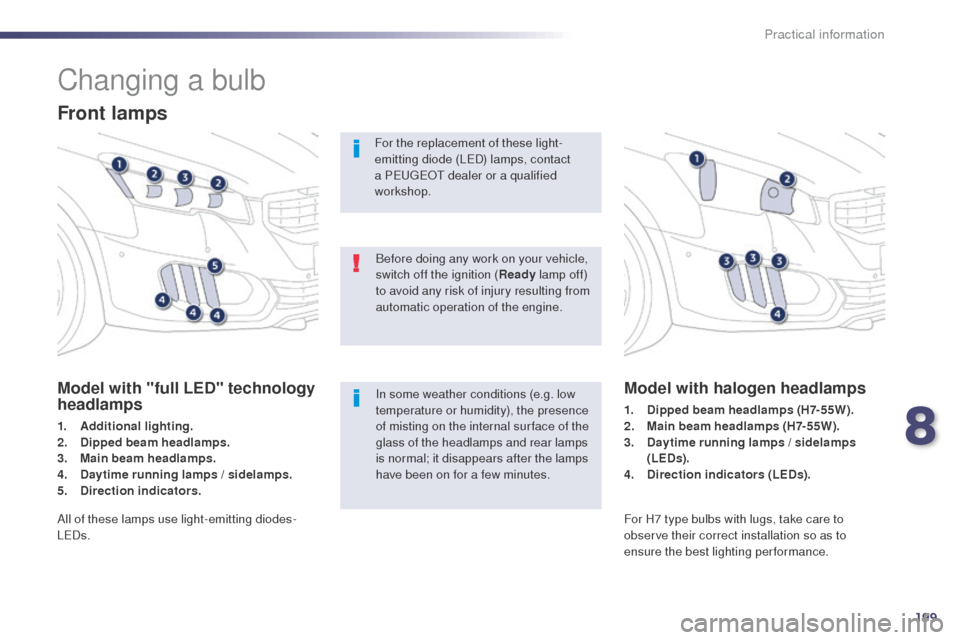
Model with "full LED" technology
headlamps
1. Additional lighting.
2. Dipped beam headlamps.
3.
M
ain beam headlamps.
4.
D
aytime running lamps / sidelamps.
5.
D
irection indicators.
Model with halogen headlamps
1. Dipped beam headlamps (H7-55W).
2. M ain beam headlamps (H7-55W).
3.
D
aytime running lamps / sidelamps
(LEDs).
4.
D
irection indicators (LEDs).
In some weather conditions (e.g. low
temperature or humidity), the presence
of misting on the internal sur face of the
glass of the headlamps and rear lamps
is normal; it disappears after the lamps
have been on for a few minutes. Before doing any work on your vehicle,
switch off the ignition (
Ready lamp off)
to avoid any risk of injury resulting from
automatic operation of the engine.
For the replacement of these light-
emitting diode (L
eD
) lamps, contact
a P
e
uge
Ot
dealer or a qualified
workshop.
All of these lamps use light-emitting diodes-
L
e
Ds. For H7 type bulbs with lugs, take care to
observe their correct installation so as to
ensure the best lighting performance.
8
Practical information
Page 202 of 338

200
508RXH_en_Chap08_info-pratiques_ed01-2014
Main beam headlamps
Dipped beam headlamp
th
e headlamps are fitted with
polycarbonate glass with a protective
coating:
F
d
o not clean them using a dr y
or abrasive cloth, nor with a
detergent or solvent product,
F
u
se a sponge and soapy water or a
pH neutral product,
F
w
hen using a high pressure washer
on persistent marks, do not keep
the lance directed towards the
lamps or their edges for too long,
so as not to damage their protective
coating and seals.
Changing a bulb should only be done
after the headlamp has been switched
off for several minutes (risk of serious
burns).
F
D
o not touch the bulb directly with
your fingers, use a lint-free cloth.
It is imperative to use only anti-
ultraviolet (
uV
) type bulbs to avoid
damaging the headlamp.
Always replace a failed bulb with a
new bulb with the same type and
specification.
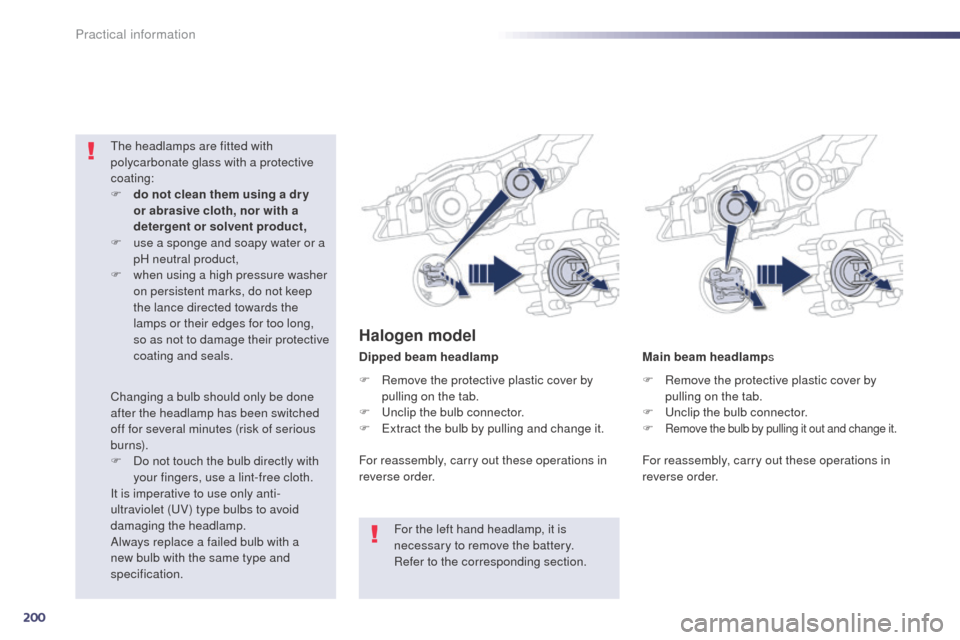
Halogen model
F Remove the protective plastic cover by pulling on the tab.
F
u
n
clip the bulb connector.
F
e
x
tract the bulb by pulling and change it. F
R emove the protective plastic cover by
pulling on the tab.
F
u
n
clip the bulb connector.
F
Remove the bulb by pulling it out and change it.
For reassembly, carry out these operations in
reverse order.For reassembly, carry out these operations in
reverse order.
For the left hand headlamp, it is
necessary to remove the battery.
Refer to the corresponding section.
Practical information
Page 203 of 338
201
508RXH_en_Chap08_info-pratiques_ed01-2014
Integrated direction indicator
side repeaters
You should contact a PeugeOt dealer or a
qualified workshop for the replacement of these
bulbs.
Door mirror spotlamps
You should contact a Pe ugeOt dealer or a
qualified workshop for the replacement of the
light emitting diode - L
eD
.
8
Practical information
Page 204 of 338
202
508RXH_en_Chap08_info-pratiques_ed01-2014
1. Brake lamps (light emitting diodes - LEDs).
2.
R
eversing lamps (W19W).
3.
D
irection indicators (PY21W amber).
4.
S
idelamps (light emitting diodes -
LEDs).
5.
F
oglamps (light emitting diodes - LEDs).
Rear lamps
Direction indicators (on the wings)
F Open the boot then remove the access c ove r.
F
R
emove the sealing foam.
F
D
isconnect the lamp connector.
F
R
emove the lamp fixing nut. F
C arefully remove the lamp unit from
outside.
F
R
emove the sealing foam.
F
u
n
clip the bulb holder.
F
t
u
rn the bulb a quarter of a turn and pull it
out.
Light emitting diodes-LEDs
For replacement, contact a Pe ugeOt
dealer or qualified workshop. For reassembly, carry out these operations in
reverse order.
Practical information
Page 205 of 338
203
508RXH_en_Chap08_info-pratiques_ed01-2014
Reversing lamp (tailgate)
F Open the tailgate and then remove the access cover.
F
D
isconnect the lamp connector.
F
R
emove the lamp fixing nut. F
C arefully remove the lamp from the
outside.
F
R
emove the sealing foam.F
tu rn the bulb holder a quarter of a turn and
pull it out.
For reassembly, carry out these operations in
reverse order.
8
Practical information