2014 Peugeot 508 RXH key
[x] Cancel search: keyPage 299 of 338

07
297
508RXH_en_Chap11c_SMegplus-i_ed01-2014
PEUGEOT CONNECT APPS
these applications use vehicle
data such as the current speed,
mileage, remaining fuel range
or even
g PS position to provide
pertinent information.
Plug the "P
euge
O
t
CONN
e
C
t
APPS" connection key into one of
the
u
SB ports.
For the best reception, it is recommended to connect the "P
euge
O
t
CONN
e
C
t
APPS" key to the
u
SB port located in the glove box
(available according to equipment).
t
he "MyPeuge O t" application
is a link between the user, the
manufacturer and its dealer
network.
It allows the customer to know
everything about their vehicle:
servicing plan, accessory range,
service contracts taken out, ...
It also makes possible the sending
of the vehicle's mileage to the
"MyPeuge
O t" site, or to identify
a dealer.
"P
euge
O
t
CONN
e
C
t
APPS" is a service providing driving aid applications in real time, that\
gives access to useful information such as the
state of the traffic, danger zones, fuel prices, the availability of parking places, tourist sites, weather conditions, correct addresses…
It includes access to the mobile network associated with the use of thes\
e applications. "P
euge
O
t
CONN
e
C
t
APPS" is a service available
under subscription contract from P
euge
O
t
dealers, depending on country and the type of touch screen, both before\
and after delivery of a
new vehicle.
For safety reasons, some functions can only be used when
stationary
.
Press the "Connected services" menu to display the applications.
Page 307 of 338

305
08
508RXH_en_Chap11c_SMegplus-i_ed01-2014
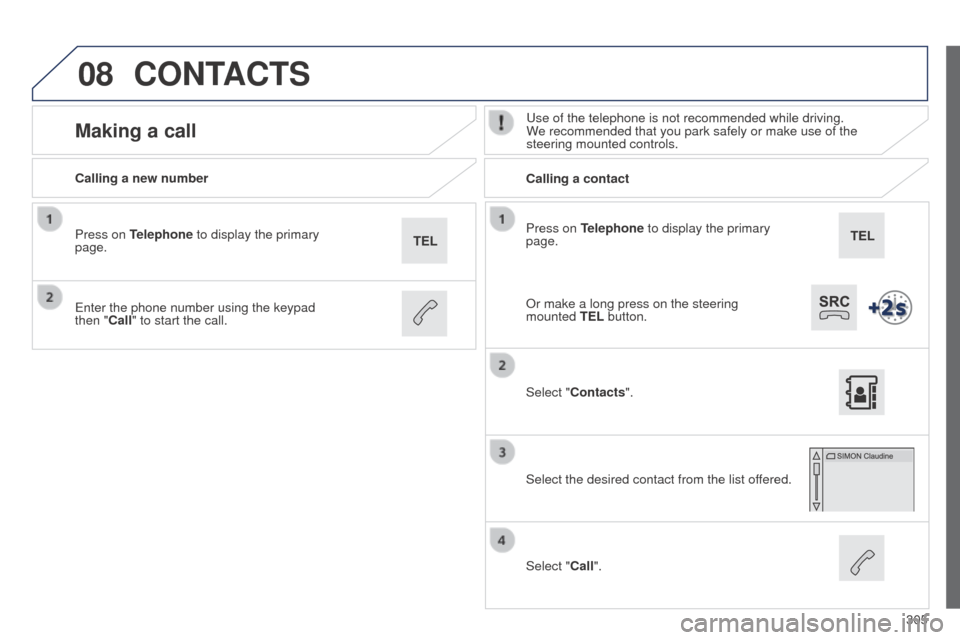
Press on Telephone to display the primary
page.
Calling a new number
Calling a contact
Making a calluse of the telephone is not recommended while driving.
W e recommended that you park safely or make use of the
steering mounted controls.
e
nter the phone number using the keypad
then
"Call" to start the call.
Press on Telephone to display the primary
page.
Select "Contacts".
Select the desired contact from the list offered.
Select "Call".
CONTACTS
Or make a long press on the steering
mounted TEL button.
Page 315 of 338

313
508RXH_en_Chap11c_SMegplus-i_ed01-2014
FREQUENTLY ASKED QUESTIONS
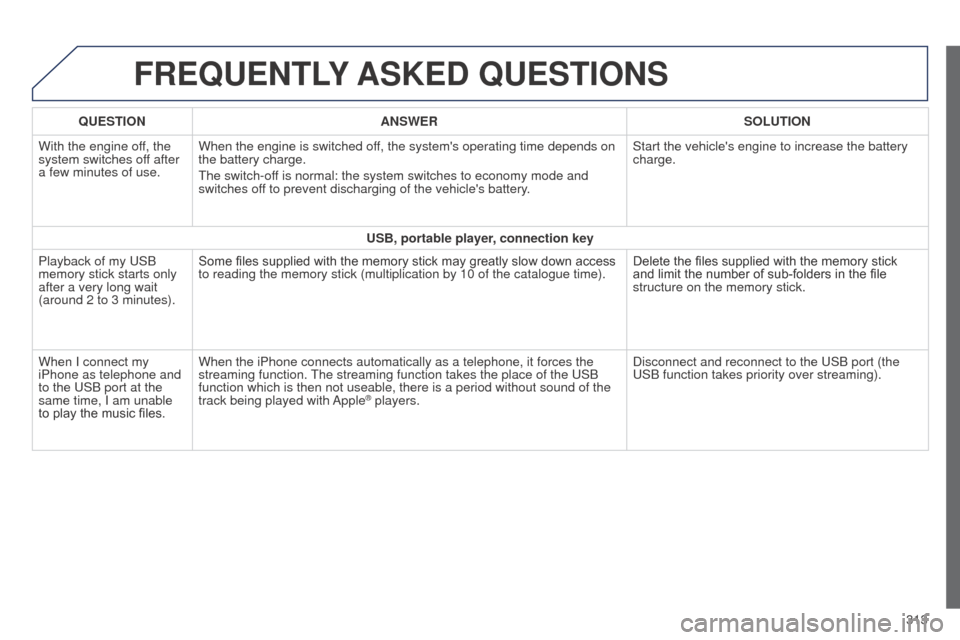
QUESTION ANSWER SOLUTION
With the engine off, the
system switches off after
a few minutes of use. When the engine is switched off, the system's operating time depends on
the battery charge.
t
he switch-off is normal: the system switches to economy mode and
switches off to prevent discharging of the vehicle's battery. Start the vehicle's engine to increase the battery
charge.
USB, portable player, connection key
Playback of my
u SB
memory stick starts only
after a very long wait
(around 2 to 3 minutes). Some files supplied with the memory stick may greatly slow down access
to reading the memory stick (multiplication by 10 of the catalogue time\
).
Delete the files supplied with the memory stick
and limit the number of sub-folders in the file
structure on the memory stick.
When I connect my
iPhone as telephone and
to the
u SB port at the
same time, I am unable
to play the music files. When the iPhone connects automatically as a telephone, it forces the
streaming function.
t
he streaming function takes the place of the u SB
function which is then not useable, there is a period without sound of t\
he
track being played with Apple
® players. Disconnect and reconnect to the u SB port (the
u
SB function takes priority over streaming).
Page 317 of 338

315
508RXH_en_Chap12_recherche-visuelle_ed01-2014
exterior
Remote control key / electronic key 1 8, 65 -74
-
ope
ning / closing
-
a
nti-theft protection
-
starting
-
battery Welcome lighting
1
49
Door mirror spotlamps
1
49
Additional headlamps
1
51
Headlamp beam adjustment
1
50
Changing front bulbs
1
99-201
Wipers
152-155
Changing a wiper blade 1
55, 217
Door mirrors
93
-94
Blind spot monitoring
1
31-133
Fuel tank, misfuel prevention
84-86
D o o r s
6 6 -74
-
K
eyless e
n
try and Starting
-
ope
ning / closing
-
c
entral locking
-
em
ergency control
Alarm
75-76
W i p e r s
7
7-78
Boot
6
8, 79, 82
-
ope
ning / closing
-
em
ergency control
Motorised tailgate
6
8, 80 - 82
te
mporary puncture
repair kit
1
87-192
Changing bulbs
2
02-204
-
r
ear lamps
-
3
rd brake lamp
-
n
umber plate lamp
Parking sensors
1
39-140
to
wbar
2
20-221
Recovery (flat bed)
2
18 -219Panoramic sunroof
8
3
Roof bars
2
22
Accessories
224-225
e
SC: ABS, e
B
FD, e
B
A, ASR,
D S C
17 7-179
Snow chains
1
98
ty
re pressures
2
40
Changing a wheel
1
93-197
-
tools
-
r
emoving / refitting
.
Visual search
Page 324 of 338

322
508RXH_en_Chap13_index-alpha_ed01-2014
Main beam .............................. 42, 142, 199 -201
Maintenance ................................................... 30
Map reading lamps
....................................... 15 6
Markings, identification
.................................240
Massage function
........................................... 90
Mat
.................................................................. 97
Menu
................... 244, 250, 252, 254, 266, 268,
270, 286, 298, 300
Mirror, rear view
.............................................. 95
Mirrors, door ...................................... 93, 94, 131
Motorised tailgate
..................................... 80, 81
Mountings for ISOFIX seats
.........................166
Navigation
..................................................... 266
Number plate lamps
...................................... 20
4
M
N
Oil change ..................................................... 230
Oil consumption ............................................ 230
Oil filter
...............
........................................... 233
Oil level ................................................... 56, 230
Opening the boot
..............................
........68, 79
Opening the doors
...............................
...........65
Opening the panoramic sunroof blind
............83
Operation indicator lamps
.........................41- 51Radio
.............................................................
256
RDS
...............................................................
259
Ready
...............
...............................................
19
Ready lamp
...............................................
19, 8 4
Rear foglamp ......................................... 14 4, 202
Rear screen (demisting) ..........................
9 3 , 114
Recharging the battery ................................. 2 11
Reduction of electrical load ..........................216
Regeneration of the particle filter
.................23
4
Reinitialising the remote control
............... 7
2, 73
Remote control
..................................... 6
5 -7 0 , 74
Removable screen (snow shield)......... 220, 223
Removing a wheel
........................................19 4
Removing the battery .................................... 212
Paint colour code
..........................................
240
Panoramic glass sunroof
................................
83
Parking brake, electric
....................
48, 117, 235
Parking lamps
...............................................
146
Parking sensors, front
...................................
140
Parking sensors, rear .................................... 13 9
Particle emission filter
.........................
232, 234
Passenger compartment filter
......................
233
P
e
uge
Ot C
ONN
eCt A
PPS
.......................
2
97
Peuge
O
t
Connect Assistance
...........
173 , 242
Peuge
O
t Connect SOS
.....................
17
3 , 242
Port, u
S
B
........................................................
98
Po
wer
..............................................................
22
Priming the fuel system ................................
228
Programmable heating (Webasto) ................115
Protecting children
.................
15 8 -171, 182, 18 4
Puncture
........................................................
187
O
R
P
Keeping children safe ............1 5 8 -171, 182, 18 4
Key ........................................... 18, 65 -70, 72-74
Keyless
e
n
try and Starting .................66, 70, 74
Key not recognised
......................................... 18
Key with remote control
..................................17
Labels, identification
..................................... 24
0
Lamps, warning and indicator
...................41- 51
L
e
D
daytime running lamps
.........................145
L
eD
s - light-emitting diodes
.................19 9, 202
Level, brake fluid
........................................... 2
31
Level, headlamp wash
..........................153, 232
Level, power steering fluid
............................2
31
Levels and checks
................................ 229-232
Light-emitting diodes - L
eD
s
................19 9, 202
Lighting bulbs (replacement)
................ 19
9 -20 4
Lighting control stalk
.............................142, 146
Lighting, guide-me home
......................146, 147
Lighting, interior
.................................... 15 6, 157
Lighting on reminder
..................................... 14 4
Loading
.................................................. 30, 222
Load reduction mode
.................................... 216
Load space cover
...............................
...........101
Locating your vehicle
...................................... 71
L
ong objects, transporting
.............................. 98
L
ow fuel level .................................................. 84
K
L
Alphabetical index
Page 333 of 338

Practical information
2
508-add_en_Chap08_info-pratiques_ed01-2016
Towbar with quickly detachable towball
Presentation
This towbar allows the towball to be fitted and removed quickly and easily without the use of tools. Installed behind the rear bumper, the towbar is invisible after removing the towball and folding the trailer harness socket carrier. 1. Carrier 2. Protective blanking plug. 3. Security ring. 4. Folding trailer harness socket. 5. Detachable towball. 6. Locking / unlocking wheel. 7. Security key lock. 8. Locking wheel protector.
9. Ball protector. 10. Storage bag.
A. Locked position
The locking wheel is not in contact with the towball (gap of about 5 mm). The green mark is visible. The lock for the locking wheel is facing rearward. The bolt is visible and extends beyond the towball.
B. Unlocked position
The locking wheel is in contact with the towball. Then green mark is hidden. The lock for the locking wheel is facing for ward. The peg is not visible.
Observe the legislation in force in the country in which you are driving.
For information on the maximum trailer weight and the recommended nose weight, refer to the "Technical data" section. For information on safely towing a trailer, refer to the "Towing a trailer" section.
Page 334 of 338

8
Practical information
3
508-add_en_Chap08_info-pratiques_ed01-2016
Before each use
Check that the towball is correctly fitted by verifying the following points: - the towball is correctly locked in place (position A ), A ), A - the security key lock is on and the key removed; the locking wheel can no longer be operated, - the towball must no longer move at all in its carrier; try to shake it by hand.
During use
Never unlock the towball when a trailer or load carrier is fitted. Never exceed the maximum authorised weight for the vehicle plus trailer (Gross Train Weight - GTW). Before driving, check the adjustment of the headlamp beam height. For more information on adjusting the headlamps, refer to the corresponding section.
After use
For journeys made without a trailer or load carrier, the trailer harness socket must be folded away, the towball removed and the protective blanking plug inserted in the carrier. This measure applies particularly if the towball could hinder visibility of the number plate or lighting.
Page 335 of 338

Practical information
4
508-add_en_Chap08_info-pratiques_ed01-2016
Fitting the towball
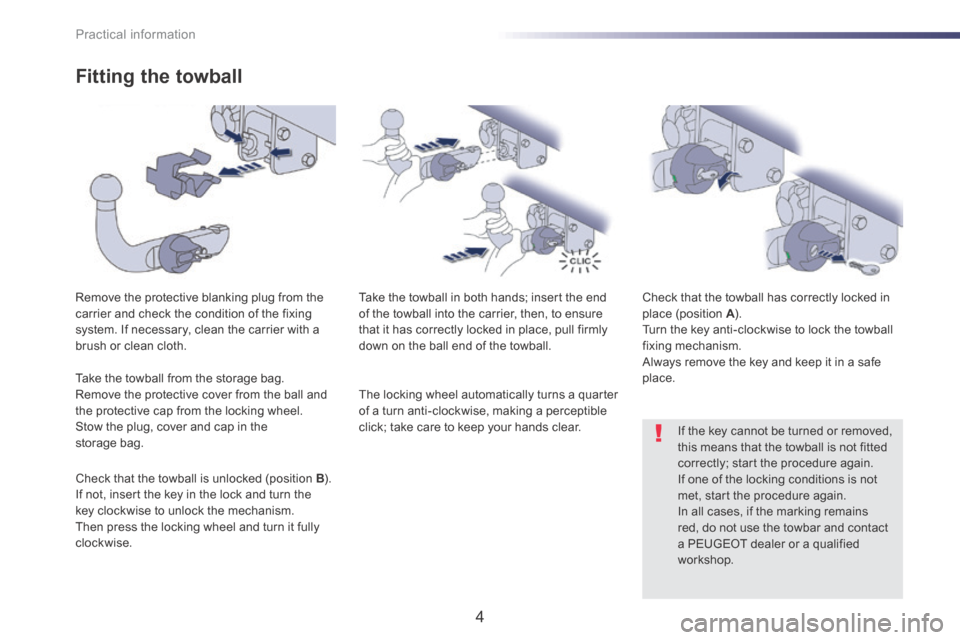
Remove the protective blanking plug from the carrier and check the condition of the fixing system. If necessary, clean the carrier with a brush or clean cloth.
Take the towball in both hands; insert the end of the towball into the carrier, then, to ensure that it has correctly locked in place, pull firmly down on the ball end of the towball.
Check that the towball has correctly locked in place (position A ). A ). A Turn the key anti-clockwise to lock the towball fixing mechanism. Always remove the key and keep it in a safe place.
If the key cannot be turned or removed, this means that the towball is not fitted correctly; start the procedure again. If one of the locking conditions is not met, start the procedure again. In all cases, if the marking remains red, do not use the towbar and contact
a PEUGEOT dealer or a qualified workshop.
Take the towball from the storage bag. Remove the protective cover from the ball and the protective cap from the locking wheel. Stow the plug, cover and cap in the storage bag.
Check that the towball is unlocked (position B ). If not, insert the key in the lock and turn the key clockwise to unlock the mechanism. Then press the locking wheel and turn it fully clockwise.
The locking wheel automatically turns a quarter of a turn anti-clockwise, making a perceptible click; take care to keep your hands clear.