Page 39 of 352
1
37
Monitoring
Engine oil level indicator *
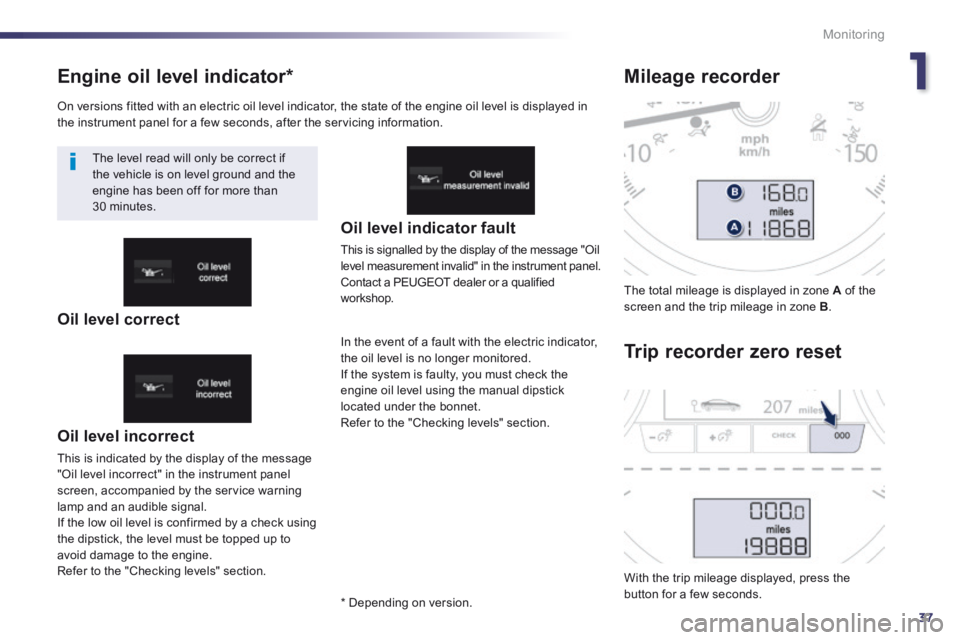
Oil level incorrect
This is indicated by the display of the message "Oil level incorrect" in the instrument panel screen, accompanied by the service warning lamp and an audible signal. If the low oil level is confirmed by a check using
the dipstick, the level must be topped up to avoid damage to the engine. Refer to the "Checking levels" section.
Oil level indicator fault
This is signalled by the display of the message "Oil level measurement invalid" in the instrument panel. Contact a PEUGEOT dealer or a qualified workshop.
In the event of a fault with the electric indicator, the oil level is no longer monitored. If the system is faulty, you must check the engine oil level using the manual dipstick located under the bonnet. Refer to the "Checking levels" section.
The total mileage is displayed in zone A of the screen and the trip mileage in zone B .
With the trip mileage displayed, press the button for a few seconds.
Mileage recorder
Trip recorder zero reset
On versions fitted with an electric oil level indicator, the state of the engine oil level is displayed in the instrument panel for a few seconds, after the servicing information.
The level read will only be correct if the vehicle is on level ground and the engine has been off for more than 30 minutes.
Oil level correct
* Depending on version.
Page 186 of 352
184
Practical information
Removing the cartridge
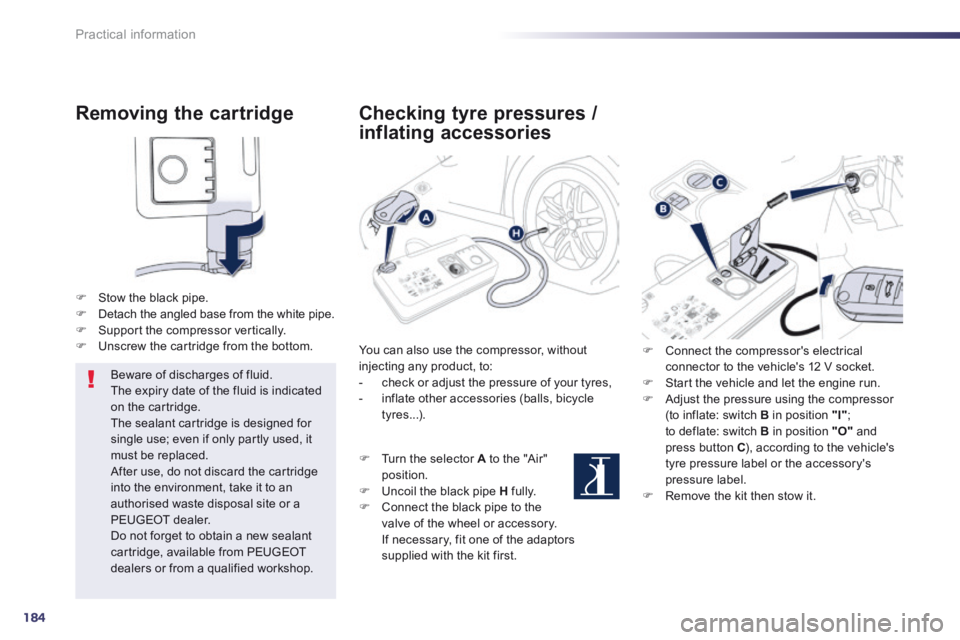
Stow the black pipe. Detach the angled base from the white pipe. Support the compressor vertically. Unscrew the cartridge from the bottom.
Beware of discharges of fluid. The expiry date of the fluid is indicated on the cartridge. The sealant cartridge is designed for single use; even if only partly used, it must be replaced. After use, do not discard the cartridge into the environment, take it to an authorised waste disposal site or a PEUGEOT dealer.
Do not forget to obtain a new sealant cartridge, available from PEUGEOT dealers or from a qualified workshop.
Checking tyre pressures /
inflating accessories
You can also use the compressor, without injecting any product, to: - check or adjust the pressure of your tyres, - inflate other accessories (balls, bicycle tyres...).
Turn the selector A to the "Air" position. Uncoil the black pipe H fully. Connect the black pipe to the valve of the wheel or accessory. If necessary, fit one of the adaptors supplied with the kit first.
Connect the compressor's electrical connector to the vehicle's 12 V socket. Start the vehicle and let the engine run. Adjust the pressure using the compressor (to inflate: switch B in position "I" ; to deflate: switch B in position "O" and press button C ), according to the vehicle's tyre pressure label or the accessory's pressure label. Remove the kit then stow it.
Page 223 of 352
9
221
Checks
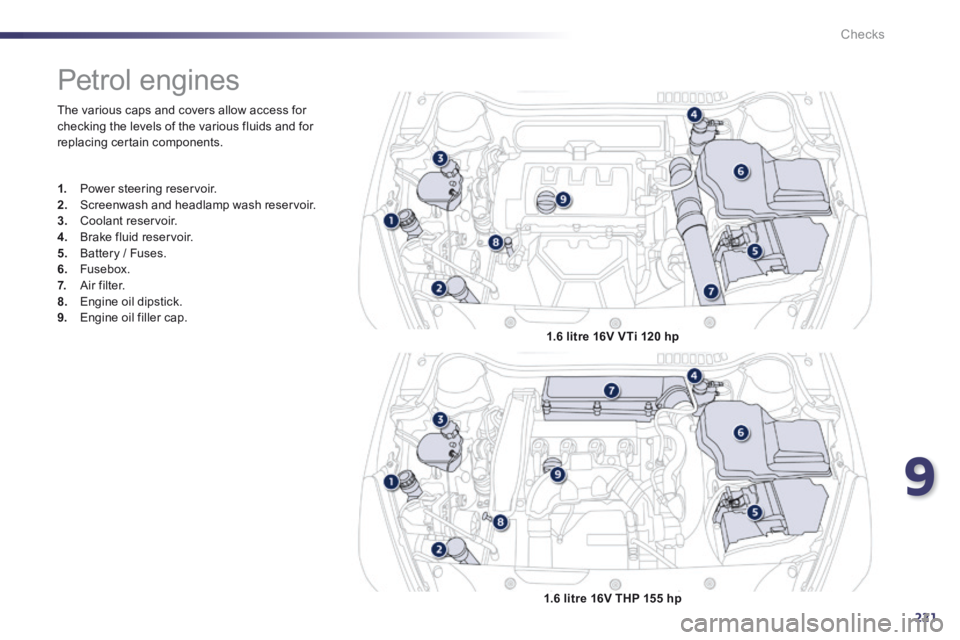
The various caps and covers allow access for checking the levels of the various fluids and for replacing certain components.
Petrol engines
1. Power steering reservoir. 2. Screenwash and headlamp wash reservoir. 3. Coolant reservoir.
4. Brake fluid reservoir. 5. Battery / Fuses. 6. Fusebox. 7. Air filter. 8. Engine oil dipstick. 9. Engine oil filler cap.
1.6 litre 16V VTi 120 hp
1.6 litre 16V THP 155 hp
Page 224 of 352
222
Checks
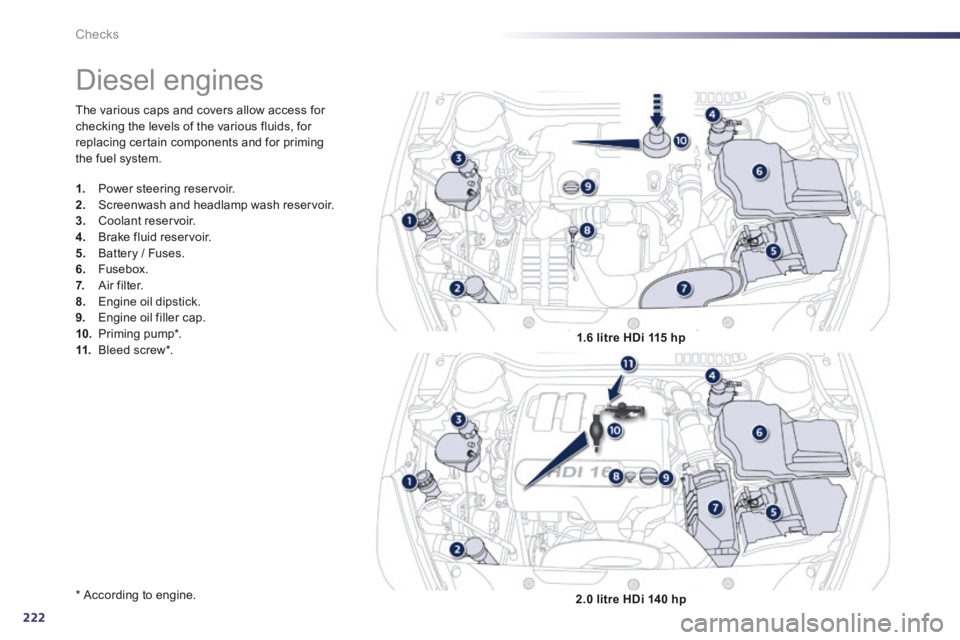
The various caps and covers allow access for checking the levels of the various fluids, for replacing certain components and for priming the fuel system.
* According to engine.
Diesel engines
1. Power steering reservoir. 2. Screenwash and headlamp wash reservoir. 3. Coolant reservoir.
4. Brake fluid reservoir. 5. Battery / Fuses. 6. Fusebox. 7. Air filter. 8. Engine oil dipstick. 9. Engine oil filler cap. 10. Priming pump * . 11. Bleed screw * . 1.6 litre HDi 115 hp
2.0 litre HDi 140 hp
Page 225 of 352
9
223
Checks
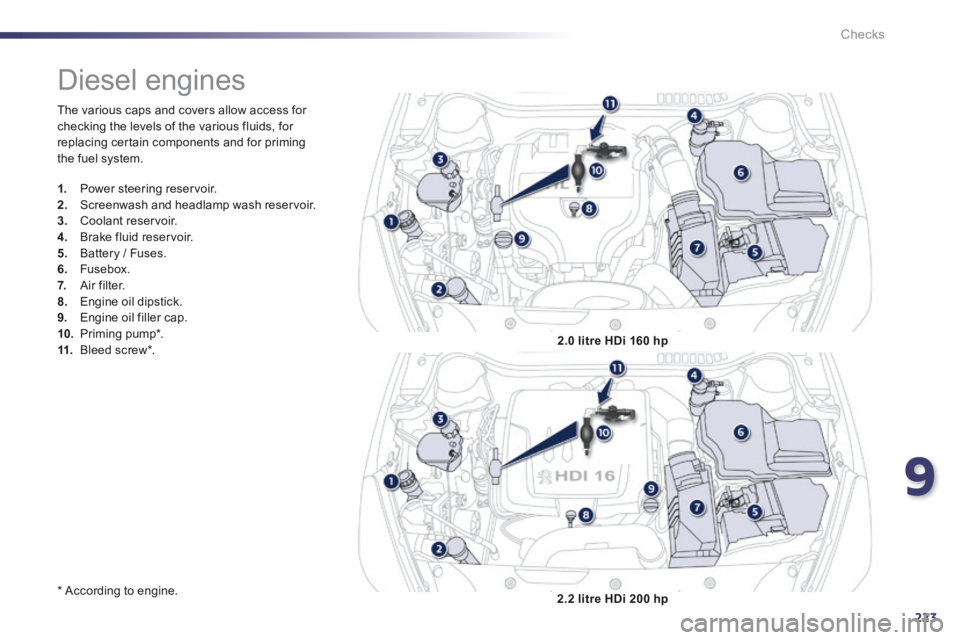
The various caps and covers allow access for checking the levels of the various fluids, for replacing certain components and for priming the fuel system.
* According to engine.
Diesel engines
1. Power steering reservoir. 2. Screenwash and headlamp wash reservoir. 3. Coolant reservoir.
4. Brake fluid reservoir. 5. Battery / Fuses. 6. Fusebox. 7. Air filter. 8. Engine oil dipstick. 9. Engine oil filler cap. 10. Priming pump * . 11. Bleed screw * . 2.0 litre HDi 160 hp
2.2 litre HDi 200 hp
Page 226 of 352
224
Checks
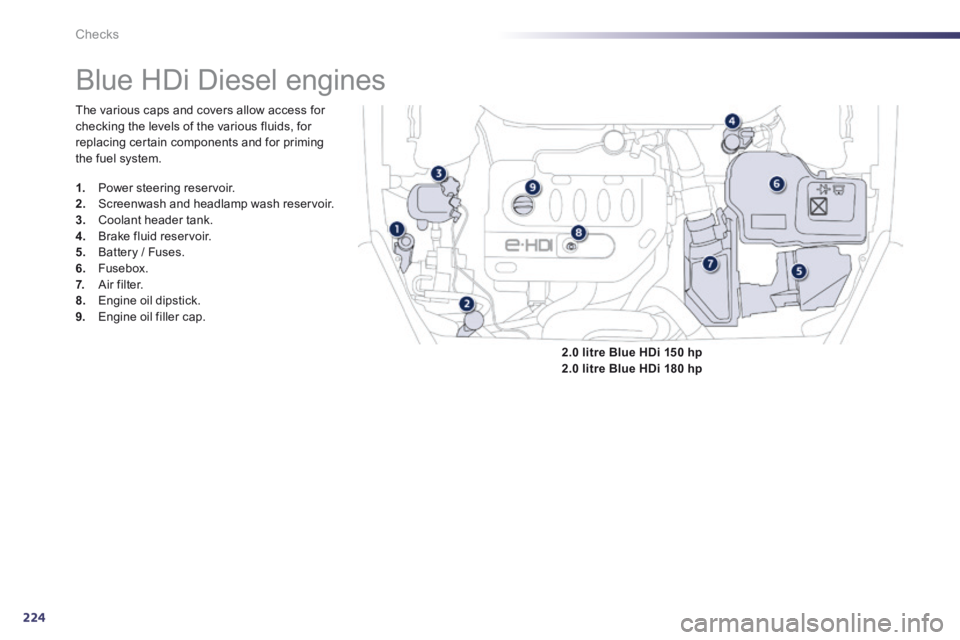
Blue HDi Diesel engines
The various caps and covers allow access for checking the levels of the various fluids, for replacing certain components and for priming the fuel system.
1. Power steering reservoir. 2. Screenwash and headlamp wash reservoir. 3. Coolant header tank. 4. Brake fluid reservoir. 5. Battery / Fuses. 6. Fusebox. 7. Air filter. 8. Engine oil dipstick. 9. Engine oil filler cap.
2.0 litre Blue HDi 150 hp2.0 litre Blue HDi 180 hp
Page 227 of 352
9
225
Checks
Checking levels
Take care when working under the bonnet, as certain areas of the engine may be extremely hot (risk of burns).
Engine oil level
The check is carried out either when the ignition is switched on using the oil level indicator in the instrument panel for vehicles with and electric oil level gauge, or using the dipstick.
To ensure that the reading is correct, your vehicle must be parked on a level sur face and the engine having been off for more than 30 minutes.
It is normal to top up the oil level between two services (or oil changes). PEUGEOT recommends that you check the level, and top up if necessary, every 3 000 miles (5 000 kms).
If a level drops significantly, have the corresponding system checked by a PEUGEOT dealer or a qualified workshop. Check all of these levels regularly, in line with the servicing booklet and the requirements of the warranty. Top them up if necessary, unless other wise indicated.
Checking using the dipstick
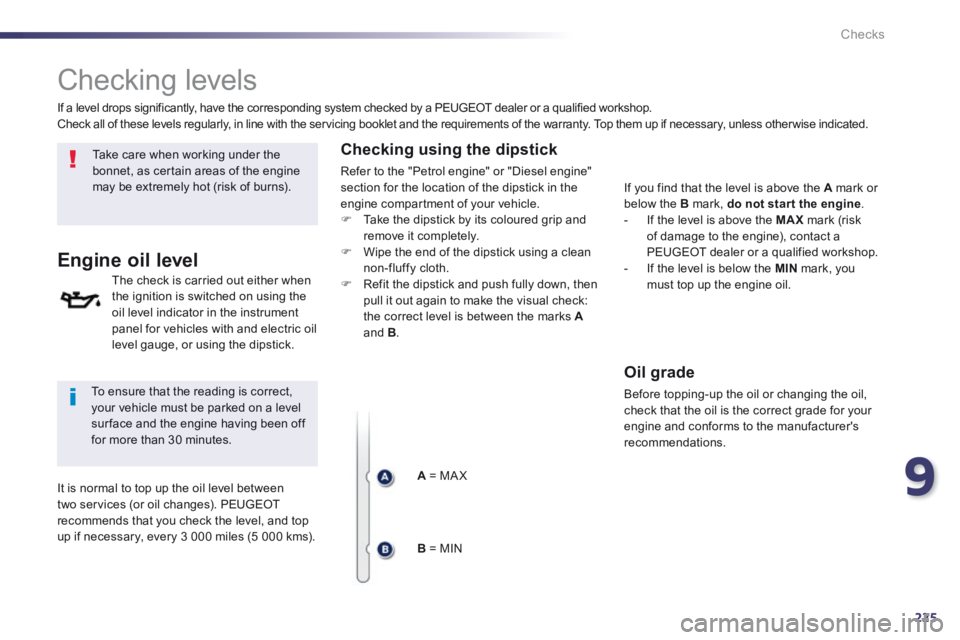
Refer to the "Petrol engine" or "Diesel engine" section for the location of the dipstick in the engine compartment of your vehicle. Take the dipstick by its coloured grip and remove it completely. Wipe the end of the dipstick using a clean non-fluffy cloth. Refit the dipstick and push fully down, then pull it out again to make the visual check: the correct level is between the marks Aand B .
A = MA X
B = MIN
If you find that the level is above the A mark or below the B mark, do not star t the engine . - If the level is above the MAX mark (risk of damage to the engine), contact a PEUGEOT dealer or a qualified workshop. - If the level is below the MIN mark, you must top up the engine oil.
Oil grade
Before topping-up the oil or changing the oil, check that the oil is the correct grade for your engine and conforms to the manufacturer's recommendations.
Page 228 of 352
226
Checks
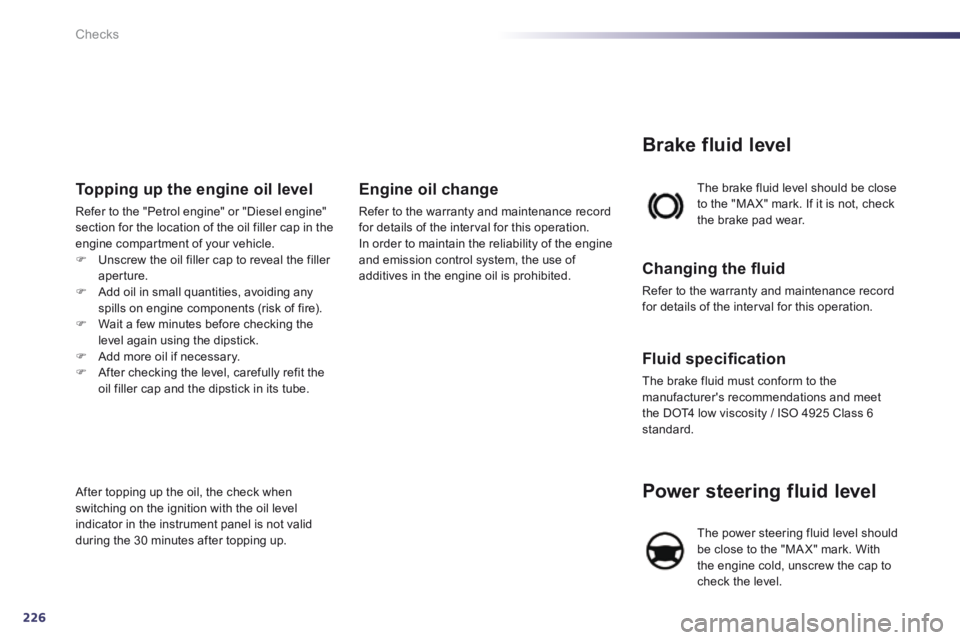
Power steering fluid level
The power steering fluid level should be close to the "MA X" mark. With the engine cold, unscrew the cap to check the level.
The brake fluid level should be close to the "MA X" mark. If it is not, check the brake pad wear.
Brake fluid level
Changing the fl uid
Refer to the warranty and maintenance record for details of the interval for this operation.
Fluid specifi cation
The brake fluid must conform to the manufacturer's recommendations and meet the DOT4 low viscosity / ISO 4925 Class 6 standard.
Topping up the engine oil level
Refer to the "Petrol engine" or "Diesel engine" section for the location of the oil filler cap in the engine compartment of your vehicle. Unscrew the oil filler cap to reveal the filler aperture. Add oil in small quantities, avoiding any spills on engine components (risk of fire). Wait a few minutes before checking the level again using the dipstick. Add more oil if necessary. After checking the level, carefully refit the oil filler cap and the dipstick in its tube.
After topping up the oil, the check when switching on the ignition with the oil level indicator in the instrument panel is not valid during the 30 minutes after topping up.
Engine oil change
Refer to the warranty and maintenance record for details of the interval for this operation. In order to maintain the reliability of the engine and emission control system, the use of additives in the engine oil is prohibited.