2014 Peugeot 508 buttons
[x] Cancel search: buttonsPage 94 of 352
92
Comfort
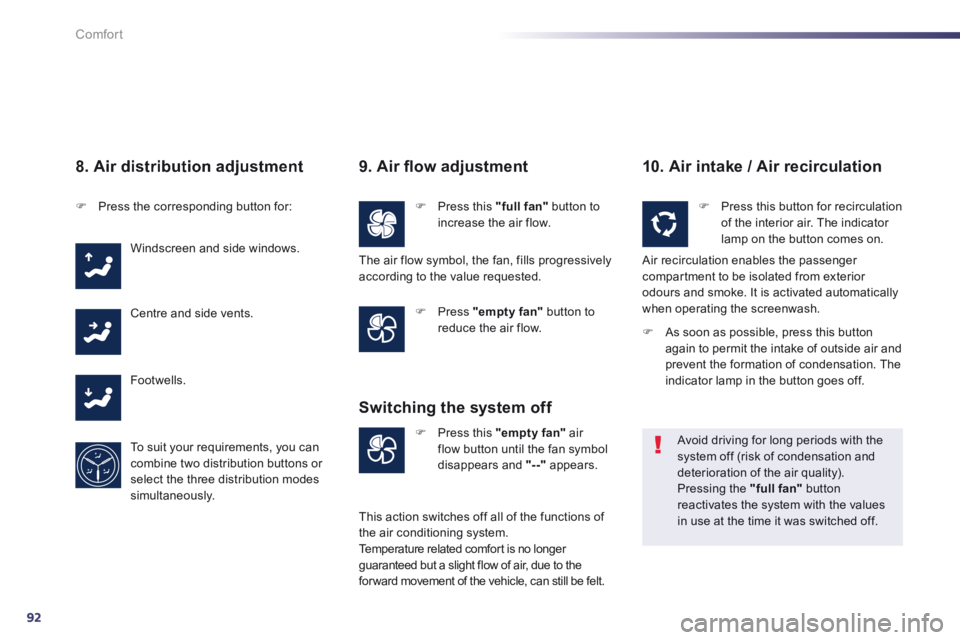
8. Air distribution adjustment
Press the corresponding button for:
Windscreen and side windows.
Centre and side vents.
Footwells.
To suit your requirements, you can combine two distribution buttons or select the three distribution modes simultaneously.
9. Air fl ow adjustment
Press this "full fan" button to increase the air flow.
Press "empty fan" button to reduce the air flow.
10. Air intake / Air recirculation
Press this "empty fan" air flow button until the fan symbol disappears and "--" appears.
Switching the system off
Press this button for recirculation of the interior air. The indicator lamp on the button comes on.
Air recirculation enables the passenger compartment to be isolated from exterior odours and smoke. It is activated automatically when operating the screenwash.
Avoid driving for long periods with the system off (risk of condensation and deterioration of the air quality). Pressing the "full fan" button reactivates the system with the values in use at the time it was switched off.
The air flow symbol, the fan, fills progressively according to the value requested.
This action switches off all of the functions of the air conditioning system. Temperature related comfort is no longer guaranteed but a slight flow of air, due to the for ward movement of the vehicle, can still be felt.
As soon as possible, press this button again to permit the intake of outside air and prevent the formation of condensation. The indicator lamp in the button goes off.
Page 96 of 352
94
Comfort
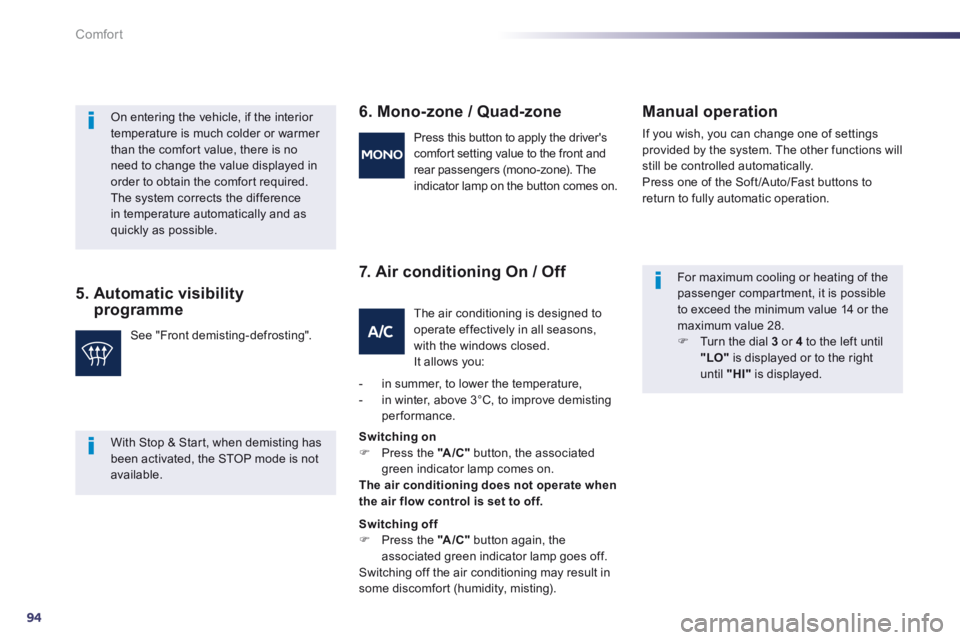
5. Automatic visibility programme
6. Mono-zone / Quad-zone
7. Air conditioning On / Off
Manual operation
If you wish, you can change one of settings provided by the system. The other functions will still be controlled automatically. Press one of the Soft /Auto/Fast buttons to return to fully automatic operation.
On entering the vehicle, if the interior temperature is much colder or warmer than the comfort value, there is no need to change the value displayed in order to obtain the comfort required. The system corrects the difference in temperature automatically and as quickly as possible.
See "Front demisting-defrosting".
Press this button to apply the driver's comfort setting value to the front and rear passengers (mono-zone). The indicator lamp on the button comes on.
The air conditioning is designed to operate effectively in all seasons, with the windows closed. It allows you:
- in summer, to lower the temperature, - in winter, above 3°C, to improve demisting performance.
Switching on Press the "A /C " button, the associated green indicator lamp comes on. The air conditioning does not operate when the air flow control is set to off.
Switching off Press the "A /C " button again, the associated green indicator lamp goes off. Switching off the air conditioning may result in some discomfort (humidity, misting).
For maximum cooling or heating of the passenger compartment, it is possible to exceed the minimum value 14 or the maximum value 28. Turn the dial 3 or 4 to the left until "LO" is displayed or to the right
until "HI" is displayed.
With Stop & Start, when demisting has been activated, the STOP mode is not available.
Page 97 of 352
3
95
Comfort
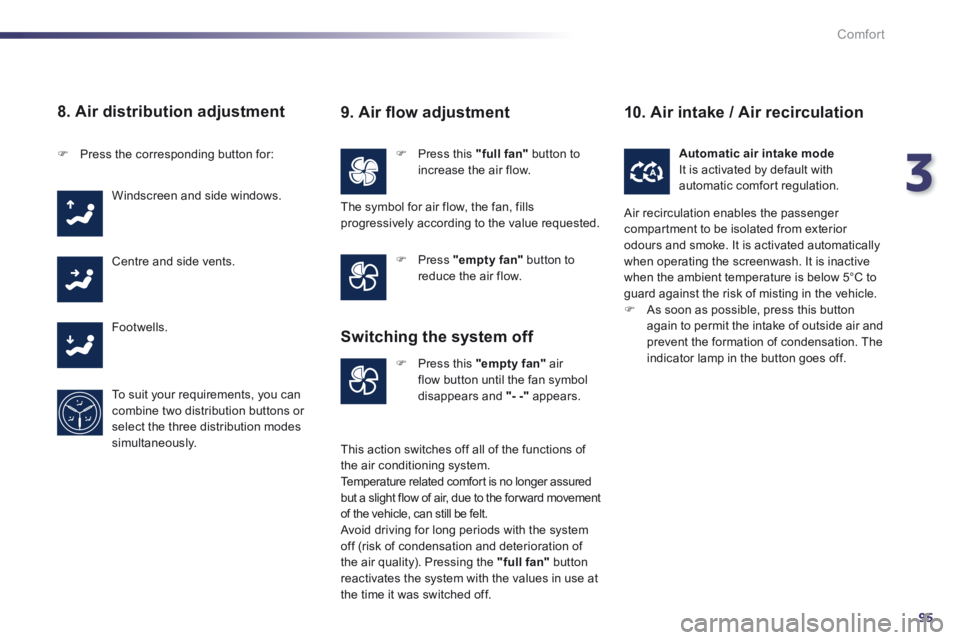
8. Air distribution adjustment
Press this "full fan" button to increase the air flow. Press the corresponding button for:
Windscreen and side windows.
Centre and side vents.
Footwells.
To suit your requirements, you can combine two distribution buttons or select the three distribution modes
simultaneously.
Press "empty fan" button to reduce the air flow.
Press this "empty fan" air flow button until the fan symbol disappears and "- -" appears.
Automatic air intake mode It is activated by default with automatic comfort regulation.
9. Air fl ow adjustment
The symbol for air flow, the fan, fills progressively according to the value requested.
Switching the system off
This action switches off all of the functions of the air conditioning system. Temperature related comfort is no longer assured but a slight flow of air, due to the for ward movement of the vehicle, can still be felt. Avoid driving for long periods with the system off (risk of condensation and deterioration of the air quality). Pressing the "full fan" button reactivates the system with the values in use at the time it was switched off.
10. Air intake / Air recirculation
Air recirculation enables the passenger compartment to be isolated from exterior odours and smoke. It is activated automatically when operating the screenwash. It is inactive when the ambient temperature is below 5°C to guard against the risk of misting in the vehicle. As soon as possible, press this button again to permit the intake of outside air and prevent the formation of condensation. The indicator lamp in the button goes off.
Page 127 of 352
4
125
Driving
Head-up display
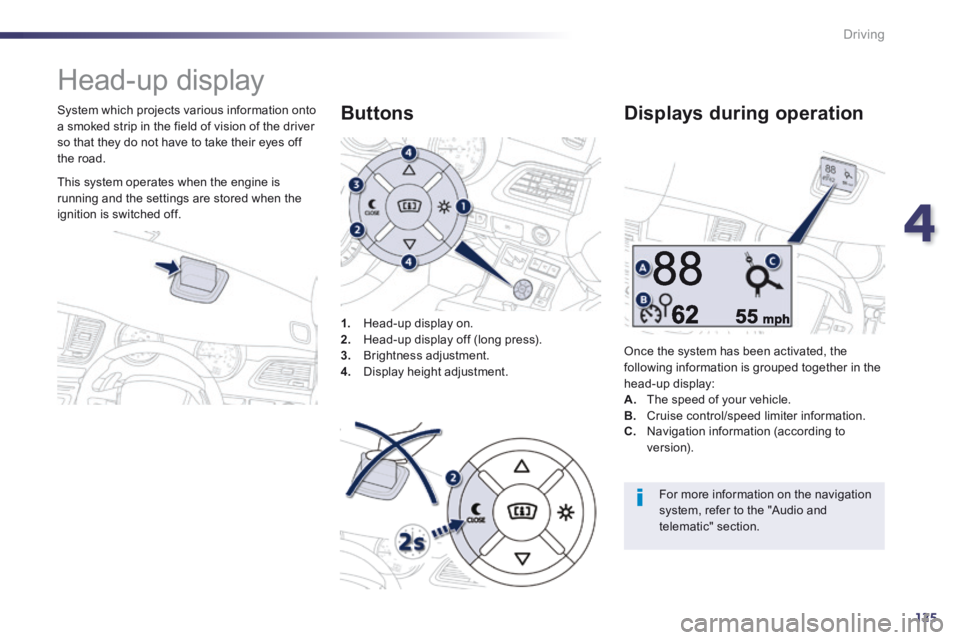
System which projects various information onto a smoked strip in the field of vision of the driver so that they do not have to take their eyes off the road.
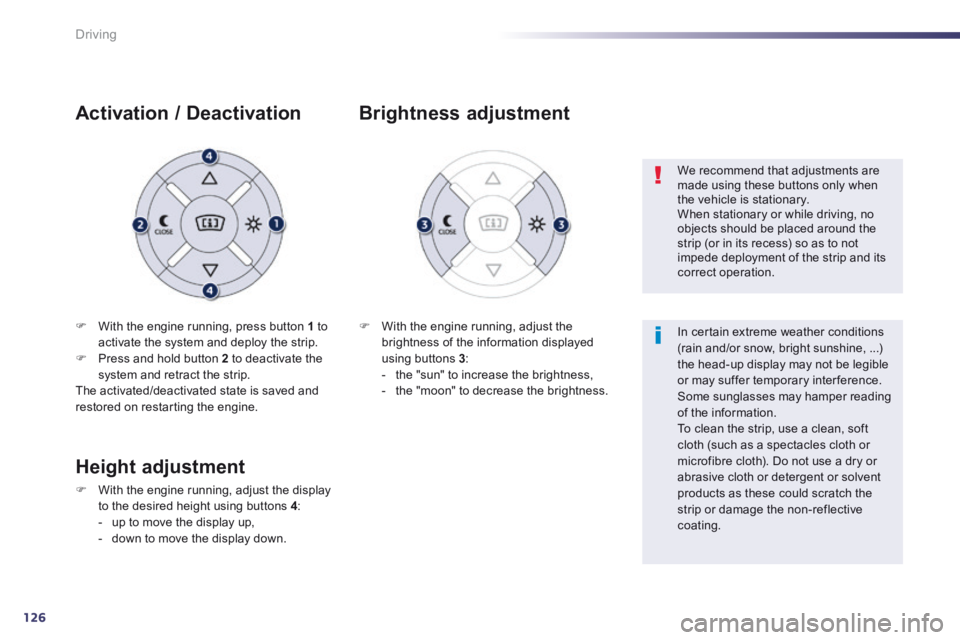
1. Head-up display on. 2. Head-up display off (long press). 3. Brightness adjustment. 4. Display height adjustment.
Buttons
Once the system has been activated, the following information is grouped together in the head-up display: A. The speed of your vehicle. B. Cruise control/speed limiter information.
Displays during operation
C. Navigation information (according to ve r s i o n).
For more information on the navigation system, refer to the "Audio and telematic" section.
This system operates when the engine is running and the settings are stored when the ignition is switched off.
Page 128 of 352
126
Driving
With the engine running, press button 1 to activate the system and deploy the strip. Press and hold button 2 to deactivate the system and retract the strip. The activated/deactivated state is saved and restored on restarting the engine.
Activation / Deactivation
With the engine running, adjust the brightness of the information displayed using buttons 3 : - the "sun" to increase the brightness, - the "moon" to decrease the brightness.
Brightness adjustment
We recommend that adjustments are made using these buttons only when the vehicle is stationary. When stationary or while driving, no objects should be placed around the strip (or in its recess) so as to not impede deployment of the strip and its correct operation.
In certain extreme weather conditions (rain and/or snow, bright sunshine, ...) the head-up display may not be legible or may suffer temporary interference. Some sunglasses may hamper reading of the information. To clean the strip, use a clean, soft
cloth (such as a spectacles cloth or microfibre cloth). Do not use a dry or abrasive cloth or detergent or solvent products as these could scratch the strip or damage the non-reflective coating.
Height adjustment
With the engine running, adjust the display to the desired height using buttons 4 : - up to move the display up,
- down to move the display down.
Page 131 of 352
4
129
Driving
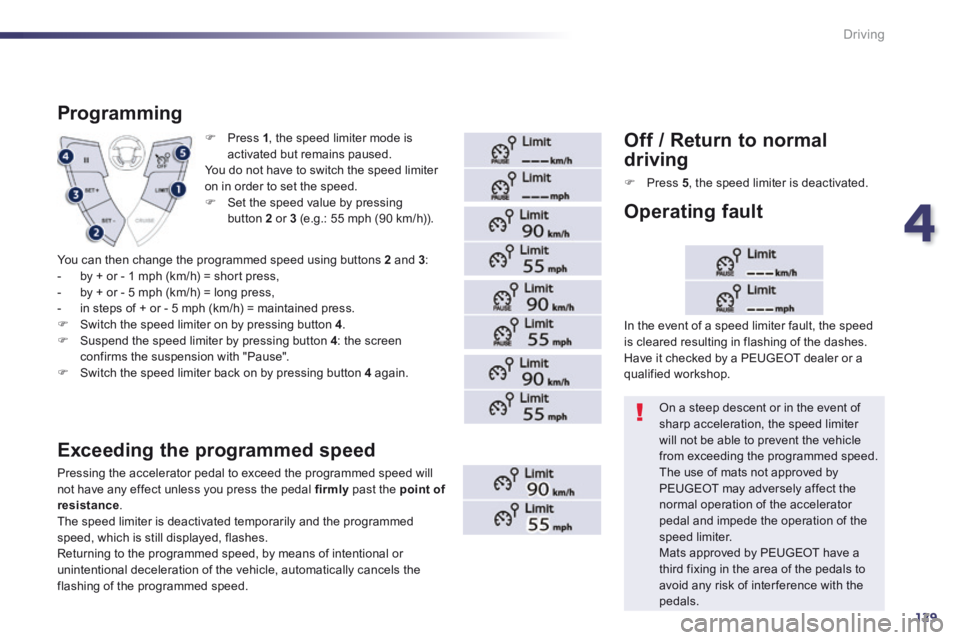
Press 1 , the speed limiter mode is activated but remains paused. You do not have to switch the speed limiter on in order to set the speed. Set the speed value by pressing button 2 or 3 (e.g.: 55 mph (90 km/h)).
Programming
Exceeding the programmed speed
Pressing the accelerator pedal to exceed the programmed speed will not have any effect unless you press the pedal firmly past the point of resistance . The speed limiter is deactivated temporarily and the programmed speed, which is still displayed, flashes. Returning to the programmed speed, by means of intentional or unintentional deceleration of the vehicle, automatically cancels the
flashing of the programmed speed.
Off / Return to normal
driving
Press 5 , the speed limiter is deactivated.
On a steep descent or in the event of sharp acceleration, the speed limiter will not be able to prevent the vehicle from exceeding the programmed speed. The use of mats not approved by PEUGEOT may adversely affect the normal operation of the accelerator pedal and impede the operation of the speed limiter. Mats approved by PEUGEOT have a third fixing in the area of the pedals to avoid any risk of inter ference with the pedals.
In the event of a speed limiter fault, the speed is cleared resulting in flashing of the dashes. Have it checked by a PEUGEOT dealer or a qualified workshop.
Operating fault
You can then change the programmed speed using buttons 2 and 3 : - by + or - 1 mph (km/h) = short press, - by + or - 5 mph (km/h) = long press, - in steps of + or - 5 mph (km/h) = maintained press. Switch the speed limiter on by pressing button 4 . Suspend the speed limiter by pressing button 4 : the screen confirms the suspension with "Pause". Switch the speed limiter back on by pressing button 4 again.
Page 133 of 352
4
131
Driving
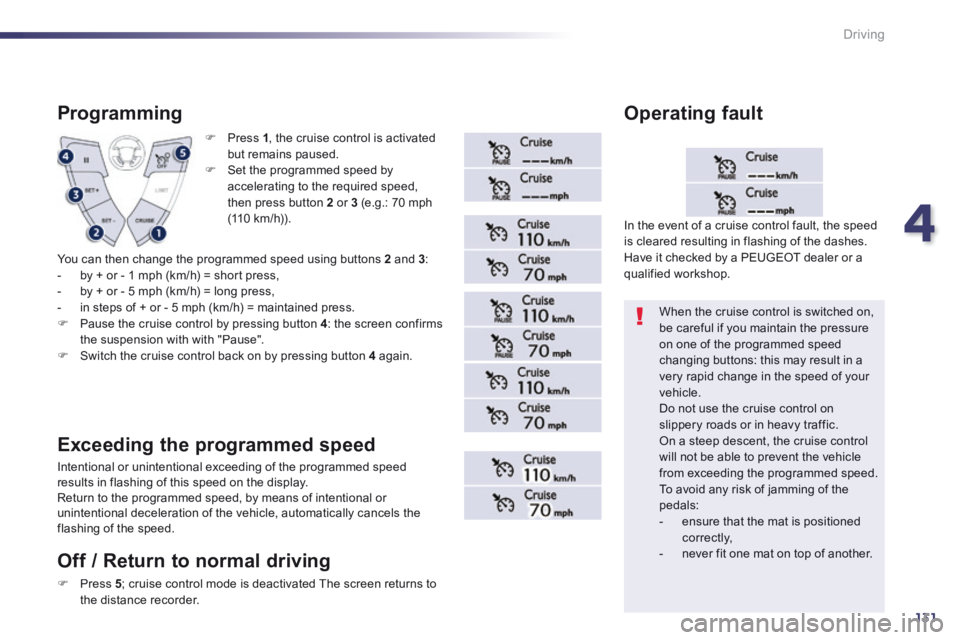
Press 1 , the cruise control is activated but remains paused. Set the programmed speed by accelerating to the required speed, then press button 2 or 3 (e.g.: 70 mph (110 km/h)).
Programming
You can then change the programmed speed using buttons 2 and 3 : - by + or - 1 mph (km/h) = short press, - by + or - 5 mph (km/h) = long press, - in steps of + or - 5 mph (km/h) = maintained press. Pause the cruise control by pressing button 4 : the screen confirms the suspension with with "Pause". Switch the cruise control back on by pressing button 4 again.
Exceeding the programmed speed
Intentional or unintentional exceeding of the programmed speed results in flashing of this speed on the display. Return to the programmed speed, by means of intentional or unintentional deceleration of the vehicle, automatically cancels the flashing of the speed.
When the cruise control is switched on, be careful if you maintain the pressure on one of the programmed speed changing buttons: this may result in a very rapid change in the speed of your vehicle. Do not use the cruise control on slippery roads or in heavy traffic. On a steep descent, the cruise control will not be able to prevent the vehicle from exceeding the programmed speed. To avoid any risk of jamming of the pedals: - ensure that the mat is positioned c o r r e c t l y, - never fit one mat on top of another.
In the event of a cruise control fault, the speed is cleared resulting in flashing of the dashes. Have it checked by a PEUGEOT dealer or a qualified workshop.
Operating fault
Off / Return to normal driving
Press 5 ; cruise control mode is deactivated The screen returns to
the distance recorder.
Page 290 of 352
288
08 RADIO
By alphabetical list
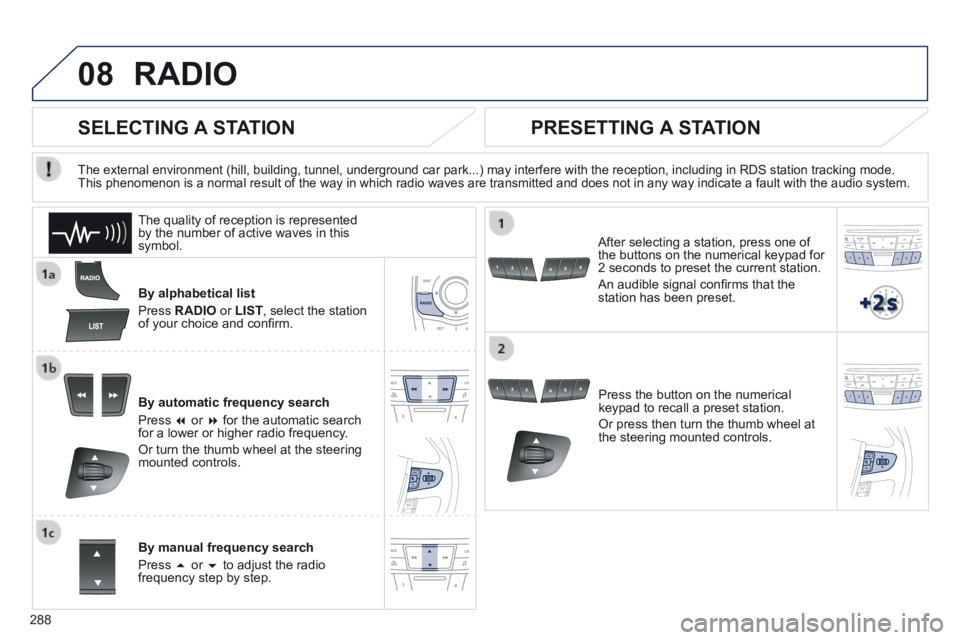
Press RADIO or LIST , select the station of your choice and confi rm.
By automatic frequency search
Press or for the automatic search for a lower or higher radio frequency.
Or turn the thumb wheel at the steering mounted controls.
By manual frequency search
Press or to adjust the radio frequency step by step.
Press the button on the numerical keypad to recall a preset station.
Or press then turn the thumb wheel at the steering mounted controls.
SELECTING A STATION
The external environment (hill, building, tunnel, underground car park.\
..) may interfere with the reception, including in RDS station tracking mode. This phenomenon is a normal result of the way in which radio waves are t\
ransmitted and does not in any way indicate a fault with the audio system.
PRESETTING A STATION
After selecting a station, press one of the buttons on the numerical keypad for 2 seconds to preset the current station.
An audible signal confi rms that the station has been preset.
The quality of reception is represented by the number of active waves in this symbol.