2014 Peugeot 508 brake light
[x] Cancel search: brake lightPage 4 of 352
.
Contents
Instrument panel 22
Indicator and warning lamps 23
Gauges and indicators 33
Trip computer 38
Setting the date and time 41
Monitoring
Familiarisation
Remote control key
43
Alarm 53
Electric windows 55
Boot 57
Motorised tailgate (SW) 58
Sunroof 61
Panoramic sunroof (SW) 63
Fuel tank 64
Diesel misfuel prevention 65
Access
Front seats 67
Rear seats 72
M i r r o r s 74
Steering wheel adjustment 76
Interior fi ttings 77
Boot fi ttings (Saloon) 80
Boot fi ttings (SW) 81
Heating and Ventilation 86
Manual air conditioning 88
Dual-zone digital air conditioning 90
Quad-zone digital air conditioning 93
Rear screen demist - defrost 98
Programmable Heating / Ventilation 99
Comfort
Starting-switching off the engine 101
Electric parking brake 103
Manual parking brake 110
Manual gearbox 111
Gear shift indicator 112
Automatic gearbox 113
6-speed electronic gear control gearbox 117
Stop & Start 121
Hill start assist 124
Head-up display 125
Speed limiter 128
Cruise control 130
Parking sensors 132
Parking space sensors 134
Driving
Lighting controls 136
Automatic illumination of headlamps 141
Headlamp adjustment 144
Directional lighting 145
Wiper controls 147
Automatic rain sensitive wipers 149
Courtesy lamps 151
Interior mood lighting 152
Visibility
Eco-driving 20
Page 10 of 352
8
Familiarisation
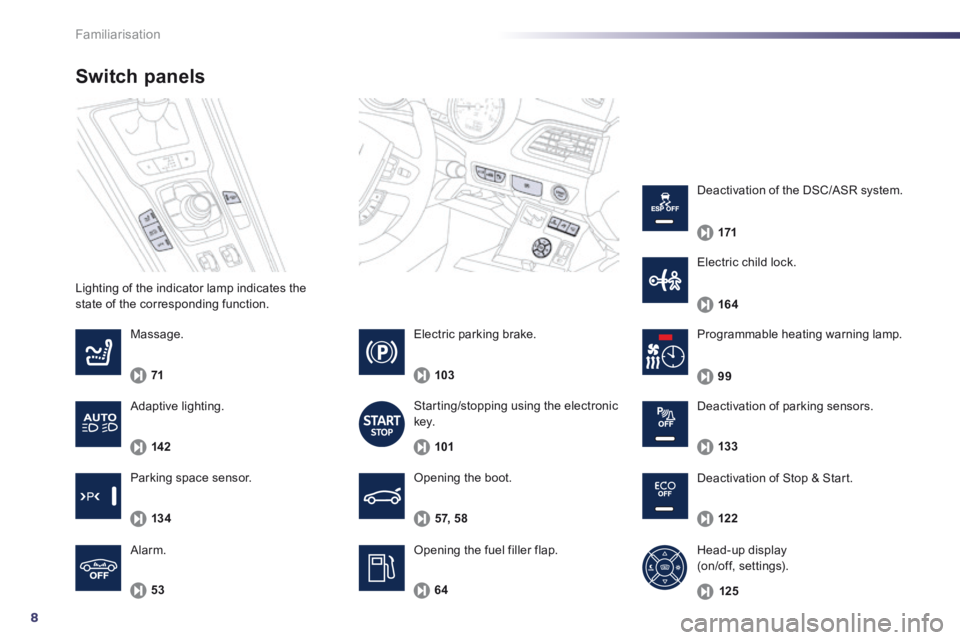
Lighting of the indicator lamp indicates the state of the corresponding function.
Switch panels
Opening the boot.
Opening the fuel filler flap.
5 7, 5 8
Massage.
71
53
Alarm.
Programmable heating warning lamp.
64
99
Electric parking brake.
103
Starting/stopping using the electronic key.
101
Deactivation of Stop & Start.
122
Head-up display (on/off, settings).
125
Deactivation of parking sensors.
133
Parking space sensor.
13 4
Electric child lock.
164
Deactivation of the DSC/ASR system.
171
Adaptive lighting.
142
Page 12 of 352
10Familiarisation
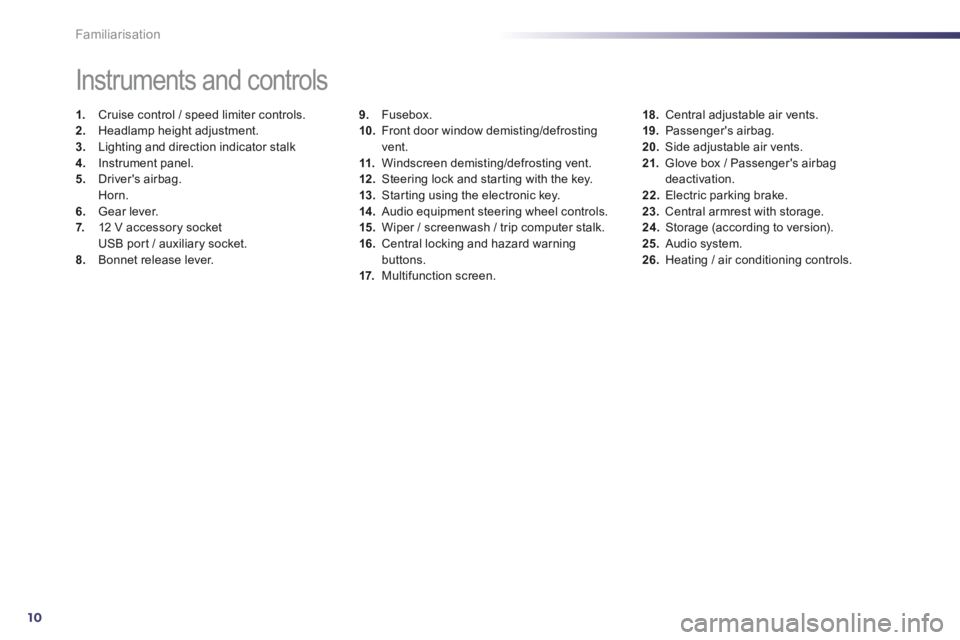
9. Fusebox. 10. Front door window demisting/defrosting vent. 11. Windscreen demisting/defrosting vent. 12 . Steering lock and starting with the key. 13. Starting using the electronic key. 14 . Audio equipment steering wheel controls. 15. Wiper / screenwash / trip computer stalk. 16. Central locking and hazard warning buttons. 17. Multifunction screen.
Instruments and controls
1. Cruise control / speed limiter controls. 2. Headlamp height adjustment. 3. Lighting and direction indicator stalk 4. Instrument panel. 5. Driver's airbag. Horn. 6. Gear lever. 7. 12 V accessory socket USB port / auxiliary socket. 8. Bonnet release lever.
18. Central adjustable air vents. 19. Passenger's airbag. 20. Side adjustable air vents. 21. Glove box / Passenger's airbag deactivation. 22. Electric parking brake. 23. Central armrest with storage. 24. Storage (according to version). 25. Audio system. 26. Heating / air conditioning controls.
Page 22 of 352
20
Optimise the use of your
gearbox
With a manual gearbox, move off gently, change up without waiting and drive by changing up quite soon. If your vehicle has
the system, the gear shift indicator invites you to change up; it is displayed in the instrument panel, follow its instructions.
With an automatic or electronic gearbox, stay in Drive "D" or Auto "A" , according to the type of gearbox, without pressing the accelerator pedal heavily or suddenly.
Drive smoothly
Maintain a safe distance between vehicles, use engine braking rather than the brake pedal, and press the accelerator progressively. These practices contribute towards a reduction in
fuel consumption and CO2 emissions and also helps reduce the background traffic noise.
If your vehicle has cruise control, make use of the system at speeds above 25 mph (40 km/h) when the traffic is flowing well.
Control the use of your electrical equipment
Before moving off, if the passenger compartment is too warm, ventilate it by opening the windows and air vents before using the air conditioning. Above 30 mph (50 km/h), close the windows and leave the air vents open.
Remember to make use of equipment that can help keep the temperature in the passenger compartment down (sunroof and window blinds...). Switch off the air conditioning, unless it has automatic digital regulation, as soon as the desired temperature is attained. Switch off the demisting and defrosting controls, if not automatic. Switch off the heated seat as soon as possible.
Switch off the headlamps and front foglamps when the level of light does not require their use.
Avoid running the engine before moving off, particularly in winter; your vehicle will warm up much faster while driving.
As a passenger, if you avoid connecting your multimedia devices (film, music, video game...), you will contribute towards limiting the consumption of electrical energy, and so of fuel. Disconnect your portable devices before leaving the vehicle.
Eco-driving Eco-driving is a range of everyday practices that allow the motorist to optimise their fuel consumption and CO2 emissions.
Page 25 of 352
1
23
Monitoring
Indicator and warning
lamps
Visual indicators informing the driver that a system is in operation, switched off or has a fault.
When the ignition is switched on
Certain warning lamps come on for a few seconds in the instrument panel and/or instrument panel screen when the vehicle's ignition is switched on. When the engine is started, these same warning lamps should go off.
If they remain on, before moving off, refer to the information on the warning lamp concerned.
Associated warnings
The switching on of certain warning lamps may be accompanied by an audible signal and a message in the instrument panel screen. The warning lamps may come on continuously (fixed) or flash.
Certain warning lamps may come on in one of two modes. Only by relating the type of lighting to the operating status of the vehicle can it be ascertained whether the situation is normal or whether a fault has occurred.
1
2
2
2
3
3
3
2
3
3
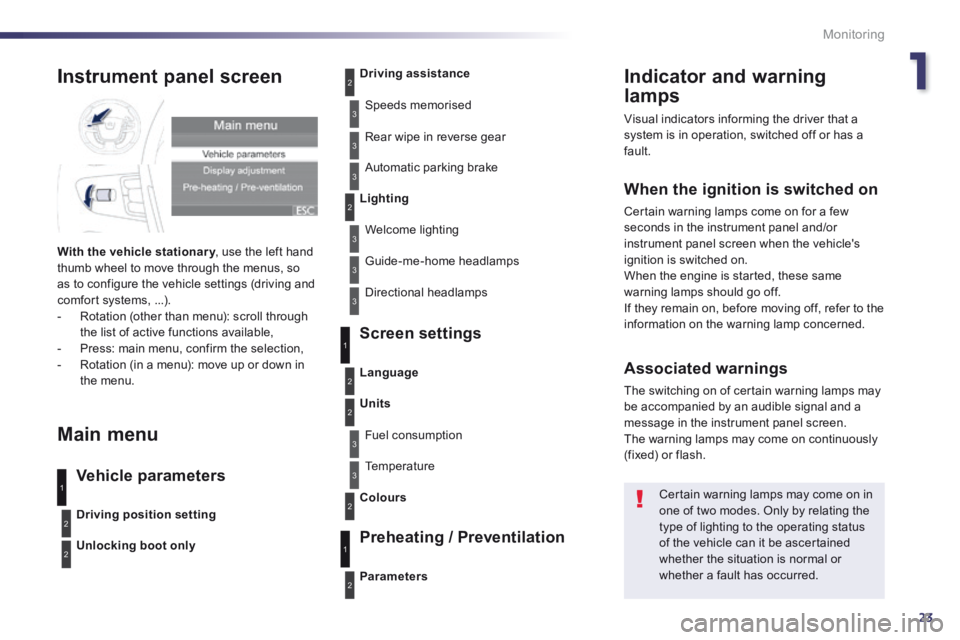
Instrument panel screen
With the vehicle stationary , use the left hand With the vehicle stationary , use the left hand With the vehicle stationarythumb wheel to move through the menus, so as to configure the vehicle settings (driving and comfort systems, ...). - Rotation (other than menu): scroll through the list of active functions available, - Press: main menu, confirm the selection, - Rotation (in a menu): move up or down in the menu.
Main menu
Vehicle parameters
Screen settings
Preheating / Preventilation
Driving position setting
Unlocking boot only
Driving assistance
Speeds memorised
Rear wipe in reverse gear
Automatic parking brake
Lighting
Welcome lighting
Guide-me-home headlamps
Directional headlamps
Parameters
Language
Units
Fuel consumption
Temperature
Colours
3
1
2
2
3
2
3
1
2
Page 103 of 352
4
101
Driving
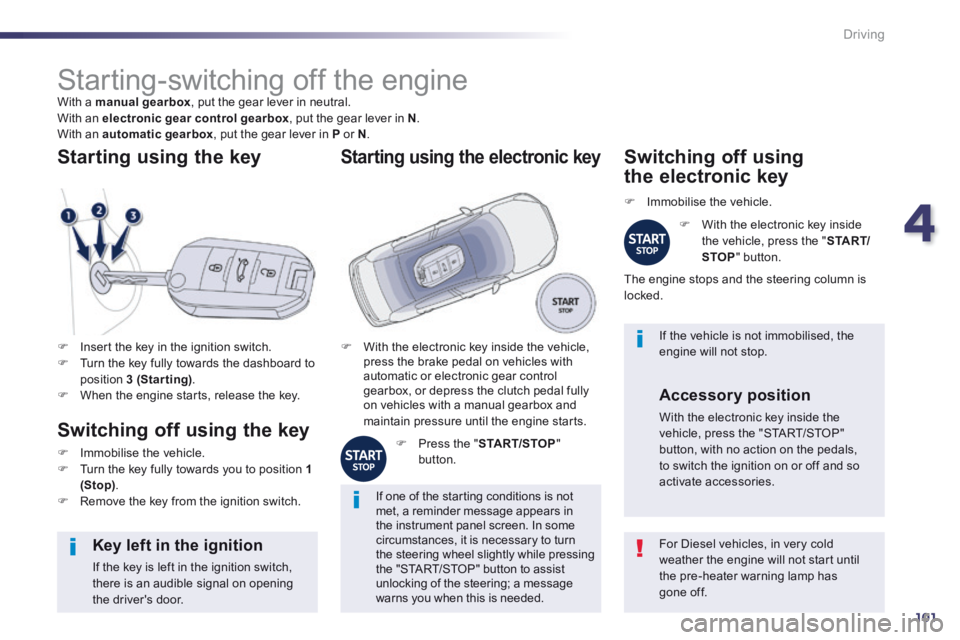
Starting-switching off the engine With a manual gearbox , put the gear lever in neutral. With an electronic gear control gearbox , put the gear lever in N . With an automatic gearbox , put the gear lever in P or N .
Insert the key in the ignition switch. Turn the key fully towards the dashboard to position 3 (Starting) . When the engine starts, release the key.
Starting using the key
Switching off using the key
Immobilise the vehicle. Turn the key fully towards you to position 1 (Stop) . Remove the key from the ignition switch.
For Diesel vehicles, in very cold weather the engine will not start until the pre-heater warning lamp has gone off.
Key left in the ignition
If the key is left in the ignition switch, there is an audible signal on opening the driver's door.
If one of the starting conditions is not met, a reminder message appears in the instrument panel screen. In some circumstances, it is necessary to turn the steering wheel slightly while pressing the "START/STOP" button to assist unlocking of the steering; a message warns you when this is needed.
If the vehicle is not immobilised, the engine will not stop. With the electronic key inside the vehicle, press the brake pedal on vehicles with automatic or electronic gear control gearbox, or depress the clutch pedal fully on vehicles with a manual gearbox and maintain pressure until the engine starts.
Starting using the electronic key
Press the " START/STOP " button.
Switching off using
the electronic key
Immobilise the vehicle.
With the electronic key inside the vehicle, press the " S TA R T/STOP " button.
The engine stops and the steering column is locked.
Accessory position
With the electronic key inside the vehicle, press the "START/STOP" button, with no action on the pedals, to switch the ignition on or off and so activate accessories.
Page 105 of 352
4
103
Driving
It is recommended that you do not apply the parking brake in very cold conditions (ice) and during towing (breakdown, caravan...). Deactivate the automatic functions and release the parking brake manually.
Before leaving the vehicle, check that parking brake warning lamps in the instrument panel and the control lever Aare on, not flashing.
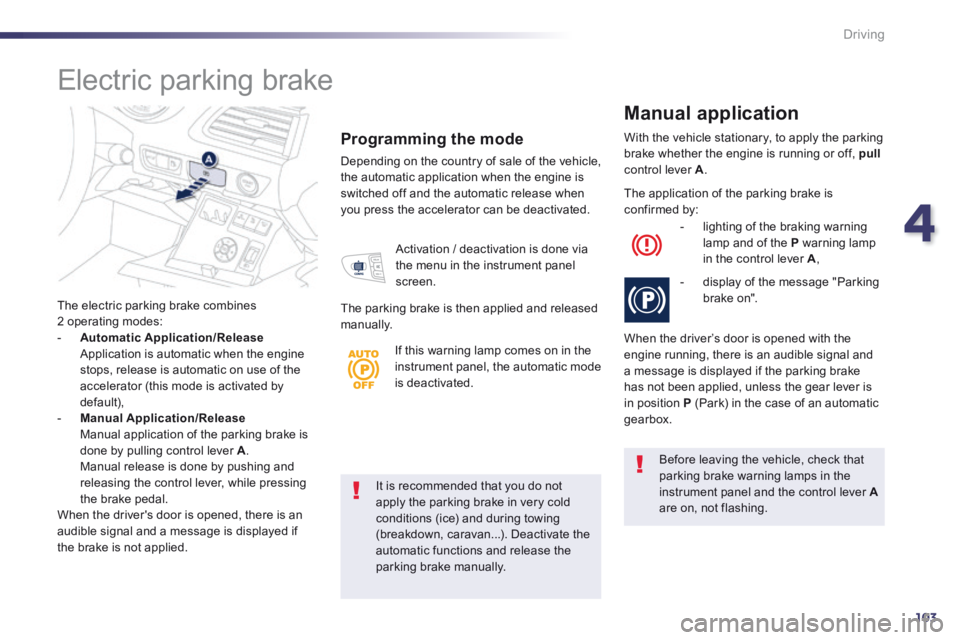
The electric parking brake combines 2 operating modes: - Automatic Application/Release Application is automatic when the engine stops, release is automatic on use of the accelerator (this mode is activated by default), - Manual Application/Release
Manual application of the parking brake is done by pulling control lever A. Manual release is done by pushing and releasing the control lever, while pressing the brake pedal. When the driver's door is opened, there is an audible signal and a message is displayed if the brake is not applied.
Programming the mode
Depending on the country of sale of the vehicle, the automatic application when the engine is switched off and the automatic release when you press the accelerator can be deactivated.
With the vehicle stationary, to apply the parking brake whether the engine is running or off, pullcontrol lever A .
Manual application
Activation / deactivation is done via the menu in the instrument panel screen.
The parking brake is then applied and released manually.
The application of the parking brake is confirmed by:
- lighting of the braking warning lamp and of the P warning lamp in the control lever A ,
- display of the message "Parking brake on".
When the driver’s door is opened with the engine running, there is an audible signal and a message is displayed if the parking brake has not been applied, unless the gear lever is in position P (Park) in the case of an automatic gearbox.
Electric parking brake
If this warning lamp comes on in the instrument panel, the automatic mode is deactivated.
Page 108 of 352
106
Driving
Emergency braking
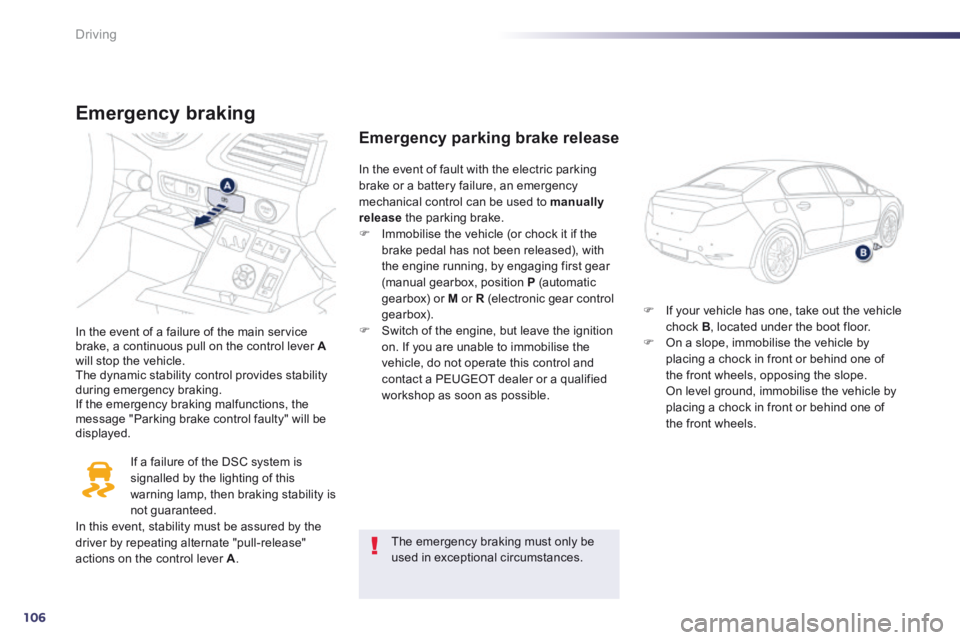
In the event of a failure of the main service brake, a continuous pull on the control lever Awill stop the vehicle. The dynamic stability control provides stability during emergency braking. If the emergency braking malfunctions, the message "Parking brake control faulty" will be displayed.
If a failure of the DSC system is signalled by the lighting of this warning lamp, then braking stability is not guaranteed. In this event, stability must be assured by the
driver by repeating alternate "pull-release" actions on the control lever A .
Emergency parking brake release
If your vehicle has one, take out the vehicle chock B , located under the boot floor. On a slope, immobilise the vehicle by placing a chock in front or behind one of the front wheels, opposing the slope. On level ground, immobilise the vehicle by placing a chock in front or behind one of the front wheels.
In the event of fault with the electric parking brake or a battery failure, an emergency mechanical control can be used to manually release the parking brake.
Immobilise the vehicle (or chock it if the brake pedal has not been released), with the engine running, by engaging first gear (manual gearbox, position P (automatic gearbox) or M or R (electronic gear control gearbox). Switch of the engine, but leave the ignition on. If you are unable to immobilise the vehicle, do not operate this control and contact a PEUGEOT dealer or a qualified workshop as soon as possible.
The emergency braking must only be used in exceptional circumstances.