Page 128 of 404
Fittings
126
1. Load space cover
2. Hooks
3. 12 V accessor y socket (120 W)
4. To r c h
5. Concertina boards
6. Stowing rings on the floor
7. Cup holder
8. Armrests
9. Storage compartments or audio amplifier
10. 3 rd row seat belt buckles
Boot fi ttings (7 seat version)
Page 129 of 404
6
Fittings127
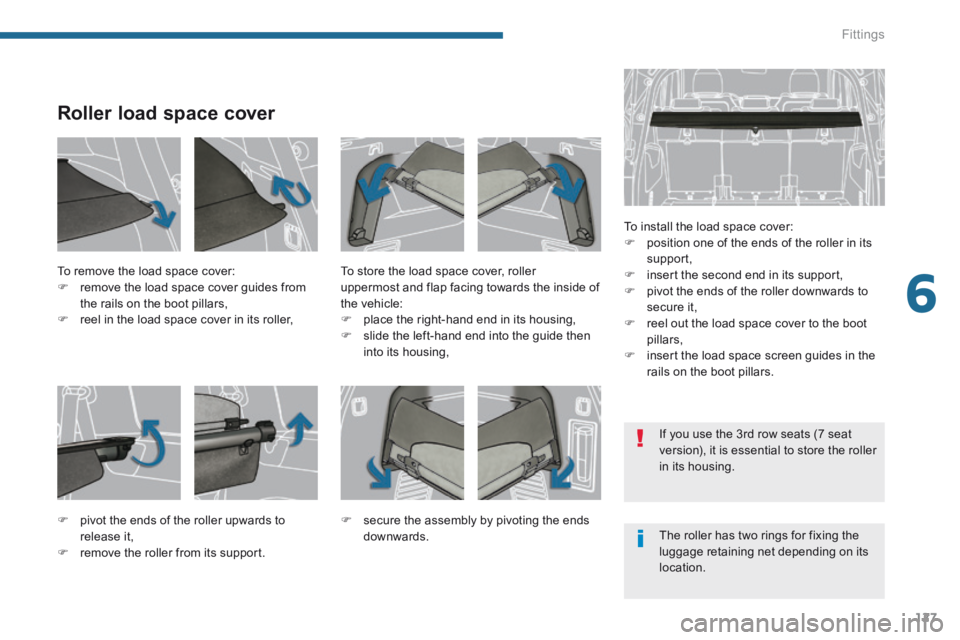
Roller load space cover
To install the load space cover: position one of the ends of the roller in its support, insert the second end in its support, pivot the ends of the roller downwards to secure it, reel out the load space cover to the boot pillars, insert the load space screen guides in the rails on the boot pillars.
To remove the load space cover: remove the load space cover guides from the rails on the boot pillars, reel in the load space cover in its roller,
To store the load space cover, roller uppermost and flap facing towards the inside of the vehicle: place the right-hand end in its housing, slide the left-hand end into the guide then into its housing,
pivot the ends of the roller upwards to release it, remove the roller from its support.
secure the assembly by pivoting the ends downwards. The roller has two rings for fixing the luggage retaining net depending on its location.
If you use the 3 rd row seats (7 seat version), it is essential to store the roller in its housing.
Page 130 of 404
Fittings
128
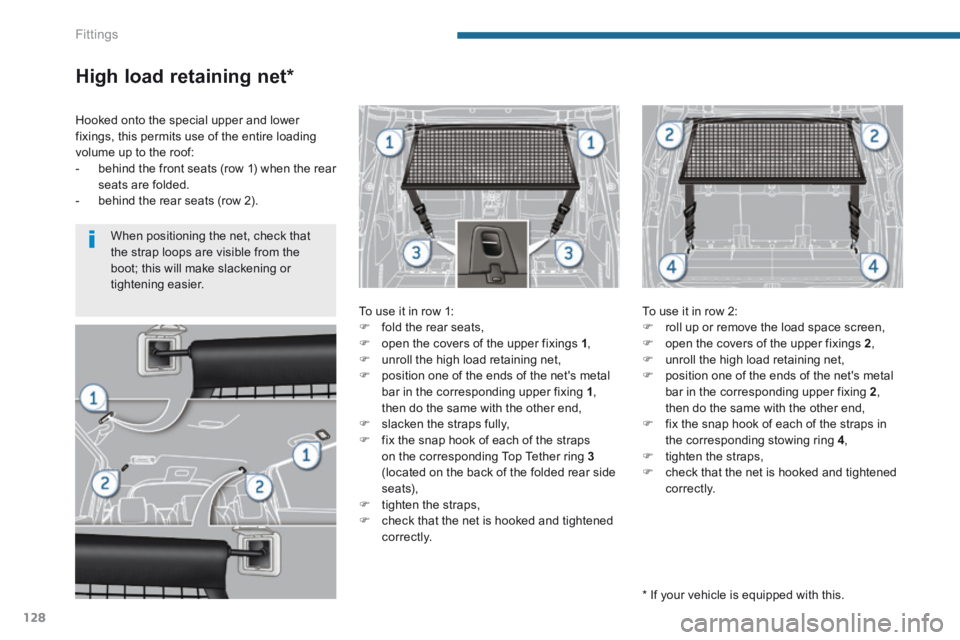
High load retaining net *
To use it in row 1: fold the rear seats, open the covers of the upper fixings 1 , unroll the high load retaining net, position one of the ends of the net's metal bar in the corresponding upper fixing 1 , then do the same with the other end, slacken the straps fully, fix the snap hook of each of the straps on the corresponding Top Tether ring 3(located on the back of the folded rear side seats), tighten the straps, check that the net is hooked and tightened
c o r r e c t l y.
To use it in row 2: roll up or remove the load space screen, open the covers of the upper fixings 2 , unroll the high load retaining net, position one of the ends of the net's metal bar in the corresponding upper fixing 2 , then do the same with the other end, fix the snap hook of each of the straps in the corresponding stowing ring 4 , tighten the straps, check that the net is hooked and tightened c o r r e c t l y.
Hooked onto the special upper and lower fixings, this permits use of the entire loading volume up to the roof: - behind the front seats (row 1) when the rear seats are folded. - behind the rear seats (row 2).
* If your vehicle is equipped with this.
When positioning the net, check that the strap loops are visible from the boot; this will make slackening or tightening easier.
Page 131 of 404
6
Fittings129
Luggage retaining net
Hooked onto the stowing rings on the floor and/or on the load space cover roller, the luggage retaining net available as an accessory enables you to secure your luggage.
There are 4 possible positions:
- flat at the bottom of the boot,
- horizontal, level with the load space cover,
- vertical at the back of the rear seats,
- flat at the bottom of the boot and vertical at the back of the rear seats.
Page 143 of 404
7
Child safety141
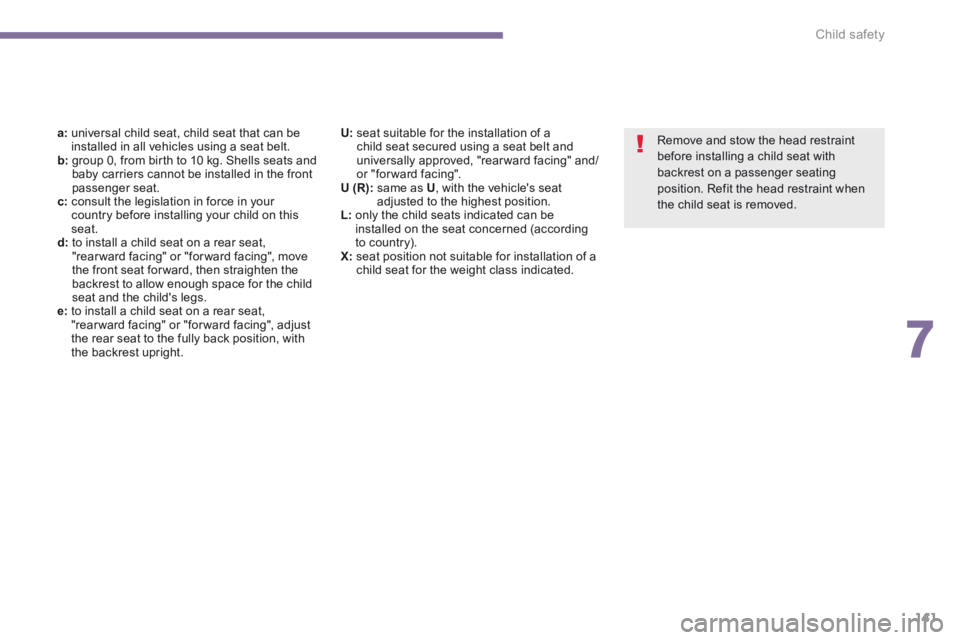
Remove and stow the head restraint before installing a child seat with backrest on a passenger seating position. Refit the head restraint when the child seat is removed.
a: universal child seat, child seat that can be installed in all vehicles using a seat belt. b: group 0, from birth to 10 kg. Shells seats and baby carriers cannot be installed in the front passenger seat. c: consult the legislation in force in your country before installing your child on this seat. d: to install a child seat on a rear seat, "rear ward facing" or "for ward facing", move the front seat for ward, then straighten the backrest to allow enough space for the child seat and the child's legs. e: to install a child seat on a rear seat, "rearward facing" or "forward facing", adjust the rear seat to the fully back position, with the backrest upright.
U: seat suitable for the installation of a child seat secured using a seat belt and universally approved, "rearward facing" and/or "for ward facing". U (R): same as U , with the vehicle's seat adjusted to the highest position. L: only the child seats indicated can be installed on the seat concerned (according to country). X: seat position not suitable for installation of a child seat for the weight class indicated.
Page 145 of 404
7
Child safety143
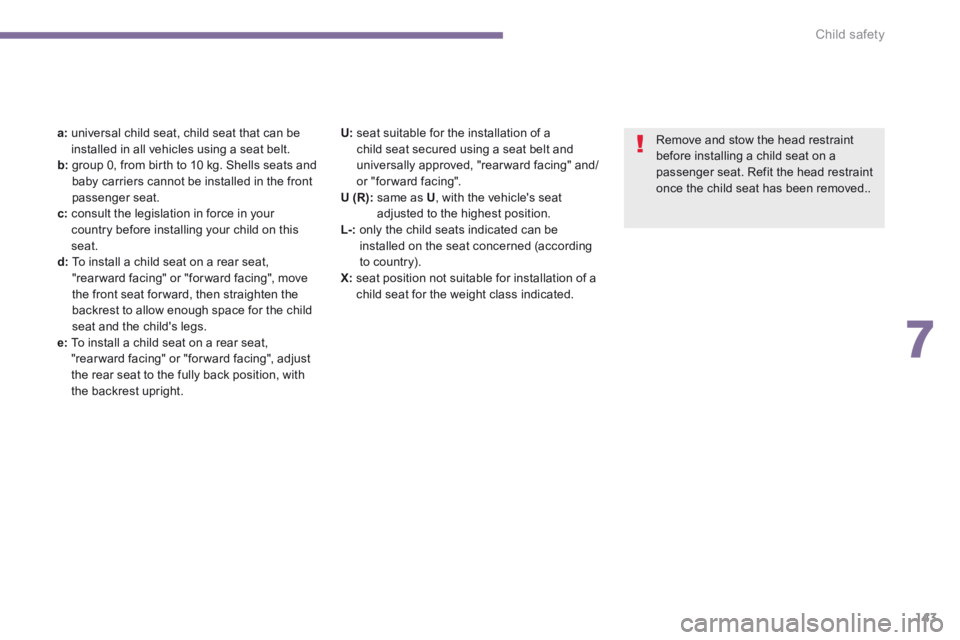
a: universal child seat, child seat that can be installed in all vehicles using a seat belt. b: group 0, from birth to 10 kg. Shells seats and baby carriers cannot be installed in the front passenger seat. c: consult the legislation in force in your country before installing your child on this seat. d: To install a child seat on a rear seat, "rear ward facing" or "for ward facing", move the front seat for ward, then straighten the backrest to allow enough space for the child seat and the child's legs. e: To install a child seat on a rear seat, "rearward facing" or "forward facing", adjust the rear seat to the fully back position, with the backrest upright.
Remove and stow the head restraint before installing a child seat on a passenger seat. Refit the head restraint once the child seat has been removed..
U: seat suitable for the installation of a child seat secured using a seat belt and universally approved, "rearward facing" and/or "for ward facing". U (R): same as U , with the vehicle's seat adjusted to the highest position. L-: only the child seats indicated can be installed on the seat concerned (according to country). X: seat position not suitable for installation of a child seat for the weight class indicated.
Page 146 of 404
Child safety
144
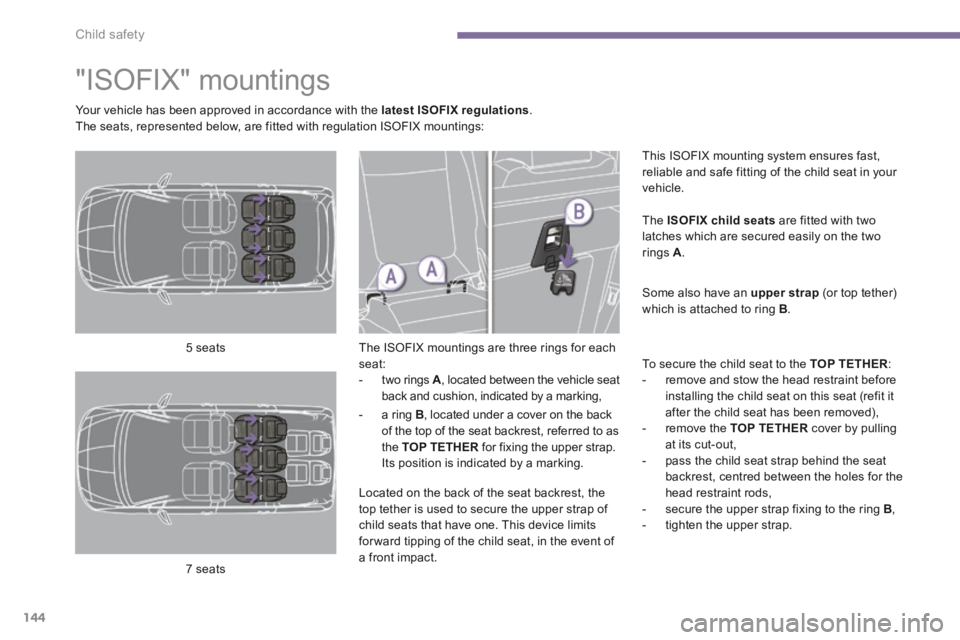
"ISOFIX" mountings
The ISOFIX mountings are three rings for each seat: - two rings A , located between the vehicle seat back and cushion, indicated by a marking,
This ISOFIX mounting system ensures fast, reliable and safe fitting of the child seat in your vehicle.
The ISOFIX child seats are fitted with two latches which are secured easily on the two rings A .
Some also have an upper strap (or top tether) which is attached to ring B .
To secure the child seat to the TOP TETHER : - remove and stow the head restraint before installing the child seat on this seat (refit it after the child seat has been removed), - remove the TOP TETHER cover by pulling at its cut-out, - pass the child seat strap behind the seat backrest, centred between the holes for the head restraint rods, - secure the upper strap fixing to the ring B , - tighten the upper strap.
5 seats
7 seats
Your vehicle has been approved in accordance with the latest ISOFIX regulations . The seats, represented below, are fitted with regulation ISOFIX mountings:
- a ring B , located under a cover on the back
of the top of the seat backrest, referred to as the TOP TETHER for fixing the upper strap. TOP TETHER for fixing the upper strap. TOP TETHER Its position is indicated by a marking.
Located on the back of the seat backrest, the top tether is used to secure the upper strap of child seats that have one. This device limits for ward tipping of the child seat, in the event of a front impact.
Page 149 of 404
7
Child safety147
Remove and stow the head restraint before installing a child seat on a passenger seat. Refit the head restraint once the child seat has been removed.
* Precautions are required when fitting a child seat with a stay (or drop down leg). Refer to the section on "Installing a child seat with a support leg" for more information.
I UF: seat suitable for the installation of an I sofix U niversal seat, " F or ward facing" secured using the top belt to the upper ring of an ISOFIX seating position. IL- SU: seat suitable for the installation of an I sofix S emi- U niversal seat either: - "rear ward facing" fitted with a top belt or a support leg, - "for ward facing" fitted with a support leg,
- a shell seat fitted with an upper strap or a support leg.
For advice on securing of the top belt, refer to the section on "ISOFIX mountings". X: seat not suitable for the installation of a child seat or shell for the weight group indicated.