Page 195 of 404
9
Driving193
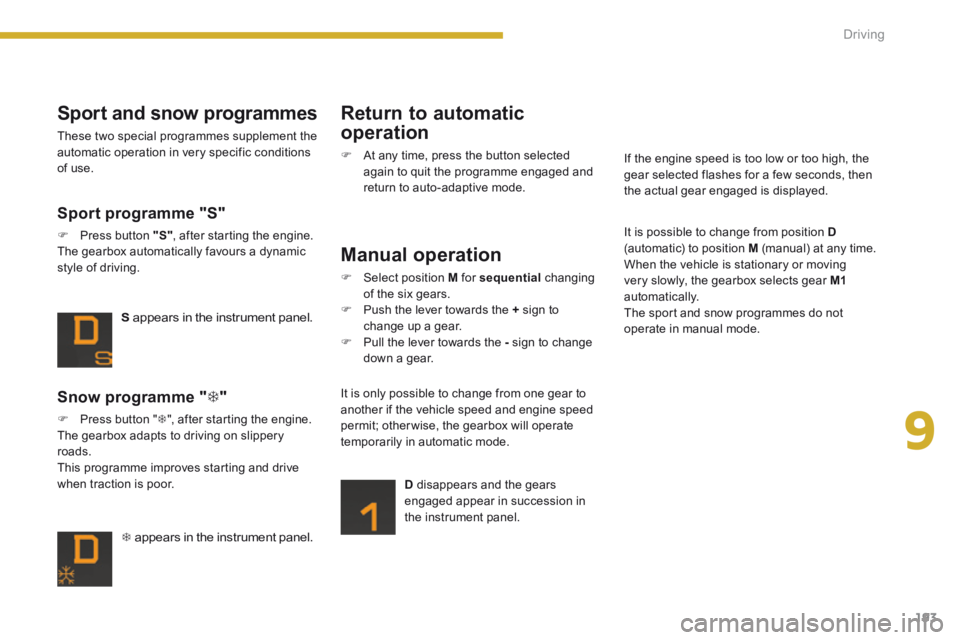
appears in the instrument panel.
Snow programme " "
Press button " ", after starting the engine. The gearbox adapts to driving on slippery roads. This programme improves starting and drive when traction is poor.
S appears in the instrument panel.
Sport programme "S"
Press button "S" , after starting the engine. The gearbox automatically favours a dynamic style of driving.
Sport and snow programmes
These two special programmes supplement the automatic operation in very specific conditions of use.
Return to automatic
operation
At any time, press the button selected again to quit the programme engaged and return to auto-adaptive mode.
Manual operation
Select position M for sequential changing of the six gears. Push the lever towards the + sign to change up a gear. Pull the lever towards the - sign to change down a gear.
D disappears and the gears engaged appear in succession in the instrument panel.
It is only possible to change from one gear to another if the vehicle speed and engine speed permit; otherwise, the gearbox will operate temporarily in automatic mode.
It is possible to change from position D(automatic) to position M (manual) at any time. When the vehicle is stationary or moving very slowly, the gearbox selects gear M1automatically. The sport and snow programmes do not operate in manual mode.
If the engine speed is too low or too high, the gear selected flashes for a few seconds, then the actual gear engaged is displayed.
Page 201 of 404
9
Driving199
The parking sensors are switched off : switched off : switched off - when you exit reverse gear, - when the speed is higher than 6 mph (10 km/h) in for ward gear, - when the vehicle has been stationary for more than three seconds in for ward gear.
Deactivation Operating fault
Reactivation
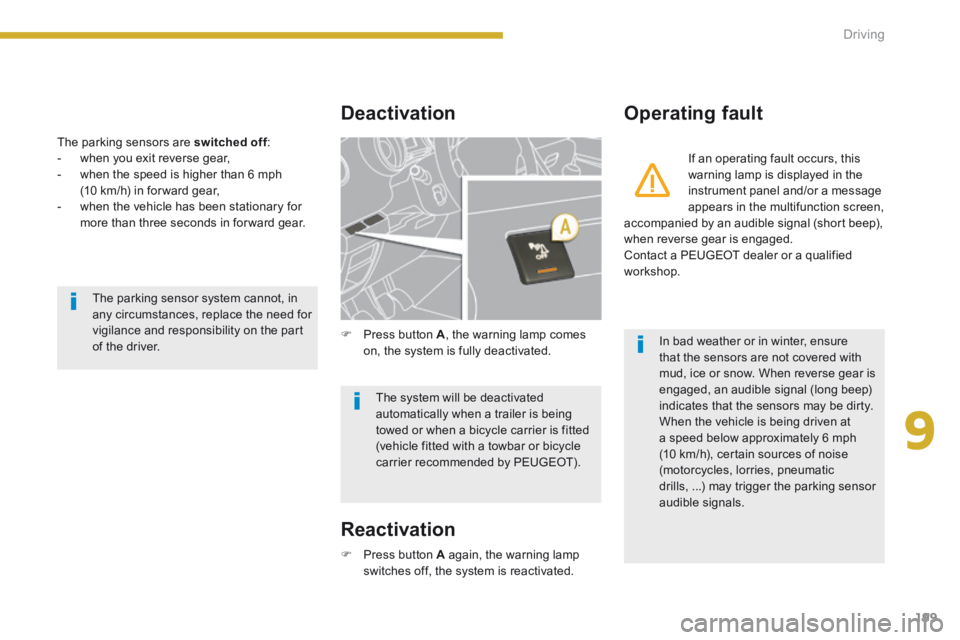
Press button A , the warning lamp comes on, the system is fully deactivated.
If an operating fault occurs, this warning lamp is displayed in the instrument panel and/or a message appears in the multifunction screen, accompanied by an audible signal (short beep), when reverse gear is engaged. Contact a PEUGEOT dealer or a qualified workshop.
In bad weather or in winter, ensure that the sensors are not covered with mud, ice or snow. When reverse gear is engaged, an audible signal (long beep) indicates that the sensors may be dirty. When the vehicle is being driven at a speed below approximately 6 mph (10 km/h), certain sources of noise (motorcycles, lorries, pneumatic drills, ...) may trigger the parking sensor audible signals.
The parking sensor system cannot, in any circumstances, replace the need for vigilance and responsibility on the part of the driver.
The system will be deactivated automatically when a trailer is being towed or when a bicycle carrier is fitted (vehicle fitted with a towbar or bicycle carrier recommended by PEUGEOT).
Press button A again, the warning lamp switches off, the system is reactivated.
Page 214 of 404
Checks
212
Brake disc wear
Brake pads
Brake wear depends on the style of driving, particularly in the case of vehicles used in town, over short distances. It may be necessary to have the condition of the brakes checked, even between vehicle services. Unless there is a leak in the circuit, a drop in the brake fluid level indicates that the brake pads are worn.
For information on checking brake disc wear, contact a PEUGEOT dealer or a qualified workshop.
Manual gearbox
The gearbox does not require any maintenance (no oil change). Refer to the warranty and maintenance record for the details of the level checking interval for this component.
Electronic gearbox
The gearbox does not require any maintenance (no oil change). Refer to the warranty and maintenance record for details of the checking interval for this component.
Automatic gearbox
The gearbox does not require any maintenance (no oil change). Refer to the warranty and maintenance record for details of the level checking interval for this component.
This system does not require any routine servicing. However, in the event of a problem, have the system checked by a PEUGEOT dealer or a qualified workshop.
Electric parking brake
Only use products recommended by PEUGEOT or products of equivalent quality and specification. In order to optimise the operation of units as important as those in the braking system, PEUGEOT selects and offers very specific products. After washing the vehicle, dampness, or in wintry conditions, ice can form on the brake discs and pads: braking efficiency may be reduced. Make light brake applications to dry and defrost the brakes.
For more information, refer to the "Electric parking brake - Operating faults" section.
Page 215 of 404
11
Practical information213
Temporary puncture repair kit
Complete system consisting of a compressor and a sealant cartridge which permits temporary repair of a tyre so that you can temporary repair of a tyre so that you can temporary repairdrive to the nearest garage. It is designed to repair most punctures which could affect the tyre, located on the tyre tread or shoulder.
List of tools
All of these tools are specific to your vehicle.
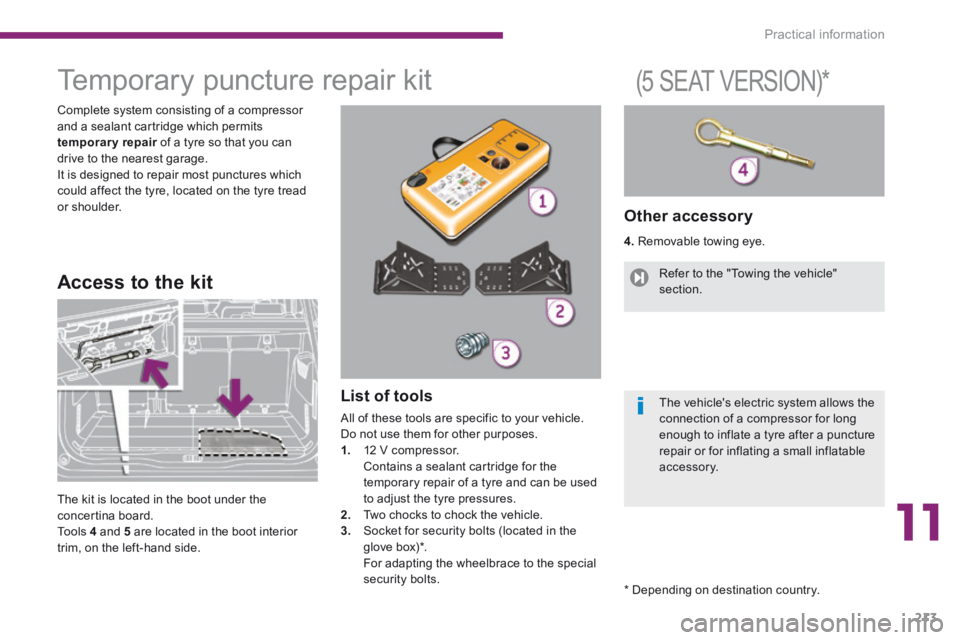
Do not use them for other purposes. 1. 12 V compressor. Contains a sealant cartridge for the temporary repair of a tyre and can be used to adjust the tyre pressures. 2. Two chocks to chock the vehicle. 3. Socket for security bolts (located in the glove box) * . For adapting the wheelbrace to the special security bolts.
Other accessory
4. Removable towing eye.
Access to the kit
(5 SEAT VERSION) *
The kit is located in the boot under the concertina board. To o l s 4 and 5 are located in the boot interior trim, on the left-hand side.
Refer to the "Towing the vehicle" section.
The vehicle's electric system allows the connection of a compressor for long
enough to inflate a tyre after a puncture repair or for inflating a small inflatable accessory.
* Depending on destination country.
Page 219 of 404
11
Practical information217
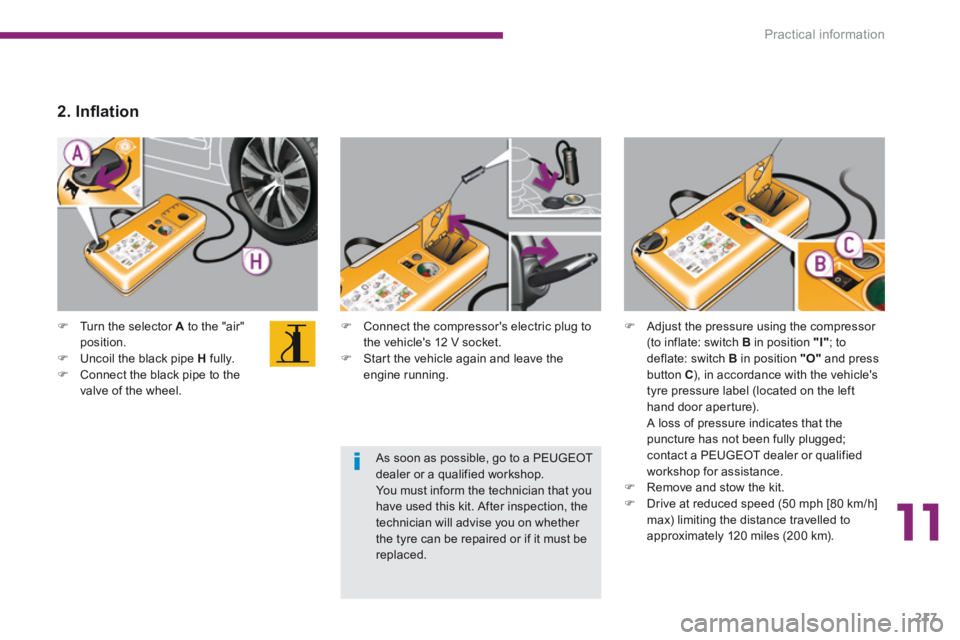
Connect the compressor's electric plug to the vehicle's 12 V socket. Start the vehicle again and leave the engine running.
Turn the selector A to the "air" position. Uncoil the black pipe H fully. Connect the black pipe to the valve of the wheel.
2 . I n fl a t i o n
Adjust the pressure using the compressor (to inflate: switch B in position "I" ; to deflate: switch B in position "O" and press button C ), in accordance with the vehicle's tyre pressure label (located on the left hand door aperture). A loss of pressure indicates that the puncture has not been fully plugged; contact a PEUGEOT dealer or qualified workshop for assistance. Remove and stow the kit. Drive at reduced speed (50 mph [80 km/h] max) limiting the distance travelled to approximately 120 miles (200 km).
As soon as possible, go to a PEUGEOT dealer or a qualified workshop. You must inform the technician that you have used this kit. After inspection, the technician will advise you on whether the tyre can be repaired or if it must be replaced.
Page 220 of 404
Practical information
218
Removing the cartridge
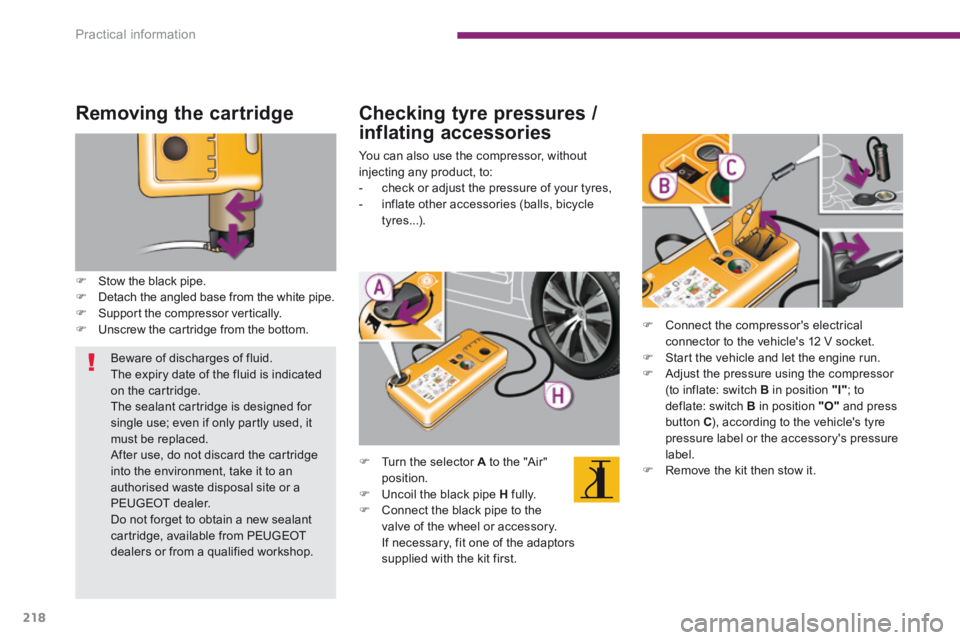
Stow the black pipe. Detach the angled base from the white pipe. Support the compressor vertically. Unscrew the cartridge from the bottom.
Checking tyre pressures /
inflating accessories
You can also use the compressor, without injecting any product, to: - check or adjust the pressure of your tyres, - inflate other accessories (balls, bicycle tyres...).
Turn the selector A to the "Air" position. Uncoil the black pipe H fully. Connect the black pipe to the valve of the wheel or accessory. If necessary, fit one of the adaptors supplied with the kit first.
Connect the compressor's electrical connector to the vehicle's 12 V socket. Start the vehicle and let the engine run. Adjust the pressure using the compressor (to inflate: switch B in position "I" ; to deflate: switch B in position "O" and press button C ), according to the vehicle's tyre pressure label or the accessory's pressure label. Remove the kit then stow it.
Beware of discharges of fluid. The expiry date of the fluid is indicated on the cartridge. The sealant cartridge is designed for single use; even if only partly used, it must be replaced. After use, do not discard the cartridge into the environment, take it to an authorised waste disposal site or a PEUGEOT dealer. Do not forget to obtain a new sealant cartridge, available from PEUGEOT dealers or from a qualified workshop.
Page 225 of 404
11
Practical information223
Changing a wheel *
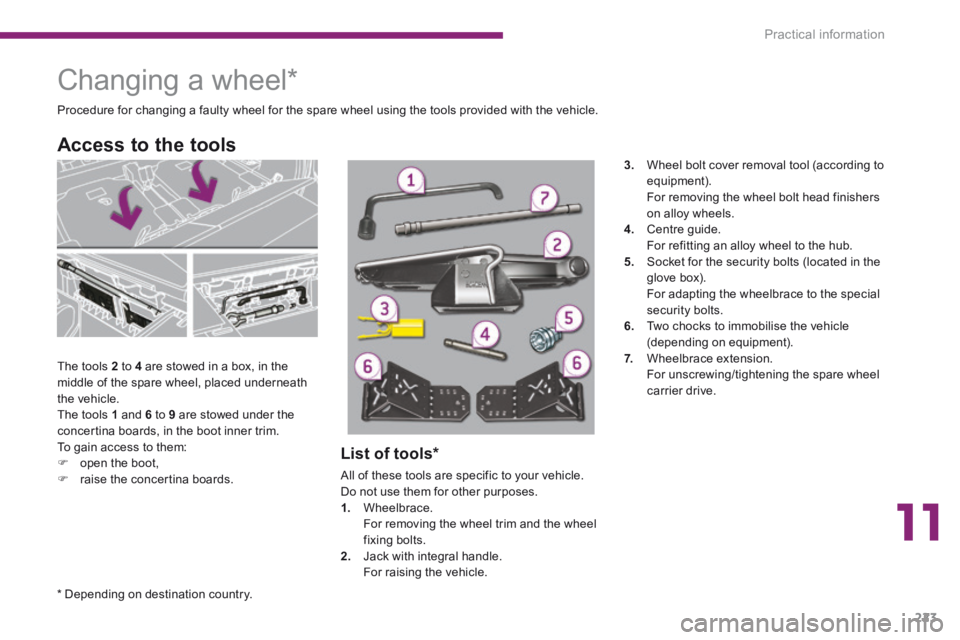
The tools 2 to 4 are stowed in a box, in the middle of the spare wheel, placed underneath the vehicle. The tools 1 and 6 to 9 are stowed under the concertina boards, in the boot inner trim. To gain access to them: open the boot, raise the concertina boards.
Access to the tools
Procedure for changing a faulty wheel for the spare wheel using the tools provided with the vehicle.
List of tools *
All of these tools are specific to your vehicle. Do not use them for other purposes. 1. Wheelbrace. For removing the wheel trim and the wheel fixing bolts. 2. Jack with integral handle. For raising the vehicle.
3. Wheel bolt cover removal tool (according to equipment). For removing the wheel bolt head finishers on alloy wheels. 4. Centre guide. For refitting an alloy wheel to the hub. 5. Socket for the security bolts (located in the glove box). For adapting the wheelbrace to the special security bolts. 6. Two chocks to immobilise the vehicle (depending on equipment). 7. Wheelbrace extension. For unscrewing/tightening the spare wheel carrier drive.
* Depending on destination country.
Page 226 of 404
Practical information
224
Other accessory
8. Removable towing eye.
Wheel with trim
When removing the wheel , detach the trim first using the wheelbrace 1 pulling at the valve passage hole. When refitting the wheel , refit the trim starting by placing its notch facing the valve and press around its edge with the palm of your hand.
Refer to the "Towing the vehicle" section.