2014 PEUGEOT 5008 lock
[x] Cancel search: lockPage 51 of 404

2
Multifunction screens49
"Trip computer" menu
Alert log
This summarises the active warning messages, displaying them in succession in the multifunction screen
Status of functions
This summarises the status of the functions present on the vehicle.
Press the "MENU" button to gain access to the general menu. Press the arrows, then the "OK" button to select the "Trip computer" menu.
Once this menu has been selected, you can consult information concerning the status of the vehicle (alert log, status of the functions...).
Defi ne the vehicle parameters
Once this menu has been selected, you can activate or deactivate the following equipment (according to country): - wiper linked with reverse gear (see "Visibility" section), - selective unlocking (see the "Access" section), - guide-me-home lighting (see the " Visibility" section), - interior mood lighting (see the " Visibility" section), - directional headlamps (see the "Visibility" section), - automatic or manual parking brake (see the "Driving" section), - ...
"Personalisation-
Configuration" menu
Once this menu has been selected, you can gain access to the following functions: - define the vehicle parameters, - display configuration, - choice of language.
On the "Trip computer" menu, select one of the applications:
This allows you to enter an approximate value for the distance to the final destination.
Enter the distance to the destination
Page 54 of 404
Multifunction screens
52
"SETUP" menu (PEUGEOT Connect PEUGEOT Connect PEUGEOT
Media Navigation (NG4 3D))
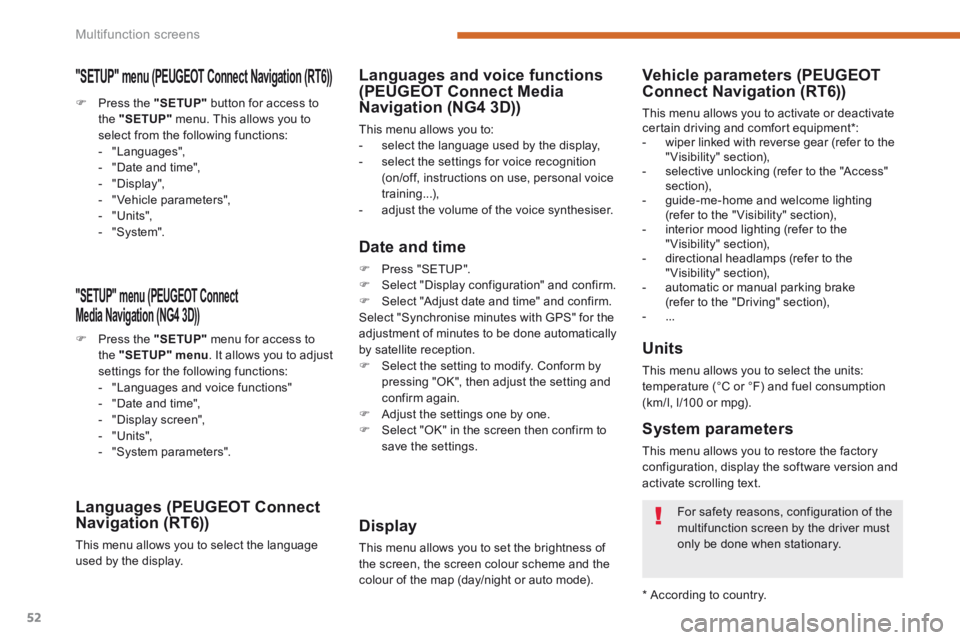
Press the "SETUP" menu for access to the "SETUP" menu . It allows you to adjust settings for the following functions: - "Languages and voice functions" - "Date and time", - "Display screen", - "Units", - "System parameters".
Languages (PEUGEOT Connect Navigation (RT6))
This menu allows you to select the language used by the display.
Languages and voice functions (PEUGEOT Connect Media Navigation (NG4 3D))
This menu allows you to: - select the language used by the display, - select the settings for voice recognition (on/off, instructions on use, personal voice training...), - adjust the volume of the voice synthesiser.
Date and time
Press "SETUP". Select "Display configuration" and confirm. Select "Adjust date and time" and confirm. Select "Synchronise minutes with GPS" for the adjustment of minutes to be done automatically by satellite reception. Select the setting to modify. Conform by pressing "OK", then adjust the setting and confirm again. Adjust the settings one by one.
Select "OK" in the screen then confirm to save the settings.
Display
This menu allows you to set the brightness of the screen, the screen colour scheme and the colour of the map (day/night or auto mode).
Units
This menu allows you to select the units: temperature (°C or °F) and fuel consumption (km/l, l/100 or mpg).
System parameters
This menu allows you to restore the factory configuration, display the software version and activate scrolling text.
For safety reasons, configuration of the multifunction screen by the driver must
only be done when stationary.
* According to country.
Vehicle parameters (PEUGEOTConnect Navigation (RT6))
This menu allows you to activate or deactivate certain driving and comfort equipment * : - wiper linked with reverse gear (refer to the "Visibility" section), - selective unlocking (refer to the "Access" section), - guide-me-home and welcome lighting (refer to the " Visibility" section), - interior mood lighting (refer to the "Visibility" section), - directional headlamps (refer to the "Visibility" section), - automatic or manual parking brake (refer to the "Driving" section), - ...
Press the "SETUP" button for access to the "SETUP" menu. This allows you to select from the following functions: - "Languages", - "Date and time", - "Display", - " Vehicle parameters", - "Units", - "System".
"SETUP" menu (PEUGEOT Connect Navigation (RT6)) PEUGEOT Connect Navigation (RT6)) PEUGEOT
Page 72 of 404
Comfort
70
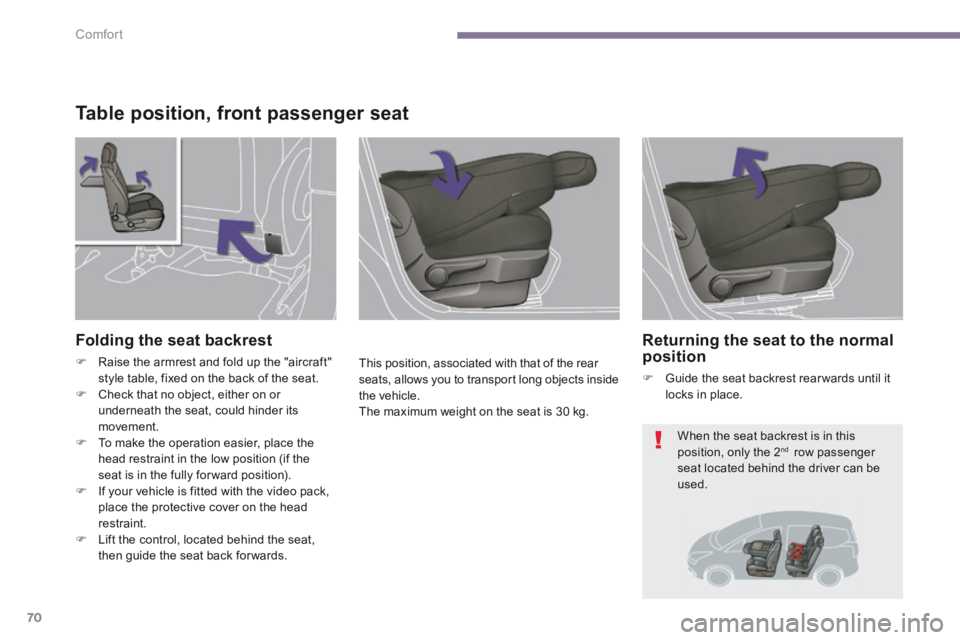
Table position, front passenger seat
This position, associated with that of the rear seats, allows you to transport long objects inside the vehicle. The maximum weight on the seat is 30 kg.
Folding the seat backrest
Raise the armrest and fold up the "aircraft" style table, fixed on the back of the seat. Check that no object, either on or underneath the seat, could hinder its movement. To make the operation easier, place the head restraint in the low position (if the seat is in the fully for ward position). If your vehicle is fitted with the video pack, place the protective cover on the head restraint. Lift the control, located behind the seat, then guide the seat back for wards.
Returning the seat to the normal position
Guide the seat backrest rear wards until it locks in place.
When the seat backrest is in this position, only the 2 nd row passenger seat located behind the driver can be used.
Page 75 of 404
3
Comfort73
Flat floor
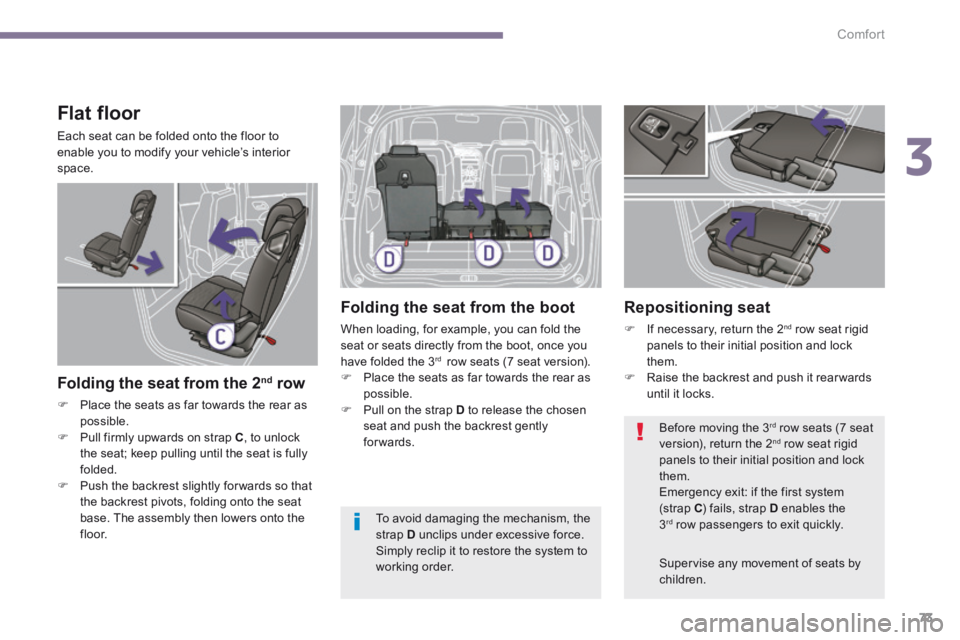
Each seat can be folded onto the floor to enable you to modify your vehicle’s interior space.
Folding the seat from the 2 nd row
Place the seats as far towards the rear as possible. Pull firmly upwards on strap C , to unlock the seat; keep pulling until the seat is fully folded. Push the backrest slightly for wards so that the backrest pivots, folding onto the seat base. The assembly then lowers onto the f l o o r.
Folding the seat from the boot
When loading, for example, you can fold the seat or seats directly from the boot, once you have folded the 3 rd row seats (7 seat version). Place the seats as far towards the rear as possible. Pull on the strap D to release the chosen seat and push the backrest gently forwards.
Repositioning seat
If necessary, return the 2 nd row seat rigid panels to their initial position and lock them. Raise the backrest and push it rear wards until it locks.
Supervise any movement of seats by children.
Before moving the 3 rd row seats (7 seat version), return the 2 nd row seat rigid panels to their initial position and lock them. Emergency exit: if the first system (strap C ) fails, strap D enables the 3 rd row passengers to exit quickly. To avoid damaging the mechanism, the strap D unclips under excessive force. Simply reclip it to restore the system to working order.
Page 76 of 404
Comfort
74
Rigid panel
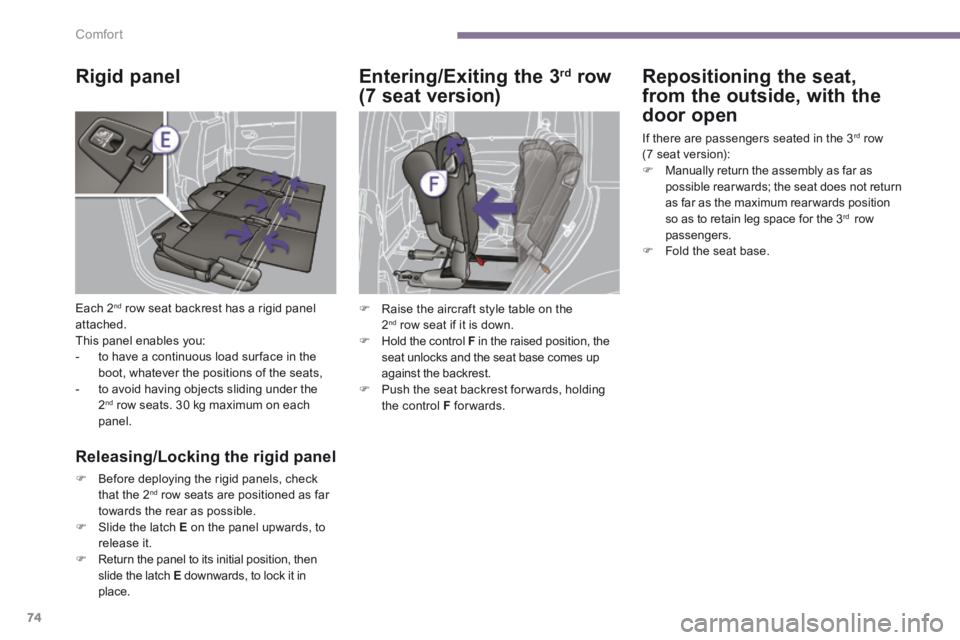
Each 2 nd row seat backrest has a rigid panel attached. This panel enables you: - to have a continuous load sur face in the boot, whatever the positions of the seats, - to avoid having objects sliding under the 2 nd row seats. 30 kg maximum on each panel.
Releasing/Locking the rigid panel
Before deploying the rigid panels, check that the 2 nd row seats are positioned as far towards the rear as possible. Slide the latch E on the panel upwards, to
release it. Return the panel to its initial position, then slide the latch E downwards, to lock it in place.
Entering/Exiting the 3 rd row
(7 seat version)
Repositioning the seat,
from the outside, with the
door open
If there are passengers seated in the 3 rd row (7 seat version): Manually return the assembly as far as possible rear wards; the seat does not return as far as the maximum rear wards position so as to retain leg space for the 3 rd row passengers. Fold the seat base.
Raise the aircraft style table on the 2 nd row seat if it is down. Hold the control F in the raised position, the seat unlocks and the seat base comes up against the backrest. Push the seat backrest for wards, holding the control F forwards.
Page 77 of 404
3
Comfort75
3 rd row seats (7 seat version)
Concertina boards
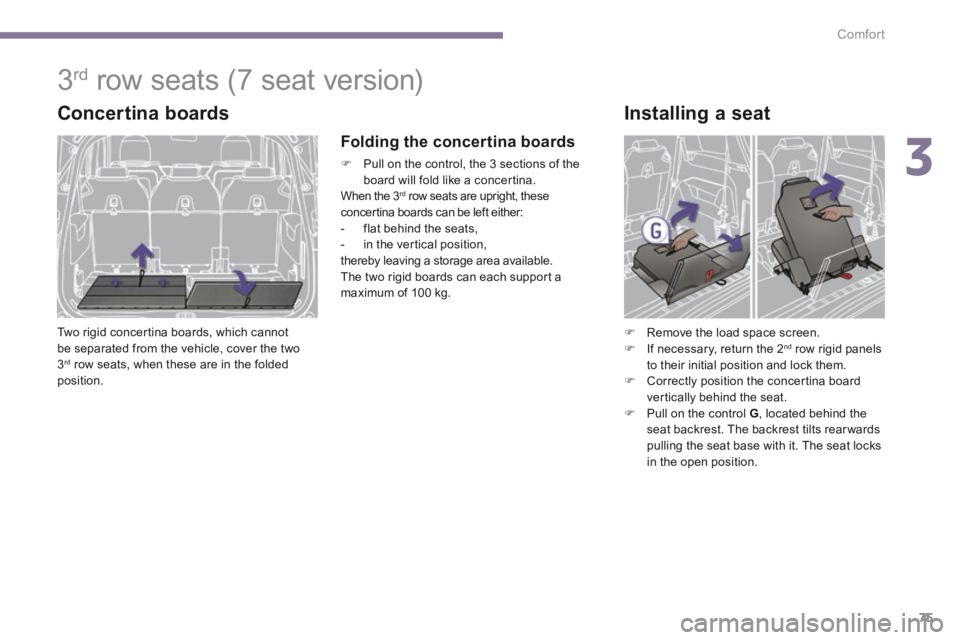
Two rigid concertina boards, which cannot be separated from the vehicle, cover the two 3 rd row seats, when these are in the folded position.
Folding the concertina boards
Pull on the control, the 3 sections of the board will fold like a concertina. When the 3 rd row seats are upright, these concertina boards can be left either:
- flat behind the seats, - in the vertical position, thereby leaving a storage area available. The two rigid boards can each support a maximum of 100 kg.
Installing a seat
Remove the load space screen. If necessary, return the 2 nd row rigid panels to their initial position and lock them. Correctly position the concertina board vertically behind the seat. Pull on the control G , located behind the seat backrest. The backrest tilts rear wards
pulling the seat base with it. The seat locks in the open position.
Page 78 of 404
Comfort
76
Storing a seat
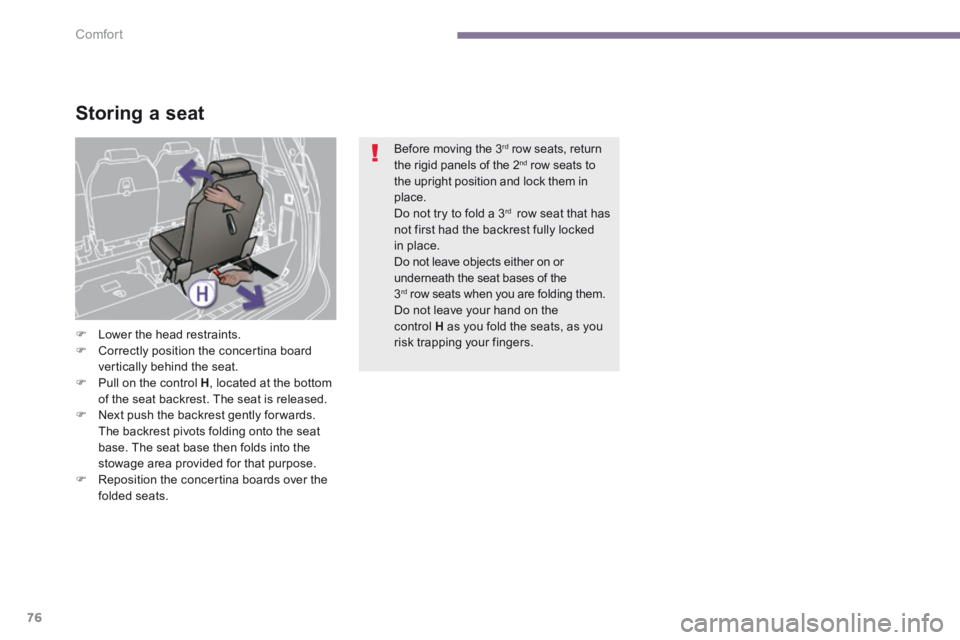
Lower the head restraints. Correctly position the concertina board vertically behind the seat. Pull on the control H , located at the bottom of the seat backrest. The seat is released. Next push the backrest gently for wards. The backrest pivots folding onto the seat base. The seat base then folds into the stowage area provided for that purpose. Reposition the concertina boards over the folded seats.
Before moving the 3 rd row seats, return the rigid panels of the 2 nd row seats to the upright position and lock them in place. Do not try to fold a 3 rd row seat that has
not first had the backrest fully locked in place. Do not leave objects either on or underneath the seat bases of the 3 rd row seats when you are folding them. Do not leave your hand on the control H as you fold the seats, as you risk trapping your fingers.
Page 80 of 404

Comfort
78
Mirrors
Each fitted with an adjustable mirror glass permitting the lateral rearward vision necessary for overtaking or parking. They can also be folded for parking in confined spaces.
Folding
- Automatic: lock the vehicle using the remote control or the key. - Manual: with the ignition on, pull control A - Manual: with the ignition on, pull control A - Manual: with the ignition on, pull control rearwards.
Unfolding
- Automatic: unlock the vehicle using the remote control or the key. - Manual: with the ignition on, pull control A - Manual: with the ignition on, pull control A - Manual: with the ignition on, pull control rearwards.
Adjustment
Move control A to the right or to the left to A to the right or to the left to Aselect the corresponding mirror. Move control B in all four directions to adjust. Return control A to the central position. Demisting - Defrosting
If your vehicle is fitted with heated mirrors, the demisting-defrosting operates by switching on the heated rear screen (refer to the "Rear screen demist-defrost" page).
The rear screen demist - defrost can only operate when the engine is running.
The objects observed are, in reality, closer than they appear. Take this into account in order to correctly judge the distance of vehicles approaching from behind.
If the mirrors are folded using control A , they will not unfold when the vehicle is unlocked. Pull again on control A .
The folding and unfolding of the door mirrors using the remote control can be deactivated by a PEUGEOT dealer or a qualified workshop. Fold the mirrors when putting your vehicle through an automatic car wash.
Door mirrors
If necessary, it is possible to fold the mirrors manually.