Page 74 of 404
Comfort
72
2 nd row seats
Forwards-backwards adjustment
Lift the control A Lift the control A Lift the control , located at the front of the seat, then adjust the seat to the position desired.
"Comfort" position
The three 2 nd row seats are independent of each other and all the same width. They all have a "comfort" position. Placing a seat in the "comfort" position
Pull on the control B and guide the seat rearwards. The backrest reclines and the seat base moves for ward slightly.
Returning the seat to the initial position
Pull on the control B and allow the seat to come for wards.
Always supervise any movements of seats by children.
Page 75 of 404

3
Comfort73
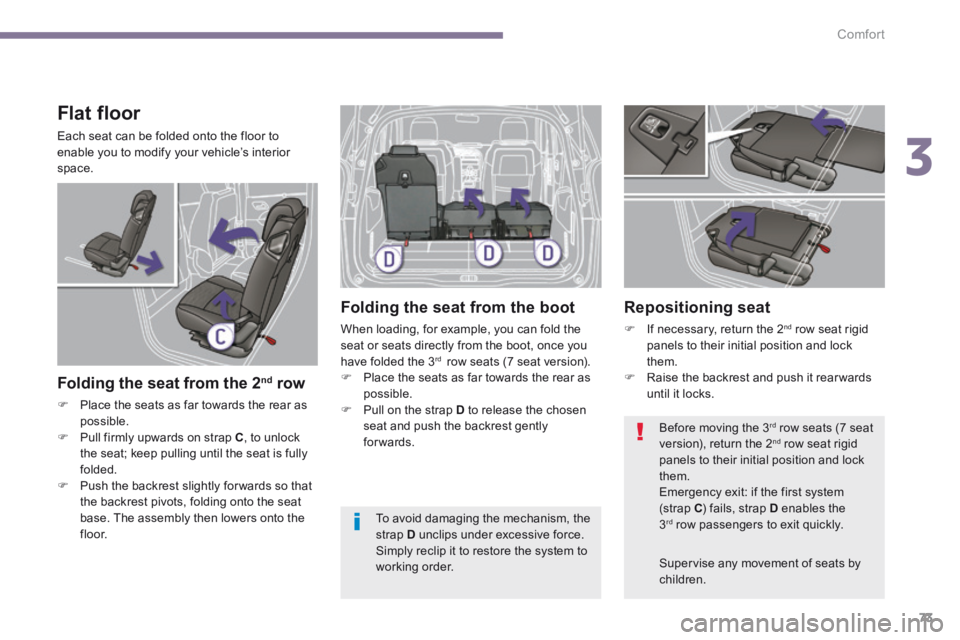
Flat floor
Each seat can be folded onto the floor to enable you to modify your vehicle’s interior space.
Folding the seat from the 2 nd row
Place the seats as far towards the rear as possible. Pull firmly upwards on strap C , to unlock the seat; keep pulling until the seat is fully folded. Push the backrest slightly for wards so that the backrest pivots, folding onto the seat base. The assembly then lowers onto the f l o o r.
Folding the seat from the boot
When loading, for example, you can fold the seat or seats directly from the boot, once you have folded the 3 rd row seats (7 seat version). Place the seats as far towards the rear as possible. Pull on the strap D to release the chosen seat and push the backrest gently forwards.
Repositioning seat
If necessary, return the 2 nd row seat rigid panels to their initial position and lock them. Raise the backrest and push it rear wards until it locks.
Supervise any movement of seats by children.
Before moving the 3 rd row seats (7 seat version), return the 2 nd row seat rigid panels to their initial position and lock them. Emergency exit: if the first system (strap C ) fails, strap D enables the 3 rd row passengers to exit quickly. To avoid damaging the mechanism, the strap D unclips under excessive force. Simply reclip it to restore the system to working order.
Page 76 of 404

Comfort
74
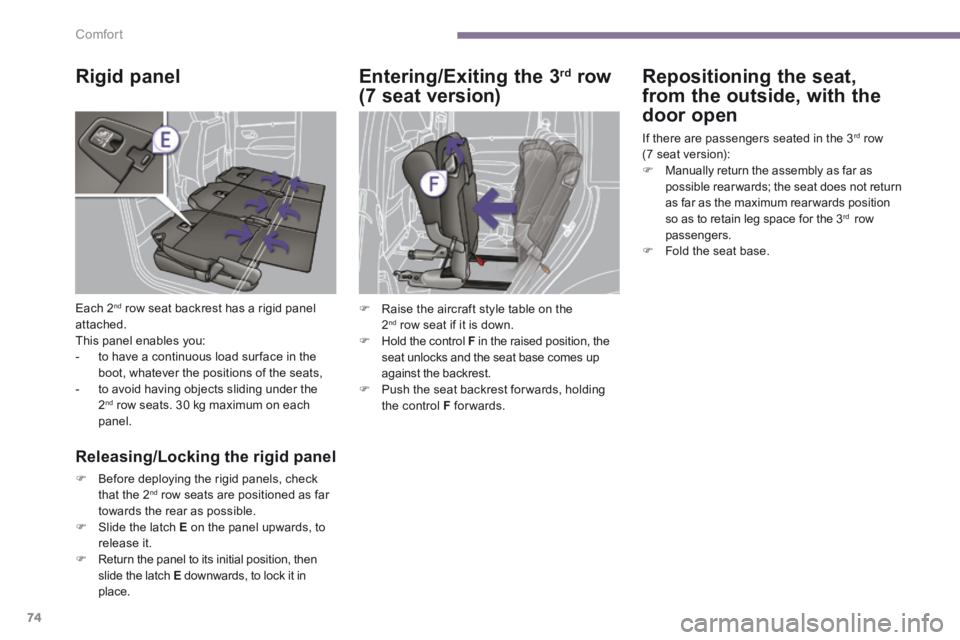
Rigid panel
Each 2 nd row seat backrest has a rigid panel attached. This panel enables you: - to have a continuous load sur face in the boot, whatever the positions of the seats, - to avoid having objects sliding under the 2 nd row seats. 30 kg maximum on each panel.
Releasing/Locking the rigid panel
Before deploying the rigid panels, check that the 2 nd row seats are positioned as far towards the rear as possible. Slide the latch E on the panel upwards, to
release it. Return the panel to its initial position, then slide the latch E downwards, to lock it in place.
Entering/Exiting the 3 rd row
(7 seat version)
Repositioning the seat,
from the outside, with the
door open
If there are passengers seated in the 3 rd row (7 seat version): Manually return the assembly as far as possible rear wards; the seat does not return as far as the maximum rear wards position so as to retain leg space for the 3 rd row passengers. Fold the seat base.
Raise the aircraft style table on the 2 nd row seat if it is down. Hold the control F in the raised position, the seat unlocks and the seat base comes up against the backrest. Push the seat backrest for wards, holding the control F forwards.
Page 77 of 404
3
Comfort75
3 rd row seats (7 seat version)
Concertina boards
Two rigid concertina boards, which cannot be separated from the vehicle, cover the two 3 rd row seats, when these are in the folded position.
Folding the concertina boards
Pull on the control, the 3 sections of the board will fold like a concertina. When the 3 rd row seats are upright, these concertina boards can be left either:
- flat behind the seats, - in the vertical position, thereby leaving a storage area available. The two rigid boards can each support a maximum of 100 kg.
Installing a seat
Remove the load space screen. If necessary, return the 2 nd row rigid panels to their initial position and lock them. Correctly position the concertina board vertically behind the seat. Pull on the control G , located behind the seat backrest. The backrest tilts rear wards
pulling the seat base with it. The seat locks in the open position.
Page 78 of 404
Comfort
76
Storing a seat
Lower the head restraints. Correctly position the concertina board vertically behind the seat. Pull on the control H , located at the bottom of the seat backrest. The seat is released. Next push the backrest gently for wards. The backrest pivots folding onto the seat base. The seat base then folds into the stowage area provided for that purpose. Reposition the concertina boards over the folded seats.
Before moving the 3 rd row seats, return the rigid panels of the 2 nd row seats to the upright position and lock them in place. Do not try to fold a 3 rd row seat that has
not first had the backrest fully locked in place. Do not leave objects either on or underneath the seat bases of the 3 rd row seats when you are folding them. Do not leave your hand on the control H as you fold the seats, as you risk trapping your fingers.
Page 79 of 404
3
Comfort77
Seat modularity and the various seat confi gurations
Examples of configurations
7 seats
Transporting long objects 5 seats
Transport (4 seats)
Loading a large volume
Designed to be modular, your vehicle offers numerous seat installation and loading configurations. Operations to change the existing configuration must only be carried out when stationary (see paragraphs "Rear seats".
Page 97 of 404
4
Access95
Tailgate release
Unlocking
Fold back the rear seats to gain access to the lock from inside the boot. Insert a small screwdriver into hole A of the lock to unlock the tailgate. Move the latch to the left.
Locking after closing
If the fault persists after closing again, the boot will remain locked. System allowing the mechanical unlocking of the boot in the event of a battery or central locking system malfunction.
Page 109 of 404

5
Visibility107
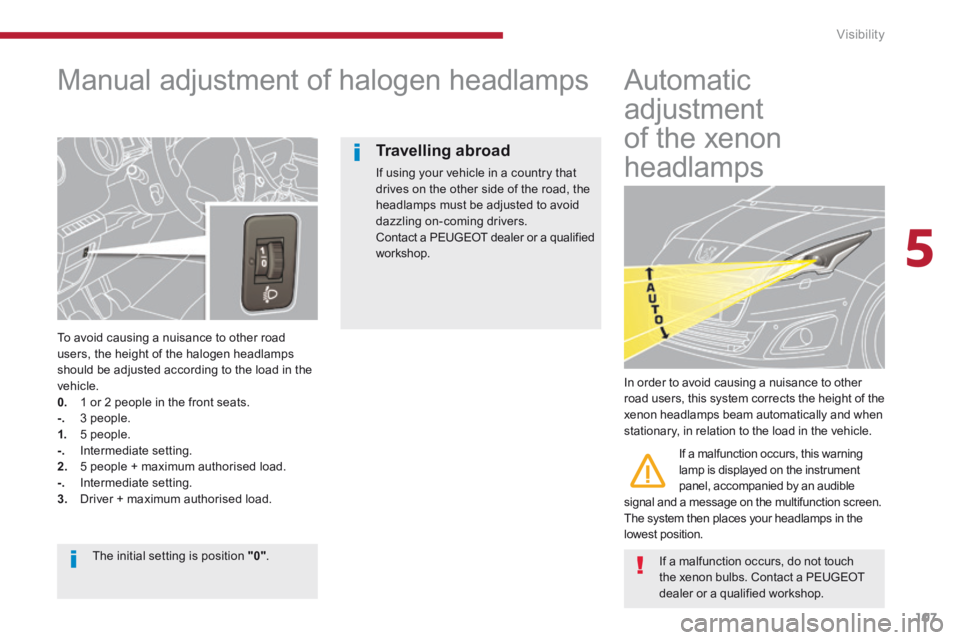
Manual adjustment of halogen headlamps
To avoid causing a nuisance to other road users, the height of the halogen headlamps should be adjusted according to the load in the vehicle. 0. 1 or 2 people in the front seats. -. 3 people. 1. 5 people. -. Intermediate setting. 2. 5 people + maximum authorised load. -. Intermediate setting. 3. Driver + maximum authorised load.
Automatic
adjustment
of the xenon
headlamps
In order to avoid causing a nuisance to other road users, this system corrects the height of the xenon headlamps beam automatically and when stationary, in relation to the load in the vehicle.
If a malfunction occurs, this warning lamp is displayed on the instrument panel, accompanied by an audible signal and a message on the multifunction screen. The system then places your headlamps in the
lowest position.
If a malfunction occurs, do not touch the xenon bulbs. Contact a PEUGEOT
dealer or a qualified workshop.
Travelling abroad
If using your vehicle in a country that drives on the other side of the road, the headlamps must be adjusted to avoid dazzling on-coming drivers. Contact a PEUGEOT dealer or a qualified workshop.
The initial setting is position "0" .