2014 Peugeot 308 display
[x] Cancel search: displayPage 4 of 400
.
.
ContentsVisual search
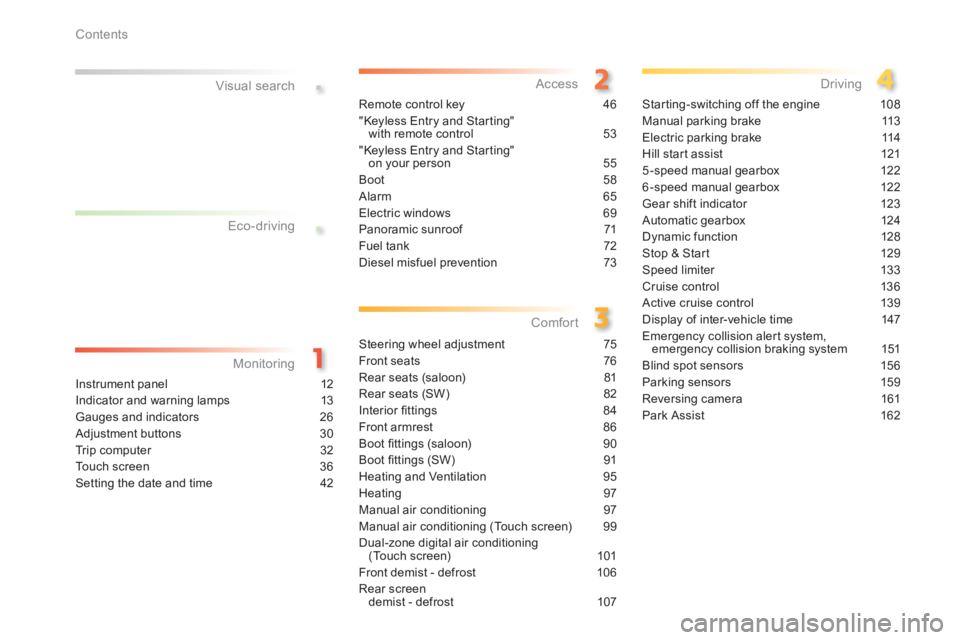
Instrument panel 12
Indicator and warning lamps 13
Gauges and indicators 26
Adjustment buttons 30
Trip computer 32
Touch screen 36
Setting the date and time 42
Remote control key 46
"Keyless Entry and Starting" with remote control 53
"Keyless Entry and Starting" on your person 55
Boot 58
Alarm 65
Electric windows 69
Panoramic sunroof 71
Fuel tank 72
Diesel misfuel prevention 73
Steering wheel adjustment 75
Front seats 76
Rear seats (saloon) 81
Rear seats (SW) 82
Interior fi ttings 84
Front armrest 86
Boot fi ttings (saloon) 90
Boot fi ttings (SW) 91
Heating and Ventilation 95
Heating 97
Manual air conditioning 97
Manual air conditioning (Touch screen) 99
Dual-zone digital air conditioning (Touch screen) 101
Front demist - defrost 106
Rear screen demist - defrost 107
Starting-switching off the engine 108
Manual parking brake 113
Electric parking brake 114
Hill start assist 121
5-speed manual gearbox 122
6-speed manual gearbox 122
Gear shift indicator 123
Automatic gearbox 124
Dynamic function 128
Stop & Start 129
Speed limiter 133
Cruise control 136
Active cruise control 139
Display of inter-vehicle time 147
Emergency collision alert system, emergency collision braking system 151
Blind spot sensors 156
Parking sensors 159
Reversing camera 161
Park Assist 162
Eco-driving
Monitoring Access
Comfort Driving
Page 10 of 400
8
Visual search
Instruments and controls (cont.)
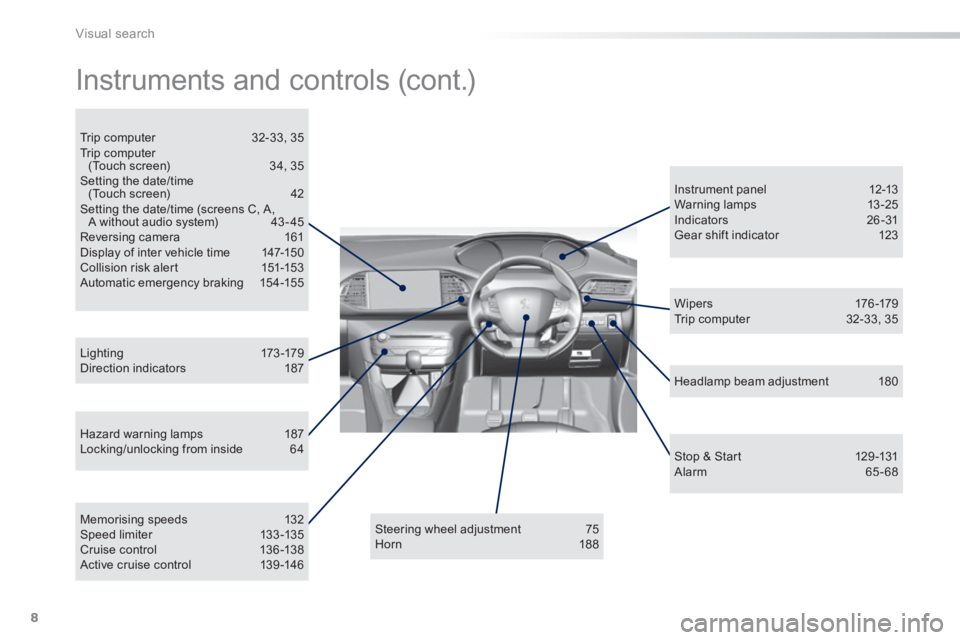
Hazard warning lamps 187 Locking/unlocking from inside 64
L i g ht i n g 173 -179 Direction indicators 187
Instrument panel 12-13 Warning lamps 13-25 Indicators 26 -31 Gear shift indicator 123
Steering wheel adjustment 75 Horn 188
Headlamp beam adjustment 180
Memorising speeds 132 Speed limiter 133 -135 Cruise control 136 -138 Active cruise control 139 -146
W i p e r s 176 -179 Trip computer 32-33, 35
Trip computer 32-33, 35 Trip computer (Touch screen) 34, 35 Setting the date/time (Touch screen) 42 Setting the date/time (screens C, A, A without audio system) 43 - 45 Reversing camera 161 Display of inter vehicle time 147-150 Collision risk alert 151-153 Automatic emergency braking 154-155
Stop & Start 129 -131 Alarm 65 - 68
Page 12 of 400
10
Eco-driving
Optimise the use of your gearbox
With a manual gearbox, move off gently and change up without waiting. During acceleration change up early.
With an automatic or electronic gearbox, give preference to automatic mode and avoid pressing the accelerator pedal heavily or suddenly.
Control the use of your electrical
equipment
Before moving off, if the passenger compartment is too warm, ventilate it by opening the windows and air vents before using the air conditioning. Above 30 mph (50 km/h), close the windows and leave the air vents open. Remember to make use of equipment that can help keep the temperature in the passenger compartment down (sunroof and window blinds...). Switch off the air conditioning, unless it has automatic regulation, as soon as the desired temperature is attained. Switch off the demisting and defrosting controls, if not automatic. Switch off the heated seat as soon as possible.
Switch off the headlamps and front foglamps when the level of light does not require their use.
Avoid running the engine before moving off, particularly in winter; your vehicle will warm up much faster while driving.
As a passenger, if you avoid connecting your multimedia devices (film, music, video game...), you will contribute towards limiting the consumption of electrical energy, and so of fuel. Disconnect your portable devices before leaving the vehicle.
Eco-driving
Eco-driving is a range of everyday practices that allow the motorist to optimise their fuel consumption and CO2 emissions.
Drive smoothly
Maintain a safe distance between vehicles, use engine braking rather than the brake pedal, and press the accelerator progressively. These practices contribute towards a reduction in fuel consumption and CO2 emissions and also helps reduce the background traffic noise.
If your vehicle has cruise control, make use of the system at speeds above 25 mph (40 km/h) when the traffic is flowing well.
The gear shift indicator invites you engage the most suitable gear: as soon as the indication is displayed in the instrument panel, follow it straight away. For vehicles fitted with an electronic or automatic gearbox, this indicator appears only in manual mode.
Page 14 of 400
12
Monitoring
Instrument panel
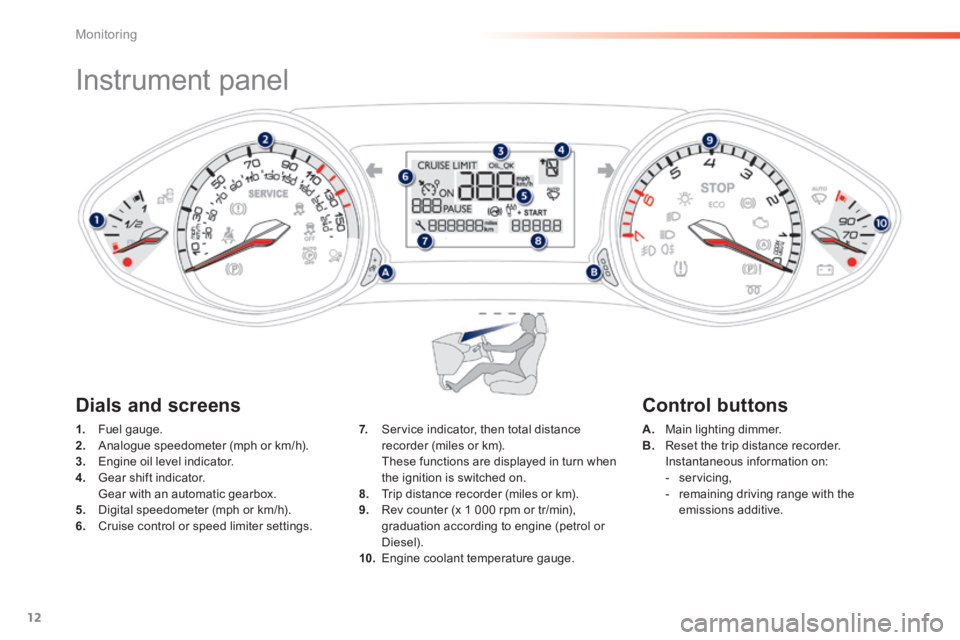
1. Fuel gauge. 2. Analogue speedometer (mph or km/h). 3. Engine oil level indicator. 4. Gear shift indicator. Gear with an automatic gearbox. 5. Digital speedometer (mph or km/h). 6. Cruise control or speed limiter settings.
A. Main lighting dimmer. B. Reset the trip distance recorder. Instantaneous information on: - servicing, - remaining driving range with the emissions additive.
7. Service indicator, then total distance recorder (miles or km). These functions are displayed in turn when the ignition is switched on. 8. Trip distance recorder (miles or km). 9. Rev counter (x 1 000 rpm or tr/min), graduation according to engine (petrol or
Diesel). 10. Engine coolant temperature gauge.
Dials and screens Control buttons
Page 19 of 400
17
1
Monitoring
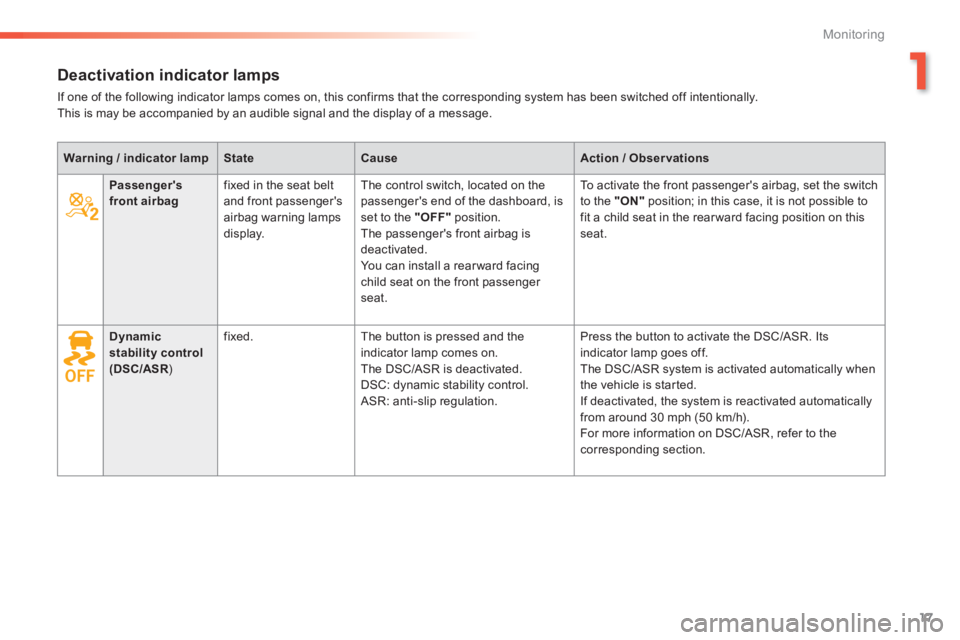
Deactivation indicator lamps
If one of the following indicator lamps comes on, this confirms that the corresponding system has been switched off intentionally. This is may be accompanied by an audible signal and the display of a message.
Warning / indicator lampStateCauseAction / Observations
Passenger's front airbag fixed in the seat belt and front passenger's airbag warning lamps
display.
The control switch, located on the passenger's end of the dashboard, is set to the "OFF" position.
The passenger's front airbag is deactivated. You can install a rear ward facing child seat on the front passenger seat.
To activate the front passenger's airbag, set the switch to the "ON" position; in this case, it is not possible to fit a child seat in the rear ward facing position on this
seat.
Dynamic stability control (DSC/ASR ) (DSC/ASR ) (DSC/ASR
fixed. The button is pressed and the indicator lamp comes on. The DSC/ASR is deactivated. DSC: dynamic stability control. ASR: anti-slip regulation.
Press the button to activate the DSC/ASR. Its indicator lamp goes off. The DSC/ASR system is activated automatically when the vehicle is started. If deactivated, the system is reactivated automatically from around 30 mph (50 km/h).
For more information on DSC/ASR, refer to the corresponding section.
Page 29 of 400
27
1
Monitoring
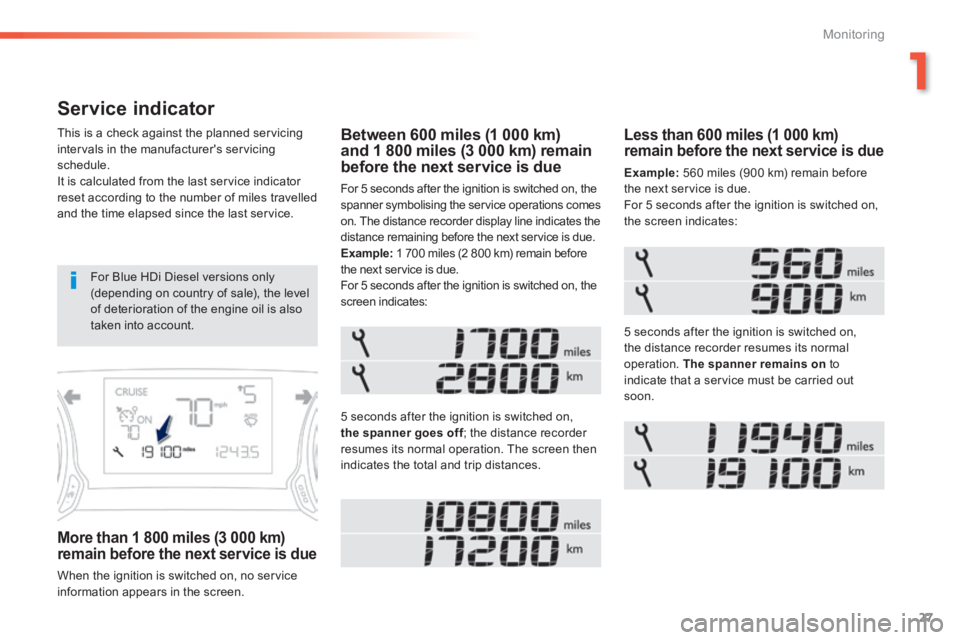
Service indicator
This is a check against the planned servicing intervals in the manufacturer's servicing schedule. It is calculated from the last service indicator reset according to the number of miles travelled and the time elapsed since the last service.
More than 1 800 miles (3 000 km) remain before the next service is due
When the ignition is switched on, no service information appears in the screen.
Less than 600 miles (1 000 km) remain before the next service is due
Example: 560 miles (900 km) remain before the next service is due. For 5 seconds after the ignition is switched on, the screen indicates:
Between 600 miles (1 000 km) and 1 800 miles (3 000 km) remain before the next service is due
For 5 seconds after the ignition is switched on, the spanner symbolising the service operations comes on. The distance recorder display line indicates the
distance remaining before the next service is due. Example: 1 700 miles (2 800 km) remain before the next service is due. For 5 seconds after the ignition is switched on, the screen indicates:
5 seconds after the ignition is switched on, the spanner goes off ; the distance recorder the spanner goes off ; the distance recorder the spanner goes offresumes its normal operation. The screen then indicates the total and trip distances.
5 seconds after the ignition is switched on, the distance recorder resumes its normal operation. The spanner remains on to indicate that a service must be carried out soon.
For Blue HDi Diesel versions only (depending on country of sale), the level of deterioration of the engine oil is also taken into account.
Page 30 of 400
28
Monitoring
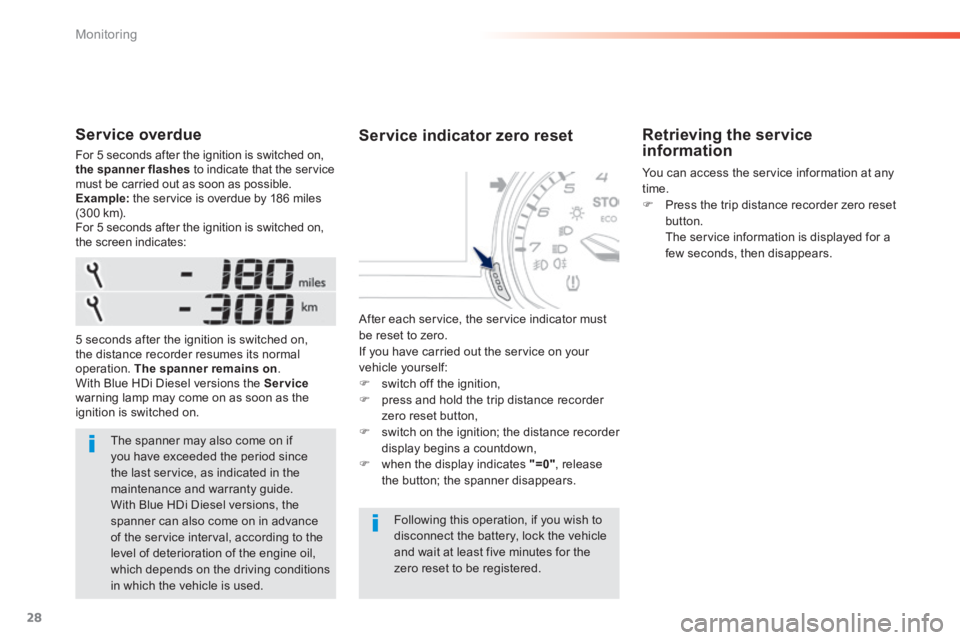
Service overdue
For 5 seconds after the ignition is switched on, the spanner flashes to indicate that the service must be carried out as soon as possible. Example: the service is overdue by 186 miles (3 0 0 k m). For 5 seconds after the ignition is switched on, the screen indicates:
The spanner may also come on if you have exceeded the period since the last service, as indicated in the maintenance and warranty guide. With Blue HDi Diesel versions, the spanner can also come on in advance
of the service interval, according to the level of deterioration of the engine oil, which depends on the driving conditions in which the vehicle is used.
5 seconds after the ignition is switched on, the distance recorder resumes its normal operation. The spanner remains on . With Blue HDi Diesel versions the Servicewarning lamp may come on as soon as the ignition is switched on.
Service indicator zero reset
Following this operation, if you wish to
disconnect the battery, lock the vehicle and wait at least five minutes for the zero reset to be registered.
Retrieving the service information
You can access the service information at any time. Press the trip distance recorder zero reset button. The service information is displayed for a few seconds, then disappears.
After each service, the service indicator must be reset to zero. If you have carried out the service on your vehicle yourself: switch off the ignition, press and hold the trip distance recorder zero reset button, switch on the ignition; the distance recorder display begins a countdown, when the display indicates "=0" , release the button; the spanner disappears.
Page 31 of 400
29
1
Monitoring
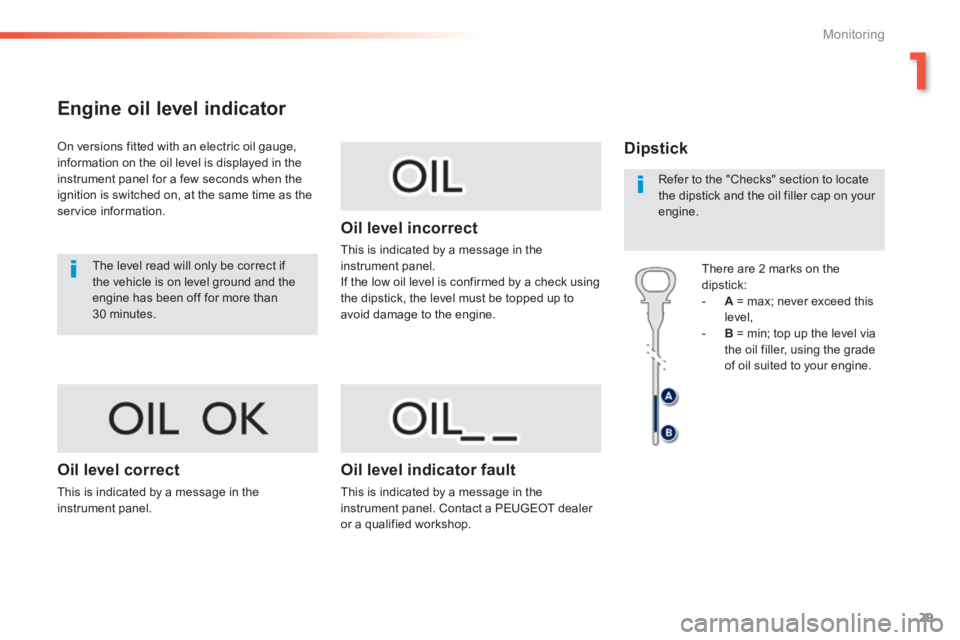
Engine oil level indicator
On versions fitted with an electric oil gauge, information on the oil level is displayed in the instrument panel for a few seconds when the ignition is switched on, at the same time as the service information.
The level read will only be correct if the vehicle is on level ground and the engine has been off for more than 30 minutes.
Oil level correct
This is indicated by a message in the instrument panel.
Oil level incorrect
This is indicated by a message in the instrument panel. If the low oil level is confirmed by a check using the dipstick, the level must be topped up to avoid damage to the engine.
Oil level indicator fault
This is indicated by a message in the instrument panel. Contact a PEUGEOT dealer or a qualified workshop.
Dipstick
There are 2 marks on the dipstick: - A = max; never exceed this level, - B = min; top up the level via the oil filler, using the grade of oil suited to your engine.
Refer to the "Checks" section to locate the dipstick and the oil filler cap on your engine.