Page 49 of 268

3
i
i
47
COMFORT
The control button is located
on the heating or air condition-
ing system control panel.
REAR SCREEN DEMIST - DEFROST
Switching on
The rear screen demisting/defrosting
can only operate when the engine is
running.
Press this button to demist/defrost the rear screen and (depending on
version) the door mirrors. The indi-
cator lamp associated with the but-
ton comes on.
Switching off
The demisting/defrosting switches off
automatically to prevent an excessive
consumption of current.
It is possible to stop the demisting/de-frosting operation before it is switched
off automatically by pressing the button
again. The indicator lamp associated
with the button switches off.
If the engine is switched off before the
demisting/defrosting is switched off au-
tomatically, demisting/defrosting will re-
sume next time the engine is switched on.
Switch off the demisting/de-frosting of the rear screen and
door mirrors as soon as ap-
propriate as lower current con-
sumption results in reduced
fuel consumption.
The demist/defrost is deactivated
when the retractable roof is stored
in the boot.
Page 50 of 268

3
ii
i
48
COMFORT
When the engine is cold, to prevent
too great a distribution of cold air,
the air fl ow will reach its optimum
level gradually.
In cold weather, it favours the dis-
tribution of warm air to the wind-
screen, side windows and footwells
only. On entering the vehicle, if the in-
terior temperature is much colder
or warmer than the comfort value,
there is no need to change the
value displayed in order to obtain
the comfort required. The system
corrects the difference in tempera-
ture automatically and as quickly
as possible.
The air conditioning can only operate
with the engine running. The driver and front passen-
ger can each adjust the tem-
perature to their requirements.
Turn control 2 or 3 to the left or to
the right respectively to decrease or
increase this value.
A setting around the value 21 provides
optimum comfort. However, depend-
ing on your requirements, a setting be-
tween 18 and 24 is normal.
You are advised to avoid a left / right
setting difference of more than 3. 4. Automatic visibility programme
The automatic comfort pro-
gramme may not be suffi cient
to quickly demist or defrost
the windscreen and side win-
dows (humidity, several pas-
sengers, ice, etc.).
In this case, select the automatic visibility programme.
The system automatically controls the
air conditioning, the air fl ow and the air
intake and provides optimum distribu-
tion of the ventilation to the windscreen
and side windows.
Automatic operation
Press the "AUTO" button.
The indicator lamp in the
button comes on. 2. Driver's side adjustment
DUAL-ZONE DIGITAL AIR CONDITIONING
We recommend the use of this mode:
it permits automatic and optimised ad-
justment of all of the functions, passen-
ger compartment temperature, air fl ow,
air distribution and air recirculation, in
accordance with the comfort value that
you have chosen.
This system is designed to operate ef-
fectively in all seasons, with automatic
adaptation in the "cabriolet" confi gura-
tion. The value indicated on the display cor-
responds to a level of comfort and not
to a temperature in degrees Celsius or
Fahrenheit.
To switch it off, press the "visibility"
button again or press the "AUTO"
button, the indicator lamp in the but-
ton goes off and the indicator lamp
in the "AUTO" button comes on.
1. Automatic comfort programme
3. Passenger's side adjustment
With Stop & Start, when demist-
ing has been activated, the STOP
mode is not available.
Page 51 of 268

3
!
i
49
COMFORT
Manual operation
If you wish, you can make a different
choice from that offered by the system
by changing a setting. The other func-
tions will still be controlled automati-
cally.
Pressing the "AUTO" button returns
the system to completely automatic
operation.
Press this button to switch off the air conditioning. 6. Air distribution adjustment
Press one or more buttons to direct the air fl ow towards
the:
7. Air fl ow adjustment Turn this control to the left to decrease the air fl ow or
to the right to increase the
air fl ow.
8. Air intake / Air recirculation
Switching the system off
Turn the air fl ow control to the left until all of the indicator lamps go off.
This action switches off all of the func-
tions of the system.
Temperature related comfort is no lon-
ger guaranteed but a slight fl ow of air,
due to the movement of the vehicle, can
still be felt.
Turn the air fl ow dial to the right or press the "AUTO" button to reacti-
vate the system with the values set
before it was switched off.
Press this button for recir- culation of the interior air.
The indicator lamp in the
button comes on.
5. Air conditioning On / Off
Avoid prolonged operation in inte-
rior air recirculation mode or driving
for long periods with the system off
(risk of condensation and of dete-
rioration of the air quality).
- windscreen and side windows (dem-
isting or defrosting),
- windscreen, side windows and vents,
- windscreen, side windows, vents and footwells,
- vents and footwells,
- vents,
- footwells,
- windscreen, side windows and foot- wells.
The air fl ow indicator lamps, between
the two fans, come on progressively ac-
cording to the value requested. As soon as possible, press this but-
ton again to permit the intake of out-
side air and prevent the formation of
condensation. The indicator lamp in
the button goes off.
For maximum cooling or heating
of the passenger compartment, it
is possible to exceed the minimum
value 14 or the maximum value 28.
Turn control 2 or 3 to the left
until "LO" is displayed or to the
right until "HI" is displayed. 9. Mono-zone / Dual-zone
Press this button to equal-ise the comfort value on the
passenger side with that
on the driver's side (mono-
zone). The indicator lamp in
the button comes on.
Air recirculation enables the passenger
compartment to be isolated from exte-
rior odours and smoke.
Switching the system off could result in
discomfort (humidity, condensation).
Press this button again to return to
automatic operation of the air con-
ditioning. The indicator lamp in the
"A/C" button comes on.
Page 52 of 268
3
50
COMFORT
Windstop folded
FITTING / REMOVING THE WINDSTOP
In the "cabriolet" confi guration, the
windstop improves comfort in the pas-
senger compartment.
The vertical part of the windstop can be
folded down to improve rear visibility
during manoeuvres.
It is supplied folded in four.
Windstop unfolded Fitting
Clip the ends of the assembly until a
click is heard.
Unfold the windstop by opening the two parts to 90° until a click is heard.
Unfold the windstop frame guides.
Engage the guides in the points located behind each corner of the
back of the rear bench seat.
Unfold each of the two parts fully.
Page 53 of 268
3
i
51
COMFORT
Engage the shafts of the windstop frame in the openings in the rear
side trim so that the red indicators
are concealed.
When installing the windstop for the fi rst
time:
position a size 10 open-ended span- ner on the hexagonal part of the
shaft,
tighten or slacken without forcing on each side to adjust the depth setting.
Lastly, always check that the wind- stop is retained securely before use
in the "cabriolet" confi guration.
Removal
Press and pull on the shaft supports to release the shafts from the open-
ings in the rear side trim; the red in-
dicators then become visible. It is not necessary to remove the
windstop when operating the roof.
Page 54 of 268
3
52
COMFORT
Pull the windstop forwards to re-lease the guides from the points,
located behind each corner of the
back of the rear bench seat.
Fold the windstop frame guides. Storing
In the storage box (version
equipped with a temporary tyre
repair kit)
Raise the boot carpet and hook its handle on the boot seal.
Store the folded windstop in the cor- responding recess in the box.
Lower the boot carpet.
In the boot (version equipped with
a spare wheel)
Stow the folded windstop securing it using the luggage retaining net.
Fold the windstop closing the two
large parts on themselves.
Unclip each end individually.
Fold each of the two parts on them- selves.
Page 55 of 268
3
!
53
COMFORT
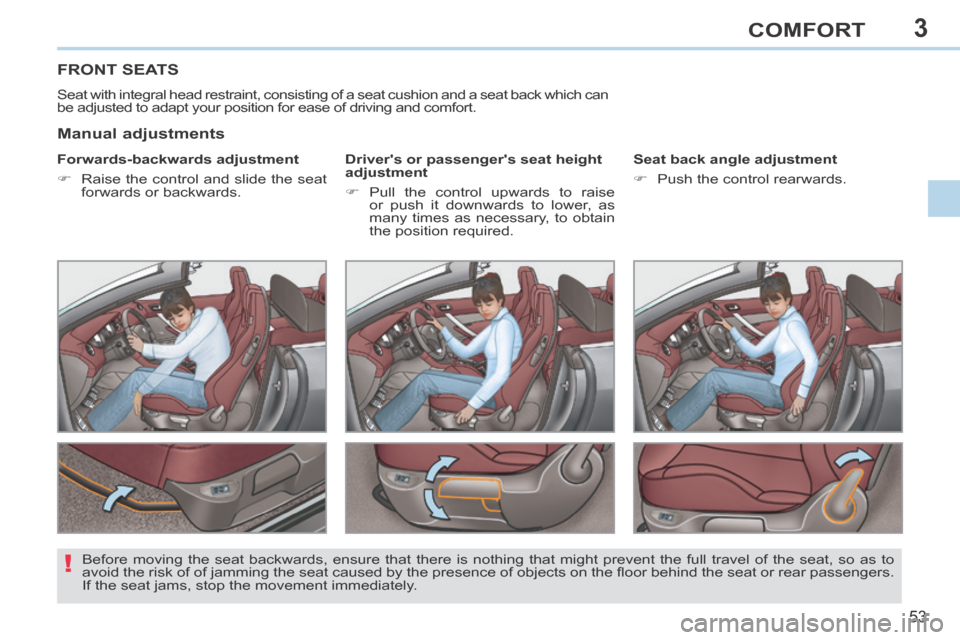
FRONT SEATS
Seat with integral head restraint, consisting of a seat cushion and a se\
at back which can
be adjusted to adapt your position for ease of driving and comfort.
Forwards-backwards adjustment
Raise the control and slide the seat forwards or backwards. Driver's or passenger's seat height
adjustment
Pull the control upwards to raise
or push it downwards to lower, as
many times as necessary, to obtain
the position required. Seat back angle adjustment
Push the control rearwards.
Manual adjustments
Before moving the seat backwards, ensure that there is nothing that migh\
t prevent the full travel of the seat, so as to
avoid the risk of of jamming the seat caused by the presence of objects on the fl oor behind the seat or rear passengers.
If the seat jams, stop the movement immediately.
Page 56 of 268

3
i
!
54
COMFORT
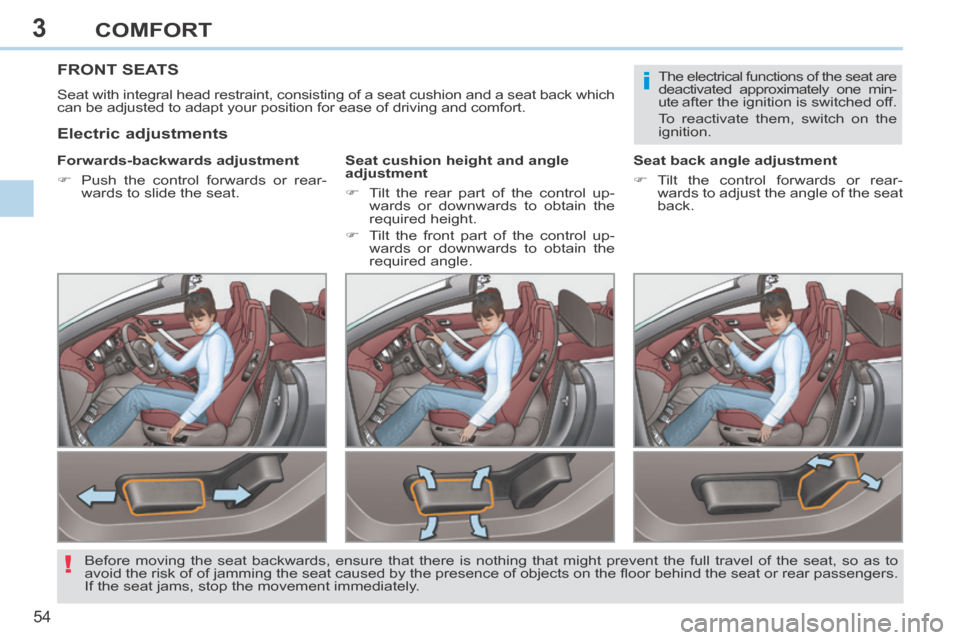
FRONT SEATS
Seat with integral head restraint, consisting of a seat cushion and a seat back which
can be adjusted to adapt your position for ease of driving and comfort.
Forwards-backwards adjustment
Push the control forwards or rear-wards to slide the seat. Seat cushion height and angle
adjustment
Tilt the rear part of the control up-
wards or downwards to obtain the
required height.
Tilt the front part of the control up- wards or downwards to obtain the
required angle. Seat back angle adjustment
Tilt the control forwards or rear-
wards to adjust the angle of the seat
back.
Electric adjustments
The electrical functions of the seat are
deactivated approximately one min-
ute after the ignition is switched off.
To reactivate them, switch on the
ignition.
Before moving the seat backwards, ensure that there is nothing that migh\
t prevent the full travel of the seat, so as to
avoid the risk of of jamming the seat caused by the presence of objects on the fl oor behind the seat or rear passengers.
If the seat jams, stop the movement immediately.