Page 73 of 389

3
Comfort71
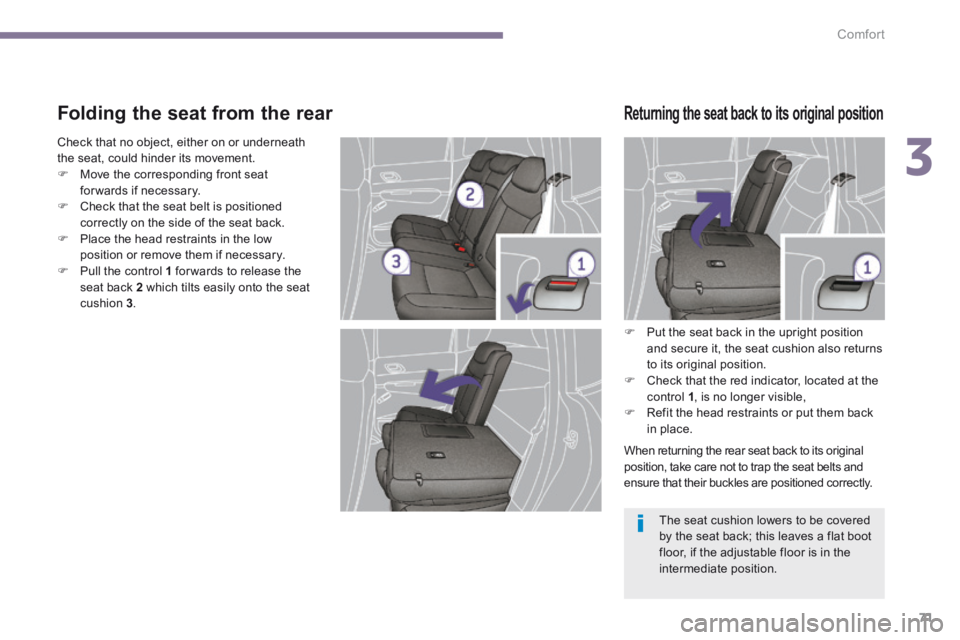
Folding the seat from the rear
Put the seat back in the upright position and secure it, the seat cushion also returns to its original position. Check that the red indicator, located at the control 1 , is no longer visible,
Refit the head restraints or put them back in place.
When returning the rear seat back to its original position, take care not to trap the seat belts and ensure that their buckles are positioned correctly.
The seat cushion lowers to be covered by the seat back; this leaves a flat boot floor, if the adjustable floor is in the intermediate position.
Returning the seat back to its original position
Check that no object, either on or underneath the seat, could hinder its movement. Move the corresponding front seat for wards if necessary. Check that the seat belt is positioned correctly on the side of the seat back. Place the head restraints in the low position or remove them if necessary. Pull the control 1 for wards to release the seat back 2 which tilts easily onto the seat cushion 3 .
Page 85 of 389

4
Access83
Electric windows
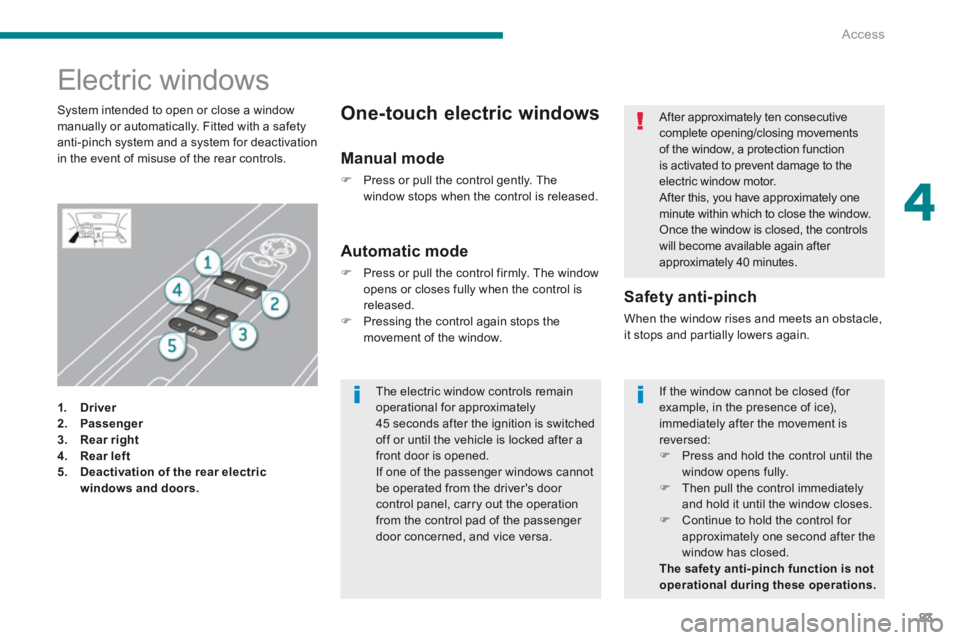
1. Driver2. Passenger
3. Rear right4. Rear left5. Deactivation of the rear electric windows and doors.
Safety anti-pinch
When the window rises and meets an obstacle, it stops and partially lowers again.
Automatic mode
Press or pull the control firmly. The window opens or closes fully when the control is released. Pressing the control again stops the movement of the window.
One-touch electric windows System intended to open or close a window manually or automatically. Fitted with a safety anti-pinch system and a system for deactivation in the event of misuse of the rear controls. Manual mode
Press or pull the control gently. The window stops when the control is released.
After approximately ten consecutive complete opening/closing movements of the window, a protection function is activated to prevent damage to the electric window motor. After this, you have approximately one minute within which to close the window. Once the window is closed, the controls will become available again after approximately 40 minutes.
The electric window controls remain operational for approximately 45 seconds after the ignition is switched off or until the vehicle is locked after a front door is opened. If one of the passenger windows cannot be operated from the driver's door control panel, carry out the operation from the control pad of the passenger door concerned, and vice versa.
If the window cannot be closed (for example, in the presence of ice), immediately after the movement is reversed: Press and hold the control until the window opens fully. Then pull the control immediately and hold it until the window closes. Continue to hold the control for approximately one second after the window has closed. The safety anti-pinch function is not operational during these operations.
Page 91 of 389
4
Access89
Lower tailgate
Opening Closing
Before opening the boot, ensure that there is nothing or anyone within the opening radius. For reasons of safety, correct operation and compliance with regulations, do not drive with the boot and the lower tailgate open. If the battery is disconnected, the boot cannot be opened. Do not climb onto the lower tailgate and do not subject it to heavy knocks, it may be damaged. Always close the lower tailgate and check that it is secured correctly before closing the boot. When closing the lower tailgate, ensure that no person or object is in the proximity of the moving parts to avoid any risk of injury or damage.
Do not open the lower tailgate when a towbar is fitted.
Maximum authorised weight on the lower tailgate when open: 200 kg .
Push the handle C to the right and tilt the tailgate D g e nt l y. Raise the tailgate D , push it fully to close it, check that it is secured correctly.
Page 93 of 389
4
Access91
To fill the tank safely: the engine must be switched off, open the fuel filler flap, insert the key in the cap, then turn it to the left,
When refuelling is complete: put the cap back in place, turn the key to the right, then remove it from the cap, close the filler flap.
remove the cap and secure it on the hook, located on the inside of the flap, fill the tank, but do not continue after the 3rd cut- off of the nozzle ; this could cause malfunctions.
Operating fault
A malfunction of the fuel gauge is indicated by the return to zero of the fuel gauge needle. Have it checked by a PEUGEOT dealer or a qualified workshop.
With Stop & Start, never refuel with the system in STOP mode; you must switch off the ignition with the key.
Page 116 of 389

Fittings
114
Mats
Refitting
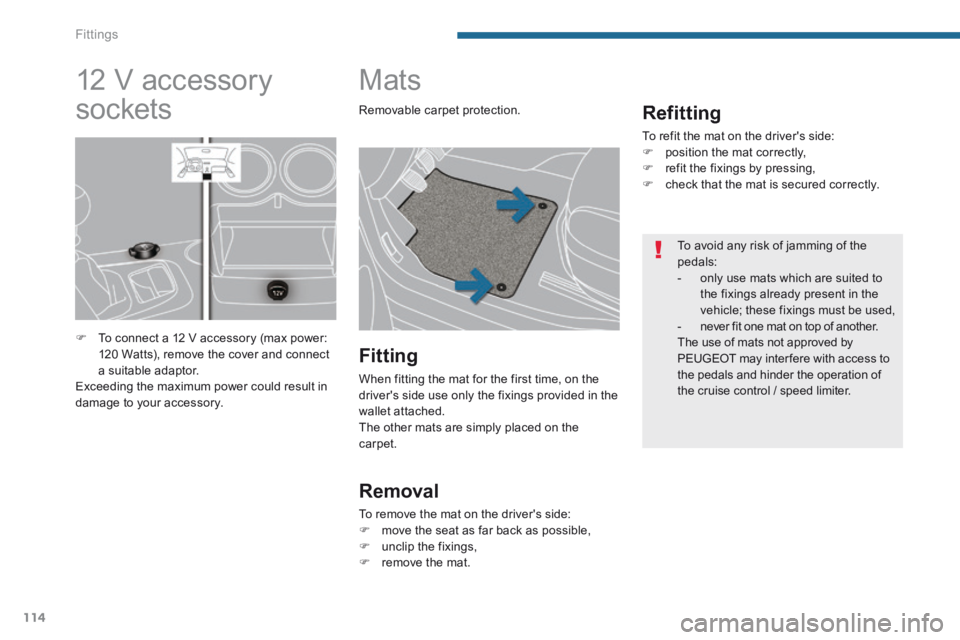
To refit the mat on the driver's side: position the mat correctly, refit the fixings by pressing, check that the mat is secured correctly.
Fitting
When fitting the mat for the first time, on the driver's side use only the fixings provided in the wallet attached. The other mats are simply placed on the carpet.
Removal
To remove the mat on the driver's side: move the seat as far back as possible,
unclip the fixings, remove the mat.
12 V accessory
sockets
To connect a 12 V accessory (max power: 120 Watts), remove the cover and connect a suitable adaptor. Exceeding the maximum power could result in damage to your accessory.
Removable carpet protection.
To avoid any risk of jamming of the pedals: - only use mats which are suited to the fixings already present in the vehicle; these fixings must be used, - never fit one mat on top of another.
The use of mats not approved by PEUGEOT may inter fere with access to the pedals and hinder the operation of the cruise control / speed limiter.
Page 123 of 389
6
Fittings121
The hooks can be used to secure shopping bags.
Hooks
To store it at the bottom of the boot: remove the rear parcel shelf as described above, place the floor at an angle, place the rear parcel shelf in its location (recess marked A ), at bottom of the boot, A ), at bottom of the boot, A the rear parcel shelf will be protected if you place the floor in the intermediate position.
To put it back in place: take hold of the rear parcel shelf with both hands then place it on its support, unfold it to the boot pillars, hook the two cords, if necessary, press on the top of the rear parcel shelf, on the left and on the right, to engage the fixings.
When changing a wheel
The hooks facilitate access to the spare
wheel, retaining the boot carpet by means of the two cords.
Page 124 of 389
Fittings
122
Raise the boot carpet, hooking the two cords on the hooks, then gain access to the storage box. Depending on the configuration, this has areas for storing: - a box of spare bulbs, - a first aid kit, - a tyre repair kit, - two warning triangles, - ...
Storage box
To connect a 12 V accessory (max power: 120 W), remove the cap and connect an appropriate adaptor. Turn the key to the ignition on position.
12 V accessory socket Luggage retaining net
Hooked onto the stowing rings on the movable boot floor, the luggage retaining net available as an accessory enables you to secure your luggage. Observe the loads indicated on the side of the boot, in accordance with the position of the movable floor. For safety reasons in case of sharp braking, we recommend that heavy objects are placed on the floor as close as possible to the back of the rear seats.
Page 125 of 389

6
Fittings123
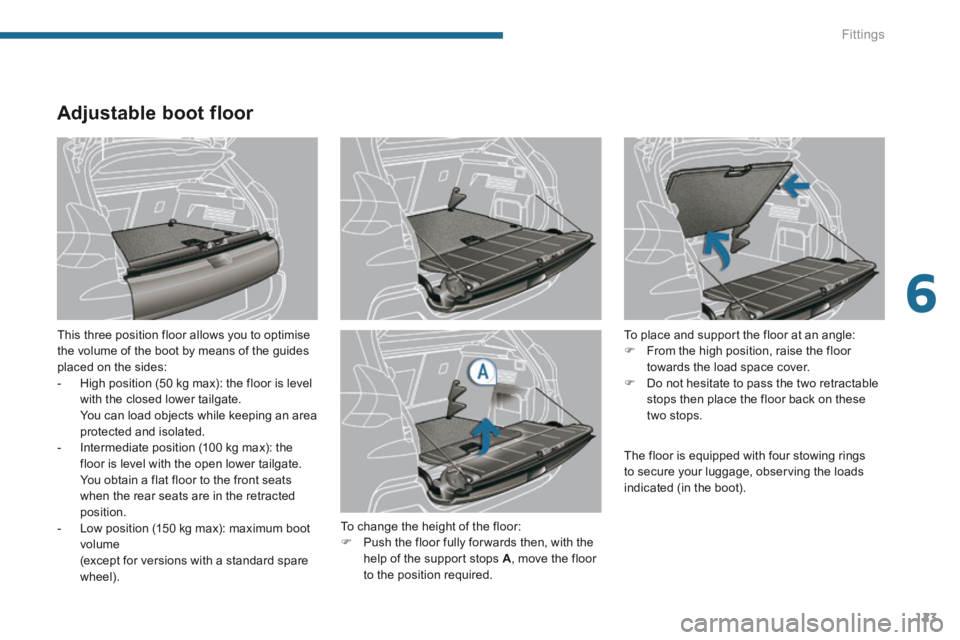
Adjustable boot floor
This three position floor allows you to optimise the volume of the boot by means of the guides placed on the sides: - High position (50 kg max): the floor is level with the closed lower tailgate. You can load objects while keeping an area protected and isolated. - Intermediate position (100 kg max): the floor is level with the open lower tailgate. You obtain a flat floor to the front seats when the rear seats are in the retracted position. - Low position (150 kg max): maximum boot volume (except for versions with a standard spare wheel).
To place and support the floor at an angle: From the high position, raise the floor towards the load space cover. Do not hesitate to pass the two retractable stops then place the floor back on these two stops.
To change the height of the floor:
Push the floor fully for wards then, with the help of the support stops A , move the floor to the position required.
The floor is equipped with four stowing rings to secure your luggage, observing the loads indicated (in the boot).