Page 13 of 389
.
65
66
Familiarisation11
Sitting comfortably
Driver's seat
Forwards-backwards Height
Manual adjustment
Electric adjustment
Seat back angle
Page 14 of 389
67, 68
74
69
11 3
Familiarisation
12
Sitting comfortably
Front seats
Head restraint height and angle
Lumbar
Steering wheel adjustment
1. Release the steering wheel. 2. Adjust for height and reach. 3. Lock the steering wheel.
As a safety precaution, these operations must only be carried out when stationary.
Table position (front
passenger seat)
To place objects on the table or to make the loading of long objects in the vehicle easier.
Front armrest
This incorporates a USB port and/or a JACK auxiliary socket.
Page 15 of 389
.
72
73
73147
Familiarisation13
Sitting comfortably
Door mirrors
Adjustment
A. Selection of the mirror to be adjusted. B. Adjustment of the position of the mirror in the four directions.
Rear view mirror
Manual model
1. Selection of the "day" position of the mirror. 2. Adjustment of the mirror.
Automatic day/night model
1. Adjustment of the mirror.
Front seat belts
1. Fastening of the buckle.
2. Height adjustment.
Also...C. Folding / Unfolding.
Page 20 of 389
123
Familiarisation
18
Arrange your boot
3 position adjustable boot
Low position (150 kg max) (except for version with standard spare wheel). Intermediate position (100 kg max).
High position (50 kg max) with the lower tailgate closed to isolate the lower part of the
boot.
From the high position, place the floor at an angle), supported by the side stops, to allow access to the spare wheel or to the storage areas in the bottom of the boot.
To release the floor, push it slightly for wards then raise it from the rear. Use the stops A , placed on each side of the boot to change the height of the floor more easily.
Page 24 of 389
161163
145
Familiarisation
22
Driving safely
Head-up display
1. Head-up display on / off. 2. Brightness adjustment. 3. Display height adjustment.
Distance alert
1. Distance alert on /off. 2. Alert value increase / decrease.
Grip control
Standard mode.
Snow mode.
Mud mode.
Sand mode.
ASR /DSC OFF. The adjustments must be made with the engine running and the vehicle stationary.
Page 67 of 389
3
Comfort65
Front seats with manual adjustments
Height
Pull the control upwards to raise or push it downwards to lower, as many times as required, to obtain the position required.
Seat back angle
Push the control rear wards.
Forwards-backwards
Raise the control and slide the seat for wards or backwards.
Seat consisting of a seat cushion, a seat back and a head restraint which can all be adjusted to adapt your position for ease of driving and comfort.
Before moving the seat backwards, ensure that there is nothing that might prevent the full travel of the seat, so as to avoid the risk of of jamming the seat caused by the presence of objects on the floor behind the seat or rear passengers. If the seat jams, stop the movement immediately.
Page 68 of 389
Comfort
66
Driver's electric seat
Forwards-backwards
Push the control for wards or rear wards to slide the seat.
Cushion height and angle
Tilt the rear part of the control upwards or downwards to obtain the required height. Tilt the front part of the control upwards or downwards to obtain the required angle.
Backrest angle
Tilt the control for wards or rear wards to adjust the angle of the seat back.
Seat consisting of a seat cushion, a seat back and a head restraint which can all be adjusted to adapt your position for ease of driving and comfort.
Page 69 of 389

3
Comfort67
The electrical functions of the driver's seat are active approximately one minute after opening the front door. They are deactivated approximately one minute after the ignition is switched off and in economy mode. To reactivate them, switch on the ignition.
Before moving the seat backwards, ensure that there is nothing that might prevent the full travel of the seat, so as to avoid the risk of of jamming the seat caused by the presence of objects
on the floor behind the seat or rear passengers. If the seat jams, stop the movement immediately.
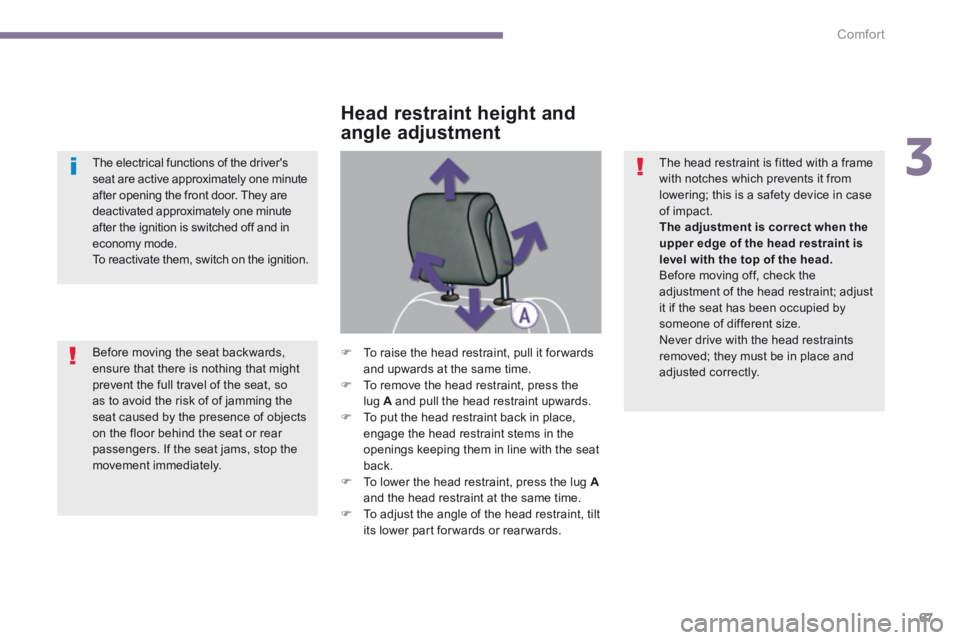
Head restraint height and
angle adjustment
To raise the head restraint, pull it for wards and upwards at the same time. To remove the head restraint, press the lug A and pull the head restraint upwards. To put the head restraint back in place, engage the head restraint stems in the openings keeping them in line with the seat
back. To lower the head restraint, press the lug Aand the head restraint at the same time. To adjust the angle of the head restraint, tilt its lower part forwards or rearwards.
The head restraint is fitted with a frame with notches which prevents it from lowering; this is a safety device in case of impact. The adjustment is correct when the upper edge of the head restraint is level with the top of the head. Before moving off, check the adjustment of the head restraint; adjust it if the seat has been occupied by someone of different size. Never drive with the head restraints removed; they must be in place and adjusted correctly.