Page 195 of 378

10
Checks193
Brake fluid level
The brake fluid level should be close to the "MA X" mark. If it is not, check the brake pad wear.
Changing the fl uid
Refer to the warranty and maintenance record for details of the interval for this operation.
Fluid specifi cation
The brake fluid must conform to the manufacturer's recommendations.
Power steering fluid level
The power steering fluid level should be close to the "MA X" mark. With the engine cold, unscrew the cap to check the level.
Topping up the engine oil level
Oil grade The oil must be the correct grade for your engine and conform to the manufacturer's recommendations.
Refer to the "Diesel engine" section for the
location of the oil filler cap in the engine compartment of your vehicle. - Unscrew the oil filler cap to reveal the filler aperture. - Add oil in small quantities, avoiding any spills on engine components (risk of fire). - Wait a few minutes before checking the level again using the dipstick. - Add more oil if necessary. - After checking the level, carefully refit the oil filler cap and the dipstick in its tube.
After topping up the oil, the check when switching on the ignition with the oil level indicator in the instrument panel is not valid during the 30 minutes after topping up.
Engine oil change
Refer to the warranty and maintenance record for details of the interval for this operation. In order to maintain the reliability of the engine and emission control system, the use of additives in the engine oil is prohibited.
Page 198 of 378

Checks
196
Brake disc wear
Brake pads
Brake wear depends on the style of driving, particularly in the case of vehicles used in town, over short distances. It may be necessary to have the condition of the brakes checked, even between vehicle services. Unless there is a leak in the circuit, a drop in the brake fluid level indicates that the brake pads are worn.
For information on checking brake disc wear, contact a PEUGEOT dealer or a qualified workshop.
Electronic gearbox
The gearbox does not require any maintenance (no oil change). Refer to the warranty and maintenance record for details of the checking interval for this component.
Electric parking brake
This system does not require any routine servicing. However, in the event of a problem, have the system checked by a PEUGEOT dealer or a qualified workshop.
Only use products recommended by PEUGEOT or products of equivalent quality and specification. In order to optimise the operation of units as important as those in the braking system, PEUGEOT selects and offers very specific products. After washing the vehicle, dampness, or in wintry conditions, ice can form on the brake discs and pads: braking efficiency may be reduced. Make light brake applications to dry and defrost the brakes.
For more information, refer to the "Electric parking brake - Operating faults" section.
Page 207 of 378

11
Practical information205
Removing a wheel
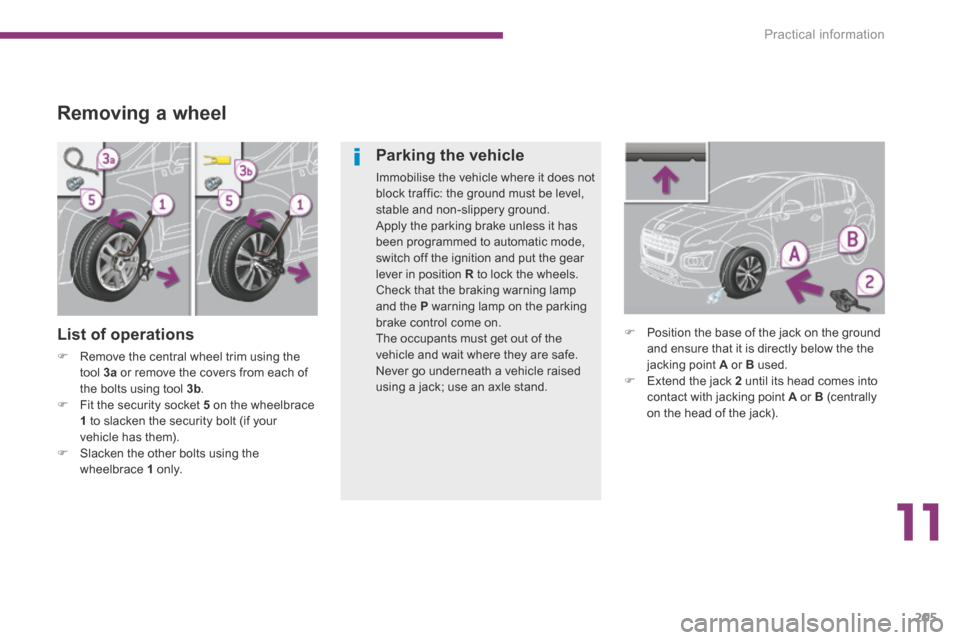
List of operations
Remove the central wheel trim using the tool 3a or remove the covers from each of the bolts using tool 3b . Fit the security socket 5 on the wheelbrace 1 to slacken the security bolt (if your
vehicle has them).
Slacken the other bolts using the wheelbrace 1 o n l y.
Position the base of the jack on the ground and ensure that it is directly below the the jacking point A or B used. Extend the jack 2 until its head comes into contact with jacking point A or B (centrally on the head of the jack).
Parking the vehicle
Immobilise the vehicle where it does not block traffic: the ground must be level, stable and non-slippery ground. Apply the parking brake unless it has been programmed to automatic mode, switch off the ignition and put the gear lever in position R to lock the wheels. Check that the braking warning lamp and the P warning lamp on the parking brake control come on. The occupants must get out of the vehicle and wait where they are safe. Never go underneath a vehicle raised using a jack; use an axle stand.
Page 210 of 378

Practical information
208
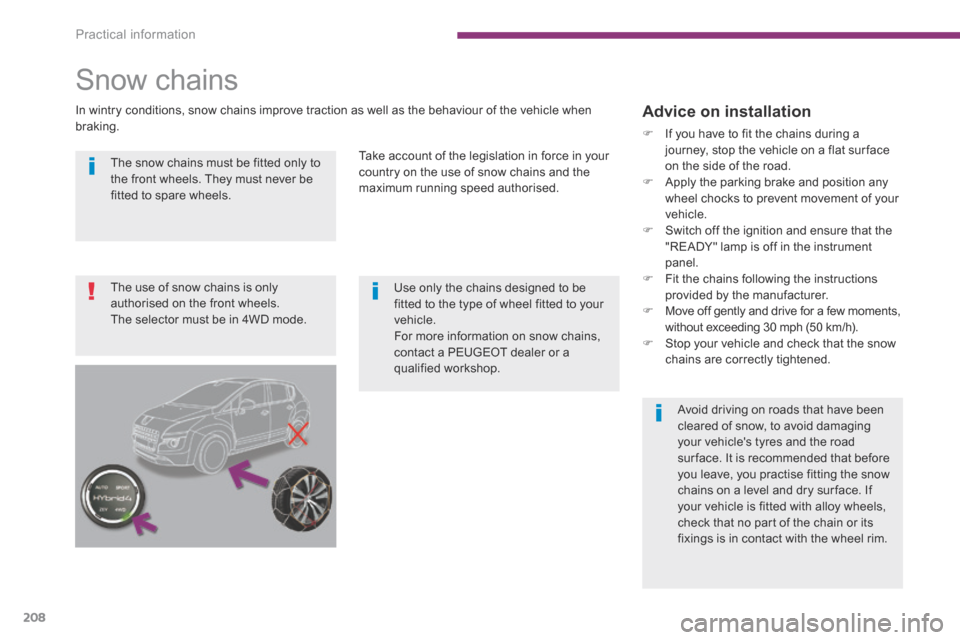
The snow chains must be fitted only to the front wheels. They must never be fitted to spare wheels.
Use only the chains designed to be fitted to the type of wheel fitted to your vehicle. For more information on snow chains, contact a PEUGEOT dealer or a qualified workshop.
Avoid driving on roads that have been cleared of snow, to avoid damaging your vehicle's tyres and the road sur face. It is recommended that before you leave, you practise fitting the snow chains on a level and dry sur face. If your vehicle is fitted with alloy wheels, check that no part of the chain or its fixings is in contact with the wheel rim.
Snow chains
In wintry conditions, snow chains improve traction as well as the behaviour of the vehicle when braking.
Take account of the legislation in force in your country on the use of snow chains and the maximum running speed authorised.
Advice on installation
If you have to fit the chains during a journey, stop the vehicle on a flat sur face on the side of the road. Apply the parking brake and position any wheel chocks to prevent movement of your vehicle. Switch off the ignition and ensure that the "READY" lamp is off in the instrument panel. Fit the chains following the instructions provided by the manufacturer. Move off gently and drive for a few moments, without exceeding 30 mph (50 km/h). Stop your vehicle and check that the snow chains are correctly tightened.
The use of snow chains is only authorised on the front wheels. The selector must be in 4WD mode.
Page 214 of 378
Practical information
212
Rear lamps
1. Brake lamps / sidelamps (light - emitting diodes - LEDs). 2. Reversing lamps (W16W).3. Direction indicators (P21W).4.S idelamps (light-emitting diodes - LEDs).5. Foglamps (P21W).
Changing reversing lamp and direction indicator bulbs
Raise the tailgate. Remove the plastic cover. Unscrew the two fixing nuts. Extract the lamp unit carefully from the outside. Disconnect the bulb holder connector.
- Turn the the lamp unit over. - Press the five tabs and remove the bulb h o l d e r.
- Reversing lamp (2) : pull on the bulb to
remove it. - Direction indicator (3) : turn the bulb a quarter of a turn (anti-clockwise) to remove it.
To refit, carry out these operations in reverse o r d e r.
Page 215 of 378
11
Practical information213
Changing the third brake lamp (light emitting diodes - LEDs)
Changing sidelamp and brake lamp/sidelamp bulbs Changing foglamp bulbs
For the replacement of these LED (light-emitting diode) lamps, contact a PEUGEOT dealer or a qualified workshop.
Reach under the bumper. Turn the bulb a quarter of a turn and pull it out.
Contact a PEUGEOT dealer or a qualified workshop.
Changing the number plate lamp bulbs (W5W)
Insert a thin screwdriver into one of the outer holes of the lens. Push it outwards to unclip. Remove the lens. Pull the bulb out and change it.
Page 220 of 378
Practical information
218
Engine compartment fuses
Access to the fuses
Unclip the cover. Change the fuse (see corresponding paragraph). When you have finished, close the cover carefully to ensure correct sealing of the fusebox.
The fusebox is placed in the engine compartment near the battery. Fuse N° Rating (A) Functions
F215 Horn.
F310 Front / rear wash-wipe.
F410 Daytime running lamps.
F515
Air flow sensor, wiper, sensor heater, hybrid control unit, hybrid selector dial, electronic thermostat, variable valve timing electrovalves, turbo pressure regulation electrovalves (Diesel), engine coolant level sensor (Diesel).
F610 Diagnostic socket, directional headlamps, particle emission filter pump (Diesel), mirror adjustment control, network inter face unit, head-up display.
F710 Power steering control unit, directional headlamps height adjustment motor.
F820 Starter motor control.
F910 Clutch and brake pedal switches.
F1140 Air conditioning blower.
Page 222 of 378
Practical information
220
Fuses above the battery Fuse N° Rating (A) Functions
F15 Controlled air intake.
F25 Dual function brake switch.
F35 Battery charge unit.
F425 ABS/DSC electrovalves.
F615 Electronic gearbox.